Guys Look At This GIANT Millipede!! Free Pattern From Projectarian! 🐛✨


Guys look at this GIANT millipede!! Free pattern from Projectarian! 🐛✨
Definitely want to make one myself!
More Posts from Cloudyskiesgivesrain and Others


Different types of kimono.


“One time my Nanny and the Gardener were having a heated argument in the car and he took her Queen tape out of the player and threw it out the window with rage and she looked him dead in the eyes and pulled out a second copy of that same tape and put it back in the player.”
— Warlock, probably
No harm to any religion. It’s just a lamp ads by an Australian company. However, it’s funny!


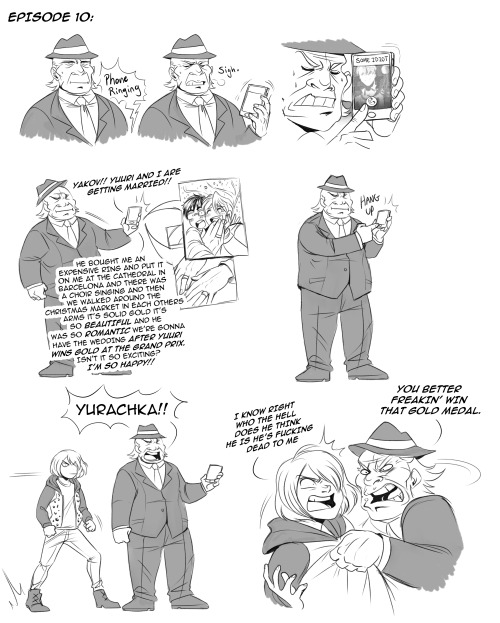


Me @ me: “Hey maybe don’t draw the entire first season of YOI from yakov feltsman’s perspective. That will take weeks and you’re an adult with a life”
…I did it.
Bonus:

Loosely based on this post.
{My Twitter}
Perfectly Easy (and Tasty) Microwave Mochi Recipe
For those of you who are interested, this is how I make mochi. I used to do it the traditional steamer way but that took forever, and this is just as tasty but pretty quick to whip up! Also, there’s no possibility of you accidentally spilling boiling hot mochi all down your arms as you try to transfer the glop between cheesecloths (yes that’s happened to me and it was NOT. FUN.). If you don’t know what mochi is, it’s a Japanese sweet rice treat that is absolutely addictive: chewy and soft and YUM. I’m part Japanese and lived in Hawaii for a lot of my life so it’s a staple comfort food for me! I used to make it only for New Year’s and special occasions, but now that I microwave it I can make it whenever I want. Which is good, because look at how gorgeous it is:

Microwave Mochi Recipe (makes about 20 pieces)
Ingredients:
1 ½ cups mochiko (glutinous rice flour. Sold at most grocery stores in the Asian food section, look for a white box)
1 cup white sugar
1 ½ cups water
2-4 drops vanilla (this is optional, or you could use coconut extract/other flavorings instead, but I like vanilla)
Approximately 4 drops of food coloring. Traditionally you color mochi pink or green, so 4 drops of either green or red, but of course the color is really just up to you.
Instructions:
First you need a microwavable bowl. I use a tupperware container, it’s shallow but wide, like a pan. Any microwavable container that’s big enough would do though, I imagine.
Mix mochiko and sugar together in the bowl/dish until well blended (I use a fork). Add water to mixture and stir until no lumps are left, the mixture should be liquidy and smooth. It has a consistency similar to that of warm syrup. I like using a fork because it’s easy to break up the lumps and make sure the water’s well-integrated. Now add vanilla and food coloring, and stir until color is even throughout mixture.
Put microwavable dish into the microwave and loosely cover with plastic. If you are using a tupperware container that comes with a lid, like I do, then just rest the lid askew on top of the dish so that it can vent but is still mostly covered.
Ok, now here’s the trick on how to make sure it turns out nice. Microwave the mochi on high for seven minutes total, but not all in one go. Here’s how I do it: Microwave 2 minutes, then take out of microwave and stir with that handy dandy fork. The edges will be more cooked than the middle, so mix it all together and try to get it as even as possible, then place back in microwave. Microwave 2 more minutes, then repeat; mixture will be stickier now. Microwave 2 more minutes and stir again, then microwave 1 more minute, take out and stir, and you’re done! The mixture will be really glossy and brightly colored now, and very very hot. It will also be basically glop, so stirring is more just folding the mix a little to make sure it’s even. So to sum up: Microwave 2 minutes and stir, repeat twice more so you have a total of 6 minutes, and then microwave for 1 minute and stir one last time. I microwaved for eight minutes once and the mochi wasn’t nearly as good, it got hard, so STICK WITH THIS TIMING.

The mochi will be VERY hot. Let it sit for … I’ve never timed it, but I’m guessing it’s about five minutes. Basically you need it still warm, but not hot. You want it to still be pliable so you can shape it, but don’t want to burn your fingers! While the mochi is cooling, you can make the powder you need to coat it in. This is also very simple:
Ingredients:
½ cup potato starch (again, should be in Asian food aisle. Some people use cornstarch. DON’T USE CORNSTARCH.)
¼ cup granulated white sugar
Pinch of salt (not very much at all, you don’t want your mochi to taste salty, eew. I think the original recipe I’ve adapted this one from called for ¼ t but that was too much for me, so I just use a tiny pinch now. Your call.)
In small bowl, combine potato starch, sugar, and salt.
… There, you’re done making that! Easy, right? XD
Now it’s time to shape the mochi.
[Technically, you could just leave it in the pan to cool completely (depending on your dish’s shape) and then cut it up into pieces with a plastic knife. If you’re planning on doing that, then mix the mochiko up in a separate bowl and oil your microwavable dish with vegetable oil before pouring mochi mixture in to cook. I’ve never done it this way though so I’m not sure how well it would work, considering you’d be stirring a lot. If you want to try though, it’s probably doable.]
The most important thing to remember is that warm mochi is incredibly sticky, but it doesn’t stick very much to plastic. This means that whatever utensils you’re using/surfaces you’re putting the mochi on should be plastic! To shape my mochi I actually use two plastic spoons I got from Yogurtland, haha, but to each their own.
Anyway, once the mochi is cool enough, take a plastic spoon and scoop up some mochi! Approximately a Tablespoon per piece is what I do, but the size is really up to you and your spoon. I use two spoons so I can scoop with one and then use the other to separate the scoop from the rest of the mochi, and to make sure the scoop is shaped nicely–you know, like when you shape cookie dough with two spoons? Like that.
So scoop up a dollop of mochi, and then drop it into the starch/sugar/salt mixture. Roll it around in the starch until it’s coated. Then pick it up with your fingers and just roll it in the palms of your hand until it’s a nice smooth ball shape. This is fun because it’s so squishy, like a stress ball. And finally, place on a plate to cool! You don’t have to worry about it being sticky any more because the powder coats it to keep it from being sticky. Aaaaaaaand you’re done! Just repeat with the rest of the mochi until the mochi is all nice and powder-coated, and that’s all. All that’s left is to eat all the mochi, which is, alas, way too easy to do. So yummy.
More fun things to do with Mochi:
Make mochi ice cream! No more going to the store for your mochi ice cream fix, just make your own! Microwave only six minutes (2 + 2+ 2) and then shape as usual but flatten instead of leaving a ball shape. Scoop a bite size dollop of ice cream, place in center of flattened mochi, and fold mochi closed around ice cream. Make sure it’s well coated with the powder, and return to the freezer to eat later :D
Wrap the mochi around other things too: Lychees, strawberries, sweet red bean paste …
If you add cocoa powder to your mochi mix before microwaving it, you make chocolate mochi!
You can also use green tea in lieu of plain water to make green tea mochi! I’ve never tried substituting other liquids but I know coconut milk works, and I am planning on making a batch of chai tea mochi soon :D
This recipe turned out pretty long because I ramble but honestly this stuff is SUPER easy to make. So have fun with it, happy eating, and happy new year! :)
Ya tenéis para entreteneros, a mi se me da bien, o sale por la ventana, según días.


A Shaggy and dog story
Phew! Longest one yet. I’m beat. Updates will take a break for a few weeks. More details in an upcoming post. Thanks for reading!
[Website] [Facebook] [Twitter] [Instagram] [Spanish] [Ko-fi]
If you like my comics, you can support my work on Patreon!
A magpie doing his part to save the planet

-
 dwiindovah liked this · 4 weeks ago
 -
 yellopinkjello liked this · 4 weeks ago
 -
 dada-dandy liked this · 4 weeks ago
 -
 magnus-force liked this · 4 weeks ago
 -
 sixteen6stars reblogged this · 4 weeks ago
 -
 m4arshm3lody reblogged this · 1 month ago
 -
m4arshm3lody liked this · 1 month ago
-
 thelongestway liked this · 1 month ago
 -
 kingdionra reblogged this · 1 month ago
 -
 mysticclock liked this · 1 month ago
 -
 yamikittycat reblogged this · 1 month ago
 -
 littlefaefeather reblogged this · 1 month ago
 -
 salmonfur reblogged this · 1 month ago
 -
 lemon-whale liked this · 1 month ago
 -
 forestd0ll liked this · 1 month ago
 -
 art-on-occasion reblogged this · 1 month ago
 -
 mapesprincesss liked this · 1 month ago
 -
 ladyinrosso liked this · 1 month ago
 -
 problem-with-authority reblogged this · 1 month ago
 -
 jaylogia liked this · 1 month ago
 -
 mytypeofdistraction liked this · 1 month ago
 -
 cuntzi liked this · 1 month ago
 -
 saniwa liked this · 1 month ago
 -
 a-small-pile-of-secrets liked this · 1 month ago
 -
 itisalmostlike liked this · 1 month ago
 -
 molagbald liked this · 1 month ago
 -
 davepeata-sprite liked this · 1 month ago
 -
 sm2k99 liked this · 1 month ago
 -
sm2k99 reblogged this · 1 month ago
-
 craftyworx liked this · 1 month ago
 -
 yoshspace reblogged this · 1 month ago
 -
 atriphiyde liked this · 1 month ago
 -
 re-maljaws reblogged this · 1 month ago
 -
 isowizard-handler-of-suggestions liked this · 1 month ago
 -
 suspectedgeode liked this · 1 month ago
 -
 soft-not-weak reblogged this · 1 month ago
 -
 nolovelostbetweenthetwo liked this · 1 month ago
 -
 zaviel liked this · 1 month ago
 -
 worsethankonstantinlevin liked this · 1 month ago
 -
 hirayaayarih reblogged this · 1 month ago
 -
hirayaayarih liked this · 1 month ago
-
 peachypink45 liked this · 1 month ago
 -
stupendousgalaxymaker liked this · 1 month ago
-
 softer--apricot liked this · 1 month ago
 -
 hobo-trash-dragon reblogged this · 1 month ago
 -
 naya-neko liked this · 1 month ago
 -
 glameowt reblogged this · 1 month ago
 -
glameowt liked this · 1 month ago
-
cinnamontoasten reblogged this · 1 month ago
