This Is An Important Message That Needs To Get Out To Markiplier!
This is an important message that needs to get out to Markiplier!
There is a gang war in LA. The first gang to get to 100 kills, gets to take over that part of the city. You NEED to be careful, Mark. You could be at high risk because of your high status. PLEASE be safe, everyone in or around LA, and please reblog this to get it to the youtubers in LA.
I just worry about their safety.
markiplier stay safe! <3
More Posts from Confetti-planet and Others


i saw a princess jellyfish post yesterday which made me want to pick up the manga again which made me want to draw,,

Reveal the path and grant me passage!

very cute luffy associates the light clones with peronas power

"Gaza now has the largest population of child amputees in the world." [@/abrahammatar on X. June 5th, 2024.]

Jade Harley vs the world!

If Misetani Box has million fans, then I'm one of them. If Misetani Box has one fan, then I'm THAT ONE. If Misetani Box has no fans, that means I'm dead.
sure, i’ll reblog gay joker


You Were My Joker That Night


making a compilation of every betty outfit/appearance change am i missing any of em yall

ms paint. you know her. u used her age 8 to make loads of rainbow ovals all over the canvas and then scramble it with selection tool. now u will know her true powers with my handyrandy tips under the readmore. some will be pretty basic and others are very special.
this post has 8 cool trix to learn for you. enjoy and i may do another in the future if i remember/learn more stuff
some of it might be common knowledge. but its got some deep cuts. all tips have gifs to show process easily.
🙂 enjoy and i hope this encourages you to fuck around in mspaint more
soundtrack for this post (loop it while you learn for advanced learning experience)
TIP 1) the right click trick
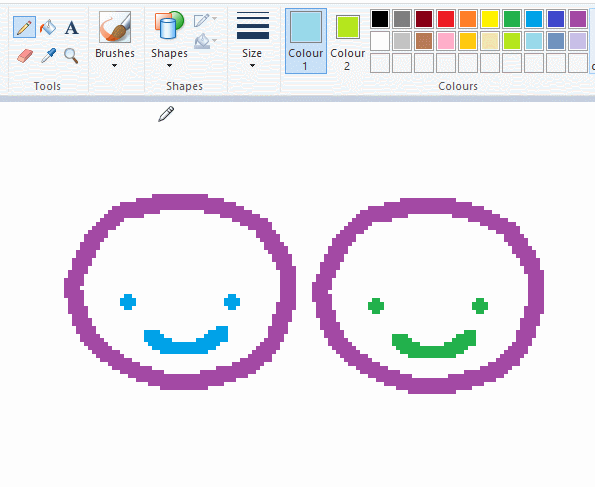
left and right mouse click correspond to col1 and col2 respectively, which u can see in the top bar. this applies to all brushes and the fill tool like above. when using shapes col2 will be the fill colour (if you have solid fill selected). right clicking with shape maker will reverse the colours use on the shape.
TIP 2) right click eraser
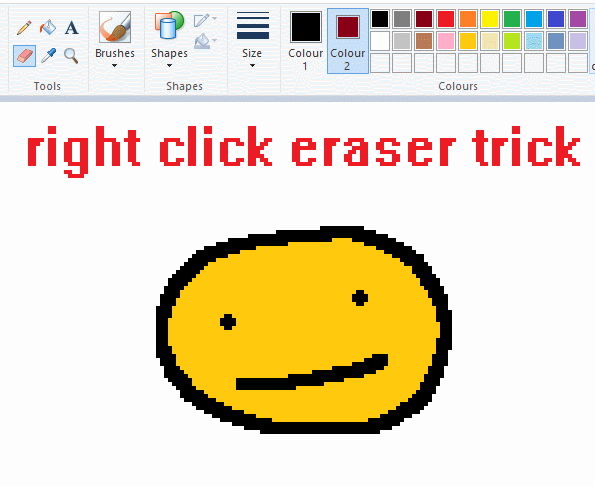
this one is extremely helpful for lineart or add shading. the eraser always uses col2. so your eraser can technically be any colour. but here's where you get powers: right clicking with eraser will only erase onto col1, with col2.
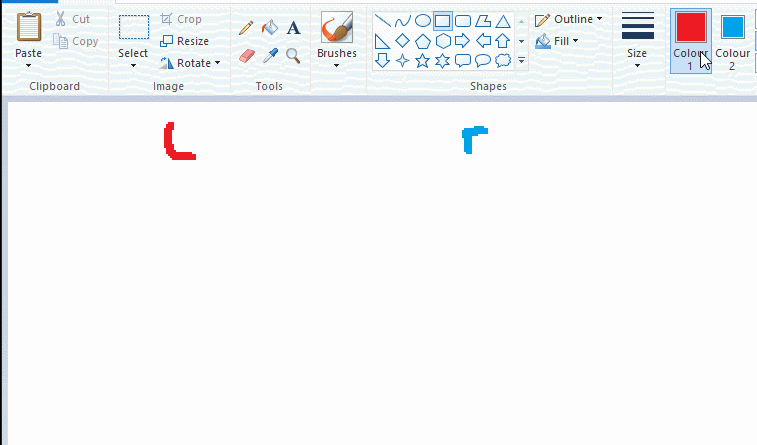
TIP 3) transparent selection change a guy destination
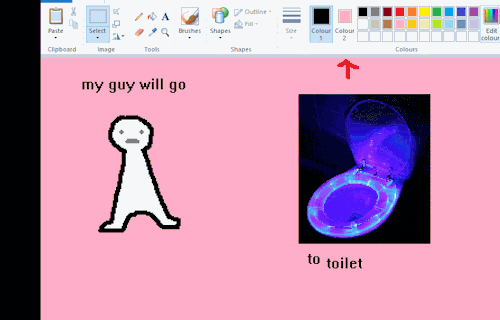
the beloved transparent selection tool works based on what is selected as col2. so long as you have the correct colour as col2 you can make any image transparent and put it on top of anything else. and yes this works with photo bg as you can see.
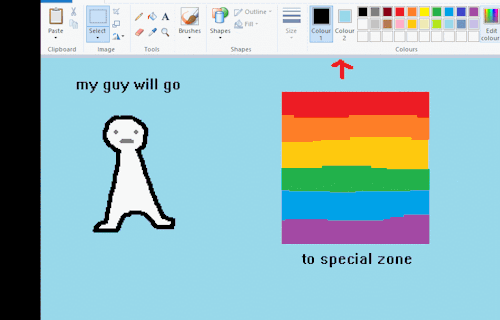
TIP 4) the gradience
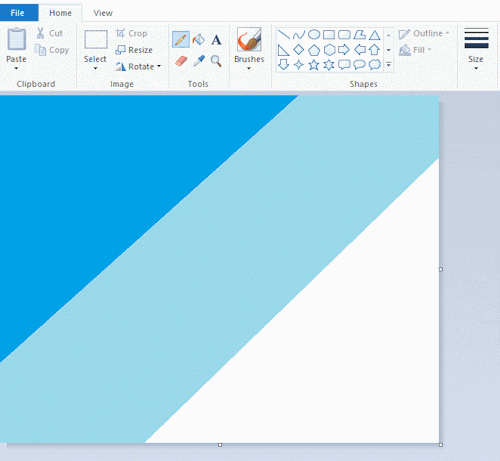
this one is a little more complex. you want to start off with any canvas size, and make as many diagonal coloured bands as you want. (protip: holding down shift makes a perfectly diagonal line with line tool)
then you need to resize the canvas to a width of 1px (make sure you resize by pixels, and do not maintain aspect ratio). then resize again back to its original width (or a different width i cant stop you). you will have your lovely gradience.
TIP 5) superimposter
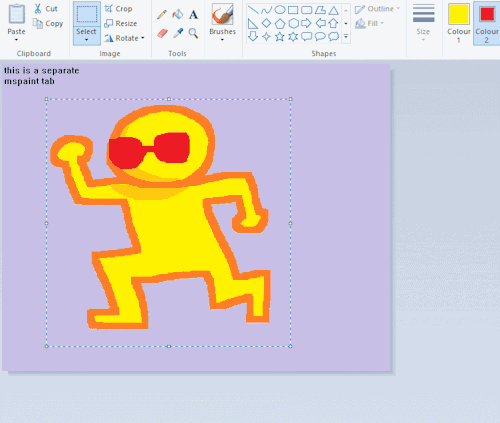
so. you got a cool gradient and wanna put a guy on it. heres what i do:
i open a 2nd mspaint with same canvas size and draw whatever i want on there. i then pick a completely unrelated colour to my entire piece, and set that as the bg. you could use white, pink, geen, whatever you want as long as it doesnt appear somewhere else in ur drawing. copy the guy.
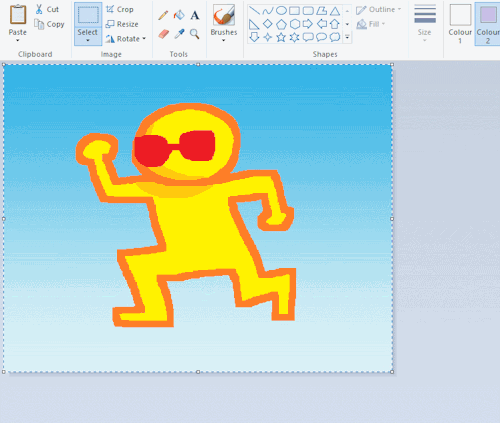
go back to your gradient tab. ensure that col2 is set as that bg colour you picked (lilac for me). have "transparent selection" enabled. paste your guy in. cue fanfare
TIP 6) advanced superimposter
the great thing about this method is u can put multiple gradients in multiple areas of the image. this is where it gets all japanese printmaking type of shit. ukiyo-esque
all you need to do is make another canvas with a new gradient, ensure col2 is set as the colour you want to replace, then paste your original piece onto the new gradient. now my guy has a soft fade. you can do this as much as you want. (you could even make a canvas with a texture or photo and paste your drawing onto there)
TIP 7) "sketch layer"

so as you now know, col2 is what is removed when you click "transparent selection". which means you can also remove any instance of a colour from ur drawing. which means you can have a unique colour for sketch layer and remove it from the drawing later. i admittedly dont do this but it is a great trick to have.
now combine this with lowering your dpi for smoother lines. may seem obvious but it helps. its like a free stabiliser whenever u want.
TIP 8) rainbow art

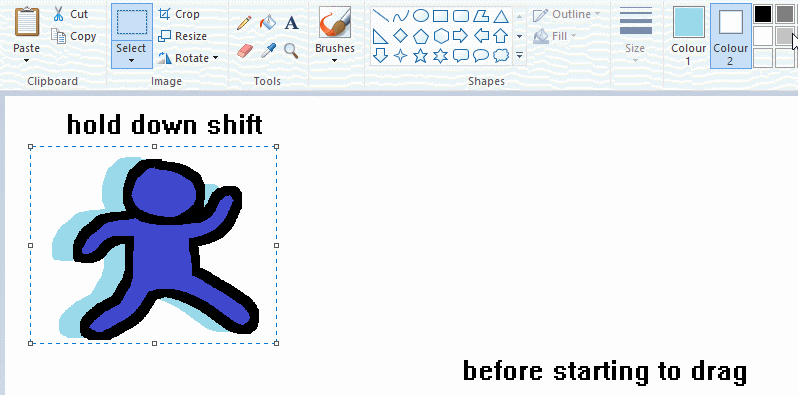
now this is where you can get dizzee rascal "bonkers". check out my small and shitty rainbow trick. you can select anything and hold down shift, then drag with left mouse, to turn that selection into its own brush. i even did it with a guy. and you can of course do this with a photo as well.
🙂well that it for now. hope you liked it thanks for reading now back to your regularly scheduled tgcg programming
-
 shadowpotentate reblogged this · 1 week ago
 -
shadowpotentate liked this · 1 week ago
-
 yvivy0629 liked this · 1 week ago
 -
 vriskazone liked this · 1 week ago
 -
 8aeddel-vriska reblogged this · 1 week ago
 -
 wolfievim reblogged this · 1 week ago
 -
 silliest-guy-ever reblogged this · 2 weeks ago
 -
 bloodlicking reblogged this · 3 weeks ago
 -
 sneefle69 liked this · 1 month ago
 -
 thelaughingmerman liked this · 1 month ago
 -
 knightotoc reblogged this · 1 month ago
 -
 multilife99 reblogged this · 1 month ago
 -
 hearteye-emoji liked this · 1 month ago
 -
 embracesadness reblogged this · 1 month ago
 -
embracesadness liked this · 1 month ago
-
 possum-riot liked this · 1 month ago
 -
 ofswordsandpens liked this · 1 month ago
 -
 damthosefandoms reblogged this · 1 month ago
 -
damthosefandoms liked this · 1 month ago
-
 chazzzberrypie reblogged this · 1 month ago
 -
 nukai liked this · 1 month ago
 -
 welcomehome-finale liked this · 1 month ago
 -
 dawn-cooper liked this · 1 month ago
 -
 mossmanismoss reblogged this · 1 month ago
 -
mossmanismoss liked this · 1 month ago
-
 lacm-ac reblogged this · 1 month ago
 -
lacm-ac liked this · 1 month ago
-
 jadenyucky reblogged this · 1 month ago
 -
 meltielyn liked this · 1 month ago
 -
meltielyn reblogged this · 1 month ago
-
 makesomethinguseful-yt reblogged this · 1 month ago
 -
makesomethinguseful-yt liked this · 1 month ago
-
 chaotic-kayne-kinnie liked this · 1 month ago
 -
 nyasputin reblogged this · 1 month ago
 -
nyasputin liked this · 1 month ago
-
 cipherinator liked this · 1 month ago
 -
cipherinator reblogged this · 1 month ago
-
 kamuzeros reblogged this · 1 month ago
 -
 tillysdoodles liked this · 1 month ago
 -
 alm0nd-b0y liked this · 1 month ago
 -
 mack-timelines liked this · 1 month ago
 -
 kreativekiss reblogged this · 1 month ago
 -
 strayrah reblogged this · 1 month ago
 -
strayrah liked this · 1 month ago
-
 the4ghost0witch4 liked this · 2 months ago
 -
 lightoftheseraph liked this · 2 months ago
 -
 rateater2000 reblogged this · 2 months ago
 -
 combustiblelemon reblogged this · 2 months ago
 -
 survivorship-bias liked this · 2 months ago

After her long absence, she returns! (not from twitter, I used to have a steven universe stan acc here in 2017) I will post art of my comic on here if I remember.
305 posts