Idk Who Else Needs To Hear This But Stop Being So Scared Of Failure And Imperfection That You Don't Even
idk who else needs to hear this but stop being so scared of failure and imperfection that you don't even do anything in the first place. nothing rewarding ever comes easy. allow yourself to explore for christ's sake
More Posts from Galaxygirl1106 and Others
so you're taking care of your computer's software health. NICE! but what about its physical health?
because yes, computers do need the occasional real-world checkup to make sure that they're running well. but what exactly does that entail? i see many posts about maintaining software health: limit your browser tabs, ensure your antiviruses are working properly, so on and so forth, but checking the physical components is something i sparsely see discussed here.
so what's the deal with physical maintenance? well, have you ever had your computer hack and wheeze trying to keep up even if your OS and all your drivers are up to date and functioning? if you've never opened up your computer before, you may be shocked to find just how FILTHY it can get in there:

take a closer look at that snout dust! PTOOEY .. BLECKH
computers are much more likely to accumulate internal dust if they're sitting on the floor, and especially if they're near any vents and/or if you have pets.
ok, you've figured out how to open your device and now you're staring at the second coming of the dust bowl in your gaming rig. what now? let's explore some basic cleaning tips, deep cleaning pointers for your CPU/GPU, and tips to help keep maintain your computer's physical health in the future.
first of all, turn off your computer and unplug it (for my computer, i turn it off, turn off the PSU switch, unplug it, and then press the power button for about 30 seconds to drain the capacitors and minimize static risk)
generally, you're gonna want to have THESE items:
some sort of face mask (dust masks are best, but anything that'll help keep the harmful dust out of your lungs will generally work)
a can of compressed air (or an electric duster if you're ~fancy~. they look and function like turbo blowdryers)
a vacuum will be useful if there's a LOT of dust, best to use in combination with an anti-static cleaning kit
if you ARE gonna use a vacuum, spray every attachment you use with an anti-static spray. disturbing large amounts of dust creates a lot of static, and electronics are very sensitive to that.
it's never a bad idea to grab an grounding wristband as well, but as long as you wear loose clothes and always keep some part of your skin in contact with the case, you should be ok. (i don't know how much this applies to laptops and smaller devices, since the cases for those are typically plastic)
if there's staining (like from smoke) or there's more gunk caked on than you thought, you can gently clean electronic components with a brush/paper towel/microfiber and medical-grade isopropyl alcohol ONLY. do not use any other cleaning alcohols for this task.
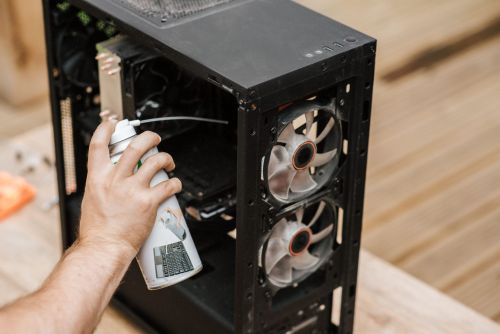
before you do anything, TAKE THAT FUCKER OUTSIDE! always clean a dusty device where the wind can carry that shit away, because oh my GOD will it fuck up your lungs like crazy. (that, and compressed air cans have fluorocarbons in them, which isn't great to breathe in either)
most of the time, you'll probably be fine just using an air duster. for compressed air cans, spray the dirty surfaces in short bursts. an electric duster can be constantly blown. when dusting fans, make sure that you're holding the blades still as to not accidentally make them spin too fast (ESPECIALLY with an electric duster!), since that can damage the mechanism that makes them spin.
however, if there's a lot of dust, it may be better to give it a vacuuming first. anything from a handheld to a shop vac will work, and attachments with brushes on the end will help tons with loosening up even more dust. and of course ALWAYS make sure that you're spraying any attachments with anti-static spray, and keep a hand on the case of the computer to electrically ground yourself since the hose will be in contact with the internals.
if there's any left over, give it a blast with the duster.
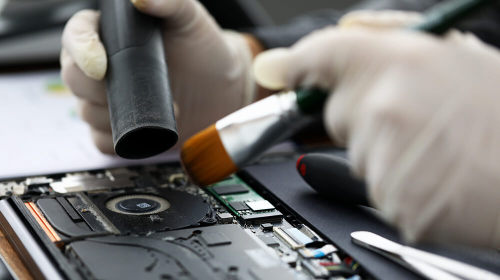
in some rare cases, there may be some extra gunk caked onto the internals, and you may have to really get your hands in there or take components out individually. if you don't have an anti static wristband (the ones with an alligator clip) do your best to ALWAYS keep your skin in contact with the case as you're finagling around in there.
it's probably a good idea to have disposable gloves on for this. grab your isopropyl and towel of choice (microfiber is ideal, but dirtier PCs may need disposable paper/shop towels), soak it a little bit, and gently scrub off the gunk n' grime as needed.
with heat sinks specifically, since they're just big blocks of metal, they're the one part of a component that can be cleaned under water. if a dusting doesn't suffice, gently scrub it with a brush under warm, soapy water, rinse thoroughly, and let it dry on a towel for a few hours before reassembling it into the electronic components.
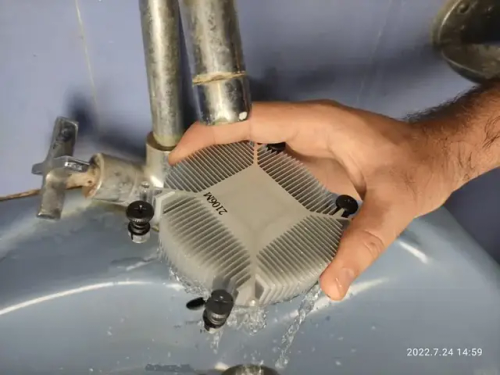
if there's still little bits stuck in the radiator fins, stick an isopropyl-soaked q-tip in there to push it out.
the dust settles, everything's put back together, and it's all clean in there again. YAY!!!!! but what if you're still experiencing temperature problems? well, it typically comes down to either the CPU or GPU:
IF ITS THE CPU: if you took off the cooler to clean it, then i hope you remembered to dab some fresh thermal paste on there. you should be replacing thermal paste few years, otherwise it dries out and loses its effectiveness.
the type you use makes a huge difference too; i like to use arctic's mx-4, it has excellent thermal conductivity while still being an electrical insulator, so spillover isn't a problem. if you go for a liquid metal compound, please do your research first, since some of them can run the risk of corroding the cooler pipes and/or the CPU's outer casing.
to replace thermal paste, make sure that the crusty old paste is sufficiently scrubbed off the contact points of both the CPU and cooler. again, use isopropyl for this. once it's all cleaned off, put about a pea-sized amount of paste on the CPU and carefully lower the cooler onto the mounting bracket before fastening it in place. (also it really doesn't matter how you put the paste on, as long as it ends up covering most of the contact area)

also if you're still using the cooler your CPU came with, you should probably get a better cooler. especially if you're doing gaming or using graphically/mathematically intensive software. sorry. the stock coolers that most CPUs come with are mid as hell. you can get a nice ARGB one for less than 20 USD i promise its worth it
IF ITS THE GPU: like CPUs, your graphics card also needs to have its thermal paste cleaned out and replaced every so often. but they also utilize a second thermal material called thermal pads. these are usually made of either silica gel or a very thick clay-like grease, and come in different thicknesses. my favoured pads are owltree's 12.8w grease pads, the assorted pack comes with enough for about 4-5 GPUs.
taking apart a GPU seems scary, and understandably so; they're incredibly expensive and hard-working pieces of technology! but i've done it twice now, and it's actually surprisingly simple (as long as you keep track of all the damn screws... im lucky there's a magnetized screw mat in the house i can use)
i recommend watching a deep clean/teardown video of the GPU model you have before digging into it yourself. generally, they separate into 4 distinct portions: the outer shell, the heatsink, the board, and the backplate.
the shell contains the fans and any possible RGB elements. it'll have 1-2 controllers plugged into the board, one for the fans and one for the lighting elements if there are any. once the case is unscrewed, unplug these connectors with a firm squeeze and tug.
these tend to be surprisingly dusty on the inside, so it's probably a good idea to blast it with a duster. again, make sure to hold the fans so they don't overspin. you can also remove the fans from the shell and clean them individually if you'd like.
the heatsink is BIG and heavy, and you can do all the same stuff here that you would with a CPU cooler heatsink. it may take a bit of effort to tug off if the thermal materials are really making it stick to the board. once it's off, scrub the old thermal paste, blast it with a duster, and wash under soapy water if needed before rinsing thoroughly and leaving it to dry for a while.
the backplate is just a flat piece of metal that protects the back side of the board. usually all this will need is a simple wipedown.
the board is where all the magic happens, and will usually have a layout that's something like this:
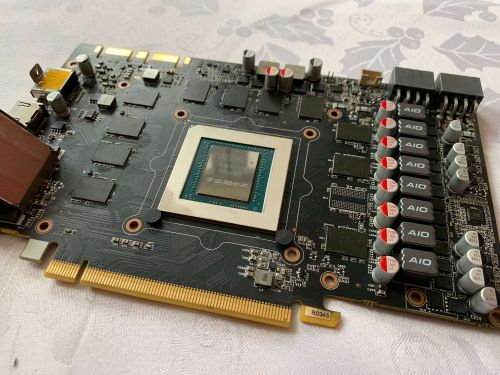
clean up as needed; gently scrub off old thermal paste, scrape off the old thermal pads (but take close note of how thick they are so you can replace them with the correct pads), and brush/wipe down the dust and grease on each side as needed. take care to avoid touching the PCIe connector too much (the bar of golden pins that juts out from the bottom)
thermal padding varies from card to card (i recommend checking thermal pad placements for your gpu in water cooling guides, even if you're not doing water cooling) but it's typically gonna be on THESE spots:

the VRAM chips surrounding the die (main chip) along with the small black chips next to the capacitors will require thermal pads the most. cut each one to size, carefully peel off the plastic films, and press each piece onto the chips.
now you can grab your thermal paste and put some on that big shiny die. now take your freshly pasted/padded board and CAREFULLY lower it back onto the heatsink. i highly suggest having a good source of lightning for this, since shifting around the pieces too much trying to get them to align properly can displace the thermal pads and mess with how the paste spreads.
screw the heatsink tight to the board, and double check to make sure that the pads and paste are snug against the heat sink. now put the backplate and shell back on and BAM YOU'RE DONE! with the paste and pads i used, i was able to bring down the temperature of my cards by a good 10-15 °C.
ok you've done all this deep cleaning shit and your computer is happy and healthy. what can you do for your computer's health in the future?
DUST AT LEAST ONCE A YEAR. haul that thang outside and spray that shit out to stop it from building up for too long.
KEEP IT OFF THE FLOOR. if you can, of course, not everyone has the desk room for it. computers accumulate dust easier when they're close to the floor. if you do need to keep it on the floor, you might have to dust it every 6-8 months rather than once a year.
AND STOP PUTTING YOUR LAPTOPS ON SOFT SURFACES I SWEAR TO GOD
GET A FAN CONTROLLER. motherboards are DOGSHIT at maintaining fan speeds!!!! there are physical fan hubs that use controller software, but if you can't afford that, fancontrol by rem0o is a stellar software-only option.
IF YOU DON'T ALREADY HAVE CASE FANS, GET THEM. the number of fans depends on the motherboard form factor your case can accommodate (ATX cases typically have 6-8), but having that air circulation is very important to maintaining ideal temperatures. arctic makes fantastic budget-friendly fans.
IF YOU HAVE AN NVMe HARD DRIVE: please put an aluminum heat sink on that thang. they get toasty :(
OK THATS IT I THINK. if anyone else has tips they wanna add, go right on ahead. ok thank you bye your computer will love you
Day 5 of Disney Dreamlight Valley
Pictures under the cut! (Date taken at 11/26/2023)
Look at the two best friends having lunch together!

I also got Maui and WALL-E!


Day 7 of Disney Dreamlight Valley
Pictures under the cut! (Date taken at 12/1/2023)
With Frozen being my favorite modern Disney movies, I was very happy to welcome Anna to my valley! 🥰

I think I was going a Mona quest where she had to talk to Maui, but he decided to do a dance first before talking to her. My character doesn't seem impressed. 🤣

I found the cave that Elsa would eventually live in, which still doesn't sit right to me, and I soon got the fifth spirit herself! However, a friend of mine said Elsa looks worried in the picture, and she isn't wrong. Let's just say she's nervous to coming to the valley and leave it at that. 😅


Me in February and March. 🤣

Day 9 of Disney Dreamlight Valley
Pictures are under the cut! (Date taken at 12/5/2023)
Now, when I say I'm a huge Frozen fan, I'm a HUGE Frozen fan. Most of the time, if I see anything that has a Frozen design on it, I would buy it. So, when I saw you can have Elsa wear the ice dress she wore in the first film, I didn't hesitate to use my moonstones to buy the skin. 🤣


Apparently, I managed to get more than one villager in the frame, so I decided to take a picture! I don't think Anna was happy that Mother Gothel joined, because she wasn't smiling at all. I was also having McScrooge follow me around, so you can see him hiding behind Anna. 🤣

I took a picture with Olaf, and Minnie and Mickey decided to join. There's even a hidden Kristoff in the back!

I got the winter racoon from the gala star path! It's so cute!

As I was mining with Kristoff, I needed to sell some things, and he decided to play his lute to keep himself busy. 🤭

I don't know what Anna's problem was, but it looked like she was giving me the stink eye, and I thought it was hilarious.

If you squint really hard, it looked like Minnie and Mickey are holding hands and it's so cute! 🥺


@wild-moss-art Hi there! I'm more than happy to share art philosophy about lineart! You are correct, I am definitely spending less time than usual on my lineart to get these requests done, but I'm still glad with the final results. :3
Here are the three stages that I take to achieve clean and polished lineart.

1) The Rough Sketch is used to figure out what the final product may look like. No fine details yet, only guidelines and basic shapes. I make sure the proportions, alignment, and composition is correct. The completed Rough Sketch gives me a good idea of what the rendered lines may look like, but is a bit too messy to follow. While I do have the option of erasing all of the guidelines and cleaning up the lines, what I usually do is lower the opacity of the rough sketch and start on a new layer.

2) The Under Drawing is done in a non-black color on top of the rough sketch. Here is where I get into finer detail with expression and anatomy. However, because we are following the messy lines of the rough sketch, the Under Drawing will still look a little unpolished. It is still very suitable for coloring if you plan to render all of the details in the painting stage, or if you are going for a more sketchy style.
In order to get sharp, detailed, finely rendered lines however, an additional stage is required.So lets lower the opacity and start a new layer using black ink this time.

3) When Rendering Lines, I carefully follow all of the details provided by the Under Drawing, which shows exactly where each line should be placed. I take my time going over each line, using the zoom tool and rotating the canvas when needed to get the best angle.

Because the final product should have a sharp and clean look, it can be very time consuming and pain staking to go over all the details. That said, I have a few tips that will help this stage go along faster while adding visual appeal to the final product.
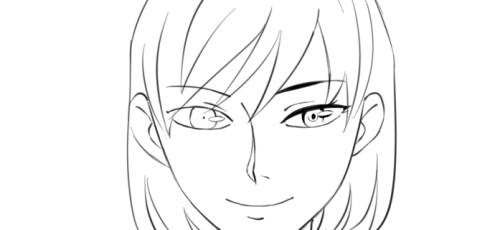
Let's use an example. Suppose you place down your lines and end up with something that looks like this.

It's not bad, but it could use a little work. The expression and level of detail that we want isn't there yet, but it's actually a good starting point. If you are new to line art or still practicing, you may wish to aim something like the drawing above so that we can take it a step further using the steps I will demonstrate in the tutorial below.
So how do we make clean lineart into something even greater?

Here is what I mean by line weight. Lines of lower weight are lighter and thinner. Lines of heavier weight are darker and thicker. Then there are modulated lines, which gradually increase or decrease in weight.
In the example drawing, all of the lines are of equal weight. We can make the line art less monotonous by increasing the weight of certain lines. For demonstration purposes, I will only make changes to the right side of the drawing so that you can see the difference.
To start, we will add another line to the upper eyelid and fill in the gap, creating a new, bolder line.


We will also build up the iris, pupil and highlight, adding details as we go. Already, it is looking more expressive.
Lets build up the nose and mouth lines while keeping the ends nice and thin.
Then, we can add weight to the face and ear lines. For the hair outline, we want to make the lines heavier closer to the roots while keeping the ends thin. Hair lines on the inside can be left alone.

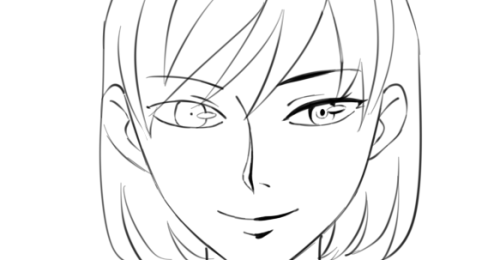
Finally, we make the outside line of the character heavier. With these small changes, we have a much more expressive, detailed, and visually appealing product.

Here I've highlighted in red where the lines remained unchanged. You will definitely want to leave some lines alone while building up others. As a rule, outlines should be thicker while the detail lines on the inside should be thinner.

If you increase the weight of all lines with the same amount, it will remain flat.

So, you should aim to have a variety of light lines, heavy lines, and modulated lines. You may wish to use the eraser to lighten up heavy lines or create modulated ones.

If you can do all the steps above, then a lot of detail and expression will be preserved even when the image is shrunk down

Hope that helps :3 Let me know if there are any other questions I can answer.
Day 3 of Disney Dreamlight Valley
I mostly cleaned up the plaza and the Peaceful Meadow areas, but I still managed to take some screenshots! Pictures under the cut! (Date taken at 11/24/2023)


I'm in love with this Ariel-themed hairstyle! It's so cute! 🥺

Managed to find Skull Rock!

It's my birthday! 🎉🥳

Day 8 of Disney Dreamlight Valley
From what I remember, I was under the weather, so I ended up playing a lot of ddv. That means a lot of pictures!
Pictures under the cut! (Date taken at 12/3/2023)
I finally managed to rescue Minnie after so long! (And by that, any iron that Mickey wanted for the device, I gave to either Anna or Elsa because I give them whatever they wanted. 🤣🤭)

I opened the Glade of Trust biome and by doing so, I unleashed a curse that came from the huge tree. Which in turn, turned the whole valley foggy.


You can even tell from my character's face that she's like, "Heh...whoops!"

I did find a constellation that looked like a snowflake, though!

After I finished Mother Gothel's quest and the biome was returned to normal, I decided to unlock Frosted Heights!...Where I unleashed a blizzard by mistake-


After finding Olaf and helping him find his arms, buttons, and carrot nose, I was almost done with his first quest!...Until I got that glitch from before and I had to redo a bit of my progress. 😒

But I'm glad I managed to hug him! Unfortunately, I didn't think about unequipping my wings, so it ruined the moment. I even tried to quit to do it again, but it saved after the hug. Oh well. 😅


Looks like Elsa and Olaf decided to have a catch-up dinner together!

@bookworm-fangirl1 here's a guide to putting up the website of your sideblog if you or anyone else needs it
my main website my rp website
go to blog settings
switch on "enable custom theme"
click "view website"
locate the icons at the top and click the paint palette icon
click "browse themes"
scroll past all the themes that cost money until you find the free ones. (or just click the dropdown on "all themes" at the top and select "free themes". i just realized you could do that.)
select a theme you like and click "use" at the top. (it doesnt have to match the colors of your blog, its only the format that matters!)
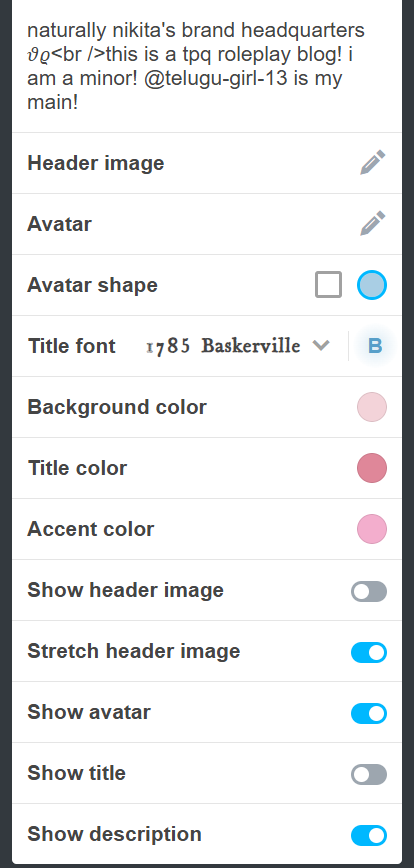
scroll down a bit and see options like "back ground color" "accent color" etc. there, you can change the colors of the theme to match your blog colors.
save and exit and stare at your nice pretty website!!
ref images below vv

(step 2 and 3)

(step 4)

(step 5)

(step 7, this is the theme i have)
(step 8)
hope this helped to anyone who needs it!
-
 autisticchangeling77 liked this · 4 months ago
 -
 teepahneeee reblogged this · 5 months ago
 -
 justanothertransgirl2 liked this · 7 months ago
 -
 aporatael reblogged this · 7 months ago
 -
 chaoticallyfluffy liked this · 7 months ago
 -
 aroace-madness reblogged this · 7 months ago
 -
 centarian reblogged this · 7 months ago
 -
centarian liked this · 7 months ago
-
 the-universal-noms-35 liked this · 7 months ago
 -
 flyingwomansinger liked this · 7 months ago
 -
 nate4game liked this · 7 months ago
 -
 misplacedgamer liked this · 7 months ago
 -
 the-not-witch-time-forgot reblogged this · 7 months ago
 -
the-not-witch-time-forgot liked this · 7 months ago
-
 beansproutdarkness reblogged this · 7 months ago
 -
 ananas1lly liked this · 7 months ago
 -
 the-thing-from-the-place liked this · 7 months ago
 -
 skythesnake liked this · 7 months ago
 -
 internetghostsposts reblogged this · 7 months ago
 -
 alchemical-spill-on-aisle-three liked this · 7 months ago
 -
 k31lover liked this · 7 months ago
 -
 skeliton13 liked this · 7 months ago
 -
 that-random-ink liked this · 7 months ago
 -
 ilbyrainum liked this · 7 months ago
 -
 scooteriaferrari liked this · 7 months ago
 -
 miniaturestarlightdelight reblogged this · 7 months ago
 -
 calamitea81 liked this · 7 months ago
 -
 littledudesclub liked this · 7 months ago
 -
 courgowr liked this · 7 months ago
 -
 riverwizard27 liked this · 7 months ago
 -
 mekkthemighty reblogged this · 7 months ago
 -
 thetomeoftatteredthoughts liked this · 7 months ago
 -
 fan-girl-of-all reblogged this · 7 months ago
 -
 disappointeddissapointment liked this · 7 months ago
 -
 stavarosthearcane reblogged this · 7 months ago
 -
 crunchling liked this · 7 months ago
 -
 zeyalderson reblogged this · 7 months ago
 -
zeyalderson liked this · 7 months ago
-
 deathstrider04 liked this · 7 months ago
 -
 idiotic-b-gilson reblogged this · 7 months ago
 -
 limreeissuffering reblogged this · 7 months ago
 -
 littlemissfanfictionlover liked this · 7 months ago
 -
 172evofan liked this · 7 months ago
 -
 polaris-wings reblogged this · 7 months ago
 -
polaris-wings liked this · 7 months ago
-
 bacon-bitch liked this · 7 months ago
 -
 offworld-lamb liked this · 8 months ago
 -
limreeissuffering reblogged this · 8 months ago
