Disclaimer: These Are All Based On My Body. I Know There Are A Ton Of Different Body Shapes Out There.


disclaimer: these are all based on my body. I know there are a ton of different body shapes out there. It’s important to study all sorts of body shapes but I’ve only ever use mine as a reference.
I’ve never actually studied arms so I had to google what muscles are what while drawing this so don’t quote me on any of this. I’ll make a head tutorial later
More Posts from Arttuti and Others


Hey just thought I'd let you know you have some of the best artwork I've ever seen! Congrats! Especially Chirrut, he's amazing in your style! I was also wondering if you had any advice on how to draw heads and eyes? They're one of my two biggest struggles and I'd love it if I could get your advice. Anything helps. Thank you and I hope you have a fantastic day!
*_* Thanks a bunch askdh and thanks for taking the time to write me! I had a lot of fun working on Chirrut ;;;
Hmmm I usually think it’s not useful to explain how I make eyes or noses, since the way to draw them changes depending on the pose… My advice would be practicing with ¾ heads. That view always force you to work volumetric shapes and also give a lot more of information. Also, I think it’s much more easy since you have more landmarks to help you.
I would also say consulting anatomy to identify the landmarks on the face (zygomatic and nasal bone , superciliary arch, mandible…) and practice on photos. Using references for drawing is not bad and drawing over photos when you need information of a face is a lot of fun. Is not necessary to draw all the bones, but knowing where the volumes and principal shapes are can help you learn. I.E:

I love that photo because it’s SO SO easy to see the volumetry of the face; just the line of the jaw gives you a lot of informacion about it. And it makes it easy to identify the elements and principal shapes of the head:

(I broke his nose, I’m sorry, but I made this quickly (??)) the point is, take your time to study the lines and understand the anatomy.Also:

that triangle is very helpful too and could help you placing the principal elements. The lines that make him look like he’s crying (?) are the relation between the eyes and the mouth and are very helpful when placing it.
Again, this is only a way to learn and understand how to build a face. That is always the key, even if you use a cartoon style. Rules can be broken, but I think it’s important to understand them first. It could help you make your style more solid.
And well, once you’ve studied it from photos, trying it on your own (even if you have references, that’s ok) and practice, practice u3u
Hope this helps and hope it’s not too technical ;;;
Your art is so good !!! How do you color the skin its soo smooth
Thank you very much Anon ( ̄ε ̄@)hehehe!!Well I have some shots of one of my recent drawings so I’ll try to explain it a little bit hhahahah


Basically what I do is: 1. Put on base color2. Add some light shadows (They don’t even have to look very smooth, like the images above) 3. Then I start adding some darker shades of color and different skin tones to give it the correct shape, at this point I start adding some brighter tones, so yeah, they usually look very messy at this point. My brushstrokes also look like crosses or some sort on this step I think (I do it like that ‘cuz I think it’s easier to merge the colors later, at least for me hehehe) 4. Aaaand at the end, to merge the colors and make them look smoother I use a soft brush with low opacity to add some light shadows and brighter tones on bigger areas, I also try to use almost the same tones I used on the step three so it can merge nicely.So yeah, I think that’s about it (〜 ̄△ ̄)〜I hope I helped you out with that <3
Hoi!! I saw a little bit of the process on your Instagram, but could you explain how you go about making a pattern? I absolutely love how that neato cactus/desert one you did turned out!
Alrighty!
So to make a repeating pattern:

1. Open a canvas and draw in the center WITHOUT touching any of the edges.

2. [Below: Light cyan lines] Divide your canvas into four equal parts.
Make four guides framing the canvas, and two across the middle.
For the ones in the middle, View > New Guide > Horizontal or Vertical for needed orientation > type in 50% to get the exact middle of your canvas. These are photoshop shortcuts, may be different on your programs.

3. [Above: Yellow arrows] Make sureyou have ‘Snap’ checked under View > Snap, then select each quarter of your piece > layer via cut > move diagonally to the other side.
After you’re done moving things diagonally, you can either turn off Snap so your doodling won’t stick to the center lines, or toggle the guide visibility off (Ctrl+;). Merge the layers back together.

4. Draw in the middle without touching the borders, color the entire thing if you plan on doing that.

5. Setting your image as a pattern After your image is done, merge all layers into one > select the entire canvas (Ctrl+A) > Edit > Define Pattern
Open a new canvas bigger than the one you made the pattern on, and paint bucket it in! (Instead of the Foreground button at the top when paint bucket is active, select Pattern then your pattern)
If you aren’t using a program that lets you define patterns, merge everything into one layer and duplicate & tile them manually.

Cheers!
Hi! Idk if my qn got sent before (tumblr mobile yeesh) I wanted to say i really really love your blog and art style! I was wondering if you have tips to draw Dean's and Cas's hair??
REALLY LATE REPLY BUT UM Dean’s got a hair parting on either side but his hair kinda all comes out from a spot on the back of his head. Keep the sides short but flip up the hair in the front

And here’s Cas again! Recapping: part on one side and have the hair come out from the parting and flip up in front as well. He’s got a longer fringe than Dean’s


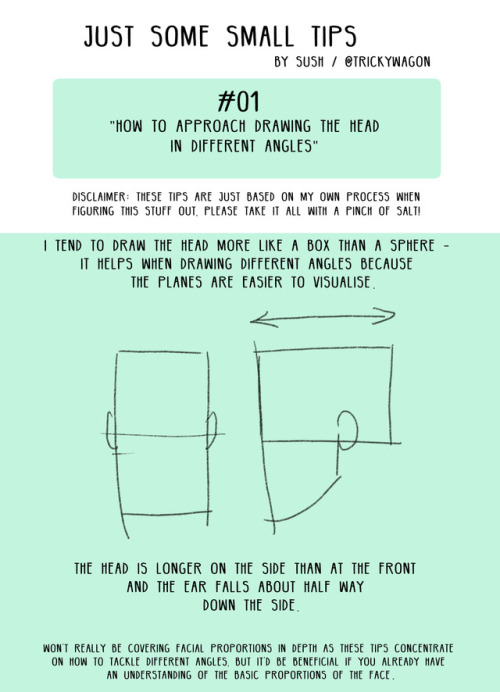
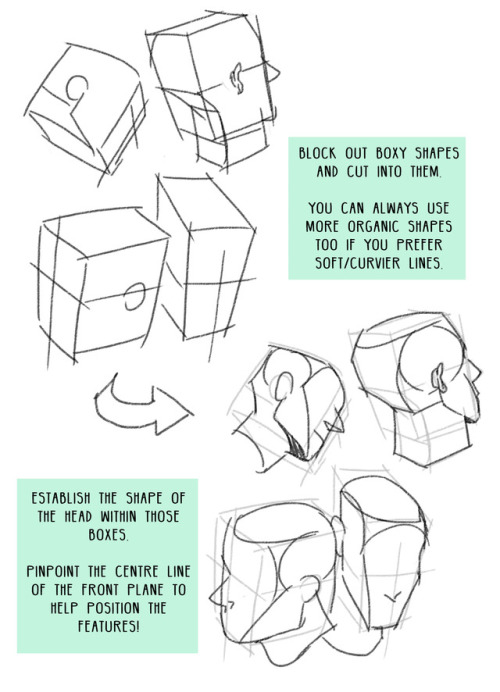
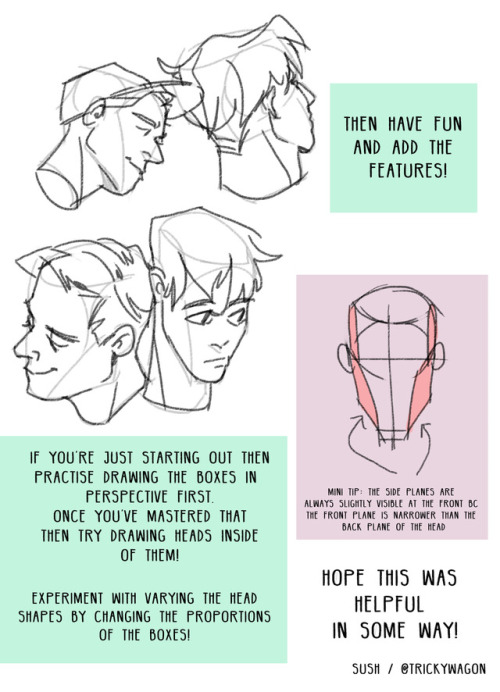
Starting a mini drawing tips series! Feel free to suggest some topics you’d like covered// Hope you find this useful!
Also on: twitter / instagram
-
 carlos-tk liked this · 1 month ago
 -
 artreferencingyay reblogged this · 1 month ago
 -
 tamlinv liked this · 1 month ago
 -
 peucetiaviridans liked this · 1 year ago
 -
 artking-4 reblogged this · 1 year ago
 -
 dimmestmorn13 liked this · 1 year ago
 -
 twadi-gurl reblogged this · 1 year ago
 -
 ladydoe8 reblogged this · 1 year ago
 -
ladydoe8 liked this · 1 year ago
-
twadi-gurl reblogged this · 1 year ago
-
 hydrangeahelper reblogged this · 1 year ago
 -
 art-refs-galore reblogged this · 1 year ago
 -
 cursed-saphire-hart liked this · 1 year ago
 -
 helpingchaodrawbetter reblogged this · 1 year ago
 -
 takkunzx reblogged this · 2 years ago
 -
 ilovearte555 liked this · 2 years ago
 -
 skellejellies liked this · 2 years ago
 -
 sorleanelandon liked this · 2 years ago
 -
 lobos-emptys-out-his-88k-likes reblogged this · 2 years ago
 -
 otaref reblogged this · 2 years ago
 -
 petiite-abeille liked this · 2 years ago
 -
 terr-ella-ref reblogged this · 2 years ago
 -
 ammomancer liked this · 3 years ago
 -
 strawberry-cheezecakes-4me liked this · 3 years ago
 -
 h-demersalis-insp reblogged this · 3 years ago
 -
 macrowdu reblogged this · 3 years ago
 -
macrowdu liked this · 3 years ago
-
 hornsonhalos liked this · 3 years ago
 -
 simply-m-a-d liked this · 3 years ago
 -
 tuturialreblog reblogged this · 3 years ago
 -
 xnovavoidx liked this · 3 years ago
