Sorry If Someone Has Already Asked This But Can You Show Us A Colouring Tutorial Please?
Sorry if someone has already asked this but can you show us a colouring tutorial please?

ya take a babi

color da babi

make a fuckin uhhh multiply/shade layer then u take ur fuckin sai marker brush
pick a shading color or something

cel shade that motherfucker
but be messy with it, literally just go fucking ham, dont be too precise and don’t make it look so clean
ysee that residue there? yea man, it looks really messy but it also kinda looks like a painting right

make a screen/luminosity layer on top of the multiply layer
then ya pick a lighting color

then u do the same thing as earlier

bam you got,,, a child
this is the simple n easy way i do it, i got more complicated ways but hewe u go
OH YEAH HERE’S MY PEN SETTINGS
More Posts from Arttuti and Others

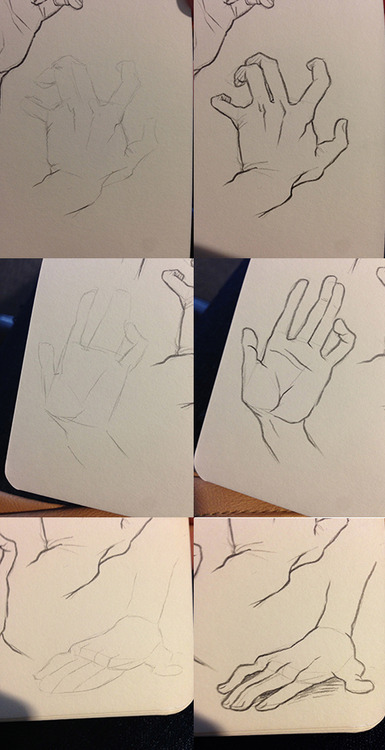
hi! you draw really nice hands, could you give some tips/make a tutorial?
sure!! this is quick and i dont have much of a method so?
i kinda start out with a box shape for the palm and make some tic marks to plan out where the fingers go
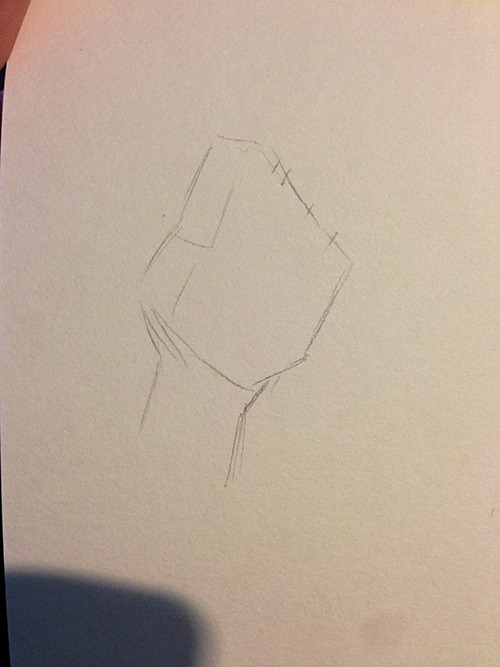
then box out some fingers
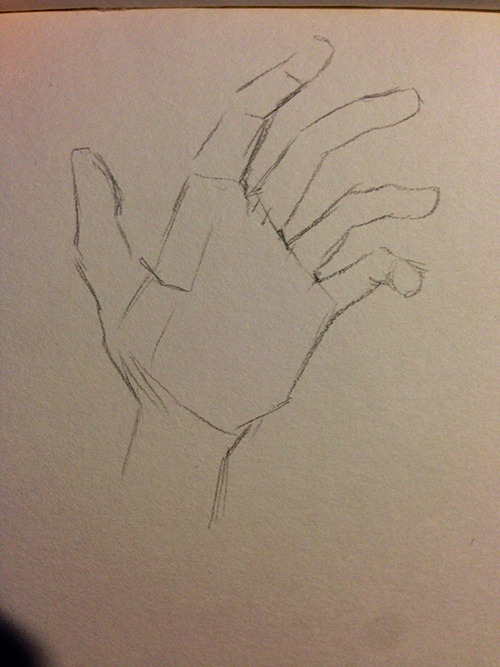
and darken out the details!
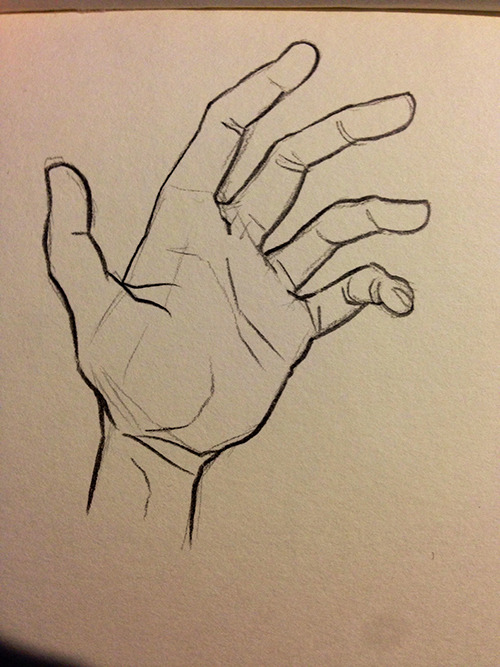
here’s some more examples too!! i always like to exaggerate the position of the thumb and pinky to make the pose of the hand more interesting?? give it more character? it’s a hand
How to do “extra” facial expressions!
Drawing basic facial expressions is not the hardest. Most people can draw a sad face, a happy face, angry etc., but making more multidimensional expressions is more of a challenge. I have gotten a lot of compliments on how I draw facial expressions, (specifically “angsty ones”) telling me that they are very dramatic and well… expressive! And there are actually only a few things I think about when I draw faces that take them to the next level, so I thought i’d illustrate them all here!
SUPER IMPORTANT TIP BEFORE WE START: Look at your own face when you draw faces. Even making the face when you are drawing (you don’t even have to look at it), will give you some sense of how the face muscles pull and where things fold and stretch, because you can feel it. You are the best reference when it comes to facial expressions!
Angles
Draw the head in an angle that matches the expressions you want to make. It is not a requirement, but is going to add to the effect.

Symmetry vs asymmetry
A face is rarely symmetric. Unless the face the character is making is 100 % relaxed or even dissociating, the eyebrows, mouth and facial muscles will have different placements of their respective side. This image shows the dramatic impact asymmetry has on a face:

That’s the difference between a smile and a smirk!

The first one’s like “oh yeah?” and the second is like “oH YEAH??”
The “balloon squishing principle”
This is something I did subconsciously, and I didn’t know about until I made this tutorial. And this principle goes hand in hand with an asymmetric face. Basically, if you squish one part of the face, you need to even out the empty space by “inflating” the other part of the face so that it doesn’t appear shrunken. The picture hopefully explains it:

Teeth
Don’t forget to add the gum when the mouth is open to its full potential!

Squinting and folding
Adding folds around the eyes when a character is squinting makes a HUGE difference. It makes a smile more genuine and a growl more intimidating. Adding folds to the face in general makes your characters more lifelike and ‘visually relatable’. Like, they look human, and less plastic or fake.


and so on..
Pupils and irises
The placement of the iris and pupil in relation to the eyelids is very important! The less of the white you see, the more relaxed the character is.

And then of course eyebrows and eyes go hand in hand!


Gestures, spitting, sweating…
Adding more elements than just a face is key to making the character actually look like they are feeling what you want them to feel. Just the tiniest sweat drop adds to their anxiety, spitting adds frustration to their rage, slouching shoulders, waving hands, a double chin, extreme angles, the list goes on! Add whatever and see what kind of impact it makes! Does it do the trick? Great! Add it!
Over exaggeration!!
Remember that you can almost always exaggerate more. Don’t be afraid to do draw “too much” because you’re just experimenting. See what works and what doesn’t. What do you like to exaggerate?


Now that you know some theory, it’s time to practice!
Practicing!!
The 25 Essential Expressions (a classic! I’ve done it multiple times)

And the one I do when I’m bored:
Fill a page with circles and fill them in with different expressions. Try and exaggerate as much as you can!


This is mostly for experimenting. They are quicker to draw than complete faces, but the same rules should apply!
And that’s about it!
I don’t know if I covered everything in this tutorial, since some things might be obvious for me, and this post perhaps only scratches the surface. So feel free to send me a message if you want an explanation about something more in depth! Thank you for reading! And now DRAW!!! ✨🎨
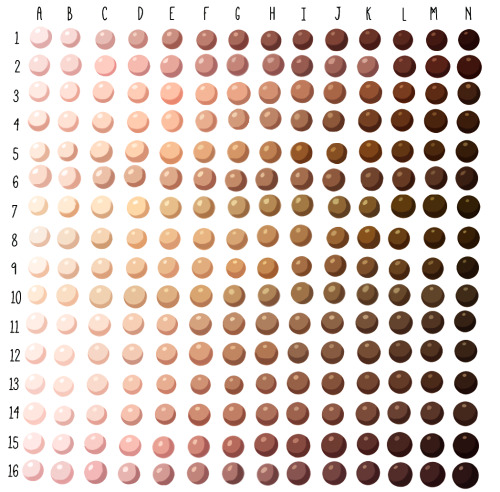
Skin tone swatches, for use as a resource.
Spudfuzz on Deviantart made the original resource, which I modified to be a bit more realistic. She gave me permission to post this.
☛These swatches, like all art resources, should be used as a “jumping off point!” All colours are relative, and change with lighting conditions. As they are now, these swatches work best for adoptables, character lineups, and other art where local colour is important. ☚
[DA]
Hi. :3 I love your art and you're totally awesome! I just had a quick question. I saw your post about hair tips on Dean and Cas, and I was wondering if you had one for Sam. Thank you, it means a lot. ^.^
Sure no problem! Just part it slightly to the right and have the hair flow down from that line. Don’t forget his killer sideburns lol

hi! umm pls pls PLS if you have the time, do a thingy on arms when you get the chance, they are so hard i could almost cry aslkdjaskjsas, i keep forgetting how many curves an arm should have/how long it should be (in diff positions/when it's not resting at the hips) etc etc etc ahhh omg please!! thank you sosososo much, i l♡ve all of your art and i hope you have a nice day!! ✧ ㅠㅠ ✧


I don’t want to go into detail in terms of muscles, but I’m sure you can find them if you google arm muscles! Hope this helps u out a little!


Okay so I followed this video about foreshortening and…


Sycra. I love you so much for making this video.


-
 choco67 liked this · 5 months ago
 -
 kyoluka liked this · 1 year ago
 -
 aoartmthebitxh reblogged this · 1 year ago
 -
aoartmthebitxh liked this · 1 year ago
-
 gggggundertale liked this · 1 year ago
 -
 pennykinz liked this · 1 year ago
 -
 zzkeee liked this · 1 year ago
 -
 persimmon-prince liked this · 2 years ago
 -
 saternsky liked this · 2 years ago
 -
 advil-eater liked this · 2 years ago
 -
 bia-and-tea liked this · 2 years ago
 -
 ruicchiii liked this · 3 years ago
 -
 shineypebble liked this · 3 years ago
 -
 reblogsstuffsblog reblogged this · 3 years ago
 -
 hauntedmyst liked this · 3 years ago
 -
 daze-stole-ur-milk liked this · 3 years ago
 -
 1iliketrains1 liked this · 3 years ago
 -
 sardonyxsroom reblogged this · 3 years ago
 -
 cloudc0la liked this · 4 years ago
 -
 feelisia liked this · 4 years ago
 -
 marshytree liked this · 4 years ago
 -
 drawfourme liked this · 4 years ago
 -
 enao-ise liked this · 4 years ago
 -
 stardust-peachh liked this · 4 years ago
 -
 tobbo-hd liked this · 4 years ago
 -
 macca-is-art liked this · 4 years ago
 -
 demons-main-hell liked this · 4 years ago
 -
 king-reblogs-shit reblogged this · 4 years ago
 -
 kingofs0da liked this · 4 years ago
 -
 sketched-artist-official liked this · 4 years ago
 -
 witchofthebriars liked this · 4 years ago
 -
 larrydog reblogged this · 4 years ago
 -
larrydog liked this · 4 years ago
-
 gluggs liked this · 4 years ago
 -
 chessebox liked this · 4 years ago
 -
 chrizantemia liked this · 4 years ago
 -
 crowpanacea liked this · 4 years ago
 -
 jollysaladtacollama liked this · 4 years ago
 -
 krota-blog2 liked this · 4 years ago
 -
 suckerfortrephacard liked this · 4 years ago
 -
 laincognitaalv-blog liked this · 4 years ago
 -
 skullyguy44 liked this · 4 years ago
 -
 peach-volcano reblogged this · 4 years ago
 -
 kickaz liked this · 4 years ago
 -
 vinaisawesome liked this · 4 years ago
