How To Do “extra” facial Expressions!
How to do “extra” facial expressions!
Drawing basic facial expressions is not the hardest. Most people can draw a sad face, a happy face, angry etc., but making more multidimensional expressions is more of a challenge. I have gotten a lot of compliments on how I draw facial expressions, (specifically “angsty ones”) telling me that they are very dramatic and well… expressive! And there are actually only a few things I think about when I draw faces that take them to the next level, so I thought i’d illustrate them all here!
SUPER IMPORTANT TIP BEFORE WE START: Look at your own face when you draw faces. Even making the face when you are drawing (you don’t even have to look at it), will give you some sense of how the face muscles pull and where things fold and stretch, because you can feel it. You are the best reference when it comes to facial expressions!
Angles
Draw the head in an angle that matches the expressions you want to make. It is not a requirement, but is going to add to the effect.

Symmetry vs asymmetry
A face is rarely symmetric. Unless the face the character is making is 100 % relaxed or even dissociating, the eyebrows, mouth and facial muscles will have different placements of their respective side. This image shows the dramatic impact asymmetry has on a face:

That’s the difference between a smile and a smirk!

The first one’s like “oh yeah?” and the second is like “oH YEAH??”
The “balloon squishing principle”
This is something I did subconsciously, and I didn’t know about until I made this tutorial. And this principle goes hand in hand with an asymmetric face. Basically, if you squish one part of the face, you need to even out the empty space by “inflating” the other part of the face so that it doesn’t appear shrunken. The picture hopefully explains it:

Teeth
Don’t forget to add the gum when the mouth is open to its full potential!

Squinting and folding
Adding folds around the eyes when a character is squinting makes a HUGE difference. It makes a smile more genuine and a growl more intimidating. Adding folds to the face in general makes your characters more lifelike and ‘visually relatable’. Like, they look human, and less plastic or fake.


and so on..
Pupils and irises
The placement of the iris and pupil in relation to the eyelids is very important! The less of the white you see, the more relaxed the character is.

And then of course eyebrows and eyes go hand in hand!


Gestures, spitting, sweating…
Adding more elements than just a face is key to making the character actually look like they are feeling what you want them to feel. Just the tiniest sweat drop adds to their anxiety, spitting adds frustration to their rage, slouching shoulders, waving hands, a double chin, extreme angles, the list goes on! Add whatever and see what kind of impact it makes! Does it do the trick? Great! Add it!
Over exaggeration!!
Remember that you can almost always exaggerate more. Don’t be afraid to do draw “too much” because you’re just experimenting. See what works and what doesn’t. What do you like to exaggerate?


Now that you know some theory, it’s time to practice!
Practicing!!
The 25 Essential Expressions (a classic! I’ve done it multiple times)

And the one I do when I’m bored:
Fill a page with circles and fill them in with different expressions. Try and exaggerate as much as you can!


This is mostly for experimenting. They are quicker to draw than complete faces, but the same rules should apply!
And that’s about it!
I don’t know if I covered everything in this tutorial, since some things might be obvious for me, and this post perhaps only scratches the surface. So feel free to send me a message if you want an explanation about something more in depth! Thank you for reading! And now DRAW!!! ✨🎨
More Posts from Arttuti and Others


Hoi!! I saw a little bit of the process on your Instagram, but could you explain how you go about making a pattern? I absolutely love how that neato cactus/desert one you did turned out!
Alrighty!
So to make a repeating pattern:

1. Open a canvas and draw in the center WITHOUT touching any of the edges.

2. [Below: Light cyan lines] Divide your canvas into four equal parts.
Make four guides framing the canvas, and two across the middle.
For the ones in the middle, View > New Guide > Horizontal or Vertical for needed orientation > type in 50% to get the exact middle of your canvas. These are photoshop shortcuts, may be different on your programs.

3. [Above: Yellow arrows] Make sureyou have ‘Snap’ checked under View > Snap, then select each quarter of your piece > layer via cut > move diagonally to the other side.
After you’re done moving things diagonally, you can either turn off Snap so your doodling won’t stick to the center lines, or toggle the guide visibility off (Ctrl+;). Merge the layers back together.

4. Draw in the middle without touching the borders, color the entire thing if you plan on doing that.

5. Setting your image as a pattern After your image is done, merge all layers into one > select the entire canvas (Ctrl+A) > Edit > Define Pattern
Open a new canvas bigger than the one you made the pattern on, and paint bucket it in! (Instead of the Foreground button at the top when paint bucket is active, select Pattern then your pattern)
If you aren’t using a program that lets you define patterns, merge everything into one layer and duplicate & tile them manually.

Cheers!


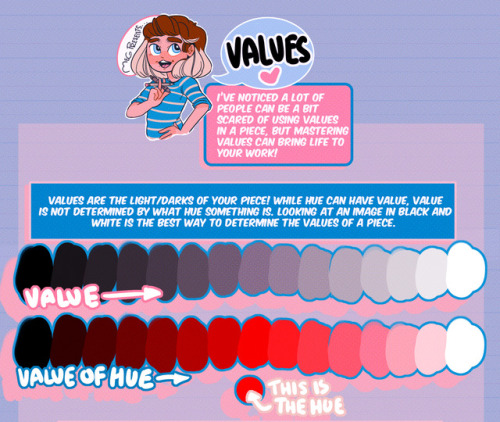

Hey friends, Meg here for WOOPS IT’S WEDNESDAY! Today we’re taking a look at how to study values and the importance of knowing how to use them! It’s not all about color, you know. If you have any tutorial recommendations send ‘em in here or my personal. Now go forth and I’ll see you next week!

why you should make a webcomic and why you can make a webcomic
why should you make a webcomic?
it’s regular drawing practice
you get to draw and develop the universe your OCs live in
you could draw your OCs making out with context
see number 3
how can you make a webcomic?
make a new tumblr
install this theme https://www.tumblr.com/theme/37061
post comics as you would on any other tumblr they show up on their own webcomic site
what if nobody sees my webcomic :(
too bad you got to draw your OCs making out and nobody can appreciate your artistic genius obviously the world is not ready for this webcomic genius

I compiled this a while ago but I was just looking for references and found the file so...
Best places to find reference photos:
Body types, poses, and anatomy:
http://reference.sketchdaily.net/en
https://www.posemaniacs.com/
https://quickposes.com/en
https://www.characterdesigns.com/#home-section
https://www.adorkastock.com/sketch/
https://line-of-action.com/practice-tools/figure-drawing/
https://www.proko.com/browse/tools?af=242
Giant anatomy reference tutorials Pinterest board:
https://www.pinterest.com/deedee1232/body-reference/
General:
https://unsplash.com/
https://pixabay.com/
https://www.pexels.com/
https://stocksnap.io/
https://www.freeimages.com/
https://kaboompics.com/
https://commons.wikimedia.org/wiki/Main_Page
https://morguefile.com/
https://www.flickr.com/
https://www.dreamstime.com/
https://pmp-art.com/
https://www.freepik.com/
https://photobash.co/
https://picjumbo.com/
https://burst.shopify.com/
https://magdeleine.co/
https://wordpress.org/openverse/
Historical:
https://nos.twnsnd.co/

Finally I got around to this. =ヮ=
Since there are so many different possibilities, this one was hard to make.
It’s hard to want to show a little bit of everything, but keep the sheet small as well orz.
Sorry there is only one shaded example lol (shading folds is a different story I think)
-
 leramarchukspyro liked this · 2 weeks ago
 -
 luzsaysfuckyou liked this · 3 weeks ago
 -
 cryingbluecactus liked this · 3 weeks ago
 -
 creatorbiaze liked this · 1 month ago
 -
 s0lace-1n-s0l1tude reblogged this · 1 month ago
 -
s0lace-1n-s0l1tude liked this · 1 month ago
-
 abstinentce liked this · 1 month ago
 -
 stupidskeletonshruggs liked this · 1 month ago
 -
stupidskeletonshruggs reblogged this · 1 month ago
-
 xxasspen-h3s-3moxx reblogged this · 1 month ago
 -
xxasspen-h3s-3moxx liked this · 1 month ago
-
 immadatdisney2 reblogged this · 1 month ago
 -
immadatdisney2 liked this · 1 month ago
-
 acetrashgremlin reblogged this · 1 month ago
 -
 isopod-action-time reblogged this · 1 month ago
 -
isopod-action-time liked this · 1 month ago
-
 freak-went-void reblogged this · 1 month ago
 -
freak-went-void liked this · 1 month ago
-
 junaslagoon liked this · 1 month ago
 -
 theshmeepking reblogged this · 1 month ago
 -
 gamerpal reblogged this · 1 month ago
 -
 artking-4 reblogged this · 1 month ago
 -
 takingcorners reblogged this · 1 month ago
 -
 hardbirdmilkshake liked this · 1 month ago
 -
bronestiff liked this · 2 months ago
-
 mellobellooo liked this · 2 months ago
 -
 xsolar-ghost reblogged this · 2 months ago
 -
 one-letter-man liked this · 2 months ago
 -
 salt-in-the-wind reblogged this · 2 months ago
 -
 lost-islands reblogged this · 2 months ago
 -
 nutiki liked this · 2 months ago
 -
 pillowsareswingjngchairs reblogged this · 2 months ago
 -
 majesticn3wt liked this · 2 months ago
 -
 reddstarr-exe liked this · 2 months ago
 -
 anastasiacactus liked this · 3 months ago
 -
 what-the-hell-mate liked this · 3 months ago
 -
 briassreblogs reblogged this · 3 months ago
 -
 kaavoken reblogged this · 3 months ago
 -
 uwutastic liked this · 4 months ago
 -
 anetdummy liked this · 4 months ago
 -
 sofiabanditareal liked this · 4 months ago
 -
 mena-2001 liked this · 4 months ago
 -
 drbugz liked this · 5 months ago
 -
 silver-hourglass reblogged this · 5 months ago
 -
 crazy-fruit liked this · 5 months ago
 -
 localweirdofishy liked this · 5 months ago
 -
 variablecemetery liked this · 5 months ago
 -
 itsagayhumannn12 reblogged this · 5 months ago
 -
itsagayhumannn12 liked this · 5 months ago
