Dubiasdead - Welcome To My Empty Blog


More Posts from Dubiasdead and Others
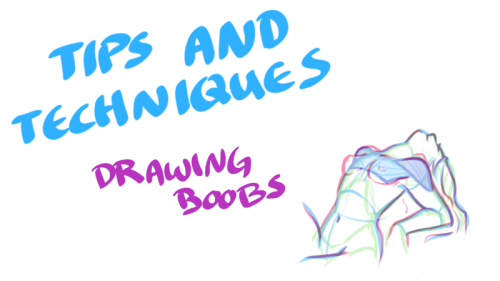
Just when you thought you knew everything about boobs… NSFW?


My darling friend Chizzi mentioned that there are a lot of booby tutorials out there are just predrawn boobs with the artist going HEY LOOK! HERE ARE SOME BOOBS! but not many that actually talk about the anatomical structure, and where to put the lines. I was like, “Hey, I can probably whip something up.“ And so I spent my thanksgiving making this.
Proportions probably aren’t exact, but I did my best. I also didn’t explore the various body types, but perhaps I could do a separate tutorial someday. I hope you find this tutorial useful :)
All photo references used in the tutorial were found on The Drawing Script. Credits to each photo belong to their respective owners.
Wow so I just hit 2000 followers! I wanted to do something to celebrate, so I’m holding a *drumroll*


Thank y’all so much!! ;v; Text transcript under cut:
Keep reading

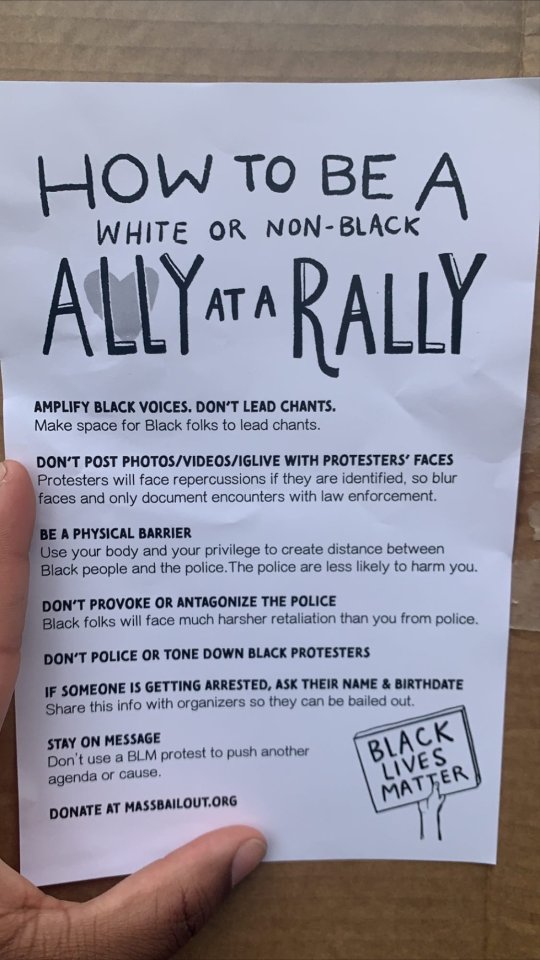
How to be a white or non-black ally at a rally
via @laurielovelugo
[SuperheroesInColor faceb / instag / twitter / tumblr / pinterest / support ]


LINKS(aka tutorials by ppl who make better tutorials):
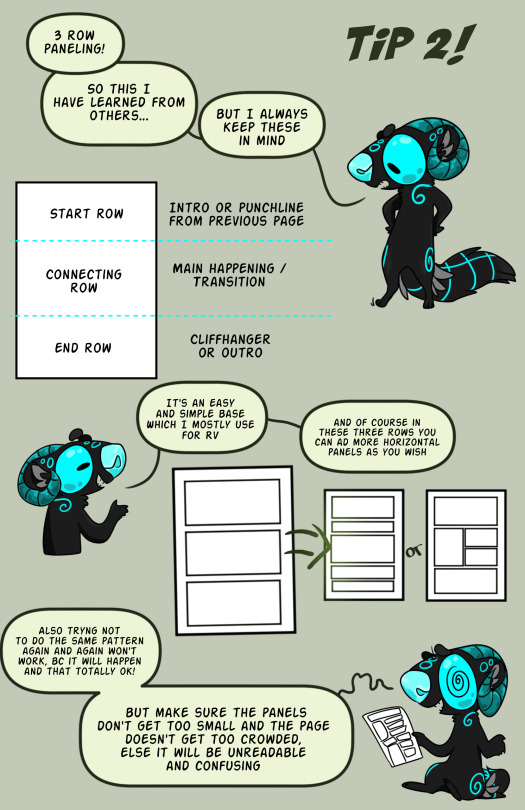
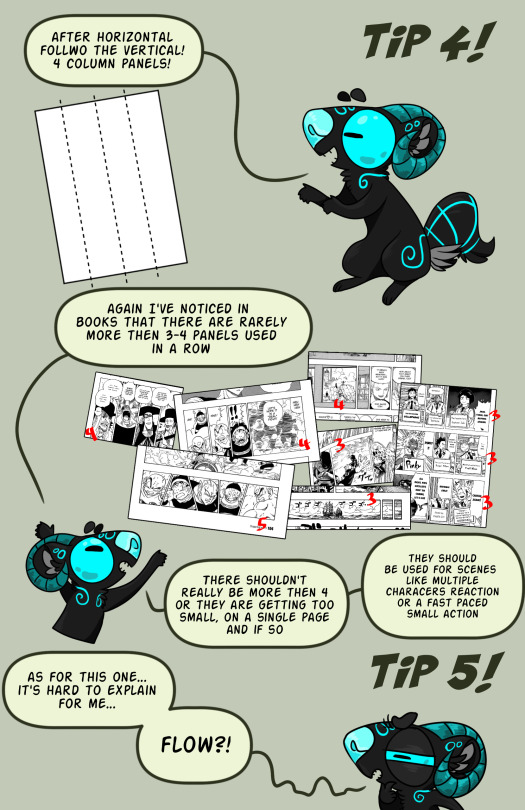
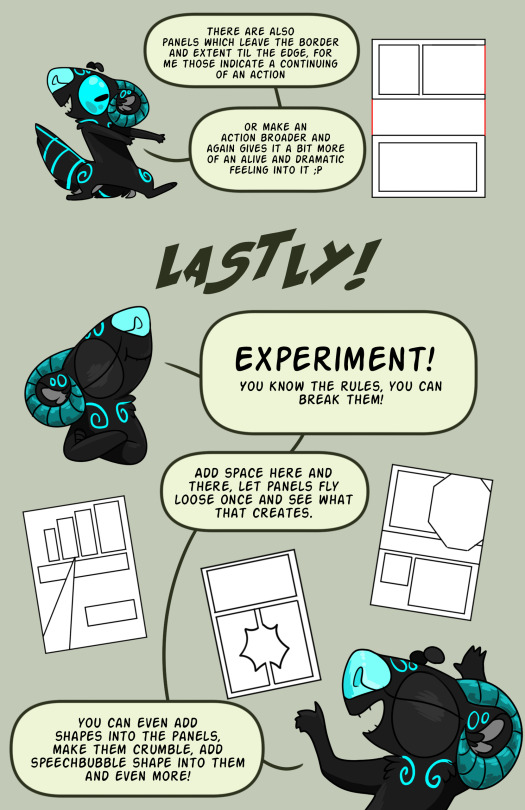
Paneling 1
Paneling 2 (text heavy)
Crossing the 180°
Simple comic panel Tutorial
Guide to comic panels (+OTHER LINKS)
Comic strip artists kit
LETTERING
Webcomic Guide by Tapastic users!
Lettering by ZombieSmile
How I draw comics (also by ZombieSmile)
an ask about comics part 1
Start a webcomic?
A thing about perspective
If you dig yourself mor einto it, you’ll find more and more helpful things, even for a style you might want in your comics and whatever more! But I should probably stop the link spam here….
But if you have any more questions, ether you want to know form me or if I know a tutorial, go ahead and ask!!
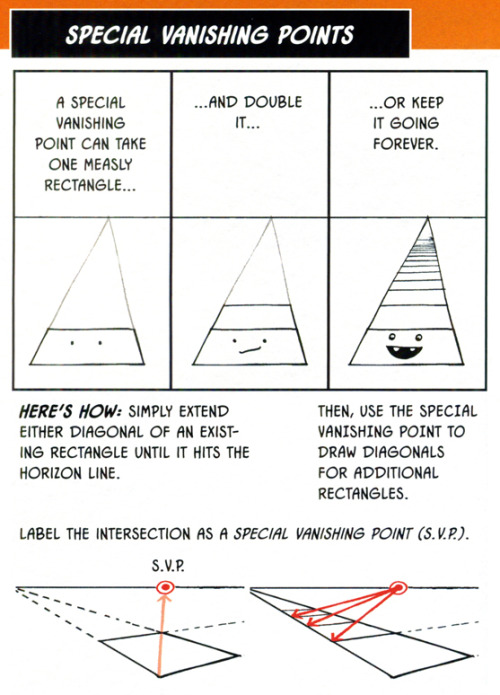
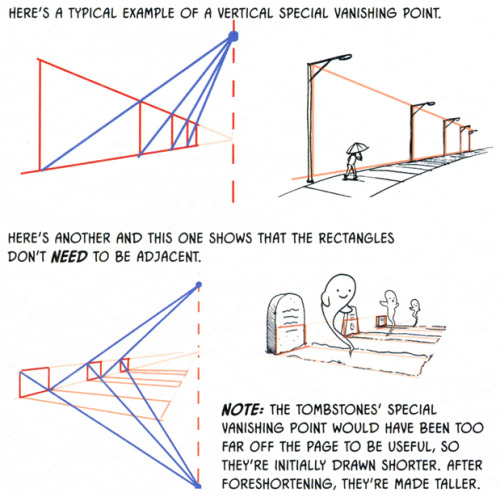


What ARE Vanishing Points?
So I feel like a lot of confusion with drawing in perspective is because people are not taught the absolute basics properly? So let’s do that.
Let’s say we have a cube.
Now, a cube we know is made out of 6 squares or rectangles, and every edge is at a 90 degree angle.
so every opposite edge of a cube is exactly parallel, right?
but let’s say we draw a cube using only parallel lines:

this looks a little weird, you know? Like if i try think of this as an object in 3d space and i look at it for too long, the faces start to look really warped - with like the back looking bigger than the front as if its been made out of weird wonky trapeziums

so what’s going on here? if all those edges are exactly parallel, why does it look weird?
lets take a look at this photo of a railway track

Now we know that the rails on a track are always going to be parallel, they have to be the same distance apart so the train can stay on the track yeah?
But we can very clearly see that these tracks are converging to a single point in the photo.
So what does this tell us, exactly? That our view of the world is naturally warped, and that lines that are physically parallel when drawn in perspective will converge to a single point.
Now, I could call this image “one point perspective” - but that’s not really true,

if these lines are also parallel, then they must also converge to a single point in perspective, right? so lets add another point

clip studio paint automatically adjusts the horizon line to fit the new points you add to your perspective…. notice how the horizon line actually fits the photo better now?

our new point is a very very long way away, so we don’t notice a lot of difference in the angle between lines, but the point that i’m trying to make here is:
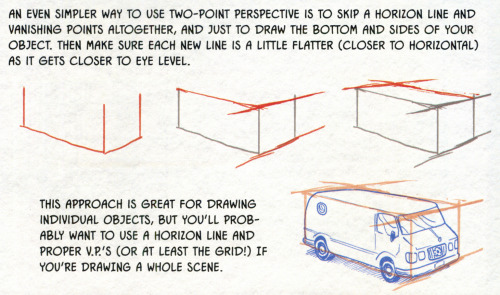
Drawing with perspective guides is not about choosing one, two, three point perspective etc. those are just quick ways to set up a certain viewing angle
What you are doing when you use these guides is making your parallel lines converge to a point.
So, if you want to draw a big ol’ cube that’s aligned to be parallel with these railroad tracks, then you can do that with the same point as the tracks - because it’s parallel. It’s on the same axis!

but what if you want to draw a cube that’s rotated, and isn’t parallel to the tracks?
well that’s not too difficult to do if you know that every point represents one set of parallel lines.
If these lines aren’t parallel to the ones you already have, then clearly you just need new points.
We’re not planning to tilt this cube up into the air, or rotate it onto its side, so we’re going to leave the vertical axis alone, and just move our horizontal points to a different place on the horizon line

But speaking of the vertical axis - the only points that will be on your horizon line are the ones that are flat on the ground. But you can still have points that are not on the horizon line!

This is important to remember because if you’re trying to draw something like a slope or stairs, something that has an incline, it’s not going to be level with your horizon.
Let’s draw some stairs as an example.

This is actually pretty simple - first draw where your slope starts and ends by drawing a big L shape.
this will give you some parallel corners, which you can then connect to make a new point for your slope

And with this you can then find the centre and divide that up into equal parts to make your stairs (http://lesbianlinkle.tumblr.com/post/176704472820)


So lets go back to our original cube, with the knowledge that our parallel lines should all converge to a point and draw it again

well, doesn’t that look better!
but also, now you know how to make a cube lean against its buddy like this

because we just make new points for the new parallel lines

Anyway I hope that clears some things up, and makes perspective easier to understand!
Also if these tutorials have been helpful and you’d like to support me, I do have a patreon & a ko-fi you can donate to :^)
Ugh, ok. I didn’t want to have to say this, but… I keep seeing those cheeky posts going around like “Tee hee, I sure hope no protesters know that-” or “It would be a shame if anyone were to-”
Guys, PLEASE STOP SPREADING THOSE. Those posts are going to get someone hurt.
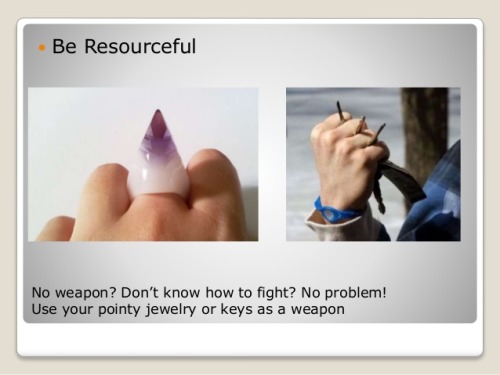
You should NOT trust unverified advice from strangers on the internet. Honestly, some of the advice I’ve seen is so bad I almost have to wonder if it was created by plants to try to get people hurt. Speaking as someone who’s involved in multiple martial arts, improper self-defense techniques will get you hurt; Speaking as someone who is familiar with plywood, it ain’t going to do shit to block a heavy projectile and WILL fill you with horrible splinters. Unless you know for certain advice is trustworthy, you should be neither listening to nor spreading it.
If you see any attempt at combat or self-defense advice online, you should ask yourself:
Who is posting it?
What are their qualifications?
Where did they get this information?
Is it being explained in a clear, detailed, and easy-to-understand manner?
What are the precautions? How might this go wrong?
If you don’t have good answers to these questions, then it’s bad advice and should not be followed or spread. Sure, maybe some of it might be genuinely good advice- But it might not be, and unless you know for sure, then it’s far better to err on the side of caution than to risk getting hurt.
Be safe, be smart, and always check your sources.

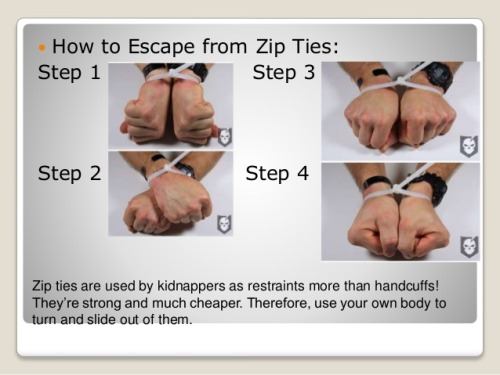


Step 1,2 3…. But, the best self defense is awareness.
The most popular feiyue shoes on: http://www.icnbuys.com/feiyue-shoes
follow back


It seems like all of the resources I can easily find online for identifying wolves vs dogs are either massive and difficult to understand without prior knowledge of the subject, or extremely bare-bones and miss a lot of key information. I tried to hit a comfortable middle-ground. (sorry if it’s a little wordy) This tutorial is made as a reference for drawing, so everything but purely visual differences between dogs and wolves have been left out. I’ve been wanting to make this for a while now, so I’m glad I finally sat down and did it! **EDIT** When it comes to the section on wolfdogs, please take it with a grain of salt. With something as complicated as genetics, they are of course, not going to be as simple as I make it seem. What features different levels of content can display, and even which percentages designate which levels of content are often hotly debated within the wolfdog community. At this point I’ve elected not to change the image set itself because: a. it’s a huge pain in the ass b. this is a tutorial for beginning artists. It’s meant to be a hugely simplified version of the topic, and I’ve stated clearly that it is NOT to be used in real-world identification. **EDIT 2** A couple people have noted that the puppies section is a little misleading. Wolf puppies will always be born a solid brown, but that brown can range from a very dark brown (appearing as black) to a llight, gray-ish brown. The important point is that wolf pups will always be a solid color with even less distinguishable markings than even adult wolves. (also this guide does not include color possibilities related to birth defects or other genetic anomalies such as albinism) ((Huge thanks to yourdogisnotawolf. who’s blog inspired me to make this and for digging up that amazing picture of the wolf/lab mix))


Simplified Anatomy by Mamoon26
-
 anarchyspider liked this · 2 weeks ago
 -
 delmarsblog liked this · 2 weeks ago
 -
 archive-of-sorts reblogged this · 2 months ago
 -
 axlclockworker reblogged this · 2 months ago
 -
axlclockworker liked this · 2 months ago
-
 crazytaizy liked this · 3 months ago
 -
 reafu liked this · 3 months ago
 -
 artking-4 reblogged this · 3 months ago
 -
 drawing-refs-yippee reblogged this · 3 months ago
 -
 sazi-skylion reblogged this · 3 months ago
 -
 art-reference-or-something reblogged this · 5 months ago
 -
 clowncatastrophe liked this · 6 months ago
 -
artking-4 reblogged this · 7 months ago
-
 wildstrike-64 liked this · 8 months ago
 -
 emmawithag liked this · 9 months ago
 -
 mjbsketchbook reblogged this · 9 months ago
 -
 alyssatsunami liked this · 10 months ago
 -
 figgdimension liked this · 10 months ago
 -
 drawinglogic reblogged this · 11 months ago
 -
 gl360 reblogged this · 11 months ago
 -
gl360 liked this · 11 months ago
-
 terrific-togekiss reblogged this · 1 year ago
 -
terrific-togekiss liked this · 1 year ago
-
 deniobehappy liked this · 1 year ago
 -
 samifeur liked this · 1 year ago
 -
 fleur2surette liked this · 1 year ago
 -
mrjay8181-blog liked this · 1 year ago
-
 ninenineburger reblogged this · 1 year ago
 -
 martianfilmz liked this · 1 year ago
 -
 naoavram liked this · 1 year ago
 -
 acleverforgery reblogged this · 1 year ago
 -
 poppypiqueerer liked this · 1 year ago
 -
 icereader12 liked this · 1 year ago
 -
 trippinfalls liked this · 1 year ago
 -
 thepandalion liked this · 1 year ago
 -
acleverforgery liked this · 1 year ago
-
 moodside-swing reblogged this · 1 year ago
 -
happykusudama reblogged this · 1 year ago
-
 yourlocalgremlin96024 liked this · 1 year ago
 -
 zairas-realm-gateway liked this · 1 year ago
 -
 handercover liked this · 1 year ago
 -
 methodicexhibit liked this · 1 year ago
 -
 deatherino reblogged this · 1 year ago
 -
deatherino liked this · 1 year ago
-
 rhuemis liked this · 1 year ago
 -
 perpetratorofentropy liked this · 1 year ago
 -
 alex134t reblogged this · 1 year ago
 -
alex134t liked this · 1 year ago