Galaxygirl1106 - Main Blog

More Posts from Galaxygirl1106 and Others
Day 5 of Disney Dreamlight Valley
Pictures under the cut! (Date taken at 11/26/2023)
Look at the two best friends having lunch together!

I also got Maui and WALL-E!


idk who else needs to hear this but stop being so scared of failure and imperfection that you don't even do anything in the first place. nothing rewarding ever comes easy. allow yourself to explore for christ's sake
Don’t look at things you know will make you angry. Don’t read the comment sections. Don’t look at the blogs of people who add dumb comments to posts to confirm that they’re dumb all the time. Don’t read old conversations you had with people you don’t talk to anymore. Go look at pictures of kittens or something instead. Protect yourself from negativity in every way you can.
Day 9 of Disney Dreamlight Valley
Pictures are under the cut! (Date taken at 12/5/2023)
Now, when I say I'm a huge Frozen fan, I'm a HUGE Frozen fan. Most of the time, if I see anything that has a Frozen design on it, I would buy it. So, when I saw you can have Elsa wear the ice dress she wore in the first film, I didn't hesitate to use my moonstones to buy the skin. 🤣


Apparently, I managed to get more than one villager in the frame, so I decided to take a picture! I don't think Anna was happy that Mother Gothel joined, because she wasn't smiling at all. I was also having McScrooge follow me around, so you can see him hiding behind Anna. 🤣

I took a picture with Olaf, and Minnie and Mickey decided to join. There's even a hidden Kristoff in the back!

I got the winter racoon from the gala star path! It's so cute!

As I was mining with Kristoff, I needed to sell some things, and he decided to play his lute to keep himself busy. 🤭

I don't know what Anna's problem was, but it looked like she was giving me the stink eye, and I thought it was hilarious.

If you squint really hard, it looked like Minnie and Mickey are holding hands and it's so cute! 🥺

Me in February and March. 🤣

Day 8 of Disney Dreamlight Valley
From what I remember, I was under the weather, so I ended up playing a lot of ddv. That means a lot of pictures!
Pictures under the cut! (Date taken at 12/3/2023)
I finally managed to rescue Minnie after so long! (And by that, any iron that Mickey wanted for the device, I gave to either Anna or Elsa because I give them whatever they wanted. 🤣🤭)

I opened the Glade of Trust biome and by doing so, I unleashed a curse that came from the huge tree. Which in turn, turned the whole valley foggy.


You can even tell from my character's face that she's like, "Heh...whoops!"

I did find a constellation that looked like a snowflake, though!

After I finished Mother Gothel's quest and the biome was returned to normal, I decided to unlock Frosted Heights!...Where I unleashed a blizzard by mistake-


After finding Olaf and helping him find his arms, buttons, and carrot nose, I was almost done with his first quest!...Until I got that glitch from before and I had to redo a bit of my progress. 😒

But I'm glad I managed to hug him! Unfortunately, I didn't think about unequipping my wings, so it ruined the moment. I even tried to quit to do it again, but it saved after the hug. Oh well. 😅


Looks like Elsa and Olaf decided to have a catch-up dinner together!

Day 2 of Disney Dreamlight Valley
I had some time to play before I had to go to my grandparents' house for Thanksgiving, and I had a blast! Pictures under the cut! (Date taken at 11/23/2023)

Every time I see this picture, it just makes me laugh. 🤣

This one too. I didn't mean to take the picture while Remy was blinking, but I was glad I did!


I originally was taking a picture with Goofy, and then Scrooge came out of nowhere and decided to get into the picture! I didn't even know you can take pictures with multiple characters!

I didn't expect to get Mirabel so early! She's in the Peaceful Meadow for now since I only had either that biome and the Plaza area by the time I took this photo, but I'll eventually move her house since it's so massive!

I just think this is so wholesome. 🥺

@wild-moss-art Hi there! I'm more than happy to share art philosophy about lineart! You are correct, I am definitely spending less time than usual on my lineart to get these requests done, but I'm still glad with the final results. :3
Here are the three stages that I take to achieve clean and polished lineart.

1) The Rough Sketch is used to figure out what the final product may look like. No fine details yet, only guidelines and basic shapes. I make sure the proportions, alignment, and composition is correct. The completed Rough Sketch gives me a good idea of what the rendered lines may look like, but is a bit too messy to follow. While I do have the option of erasing all of the guidelines and cleaning up the lines, what I usually do is lower the opacity of the rough sketch and start on a new layer.

2) The Under Drawing is done in a non-black color on top of the rough sketch. Here is where I get into finer detail with expression and anatomy. However, because we are following the messy lines of the rough sketch, the Under Drawing will still look a little unpolished. It is still very suitable for coloring if you plan to render all of the details in the painting stage, or if you are going for a more sketchy style.
In order to get sharp, detailed, finely rendered lines however, an additional stage is required.So lets lower the opacity and start a new layer using black ink this time.

3) When Rendering Lines, I carefully follow all of the details provided by the Under Drawing, which shows exactly where each line should be placed. I take my time going over each line, using the zoom tool and rotating the canvas when needed to get the best angle.

Because the final product should have a sharp and clean look, it can be very time consuming and pain staking to go over all the details. That said, I have a few tips that will help this stage go along faster while adding visual appeal to the final product.
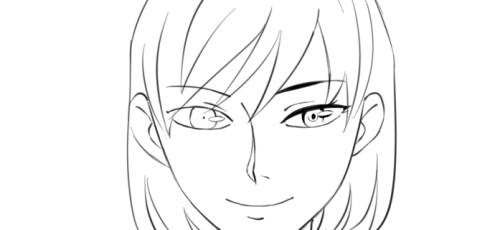
Let's use an example. Suppose you place down your lines and end up with something that looks like this.

It's not bad, but it could use a little work. The expression and level of detail that we want isn't there yet, but it's actually a good starting point. If you are new to line art or still practicing, you may wish to aim something like the drawing above so that we can take it a step further using the steps I will demonstrate in the tutorial below.
So how do we make clean lineart into something even greater?

Here is what I mean by line weight. Lines of lower weight are lighter and thinner. Lines of heavier weight are darker and thicker. Then there are modulated lines, which gradually increase or decrease in weight.
In the example drawing, all of the lines are of equal weight. We can make the line art less monotonous by increasing the weight of certain lines. For demonstration purposes, I will only make changes to the right side of the drawing so that you can see the difference.
To start, we will add another line to the upper eyelid and fill in the gap, creating a new, bolder line.


We will also build up the iris, pupil and highlight, adding details as we go. Already, it is looking more expressive.
Lets build up the nose and mouth lines while keeping the ends nice and thin.
Then, we can add weight to the face and ear lines. For the hair outline, we want to make the lines heavier closer to the roots while keeping the ends thin. Hair lines on the inside can be left alone.

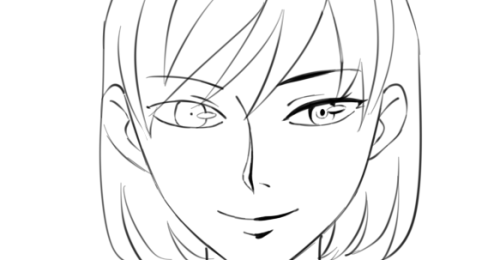
Finally, we make the outside line of the character heavier. With these small changes, we have a much more expressive, detailed, and visually appealing product.

Here I've highlighted in red where the lines remained unchanged. You will definitely want to leave some lines alone while building up others. As a rule, outlines should be thicker while the detail lines on the inside should be thinner.

If you increase the weight of all lines with the same amount, it will remain flat.

So, you should aim to have a variety of light lines, heavy lines, and modulated lines. You may wish to use the eraser to lighten up heavy lines or create modulated ones.

If you can do all the steps above, then a lot of detail and expression will be preserved even when the image is shrunk down

Hope that helps :3 Let me know if there are any other questions I can answer.
Day 4 of Disney Dreamlight Valley
Pictures under the cut! (Date taken at 11/25/2022)
I got Moana!


Frozen is my favorite modern Disney movies, so I got excited when I saw Kristoff and Anna's castle!


I managed to find Kristoff and save Donald too!


Of course, that means I get to see or hear him preform his temper tantrum whenever I walk past him. 🤣😅

@bookworm-fangirl1 here's a guide to putting up the website of your sideblog if you or anyone else needs it
my main website my rp website
go to blog settings
switch on "enable custom theme"
click "view website"
locate the icons at the top and click the paint palette icon
click "browse themes"
scroll past all the themes that cost money until you find the free ones. (or just click the dropdown on "all themes" at the top and select "free themes". i just realized you could do that.)
select a theme you like and click "use" at the top. (it doesnt have to match the colors of your blog, its only the format that matters!)
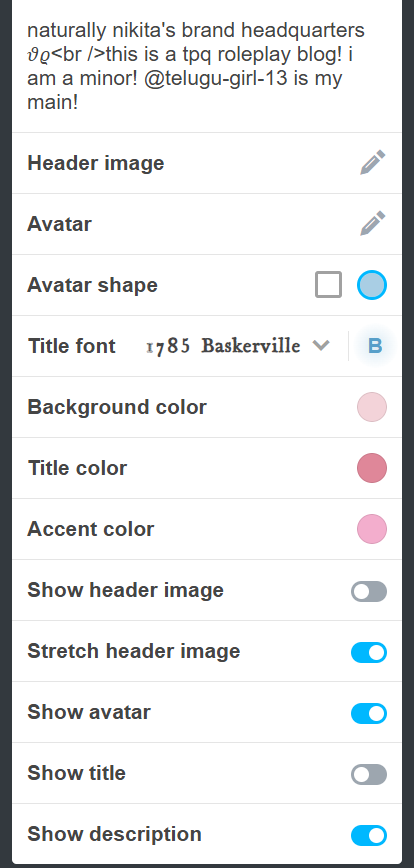
scroll down a bit and see options like "back ground color" "accent color" etc. there, you can change the colors of the theme to match your blog colors.
save and exit and stare at your nice pretty website!!
ref images below vv

(step 2 and 3)

(step 4)

(step 5)

(step 7, this is the theme i have)
(step 8)
hope this helped to anyone who needs it!
-
 unknownnnnnnnnnnnnnnnnnn liked this · 1 year ago
 -
 llrosequartz444ll reblogged this · 1 year ago
 -
llrosequartz444ll liked this · 1 year ago
-
 p1nkd0llyw0rld reblogged this · 1 year ago
 -
p1nkd0llyw0rld liked this · 1 year ago
-
 lovebtsfangirl03love liked this · 1 year ago
 -
 nightriderreese liked this · 1 year ago
 -
 pawythederg liked this · 1 year ago
 -
 pocketpiglet liked this · 1 year ago
 -
pocketpiglet reblogged this · 1 year ago
-
 ekltty liked this · 1 year ago
 -
 jyngerly liked this · 1 year ago
 -
 anna-rawrx liked this · 1 year ago
 -
 shelbylulu13 liked this · 1 year ago
 -
 dreamboatt liked this · 1 year ago
 -
 simpleblue9 reblogged this · 1 year ago
 -
simpleblue9 liked this · 1 year ago
-
 fairierealm liked this · 1 year ago
 -
 levisecretgfblog liked this · 1 year ago
 -
 victori4nflower reblogged this · 1 year ago
 -
victori4nflower liked this · 1 year ago
-
 scaredofrats liked this · 1 year ago
 -
 fr0gc4t reblogged this · 1 year ago
 -
fr0gc4t liked this · 1 year ago
-
 ichibanbaby liked this · 1 year ago
 -
 dsnyemily reblogged this · 1 year ago
 -
 sollflower reblogged this · 1 year ago
 -
 jkimawesome reblogged this · 1 year ago
 -
 nymphinia liked this · 1 year ago
 -
 kunoichi-of--destiny reblogged this · 1 year ago
 -
 yukarinuniversaltraveler liked this · 1 year ago
 -
 zimswife liked this · 1 year ago
 -
 chocosoph liked this · 1 year ago
 -
 iamfearlesss liked this · 1 year ago
 -
 the-reawoken-one reblogged this · 1 year ago
 -
 t0by-th3-r3awok3n liked this · 1 year ago
 -
 spicedhotchoco liked this · 1 year ago
 -
 fluttershyfairy reblogged this · 1 year ago
