Chopper: Nami Can You Pass Me The Salt Nami:
chopper: nami can you pass me the salt nami:

More Posts from Mackercracker and Others
“How arw you paying for photoshop” im not LMAO
i just saw a post of ‘crunchy plant inspired baby names’ and i wanted to share it with you for character names but then tumblr mobile glitched and. and i lost it. im so sorry. i have let you all down


People messing with their textbook mini DUMP


Amazing Warm Capes&Jackets
Left # Right
Left # Right
Left # Right
Left # Right
Left # Right
Good quality outerwear for low price, hurry to pick!

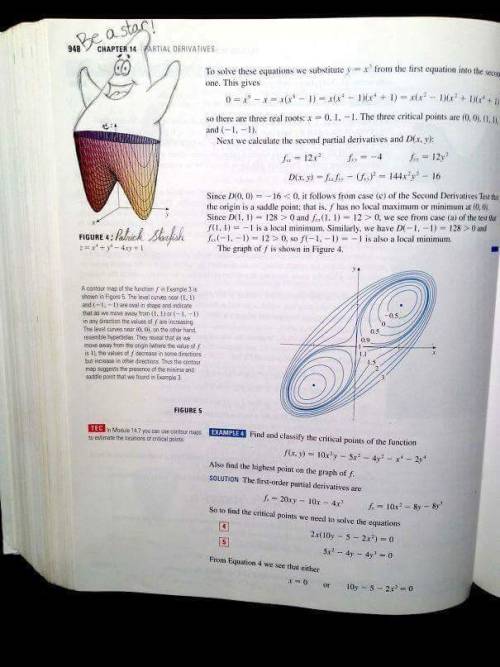
Star Hopper, a pony alien from Outerspace! She loves to gallop across the stars to visit her very best friends in Equestria, visiting them from the Neighborhood Nebula with all her other friends.
1/5

since everyone is talking about stardew valley again let me share this krobus i crocheted last year!! I took inspiration and a bit of base instructions from this tutorial but i kinda just adjusted the steps to my liking as i went
repeat after me: i am a sexy bitch and no one ruins my 2014
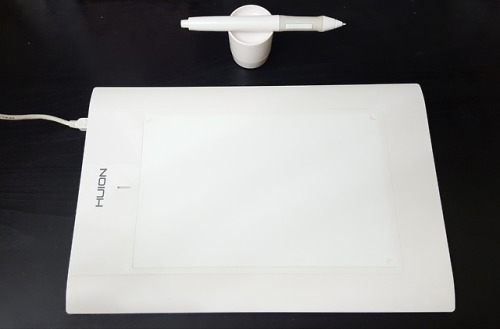
I have this tablet that I have not used much so I’d like to give it away.
Please reblog to enter this giveaway.
It ends on July the 31st.
You don’t have to be following me.
I’ll be shipping internationally.
a quick grass tutorial
I’ve never really wrote a tutorial before so apologies if this is bad
1. okay first thing I do is pick three colors, a mid, dark, and light. I like to check the colors in greyscale to make sure there’s enough contrast between each one.
I then plop down a blob of whatever my middle tone color is.

2. next, I take my dark color and just sort of randomly place it around. I try to make sure there’s a good amount of both the mid and dark tones spread throughout. I personally like to keep it kinda messy. I also have pen pressure on for both brush size and opacity, so I can have some blending action going on.

3. for the next step I do the exact same thing as before, except with the light color.

4. aight this is where we start adding details. see how you just have a bunch of colors and edges where two colors meet? use the eyedropper and go to an area where two colors meet, eyedrop a color, and then use that color to draw in your grass blades. I do this at every point where colors meet. should note I personally like to use a square brush, but you can really just use anything.

5. you can technically stop at the last step if you’re going for a more simple look, but to add more details I go to the “empty” areas of solid color and just draw in random strokes using a color nearby. it’s just a way to fill up the empty space.

6. basically more of the same idea of eyedropping and drawing. for more variety so things look interesting, I like to add random plant shapes.

7. and so the grass doesn’t look too plain, I add random dots of color and pretend it’s flowers and stuff.

and there you have it, this is how I approach drawing grass.
-
 slimecola reblogged this · 3 days ago
 -
 raphayella reblogged this · 3 days ago
 -
 pishposhbagosh reblogged this · 3 days ago
 -
 goldwaltz reblogged this · 3 days ago
 -
goldwaltz liked this · 3 days ago
-
 bitesu-bitesu-bitesu reblogged this · 3 days ago
 -
bitesu-bitesu-bitesu liked this · 3 days ago
-
 whitebookposts liked this · 3 days ago
 -
 dogedepan reblogged this · 3 days ago
 -
 rosemirmir liked this · 3 days ago
 -
 cryptcombat reblogged this · 3 days ago
 -
 the-evil-pizza reblogged this · 3 days ago
 -
 lewdonarrative-dissonance reblogged this · 3 days ago
 -
 akinari-kashihara reblogged this · 4 days ago
 -
 galactic-bi-cat liked this · 4 days ago
 -
 redchesshire reblogged this · 4 days ago
 -
 cottoncandiescupcakes reblogged this · 4 days ago
 -
 ishtarssideblog reblogged this · 4 days ago
 -
 redditexchangestudent liked this · 4 days ago
 -
 bob-time liked this · 4 days ago
 -
 gord-sky reblogged this · 4 days ago
 -
 tomothytimbo reblogged this · 4 days ago
 -
tomothytimbo liked this · 4 days ago
-
 hydratus7 liked this · 4 days ago
 -
 myutoeve liked this · 4 days ago
 -
 vintorez1 reblogged this · 4 days ago
 -
vintorez1 liked this · 4 days ago
-
 profsplosion reblogged this · 4 days ago
 -
profsplosion liked this · 4 days ago
-
 smuglysasha liked this · 4 days ago
 -
 ssbrokeboiss liked this · 4 days ago
 -
 santanael-chan reblogged this · 4 days ago
 -
 takuwaku reblogged this · 4 days ago
 -
takuwaku liked this · 4 days ago
-
 aqueousablution liked this · 4 days ago
 -
 ihatesnapchat reblogged this · 4 days ago
 -
 srdzfdxtfyuf liked this · 4 days ago
 -
 luckyhobbitsfoot reblogged this · 4 days ago
 -
 and-yet-it-is liked this · 4 days ago
 -
 littlecranelady reblogged this · 4 days ago
 -
 lamb200345567 reblogged this · 4 days ago
 -
 illharg-the-rave-boar liked this · 4 days ago
 -
 thanatologyy liked this · 4 days ago
 -
 loyal-to-the-end liked this · 4 days ago
 -
 jarateblog liked this · 4 days ago
 -
 elise-mopie reblogged this · 4 days ago
 -
 itsbecomesentient liked this · 4 days ago
 -
 chocochococoffee reblogged this · 4 days ago
 -
 doggleashh liked this · 4 days ago
