Lovely Art By A Very Talented Artist!
Lovely art by a very talented artist!


some covers i did for the Over The Garden Wall comics from across the past year
More Posts from Moola-of-hula and Others

“I wondered what that was like, to hold someone’s hand. I bet you could sometimes find all of the mysteries of the universe in someone’s hand.” — Benjamin Alire Sáenz, Aristotle and Dante Discover the Secrets of the Universe
tsorin answered your question “Doodle night”
Arslan and Gieve

The last one for yesterday’s Doodle Night (that actually went on until morning). I had an urgent business to attend after doing chibi 707 and after that I basically passed out lol. Sorry for the lateness.
And thank you everyone who gave suggestions! With this, Doodle Night ends.
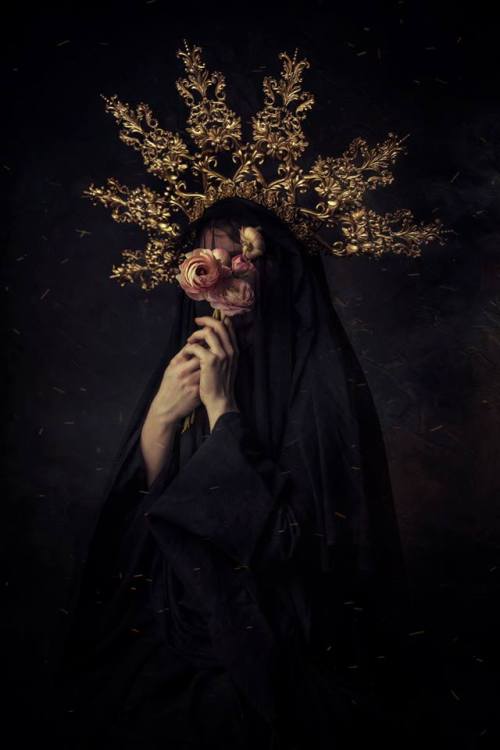
Discreet yet baroque: I love the mixed mood of this capture by @studio.sheridansart showcasing wearable art by Pioro Blue… . . . #beautifulbizarremagazine #fineartphotography #photography #wearableart #headdress #laurasheridan #pioroblue
Need to make

8-foot giant squid pillow.
You’ll need:
2 yards of felt
1 yard of patterned fabric (I suggest a polka dot-type pattern so it looks like suction cups)
1 medium piece of black felt, 1 medium piece of white felt (for the eyes)
white thread, black thread and thread of the same color as the felt you’re using
pins
about 5 lbs. of stuffing
a couple big sheets of paper to draw your pattern
First, you need to draw out your patterns. Here’s a basic template to get you started, although most of the measurements are reasonably fudgeable. If in the likely event you don’t have any four-foot-long pieces of paper lying around, just tape a few pieces together.

Once you’ve drawn out your eight patterns, it’s time to cut the fabric. Pin the pattern to the fabric, laid flat, and cut out the following, leaving a half an inch or so of extra fabric around the edge of the pattern:
FOR THE ARMS: 8 felt and 8 fabric cutouts of piece 1
FOR THE, UH, LONGER ARMS: 2 felt and 2 fabric cutouts of piece 2
FOR THE BODY: 2 felt cutouts of piece 3
FOR THE FIN: 4 felt cutouts of piece 4
FOR THE HEAD: 1 felt cutouts of piece 6
FOR THE EYES: 2 white felt cutouts of piece 7 and 2 black felt cutouts of piece 8
So now you’ve got all your pieces ready, it’s time to start sewing them together. I did mine by hand because my sewing machine is busted and I get a kind of Zen buzz from sewing by hand, but if you have a non-busted one I recommend that you use it as it will be MUCH EASIER. You’re going to be sewing everything with the nice side of the fabric facing in, then turning it inside out to stuff it.
THE ARMS: (To make a quilted pattern that looks like suckers, see this other post). Pin together one patterned fabric piece 1 and one felt piece 1 (with the nice sides facing the inside). Sew down around the U-shape and back up, leaving the top open. Then turn the arm inside out, stuff it (it’s easiest to do both of these things if you sort of scrunch it up like you’re trying to put on a pair of tights, excuse the non-dude-friendly reference) and sew the top closed. Do the same for the other seven arms and rejoice in the fact that this is the most tedious part. Same deal with the two long arms, they’re just harder to stuff.
THE FINS: Pin together two of your piece 4s and sew together the curvy outer edge. Turn the piece inside out, so the seam you just sewed is on the inside, and start sewing up the other side, stuffing gradually as you go along. You should end up with a triangle-ish puffy thing. Repeat for the other two piece 4s.

THE BODY: Put down one piece 3, then place the two fins you have down with the point up and the curvy side pointing in, then make a sandwich by putting the other piece 3 down on top. Pin it all together and sew around the edges with the two fins still inside, as shown. Turn it inside out and move on to…
THE HEAD: So take piece 6 and the ten arms you’ve already done. Lay the arms, fabric side facing you, out with the arms’ top seams in a line half an inch from the top of piece 6. The order should be arm arm arm arm BIG ARM arm arm arm arm BIG ARM. The legs should be almost entirely covering piece 6. Pin them in place and sew a straight line through the individual legs seams to attach the legs to piece 6.
When you pick up the other side of piece 6, you now have something resembling a really weird untied hula skirt. Sew together the two 9-inch ends of piece 6 with the fabric side of the arms on the outside, and keep it inside out for the moment.
PUTTING IT ALL TOGETHER: Fit the open end of the body through the arms (still fabric side facing out) and pull the edge all the way through the felt cylinder so it’s even with the edge that DOESN’T have arms attached to it. Sew around the diameters of the head cylinder and the body cylinder to attach them, then pull the legs down over the head and you’re almost done!
Stuff the body, then seal it off by sewing piece 5 over the open end (even if you do have a functional sewing machine, you’ll probably have to do this part by hand).
THE EYES: Sew the black circles on the white circles and whipstitch the eyes onto the head. You do this last because you can’t tell where they’re going to end up on the end product if you put them on before stuffing the body.

Drawing reference
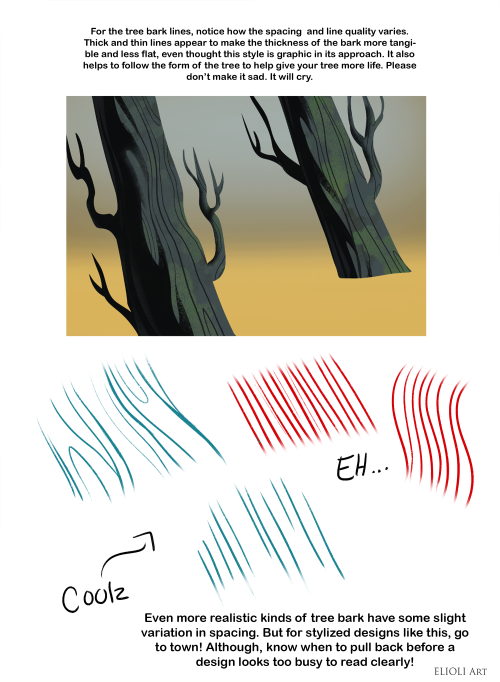
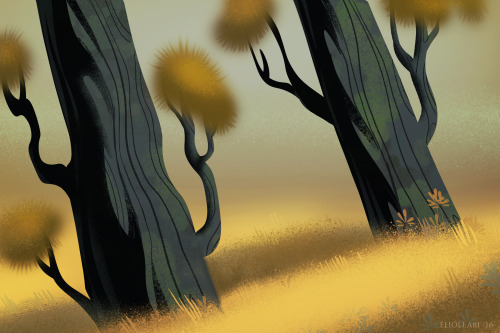
Remember, there’s not one way to draw things! You don’t have to draw it exactly like this , but you can apply certain things from this. This is just a little process we hope that might be useful to others out there! More to come, y’all!
Edit: Something else to keep in mind ! It’s something we see from other artists who put tutorials online and the result after they post it - When coming across a tutorial , taking the technique or the simplification of a process and carrying that over to your own way of drawing things is a lot more beneficial than copying the exact composition/subject matter/color pallet . If it’s for practice , that’s fine! But don’t let a tutorial direct ( or discourage) you in a way that isn’t your own unique way of drawing . If you’re in search of finding a style of your own , then finding helpful tutorials is a great way to expand your knowledge of techniques rather than doing exact copies of the actual art itself. :) And just to add , we’re big fans of Evyind Earle! His technique of graphic simplification is something we’re learning ourselves as we try to apply the photoshop layers in a similar , simpler fashion. He’s a good artist to learn from , so hopefully this tutorial was helpful in deconstructing admirable aspects of some awesome work from different artists we enjoy! And if you did this tutorial , please let us know. We’d love to see what you did !

Since Sunday tours of James Talbot’s home, Casa Neverlandia in Austin, Texas, are currently not available b/c of the Pandemic, we can take a virtual tour.


James is an artist who built this home, himself. I’ve heard. It’s still a work in progress. This is the living room looking toward the front of the home.

Simply, the Red Room.

James taking tourists through. The house is also on the Weird Homes Tour in Texas, but you can’t just show up, b/c it’s his private residence.

Kitchen & breakfast nook. He uses a gray water system and people are surprised when they hear that it has no air conditioning.

The Record Room.

The Photo Editing Room.

2nd story area.


The Master Bedroom.

The bathroom has a toilet, but James has been using a compost toilet in the back for years. This is a picture of it in progress.

3rd story area.

Sewing room.

Tile making studio.

Bead making studio.

General construction shop.

The Moon Tower in the backyard.
https://www.russmoorephotography.com/Neverlandia/i-sN85kHK/


LMAO

Weird Circus by Sergii Golotovskiy
-
 cottonclowninc liked this · 2 weeks ago
 -
 savinguniverse liked this · 3 weeks ago
 -
 mysticalanimallover liked this · 1 month ago
 -
 mattciav liked this · 2 months ago
 -
 bareminimumanarchy liked this · 3 months ago
 -
 ghostlypeachranchbear liked this · 3 months ago
 -
 ultramori liked this · 4 months ago
 -
 dinkypoo liked this · 4 months ago
 -
 spadeso liked this · 4 months ago
 -
 warrenpeace liked this · 5 months ago
 -
 vintagedaisywitch liked this · 5 months ago
 -
 hrrraandm reblogged this · 6 months ago
 -
hrrraandm liked this · 6 months ago
-
 kdreader02 reblogged this · 6 months ago
 -
 apricotsnow liked this · 6 months ago
 -
 schniggles liked this · 7 months ago
 -
 xtinctart liked this · 7 months ago
 -
 enunmundoperdido liked this · 7 months ago
 -
 melonkneesimblr liked this · 7 months ago
 -
 aequoreas liked this · 7 months ago
 -
 a-cosmonaut-or-an-astronaut liked this · 8 months ago
 -
 cosmos-moth liked this · 8 months ago
 -
 lovedpatchwork reblogged this · 8 months ago
 -
 ewrg343ert liked this · 9 months ago
 -
 inapoemunlimited liked this · 9 months ago
 -
 dopscratch liked this · 9 months ago
 -
 unearthlycat reblogged this · 9 months ago
 -
 firedjinni liked this · 10 months ago
 -
 archiveoffavstuff reblogged this · 1 year ago
 -
 mistkissedmoon liked this · 1 year ago
 -
 my14yoblogew liked this · 1 year ago
 -
 eghcrimpybenispalls liked this · 1 year ago
 -
 kmoo4lyfe liked this · 1 year ago
 -
 spring-dust-blog liked this · 1 year ago
 -
 mnemonomancy reblogged this · 1 year ago
 -
 thescouring liked this · 1 year ago
 -
 gentlenaa liked this · 1 year ago
 -
 sirstarblaze liked this · 1 year ago
 -
 astridlumina liked this · 1 year ago
 -
 soultroll729 reblogged this · 1 year ago
 -
soultroll729 liked this · 1 year ago
-
 viridianchronicle reblogged this · 1 year ago
 -
 cookiebirdtui liked this · 1 year ago
 -
 electronicalrevanche liked this · 1 year ago
 -
 todayisbrightlywoven reblogged this · 1 year ago
 -
 agatha1905 liked this · 1 year ago
 -
 getdownlau liked this · 1 year ago
 -
 cassrielghost reblogged this · 1 year ago
 -
 zodgory liked this · 1 year ago
 -
 keeperofseeds reblogged this · 1 year ago
