For My Followers With (any Sort Of) Triggers–
For my followers with (any sort of) triggers–
Tumblr has allowed filtered tags for a while, but now they offer filtered post content too.
So you can filter out posts with certain words or phrases in the text even if no one tagged it, which is fantastic. I started using it yesterday and it’s already helped me avoid 5 different posts that wouldn’t have been caught by the filtered tags.
Go to “Account,” then “Settings,” and it will be in the Filtering section right under “Filtered Tags”

More Posts from Quantumjames and Others
I really appreciate the eyes on this little guy.
My coworkers: what you'd do with your long weekend?
Me:


FURBY HAIR DYEING TUTORIAL
FURBY FUR DYEING TUTORIAL:
Hi everyone! Welcome to my Furby Tutorial! In this specific tutorial we will be dyeing the hair on the Furby’s head and tail (this can also work for maned Furbys). EDIT: THIS TUTORIAL ALSO WORKS ON BODY FUR!!!! Please read the entire tutorial before dyeing your Furby with this method! Thank you!
BACKGROUND KNOWLEDGE THAT CAN HELP YOU: Furbys have synthetic fur. Synthetic = PLASTIC. As you all know, most commercial dyes won’t work on a Furby very well. That is why we are going to use ACRYLIC PAINT to color our Furby! Keep reading!(also plz be aware that Nomi’s hair was dyed prior to this tutorial)

MATERIALS YOU WILL NEED: 1.) A glass of water 2.) A small vessel to mix your paint wash in 3.) Acrylic paint color of your choice (we are using metallic green for Nomi) 4.) A paintbrush (any medium sized flat or round brush will do) 5.) A toothbrush (CLEAN, preferably a clean used toothbrush) 6.) A Furby (thank you Nomi, for being our model and willing participant!) 7.) Paper towels (not pictured but you will need them.) 8.) Hair Dryer (optional but it can be very helpful; also not pictured)

Step One: Wash your hands! This is a great way to start a new art project!

Step Two: Create your wash/“dye”: this part looks daunting but is actually QUITE easy! We are going to make what’s called a “paint wash”- some of you artists may already be familiar with what this is! It’s basically thinned-out paint. What you do is put a tiny bit of paint into your empty vessel (I used about the size of a dime) and add water to it until it becomes a mixture that I slightly more WATER than paint. For me, that was about a dime-sized paint blob with about 3-4 tablespoons of water. You want it to be RUNNY, not thick.


Step Three: Once you have made your wash, it’s time to get that “dye” on your Furb! Take your toothbrush and dampen it with the wash. Tap your wash-soaked toothbrush out on a paper towel to remove excess wash. This step is important because you want your toothbrush WET with paint but not SOAKING wet. It’s best to start out first with a tiny dab of wash to play around with and then work your way up to a more saturated toothbrush.


Step Four: comb your wash through your Furby’s hair. It’s best to have your Furby ready to receive the wash, which means you should part the hair you wish to dye AWAY from the fur you do not wish to dye, so that there is minimal pigment transfer to the fur you do not wish to dye. (Tl;dr-part ya Furby’s hair, y’all)

NOTE: See this hair clumping here? I did this on purpose to show what can happen when you have TOO MUCH wash on your toothbrush. You don’t want this because it can take longer to dry and give your Furby’s hair a matted look. (I mean, if you like this look by all means, go for it! It’s your Furby, my dudes!) If this happens and you don’t like it, just blot with a paper towel, tap off your toothbrush a bit, and continue combing the wash through the hair again!


Step Five: YOUR ROOTS ARE SHOWING?!

This is any easy way to cover roots! Just take your paintbrush and load it with a TINY bit of wash, then dab the wash into the hair roots and continue to comb through with the toothbrush! Ta-daaah!


NOTE: Keep a paper towel nearby cause YOUR HANDS GONNA GET PAINT ON ‘EM.

Step Six: Continue adding the wash into the hair and combing it through until you like what you see!

Step Seven (optional): Use a hair dryer to dry your Furby’s hair!

This is for peeps who don’t want to wait for the hair to fully dry before they handle their newly-dyed Furb! I also believe that this can help seal the pigment in better, as it’s actually melting the pigment of the paint into the shaft of the synthetic hairs. If you don’t want to use this method, simply put your Furby in a place where they will be undisturbed until they are dry! (Please allow at least ONE HOUR for your Furby to air-dry if you don’t use a hair dryer). While you dry, continue to brush the hair with the toothbrush to get rid of any remaining clumps!
FINAL STEP: admire your work! Well done!!

I hope this helps you guys! You can also use washes to dye eyelashes!!! I’ll be making a tutorial on how I do mine next! Thank you for your time!
I’m off to the woods ! It’s been too long, I need to sit in a creek and forget some things.
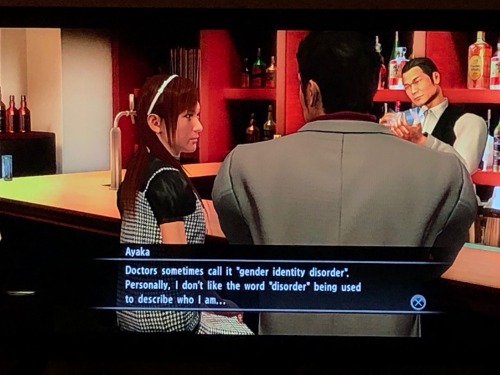
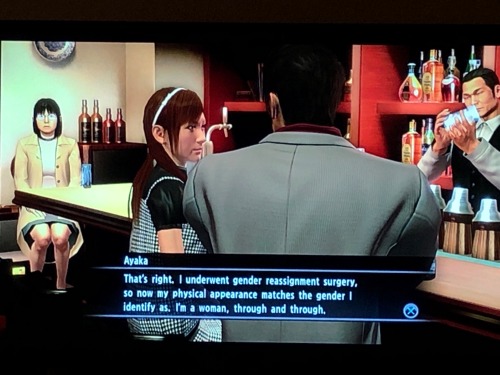
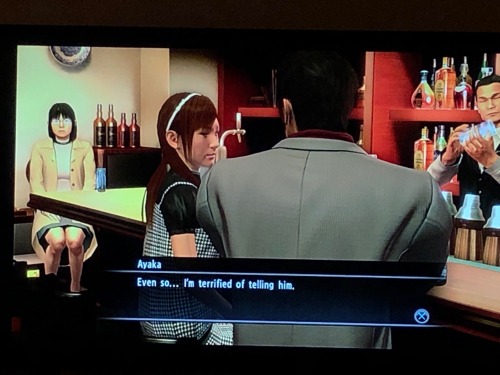
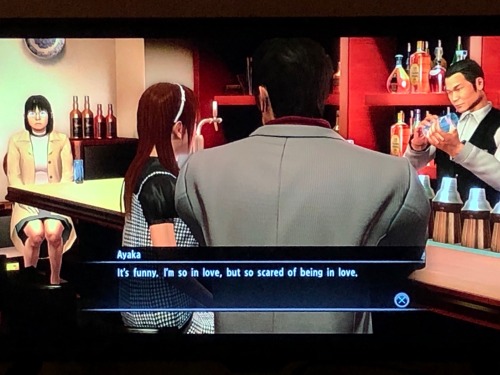
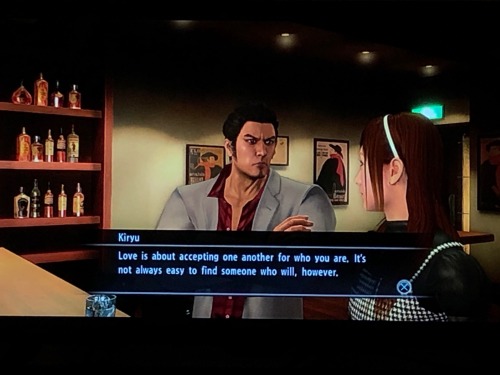
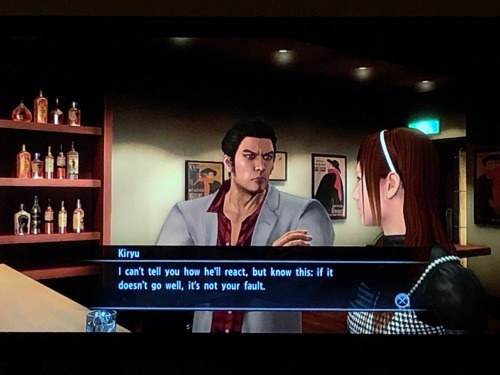
It's from the Yakuza 3 remaster (it was cut from the initial release). It's on PSN right now and a physical copy of the game (bundled with 4 and 5) will be available next year.


SEGA DOES WHAT NINTENDON'T

Somebody got new hands!
Taka commemorates this moment with the traditional "Double Flipping of the Bird." They shall soon be blushed to match his complexion.
I never even considered a Dollfie Dream type doll until I saw that beautiful creature. Android BJD here I come!


Danny Choo’s Smart Doll looks incredible! I can’t wait until the automatic version comes out.
Image by BJDConfessions
Now that Miku is becoming more mainstream
It is important that anybody new to vocaloid or even veteran fans understand something VERY important:
Miku is an instrument, a tool, a program. A song cannot be "by" Hatsune Miku. By saying this you are refusing to credit the talented producer who made that song. Miku and any other vocaloid singer is a guest singer technically. If you're going to formally address a song, format it like this:
Rolling Girl by Wowaka ft. Hatsune Miku.
Specifically using Rolling Girl as an example because the producer, Wowaka, stopped making music with vocaloid because he wasn't being credited for his work. Nobody recognized his music as HIS music. It was all "Miku's music".
So please, if you plan on saying who the song is by, do not say the song was by Miku or Rin or whoever is singing, take the few seconds it takes to look up the song's producer and give them the credit they deserve.

-
 envyissin liked this · 4 months ago
 -
 mewo-ita liked this · 10 months ago
 -
 vulpix-alola reblogged this · 1 year ago
 -
vulpix-alola liked this · 1 year ago
-
 blackholesfilm liked this · 1 year ago
 -
 anenlightenedwriter liked this · 2 years ago
 -
 ignore-meh liked this · 2 years ago
 -
ignore-meh reblogged this · 2 years ago
-
 sink-the-ship liked this · 2 years ago
 -
 sunflowersinsummers reblogged this · 2 years ago
 -
sunflowersinsummers liked this · 2 years ago
-
 j4y-jay liked this · 2 years ago
 -
 wits-and-wrongs liked this · 2 years ago
 -
 lavendervoiden liked this · 2 years ago
 -
 lilyrockerlove reblogged this · 2 years ago
 -
lilyrockerlove liked this · 2 years ago
-
 ziptiesnfries reblogged this · 2 years ago
 -
 gonefanposts reblogged this · 2 years ago
 -
 inkdragon42 liked this · 2 years ago
 -
 annoyinghoe liked this · 2 years ago
 -
 doeeyeddyke reblogged this · 2 years ago
 -
doeeyeddyke liked this · 2 years ago
-
 insanitori liked this · 2 years ago
 -
 illburnyouontheceiling reblogged this · 2 years ago
 -
 sad-broken-soul liked this · 2 years ago
 -
 madmadder reblogged this · 2 years ago
 -
 thatoneblanket liked this · 2 years ago
 -
 littletartine reblogged this · 2 years ago
 -
littletartine liked this · 2 years ago
-
 muumimafia reblogged this · 2 years ago
 -
 elizalabeth reblogged this · 2 years ago
 -
elizalabeth liked this · 2 years ago
-
 groundbreakingdot872 liked this · 2 years ago
 -
 unorganisedalienrubbish liked this · 2 years ago
 -
 idealism-sits-in-prison reblogged this · 2 years ago
 -
 purple-and-afraid reblogged this · 2 years ago
 -
 sealsarebigfatbabies liked this · 2 years ago
 -
 1uckynumb3rsev3n reblogged this · 2 years ago
 -
1uckynumb3rsev3n liked this · 2 years ago
-
 susanontherocks reblogged this · 2 years ago
 -
 geminimoon14 reblogged this · 2 years ago
 -
geminimoon14 liked this · 2 years ago