Survival Tips For Exam Week
Survival tips for exam week
TO SURVIVE EXAMS LIKE A BOSS
1. Get your electronics out of the way. I’m a huge advocator of technology in the classroom. But no so when you’re in your bedroom. I remember I had a chemistry exam the next day and I slept at midnight reading a novel. Even though I knew the material and the answers, I couldn’t finish the test on time because I was slower than usual and couldn’t concentrate. SLEEP IS IMPORTANT. So get your phone, tablet, laptop all out and just sleep. Learn from my mistakes people.
2. Take a day off and meal prep the shit out of your week. When I’m in exam week, I forget to eat. My bodily needs go on vacation to a dark corner of my mind and I simply forget about them until I’m at the verge of collapse from hunger and dehydration. What I did last year to avoid this is to have healthy food at hand all times by meal prepping inexpensive, light and nutritious snacks that can survive in the fridge.
3. Have your professor’s email or phone number. We are not perfect so from time to time, we are bound to cram everything in a day. In these days, it’s very beneficial to have your professor’s contact info to ask relevant questions. Be bold and ask right away if they have past tests so you can train with them in those lasts couple of hours. When cramming, it’s best to practice instead of reading. Your professor can make a huge difference in this game.
4. Make an efficient summary. If your professor isn’t willing to help (I see you Law Prof), then I recommend you to take notes using the chapter outline. You know that one page where they outline the chapters paragraph and give it numbers? It’s been extremely useful to me. Why? Because the paragraphs are usually named after the main ideas of the subject. Let me give you an example. One of my introductory classes was Marketing. The first chapter is named Wat is Marketing? The first paragraph is The definition of marketing, the second The marketing concept and the last one The role of marketing in a corporation. So knowing the answer to these 3 paragraphs should give you a strong idea of what marketing really is. A 20-page chapter was easily summarized in only 3 paragraphs. This saves me lots of time and I’m able to identify the most important info right away.
5. Organise a study session with your classmates. I have saved and have been saved by these. Just gather around 4-6 people from your class. Then make sure each one of you has mastered a part of the study material. Then teach what you’ve learned from the others. At the same time, you get to learn too without doing a lot of research.
6. Search it up. If you understand something, the esier it is for you to remember. So if you don’t understand the explanation the professor gave you, ditch him and go look on the internet for a video or article that explains it easier (or slower) for you.
7. Don’t cram it at the last minute. Yes, don’t do it. It’s likely not going to stay in your mind and it will only give you more stress. I would rec to stop learning all together some 5 hours before the exam and take a nap instead so you feel more fresh and relaxed.
8. Once you get your test, write all formulas, mnemonics and models. I like to do this before even reading the first question. This way I get all the tools I need out of my mind right away. Therefore I’ll have more space in my mind to think about the actual questions instead of thinking “what was the formula for that again?” and enter in panic.
More Posts from Queen-strawberry and Others
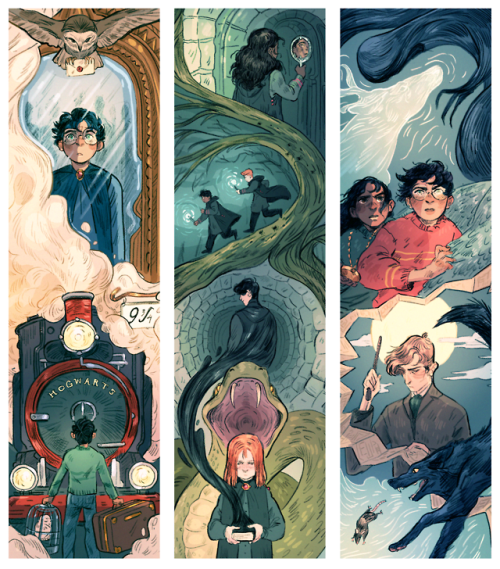
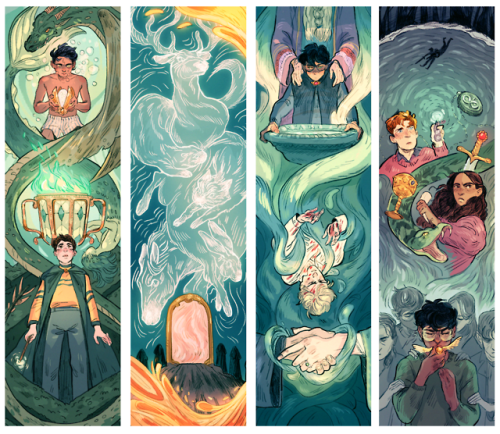
a set if hp bookmarks i’ll have for melbourne supanova next weekend! one (1) boy for each book
“All it takes is a beautiful fake smile to hide an injured soul and they will never notice how broken you really are."
- Robin Williams


Energy Management
A human-based organization method
click on images for better resolution; images also available here (link to google drive)
Other posts that may be of interest:
Getting stuff done: How to deal with a lack of motivation
Flexible time-blocking: A more breathable way to get things done
The ABCDE Method
What a legend


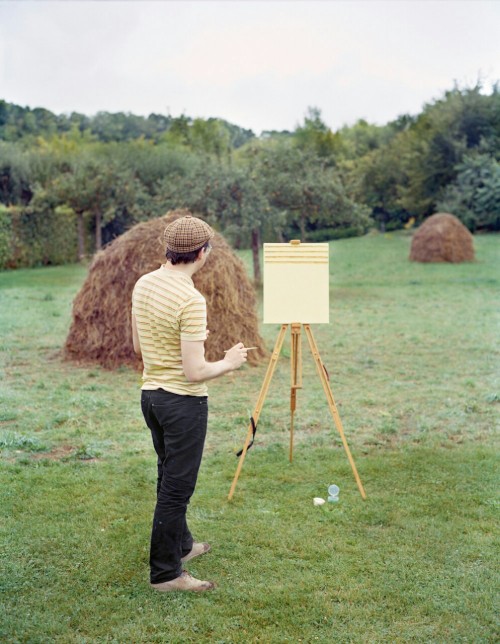

Artist Hank Schmidt travels to scenic locations only to paint the pattern on his own shirt.
difference between a report & a research paper
sources used: my history teacher & “Tips for Writing Analytic Research Papers.” (1998): n. pag. Harvard Kennedy School Shorenstein Center, 19 May 2009. Web. 29 May 2015.
• report
- organized regurgitation of facts gathered from research
- thesis statement is a general statement summarizing what your whole report is about
- thesis statement is NOT opinion or argument to be proven
- topic sentences of body paragraphs summarize what facts you’ll describe in that paragraph
- research + writing facts = report
• research paper
- organized analysis of facts gathered from research
- thesis statement identifies the overall argument or academic opinion that you will prove in your paper
- thesis statement must be (academic) opinion and argumentation
- research + writing facts + analysis = research paper
• so what is analysis? how do i do it?
analysis is basically breaking apart the facts you have found in your research and demonstrating critical thinking about those facts. make your analysis explicit - your reader should not have to infer or guess what your analysis is. it looks like:
• dissecting or breaking down larger events or concepts to explore the smaller parts [“dr. king’s plan comprised of three specific political and social actions” - then the author explains the parts]
• cause/effect [author describes situation that outrages dr. king - “this outrage motivated dr. king to deliver his speech”]
• identification or explanation of significance [“this speech is iconic in american history because…”]
• comparison of ideas from different sources, or differing opinions; examination of counterarguments [“critics of dr. king said…” “historians disagree…” “others have said…”]
• connection to broader ideas and themes in the relevant discipline [“king’s actions exemplify the overall trend in social activism towards nonviolent action to achieve change”]
• connection to experiences, examples in other geographic areas, time periods or disciplines [“this behavior is explained by psychologists as…” “the american civil rights movement was inspired by actions in…” “another leader who inspired people in similar ways was nelson mandela in south africa”]
I DON’T CARE HOW MANY TIMES I REBLOG THIS.


They say that a clear space makes for a clear mind. This post will provide you with organization advice for your pencil case, backpack, desk, papers, and computer to help you function at your best!
PENCIL CASE
Don’t go overboard with the stationery. From personal experience, these are the absolute essentials you need to bring in your pencil case/pouch on a daily basis:
2 black or blue pens
2 pencils
lead refills (for mechanical pencils)
sharpener (for wooden pencils)
try to get a sharpener with a locking top so the shavings won’t spill out!
eraser
2 highlighters or colored pens
calculator (if your class requires one)
And these are some non-essential but useful items:
black Sharpie
correction tape
colored pencils (useful for drawing diagrams)
mini stapler
6-inch ruler
sticky notes and page flags
if your writing utensils are expensive and you don’t want them getting stolen, maybe bring an extra cheap pencil you feel comfortable lending out
Group writing utensils together with rubber bands. Save yourself the hassle of rummaging through your entire pouch to find one particular pen. Make groups of all your similar writing utensils (ex: pencils, gel pens, felt-tip pens, highlighters, colored pencils), then tie each group together with a rubber band for easy access.
BACKPACK
Get an actual backpack. If you’re carrying more than one or two books, please please please get a normal, two-strapped backpack (and make sure to wear both straps!). Tote bags, purses, and messenger bags are terrible for your shoulders and spine.
Place the heaviest items closest to your back. Textbooks and binders should go in the largest pocket, while your cell phone, novel, pencil case, etc. should go in the front. This helps distribute the weight better and prevent back strain.
Alternate the directions of your binders to fit more. Don’t put all of your binders facing the same direction like this. Instead, alternate the direction like this– put the first binder in with the rings on the left, then flip the second binder so the rings are on the right, and so on. This also works for spiral notebooks to prevent the spirals from getting caught with one another!
I recommend keeping the following things in your bag:
pencil case
obviously, books, notes, homework, binders, and anything else required for class
planner
phone + earbuds
house keys
water bottle
granola bar and/or dollar bills to buy snacks from the vending machine
hair ties
lip balm
gum or breath mints
tissues
feminine hygiene products
travel-sized hand sanitizer/wipes
DESK
Make “to-do” and “done” piles. Each evening when I get home, I take out all the work I have to get done and put it in a “to-do” pile. This pile is usually a mixture of textbooks I have to take notes from, worksheets I have to complete, flashcards I have to review, and books I have to annotate. As I complete my work over the course of the night, I move the finished items from the “to-do” pile into a separate “done” pile. At the end of the night, I take everything out of the “done” pile and pack it into my backpack to turn in the next day. This is by no means necessary to stay organized, but I’ve found that keeping a physical representation of both what needs to be done and how much I’ve accomplished is extremely motivating.
Take advantage of vertical space. If your desktop space is limited, make use of magazine holders, caddies, and stacking letter trays to hold more papers while taking up minimal surface area.
Use cable ties and labels to manage your electrical cords. Winding up excess cord, tying it with a cable tie, and labeling it with tape will keep your desk neat, keep your mischievous pets safe, and prevent you from tripping.
Book stands are your friends. Book stands can prop up your giant textbooks and save you desktop space. They also make reading for long periods of time more comfortable, since you can look straight ahead instead of down.
Keep a trash can and recycling bin within easy reach. This is a great way to prevent paper clutter. You won’t be tempted to leave junk papers lying around if there’s a bin right next to you.
Do a seasonal deep-cleaning. Every few months or so, take everything off of your desk and do a complete overhaul. Dust off the eraser shavings from the corners. Wipe down the surface with an antibacterial wipe. Go through all of your stuff before putting it back– if you find papers you don’t need anymore or pens that have dried up, don’t put them back.
PAPERS
I personally use a 1-inch binder for every subject. I like binders because they’re durable, easily dividable/rearrangeable, and they keep papers from falling out. Separating each subject makes it super easy to grab the work I need for just one class– for example, if I want to study math at the library, I can take that one binder and go, as opposed to lugging the papers for three other subjects along with me.
Within each binder, I keep 5 dividers. The labels on the dividers vary for each class but generally they include notes, handouts, graded work, and reference materials.
If you’re looking for lighter binder alternatives: consider 2-pocket folders, accordion folders, or binder/notebook hybrids.
Keep your papers in good shape. If you’re using binders, consider splurging on either reinforced loose-leaf paper or adhesive reinforcements so you don’t end up with a bunch of papers dangling halfway out of your binder. If you have a tendency to accidentally tear your papers or spill coffee on them, you may want to scan everything into your computer as soon as you get it so you can always print out a second copy if the first one gets destroyed.
Keep a “general” folder. Get a pocket folder and fill it with extra lined, graph, and blank paper. You can also keep other general things like your schedule, a map of your school, your report card, and/or school announcements in here. Take this folder with you to every class.
Organize weekly. No matter how well-oiled your system is, you’re inevitably going to end up shoving some papers into a random pocket. Once a week, take some time to rearrange things, put papers back where they belong, and hole-punch anything your teacher didn’t.
Transfer regularly. After we finish the first unit, I always ask my teacher if I can take out my old papers and keep them at home. The vast majority of the time, the answer is yes. I transfer all my papers from completed units from my 1-inch binder to large 3-inch binders that I keep on my bookshelf. I label each topic within them with page flags for quick reference. This way I have all the resources to study for midterms/finals, but I don’t have to carry them to school every day.
Purge yearly. At the end of the school year, I recycle all of my papers. The exception is papers for subjects I’m continuing with the next year. For example, if I’m taking US History II next year, I’ll save my US History I papers because there’s a good chance I’ll need to refer to them later. If you’re not sure whether you’ll take a subject again, I’d recommend keeping the papers in the big binder just in case.
COMPUTER
Create a folder for each class. All of your files for one class should go into the same folder. If you have a big project that involves several files, you can make a project folder within a class. At the end of the school year, you may want to combine all of your class folders into a giant grade-level folder so your old files don’t clutter up your desktop.
Save your files properly. When you’re in a rush, it’s tempting to save your essay as “asdjksdfj” to the desktop, but your future self will thank you if you take ten extra seconds to give it a sensible name and save it into a class folder.
Use separate desktops for separate contexts. I have three different desktops on my laptop: school (for academic work), extracurriculars (for managing this blog and the other clubs/activities I’m involved in), and fun (for Netflix and online shopping). Keeping these three aspects of my life on separate desktops allows me to draw the line between work and play. I won’t get distracted by having Tumblr open next to my history project, and I can focus better on the task at hand when I “switch off” from one desktop and go to another. Learn how to set up separate desktops on your computer here: {Windows//Mac}.
Tag your documents. Create a tagging system to make your files easier to search for. Your tags can be by type (“essay”, “notes”) or section (“chapter 1″, “unit 8″).
Backup your devices weekly. Accidents happen, so always be prepared. Make sure to backup your computer, phone, tablet, etc. to cloud storage or an external hard drive every week. Or at the very least, get Google Photos, which will automatically backup your photos from your phone.
Thanks for reading! If you have questions, feedback, or post requests, feel free to drop me an ask.
+Click here for the rest of my original reference posts!
—Sophia :)
studying while dealing with depression


Hi everyone! It’s werelivingarts!
Depression is a very common mental disorder that can affect negatively on the way you feel, think and act. I think that giving some tips and strategies on dealing with depression while studying would be essential to some of you who might struggle out there to get started on assignments. 🙂 Hope that this can help you to fight against depression and embrace your positivity while studying! Remember that you are loved and you are enough ❤️💙💜
And if today all you did was hold yourself together and survive, I’m still very proud of you. 🍀💐
-
 haniyaasads liked this · 1 month ago
 -
 simsimousse liked this · 2 months ago
 -
 atrainpassenger liked this · 2 years ago
 -
 winch3stersgirl reblogged this · 2 years ago
 -
winch3stersgirl liked this · 2 years ago
-
 schrodingerscollarbone liked this · 3 years ago
 -
 miraspages liked this · 3 years ago
 -
 hazelgracelancaster2002 liked this · 3 years ago
 -
 ryabells-blog liked this · 3 years ago
 -
 feattaemin reblogged this · 3 years ago
 -
 orangeduckweed liked this · 3 years ago
 -
 anonymitie liked this · 3 years ago
 -
 veratiserum liked this · 3 years ago
 -
 solaria222 liked this · 3 years ago
 -
 slytherinprincess00 liked this · 3 years ago
 -
 desistudying liked this · 3 years ago
 -
 niriamxannna liked this · 3 years ago
 -
 jjaysontodd liked this · 3 years ago
 -
 agirlinthegalaxy reblogged this · 3 years ago
 -
 dazaisbandagesz liked this · 3 years ago
 -
 siriusly-mooned reblogged this · 3 years ago
 -
 shortlee-blog liked this · 3 years ago
 -
 exhausted-highschooler liked this · 3 years ago
 -
 astronomy-is-cute liked this · 4 years ago
 -
 chaoskyl liked this · 4 years ago
 -
 chailogica reblogged this · 4 years ago
 -
chailogica liked this · 4 years ago
-
 prett-ybird liked this · 4 years ago
 -
 luvbeomie liked this · 4 years ago
 -
 kelleyebes liked this · 4 years ago
 -
 wnttak liked this · 4 years ago
 -
 perpetualkat liked this · 4 years ago
 -
 sunlit-music reblogged this · 4 years ago
 -
 snkadmirer liked this · 4 years ago
 -
 heavenlychaleur liked this · 4 years ago
 -
 dragonidpyrus12 liked this · 4 years ago
 -
 an-annoyed-void liked this · 4 years ago
 -
 ashes-skye liked this · 4 years ago
 -
 myownhellscape liked this · 4 years ago
 -
 v-1r1e liked this · 4 years ago
