Scrapbox-in-the-attic - Assorted References

More Posts from Scrapbox-in-the-attic and Others


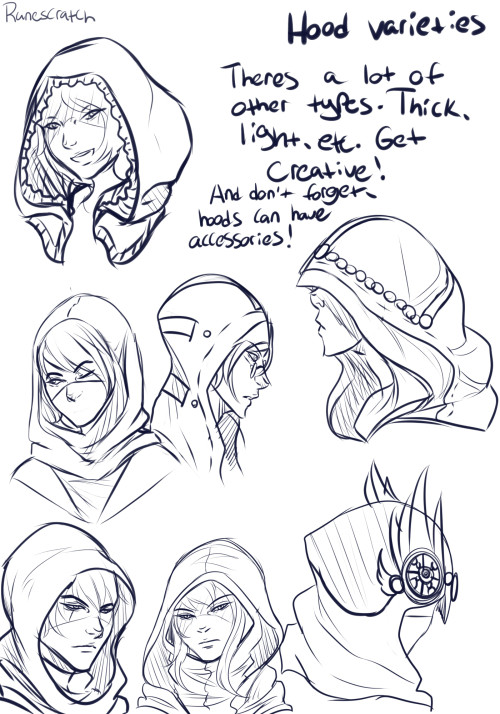
I’ve been asked a lot about how I draw hoods, mostly Talon’s hood, so I hope this helps a little? Just a pretty basic thing but hey there ya go
Hoods are pretty cool, they usually have a lot of variety in how they can look (and sometimes people even wear two hoods at once) so just get creative with it and have fun


quick proportion tips
- eyeballs are an eyeball width apart - ears align with the top of your brows to the bottom of your nose, and are the center-point of a profile view - lip corners line up to the center of each eye - hands are roughly the size of your face - feet are the same size as your forearm - elbows are aligned with your belly-button - your hands reach down mid-length of your thighs - both upper and lower legs (individually) are roughly the same size as your torso (this is all rough estimates for proportion! feel free to add more to help others)


Prepping your print from file to finish: I always hear people complaining about how much better the piece looked digitally, SO, here is a run down on how to get prints that look more like your original piece. First of all, every printer is different. Every paper is different. Make sure you take the time to do test prints and become familiar with how your printer and paper combo work, as you’ll rarely nail a print your first try. This one took about 5 test prints before I was confident to print on the expensive large paper Every time I mess up on a print, I save the remaining paper to use as scraps for test prints. As you can see, the original piece looks very nice! The focus is super strongly on the tiger, and all of the vibrant colors are still super evident in the background. That said, when I print it as is, everything about 85% gray or darker turns BLACK. And this is high quality paper designed to get accurate vibrant colors, too. The best way to fix this is to do layer effects. Brightness/contrast is my favorite, as a typical piece will generally print about 5x better if you up the brightness to around 15-25, and adjust the contrast up or down by 5-10 points. That said, if you have a HIGH contrast piece (Darks against brights) like this one, you typically need to do a few more steps. Often I’ll do a second brightness/contrast adjustment layer and push brightness to an obnoxious level so the darkest darks are closer to a mid-dark range. From there, I’ll create a mask and use a transparent gradient tool to slowly pull back the brightness on all of the lighter areas of the image. Additionally, due to printers using CMYK and your screen being RBG certain colors just physically CANNOT print. Some people will always work in CMYK because of this, but honestly I like my saturated colors and most of my work is intended to be seen digitally so I only ever work in RGB. Photoshop has a nifty toggle (Ctrl + Y) where you can toggle between CMYK and RGB view to see how your piece will appear when it prints. It’s useful to check this because if you worked in a color that cannot replicate in print, you may want to shift it entirely before you even bother printing. Artwork tends to desaturate a bit as it prints, so I’ll often make a Hue/saturation layer to play with, too. In this case the image was already pretty damn saturated, BUT some of the shadows on the tiger were printing more brown than orange, so I adjusted the saturation a bit to keep them vibrant with the rest of the image. **DO NOT use “Lightness” to lighten your image! It basically adds a white overlay to your image. Always use Brightness, instead. After all of that, I have a final print that much more closely captures the essence of the original painting. I could have tinkered even more, but to me the goal is a good print rather than an exact copy. For ULTRA high contrast images, like a dark room looking out into a snowy exterior, expect to do a LOT of adjustment to get it to print correctly. Printers just aren’t too fond of super darks right up against super lights. I could make a proper tutorial on this if people request it. Mostly, just wanted to put my thoughts down in one spot!

UPDATED DISCORD FORMATTING ♡ updated reference sheet for those newer to discord (or those who aren't familiar with markdown in general) ! my last post didn't include links, headers, or lists. you can access the google doc version in the source link.

anyone remember what these things are called like little cartoony expressive doohickies i think they have a real name but i can’t remember

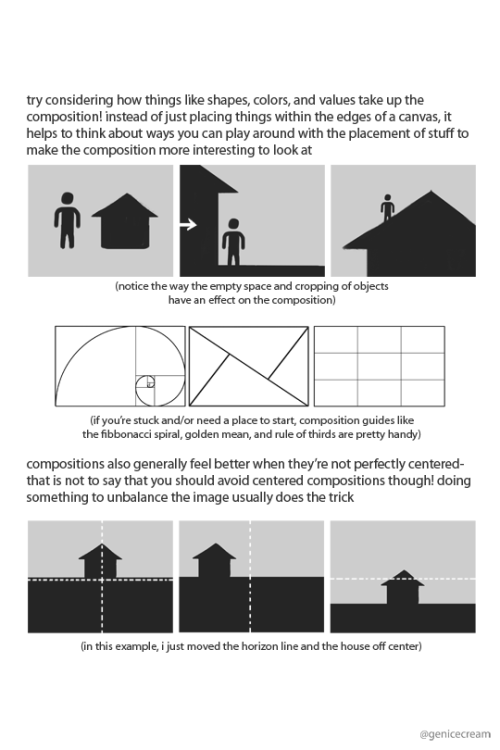
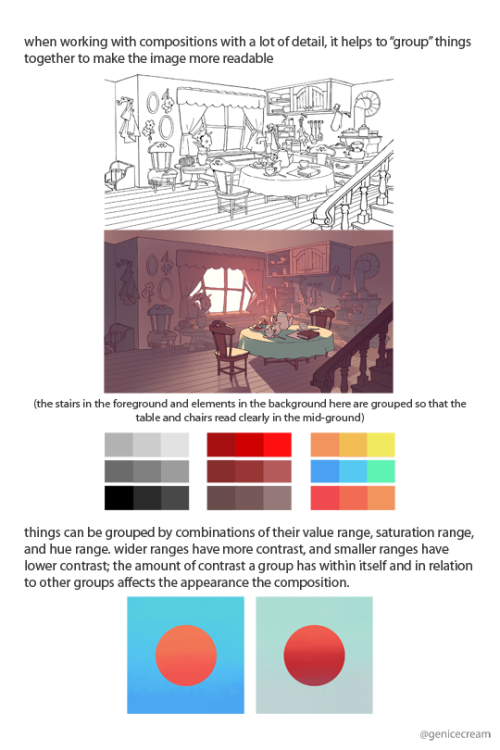
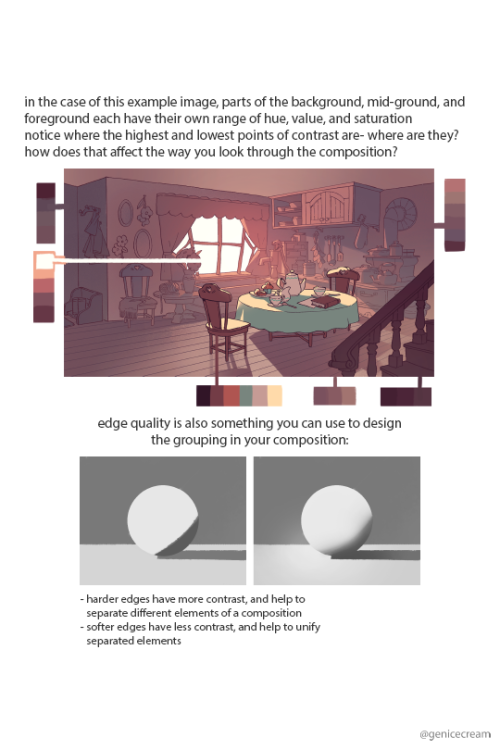
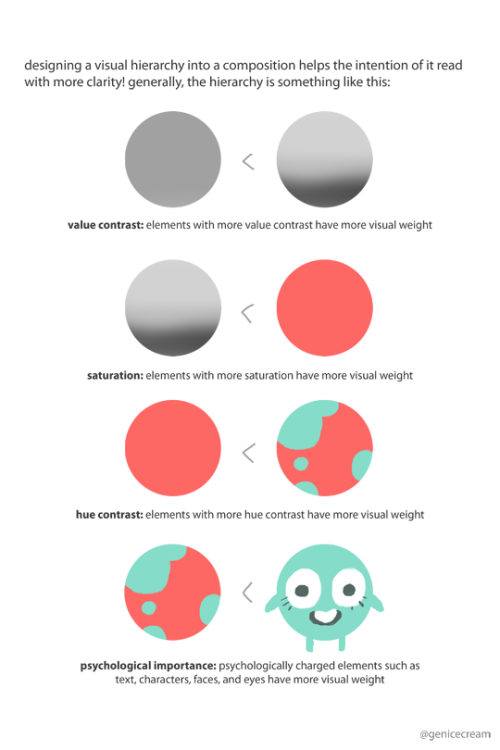
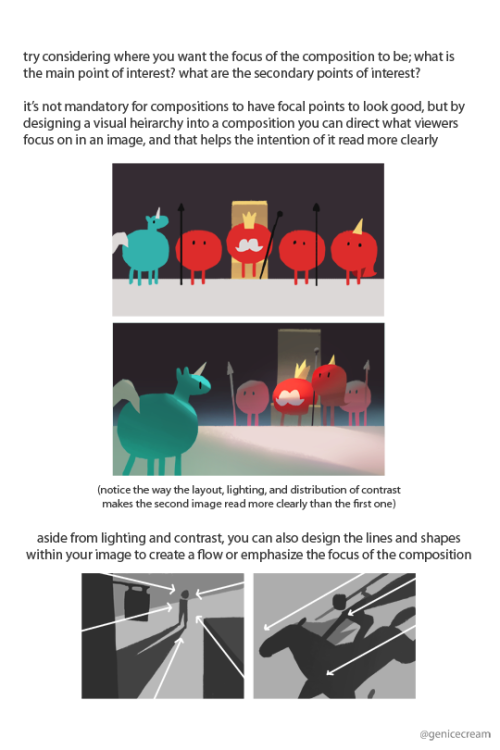
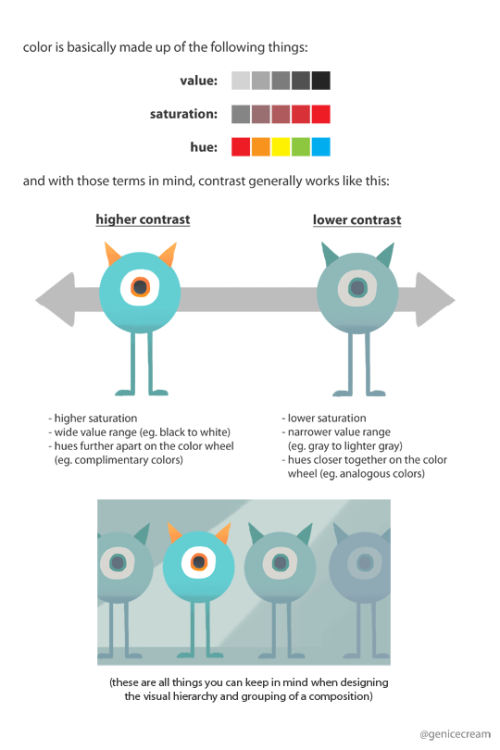
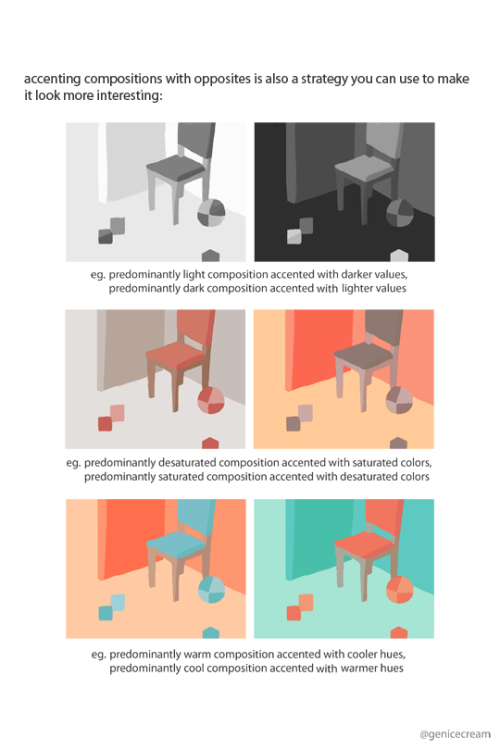
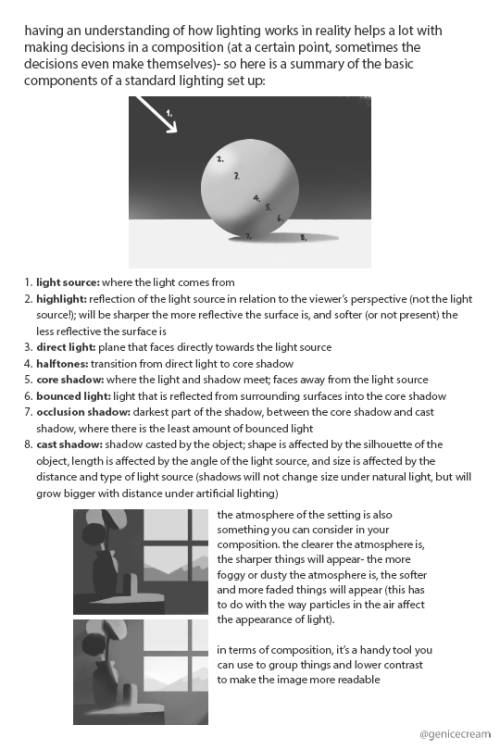
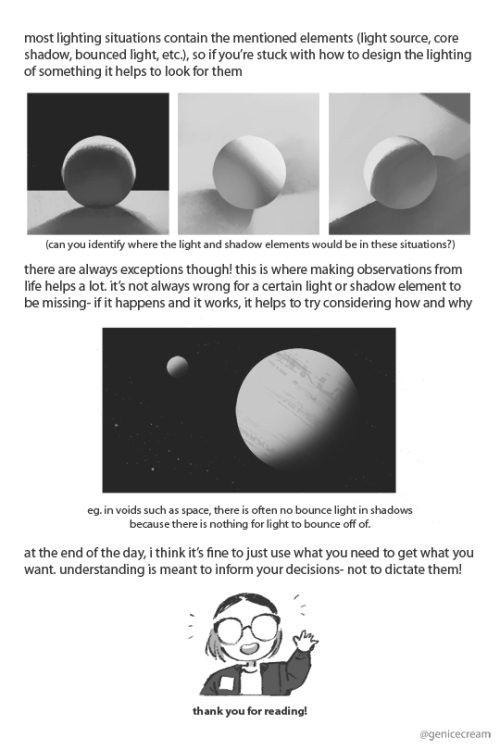
a series of composition tips i’d been sharing on twitter!
and since some people had asked, i’ve put up a pdf version of this on gumroad along with a layered psd of one of the example images too
tips would be really appreciated, but it’s up for free!
-
 inessen-kryo reblogged this · 1 month ago
 -
 slimetimetheblog liked this · 1 month ago
 -
 luxaii liked this · 1 month ago
 -
 huhwhuhhhh liked this · 1 month ago
 -
huhwhuhhhh reblogged this · 1 month ago
-
 lorcout reblogged this · 1 month ago
 -
lorcout liked this · 1 month ago
-
 cdarklock reblogged this · 1 month ago
 -
cdarklock liked this · 1 month ago
-
 teethcrunchrr liked this · 1 month ago
 -
 normystical reblogged this · 1 month ago
 -
 woomysans liked this · 1 month ago
 -
 purpleplanttea reblogged this · 1 month ago
 -
 quackels liked this · 2 months ago
 -
 awkwardkirbi liked this · 2 months ago
 -
 therabbitthatpostthings reblogged this · 2 months ago
 -
therabbitthatpostthings liked this · 2 months ago
-
 maldragon-triplet1 reblogged this · 2 months ago
 -
 m01ybdenum reblogged this · 2 months ago
 -
 tremlin reblogged this · 2 months ago
 -
 pandashepherdwitch reblogged this · 2 months ago
 -
 undeadbutstillhasahead liked this · 2 months ago
 -
 formdrop reblogged this · 2 months ago
 -
 aceiestartist reblogged this · 2 months ago
 -
 alexinwonderlandistaken reblogged this · 2 months ago
 -
 russetfoxfur reblogged this · 2 months ago
 -
 sedjammer liked this · 2 months ago
 -
 xluna0starx liked this · 2 months ago
 -
 coffeegrond liked this · 2 months ago
 -
 fresh-bed-old-sheets liked this · 2 months ago
 -
 loov1 liked this · 2 months ago
 -
 wolfiso reblogged this · 2 months ago
 -
 meridien313 reblogged this · 2 months ago
 -
meridien313 liked this · 2 months ago
-
 w1ll-gr4ham-1rl liked this · 2 months ago
 -
 carmineskiesandspidereyes liked this · 2 months ago
 -
 queervampir liked this · 2 months ago
 -
 chaos-has-theories reblogged this · 2 months ago
 -
chaos-has-theories liked this · 2 months ago
-
 trinity-blaze reblogged this · 2 months ago
 -
trinity-blaze liked this · 2 months ago
-
 strideerandflashlightgirl liked this · 2 months ago
 -
 grandpuppyalpaca reblogged this · 2 months ago
 -
 rosefyrefyre liked this · 2 months ago
 -
 thelettersfromnoone liked this · 2 months ago
 -
 deinde-prandium reblogged this · 2 months ago
 -
 peachyyym liked this · 2 months ago
