Get Access To My Brushes, Art Tips, Process Videos, And Files Here https://www.patreon.com/ramonn90


Get access to my brushes, art tips, process videos, and files here https://www.patreon.com/ramonn90
More Posts from Scrapbox-in-the-attic and Others


Webcomic platforms can help get your comic published when you want something quick and easy to start out! They generally share a few qualities:
They format everything in a basic way so you don't have to do much set up your own space to look nice on web/mobile
They have no fee to publish your comics there, because you are using their web hosting
They may get your comic in front of other readers with mobile apps or online catalogs
If you meet their criteria, you may also be able to find hosting with digital comic stores, publishers, and collectives, and this may get you a bit more in the way of money, promotional opportunities, or editor assistance.
Even if you choose to host your website on its own webhost with a comic CMS, you might also consider finding a platform that aligns with your comic goals and "mirroring" your pages there.
In this post, we look at all the webcomic platforms out there we could find in our research!
This post may be updated as time goes on as new platforms enter the hosting arena, or other important updates come to light.
Questions:
💻 Everyone uses social media, could I just use that as a platform for my comic? - One-shot or strip comics without a continuous story that can be read in any order can do okay on social media, and people have adapted Tumblr to display a series of pages. But for continuous long-form stories, social media platforms are better for keeping your readers updated and general promotion.
📚 Wait, what if I want to build my own website and drive people there? - We have another masterlist of website hosts for that!
🕵️♀️What kinds of restrictions can I expect? - Many comic platforms have restrictions on NSFW content, links to other sites, or could be invite/application-only. We've tried to note those on the cards, as well as a list of comic platforms that have predatory business practices at the very end that we recommend avoiding. Always do your research!
Webcomic Platforms
Webtoon Canvas

Tapas

Webtoon Originals

SpiderForest Webcomic Collective

Hiveworks

ComicFury

The Duck

Saturday AM

GlobalComix

NamiComi

DillyHub

Shrine Comics


10 part compilation of quick little tutorial on how to draw people, realistic or more cartoony, or pretty much anatomical. Hope this helps some people out there!

Everyone look at the cat blanket I made like .. 3 years ago

You will patch up all the holes in 2025.
(this isn’t a post about knitting)
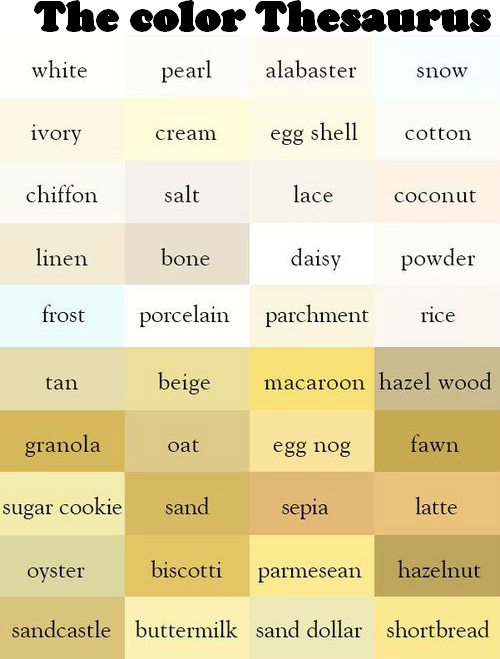
OK to make a font out of your own writing
go here
http://www.myscriptfont.com/
instead of printing it off just use this blank thing that way you dont have to scan it or anything
so fill that out by pasting it in any art program and whatnot
then save it and upload it to that site
and itll give you an option to download it
so do that and then install it BAM


Prepping your print from file to finish: I always hear people complaining about how much better the piece looked digitally, SO, here is a run down on how to get prints that look more like your original piece. First of all, every printer is different. Every paper is different. Make sure you take the time to do test prints and become familiar with how your printer and paper combo work, as you’ll rarely nail a print your first try. This one took about 5 test prints before I was confident to print on the expensive large paper Every time I mess up on a print, I save the remaining paper to use as scraps for test prints. As you can see, the original piece looks very nice! The focus is super strongly on the tiger, and all of the vibrant colors are still super evident in the background. That said, when I print it as is, everything about 85% gray or darker turns BLACK. And this is high quality paper designed to get accurate vibrant colors, too. The best way to fix this is to do layer effects. Brightness/contrast is my favorite, as a typical piece will generally print about 5x better if you up the brightness to around 15-25, and adjust the contrast up or down by 5-10 points. That said, if you have a HIGH contrast piece (Darks against brights) like this one, you typically need to do a few more steps. Often I’ll do a second brightness/contrast adjustment layer and push brightness to an obnoxious level so the darkest darks are closer to a mid-dark range. From there, I’ll create a mask and use a transparent gradient tool to slowly pull back the brightness on all of the lighter areas of the image. Additionally, due to printers using CMYK and your screen being RBG certain colors just physically CANNOT print. Some people will always work in CMYK because of this, but honestly I like my saturated colors and most of my work is intended to be seen digitally so I only ever work in RGB. Photoshop has a nifty toggle (Ctrl + Y) where you can toggle between CMYK and RGB view to see how your piece will appear when it prints. It’s useful to check this because if you worked in a color that cannot replicate in print, you may want to shift it entirely before you even bother printing. Artwork tends to desaturate a bit as it prints, so I’ll often make a Hue/saturation layer to play with, too. In this case the image was already pretty damn saturated, BUT some of the shadows on the tiger were printing more brown than orange, so I adjusted the saturation a bit to keep them vibrant with the rest of the image. **DO NOT use “Lightness” to lighten your image! It basically adds a white overlay to your image. Always use Brightness, instead. After all of that, I have a final print that much more closely captures the essence of the original painting. I could have tinkered even more, but to me the goal is a good print rather than an exact copy. For ULTRA high contrast images, like a dark room looking out into a snowy exterior, expect to do a LOT of adjustment to get it to print correctly. Printers just aren’t too fond of super darks right up against super lights. I could make a proper tutorial on this if people request it. Mostly, just wanted to put my thoughts down in one spot!


-
 fanny-malu liked this · 1 month ago
 -
 intellibeamlaserstation liked this · 1 month ago
 -
 flyawaybluebirdie liked this · 1 month ago
 -
 cherri-chicken liked this · 2 months ago
 -
 eggb34n liked this · 2 months ago
 -
 ericaciliaris liked this · 2 months ago
 -
 kiritokunuwu liked this · 2 months ago
 -
 chiewbyexplodes liked this · 2 months ago
 -
 shinygardenfan liked this · 2 months ago
 -
 phantasm-27 liked this · 2 months ago
 -
 yagodnyizefir liked this · 2 months ago
 -
 stop-it-drop-it-roll-it liked this · 2 months ago
 -
 nertleturtle liked this · 2 months ago
 -
 seafoam-seraph liked this · 2 months ago
 -
 fangirlingatstuff liked this · 2 months ago
 -
 childerinys reblogged this · 2 months ago
 -
 palepandacreation liked this · 2 months ago
 -
 radpunch liked this · 2 months ago
 -
 binzento liked this · 2 months ago
 -
 dearest-darling-pharma reblogged this · 2 months ago
 -
 gaon-xx liked this · 2 months ago
 -
 phobosuchus liked this · 2 months ago
 -
 willowfoxthefox reblogged this · 2 months ago
 -
 meewelyne liked this · 2 months ago
 -
 yuohsdle reblogged this · 2 months ago
 -
 oxidization liked this · 2 months ago
 -
 coyoxxtl liked this · 2 months ago
 -
 88y53 reblogged this · 2 months ago
 -
 laserbobcat liked this · 2 months ago
 -
 hissinghuff liked this · 2 months ago
 -
 rincewinds-hat liked this · 3 months ago
 -
 try-again--press-start reblogged this · 3 months ago
 -
willowfoxthefox liked this · 3 months ago
-
 pandaslowpoke reblogged this · 3 months ago
 -
pandaslowpoke liked this · 3 months ago
-
 cabinetsecurity reblogged this · 3 months ago
 -
cabinetsecurity liked this · 3 months ago
-
 pureed-madness liked this · 3 months ago
 -
 silverlight70 reblogged this · 3 months ago
 -
silverlight70 liked this · 3 months ago
-
 completeanimesimp reblogged this · 3 months ago
 -
 des-fangirl reblogged this · 3 months ago
 -
des-fangirl liked this · 3 months ago
-
 plshelpmeruletheworld liked this · 3 months ago
 -
 mimiko-stuff liked this · 3 months ago
 -
 valenzu liked this · 3 months ago
 -
 artistfingers liked this · 3 months ago
 -
 aloofraven liked this · 3 months ago
 -
 at-what-cost liked this · 3 months ago
