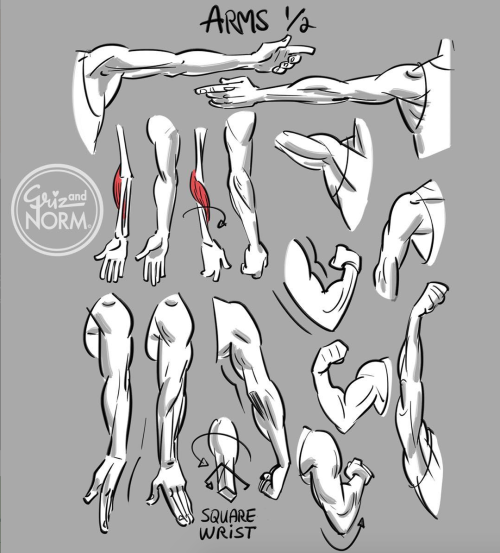
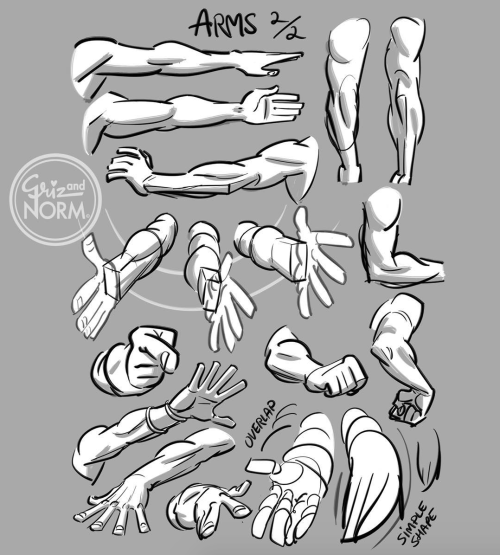
Think I’ll Take A Break Now From Art’ing And Brush Up On My Knowledge Of How Things Work And Connect…

think I’ll take a break now from art’ing and brush up on my knowledge of how things work and connect… specially arms… urgh…..

More Posts from Tryingtolearnartsob and Others

3 weeks ago

and then his boyfriend provides him with blood? :) (please say yes i need this in my life so bad)

And Then His Boyfriend Provides Him With Blood? :) (please Say Yes I Need This In My Life So Bad)

whats the point of it all if he doesnt


Tags
1 month ago
Peter And MJ Sharing Sleepy Smiles And Cuddles On The Plane Ride Home From London

Peter and MJ sharing sleepy smiles and cuddles on the plane ride home from London <3

From this deleted scene


Tags
ref
3 months ago

you know for this one im not even gonna say anything. it was one hell of a trip to madness though. that I will say. my gosh. I freakin hate you angel boy…..

You Know For This One Im Not Even Gonna Say Anything. It Was One Hell Of A Trip To Madness Though. That

I don’t even want to say anything. but funny how I was like oh I wanna see if I remember how to still draw him. tried to draw him. goes “hehehe I still remember” decides to check the trace and compare and ah: here’s where the madness starts. at at point I realize there’s no point to this. who the fck cares, also looking at the series, I don’t think he’s drawn the same constantly but kinda changed but I think it’s the sense of colouring and similarity that carries over. whatever. I just give up.

Even when I tried to draw another character it didn’t go well. im just. throwing in flag. but I. Guess I do want to at least study his hair in a bit. man just looking at this makes me want to punch something. I cannot.

Back To Poses…

back to poses…<3


Tags
1 month ago
Digital canvas titled "How to: drawing characters with paralysis on their face" with "since I barely see it and would like to see more" written underneath. It features three colored drawings of different characters with various kinds of facial paralysis, labeled "ones that look more like this", next to a drawing of a heavily exaggerated character with cartoonish facial paralysis labeled "and less like whatever this is". There is a diagram in the corner of all the cranial nerves in the brain, with half of them scribbled out. The rest of them are labeled "i.e. what happens when any of these get fucked up". In the corner there is the artist's signature "@saszor" as well as "by: someone who has it" written out.
Second digital slide. It's titled "basic information". Underneath is a spectrum colored from dark green to red, with the dark green end labeled "works perfectly" and the red "complete paralysis". The light green, yellow, orange, and light red middle is labeled as "some degree of paralysis. It's not a 0:1 thing". Below that are 4 very simplistic drawings using the spectrum's colors to show different kinds of paralysis, including Moebius syndrome (complete full face paralysis), trochlear nerve palsy (both eyes being mildly affected), Bell's palsy (half of the face being slightly affected) and "multiple (me)" with the forehead, mouth, and eyes being labeled in different shades. The text around the characters reads "All these people have some kind of paralysis on their face. Before actually drawing a character, you need to pick what part of their face is paralyzed and how much. Having your whole face completely paralyzed is really rare. Weakness on one side of the face is the most common. You probably saw someone with it since it's very common after a stroke". Another block of text in the corner reads "If you have a simpler artstyle, paralysis of the eyes and/or mouth is the easiest to show. Jaw or forehead are more subtle (usually)".
Third slide, titled "Ok, but how do I draw it? (With asymmetry, mainly)". There is a drawing of a man with Bell's palsy, captioned "I will be doing examples showing unilateral (one sided) paralysis to showcase this since it will be easier to show the differences". In the top right are two drawings, one in anime style and other in a western cartoon one. The text box reads "While I encourage to try out multiple options, focus on the features that are more important in your artstyle. Big eyes? Focus on ptosis. Big mouths? Focus on lopsided smiles, etc. Otherwise it can look out of place". The main section of the slide is titled "Upper third of the face". There are simple drawings to accompany the text. It reads "paralysis on the forehead: it looks like one-sided botox essentially. The wrinkles will be weaker or non existent. Paralysis of the eyebrow: moves less. It rests lower than the other eyebrow and can have a crease under. Eyelid paralysis (arguably the most common one): generalyl affects the upper eyelid. It rests lower and has less or no movement". There is a drawing of a pair of eyes, where one is so closed the iris is invisible. Text reads "Note: paralysis very frequently comes with strabismus. Severe ptosis+hypertropia can look like the eye is just white. The iris can be hidden like that". Another text box to another drawing reads "it does get a bit trickier in angles that don't show both sides of the face; IMO focusing on strabismus+eyebrows pointing down is the easiest way to get it across". In the bottom left is a diagram showing different eyes with increasing severities of paralysis. Text reads "As a rule of thumb, more severe paralysis = eyelid rests lower. Here you can see how much of the eye could show".
Fourth slide, titled "Eyes specifically since people tend to put more detail into them than the rest of the face". The "First step" has 2 characters with unaligned eyes, titled "Step 1: give them strabismus (easy)". Below that are examples of eyes with strabismus, captioned "literally just draw the eyes to be unaligned. Inward, outward, up, down, etc.". Step two is titled "Don't make it into the most unfunny joke possible (very hard)". It shows two characters, one having a very exaggerated strabismus and the other having a more realistic one combined with a falling eyelid. The first character is crossed out, and is saying "I'm stupid because I look weird haha (laugh)", while the second character has the checker mark and is saying "I have a personality trait that is not related to having an eye condition". The text below the step 2 reads "Not every person with facial paralysis will have strabismus but a lot do and I never see that in drawings". In the bottom right is a designated square with a character who has significant hypertropia and slightly red eyes. The text reads "rarely, people will be unable to close their eyes rather than the other way around. I meant to put it on the previous slide but I ran out of space".
Fifth slide, titled "mouth and smiling". There is a simple drawing of a man with bell's palsy smiling, there are red lines illustrating how the smile is lopsided and pulls towards the nonparalyzed side. There is another "correct/incorrect" demonstration with the incorrect one, labeled "not how faces work", having their face essentially halved, with one side smiling widely and one actively frowning, and the correct one, labeled "it just pulls to the nonparalyzed side", smiling normally on one side and having a neutral/relaxed expression on the other. The incorrect one has additional text box: "if it looks like the ancient Greek theatre mask, stop. I couldn't do this really downward frown on my paralyzed side even if I wanted to. You need to be able to move your face for that...". At the bottom of the slide are two drawings of the same character smiling; he has bell's palsy in one but not the other, highlighting the differences. The text reads "There are other things that can also be affected but smiling is the main one, especially for drawing. What is not affected are like, jaw muscles. Someone can have problem with that as well but it will be from something else". The rest reads: "A lot of people will overdo smiling so that other people can actually tell they're smiling and essentially do a really wide smile on just one side of the face. So things like gums showing, nose skewing to the side, lower eyelid going up, lip being thinner on the smiling side, etc.". There is a colored disclaimer "also a disclaimer (in case that's not clear): not all people with facial paralysis have it visible on their eyes. I do it here so that you can easily tell which side is supposed to be affected".
Sixth slide, titled "have fun smile emoji". It features a Hindu woman in a powerchair, a Black man walking with a cane, a Brown girl posing, and a white guy looking stern. The first two are captioned "Most people have facial paralysis because of a stroke/traumatic brain injury and a lot will have other disabilities". The girl is captioned "Some people are born like this also. You can draw people with facial differences as pretty people BTW, it's allowed". The last character is drawn with a straight line scar going through his eye. He is captioned "if you're giving your scarred OC #3743 this fuckass scar then at least give them nerve damage like get real LMAO. He would not be fucking ablebodied". While the main drawing doesn't show the character with any sort of paralysis, there's a smaller one where his eyelid and eyebrow are clearly paralyzed. There is another box of text in the corner reading "We are also just normal people and yous on;t have to name your OC with bell's palsy some combination of "half-face" or whatever the fuck".

[ID in alt]

Tutorial on drawing characters/OCs who have some sort of facial paralysis. It doesn't cover all possible variants because I was using mirror as my main reference lawl

Keep in mind that this is an introductory drawing tutorial and has some generalizations in it, so not every “X is Z” statement will be true for Actual People 👍

Consider supporting me on ko-fi if you find this to be helpful.


Tags
3 weeks ago

The Empty House - part 4

-Part One

-Part Two

-Part Three

The Empty House - Part 4

Holmes is quoting Dante's Inferno - there were so many good lines to choose from, but this one had a little bitchiness to it that felt character appropriate.

This is in the Watson's Sketchbook series!


Tags
1 month ago
The Big Post Of Things About Hands!!! I Don’t Consider Myself Qualified To Teach Art At This Point

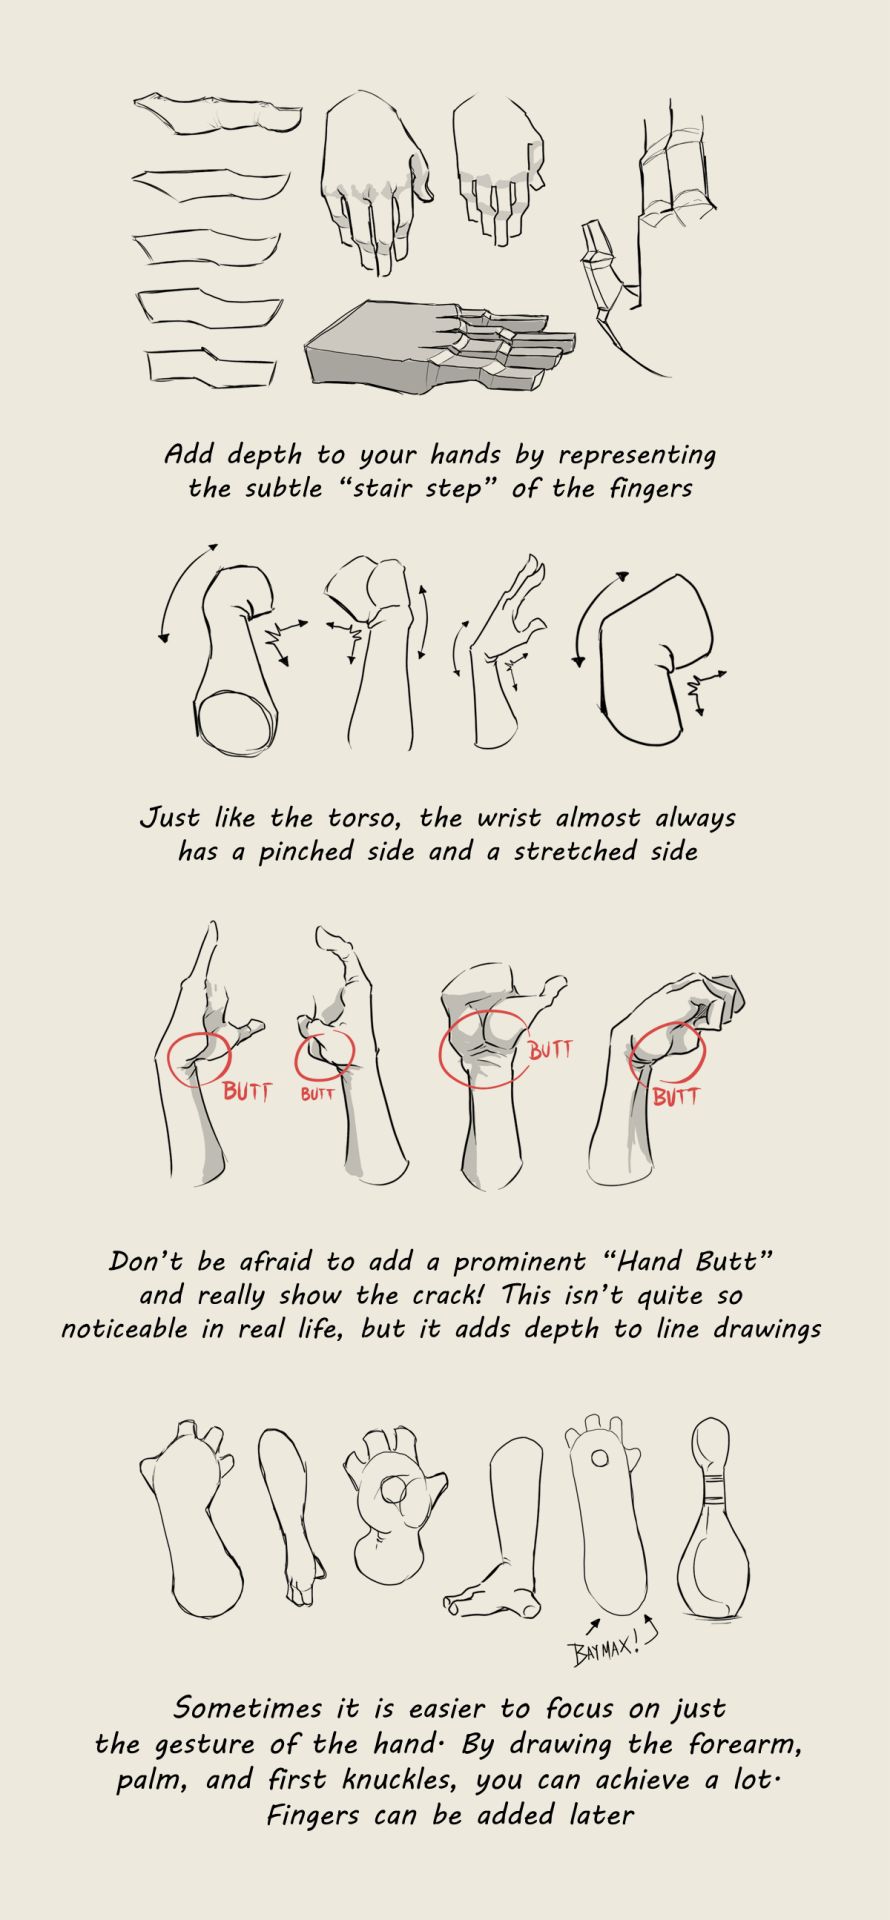
The big post of things about hands!!! I don’t consider myself qualified to teach art at this point in my life, but I don’t see any harm in sharing observations I have made. In learning to draw hands over the past few months I’ve tried to take a lot of notes, with the end goal of hopefully creating a video tutorial one day. I personally learn better from videos than written or illustrated instructions, but I’ve never found any one video that really demystifies drawing hands. I believe that in order to tackle such a difficult subject it is important to understand what makes it difficult, and this is not often addressed. If you understand the problems you can systematically solve them…

Drawing the hand is almost like drawing a whole person. Similar number of “major masses” and a big range of motion.

Because the hand is so versatile, it’s hard to pick a pose when practicing. Most individual body parts are drawn from different angles, whereas the hand must be drawn from different angles and in different poses.

Hands have a lot of moving parts and from any given angle many of these will be partially or wholly obscured by other parts. Drawing “through the form” results in confusing construction lines that are difficult to interpret.

Hands are expressive and give big clues as to what a character is doing. Odd or unnatural hand poses detract heavily from your overall piece. Most people avoid drawing hands because of this.

The thumb flexes along a different plane than the four fingers and sits on its own deviant metacarpal. Drawing the hand in perspective is hard enough, but adding the thumb in relation to the rest of the hand at a convincing angle? Forget about it!

Hands are typically simplified into box and cylinder forms, but almost every part of the hand is a combination of angles and curves. No one simplified form really describes these parts.

Hands interact with other objects, like all the time. They’re tricky enough to draw on their own… this isn’t helping anyone.

Hands have a lot of bony landmarks, veins, and tendons, all visible at the surface level. These are obstacles when trying to render them realistically.

Hands are asymmetrical from every angle. Every part, every time.

I think that about covers the major issues we face when trying to draw hands. Now here are some observations and facts that you can use to fight back!

The width of the first three fingers (index, middle and ring) is the same as the width of the wrist. The pinky and thumb both emanate from the parts of the palm that overhang this line.

The palm of the hand is more of a pentagon than a rectangle (Thanks, Jim Lee!).

The length of the middle finger is approximately the same as the length and width of the palm.

The length of the phalanxes (finger bones in this case) diminishes in size as they get further from the palm. The second (middle) phalanx is 2/3 the length of the first (proximal), and the third (distal) is 2/3 the length of the second. You don’t really notice this since the first knuckle is “inside” the palm and we tend to think of the fingers as starting at the “finger crotch”.

The thumb has no middle phalanx, only a proximal and a distal one.

The thumb is rotated 90 degrees from the angle of the four fingers. So the fingernails point “up” and the thumbnail points “to the side”. This obviously changes depending on the pose, but the thumbnail never really points “up” with the other fingernails unless it is bent backwards, as in poses when all five fingers are pressed against a flat surface. It never really points “down” unless the hand is clamping or pinching… or operating a sock puppet.

The thumb has to sit lower than the palm so that it can flex underneath the hand. The first knuckle of the thumb is almost as far below the index finger as the pinky is far away from the index finger.

The “webbing” of the thumb connects exactly half way up the palm.

Hands are asymmetrical from every angle. Every part, every time.

That is all the knowledge I have so far, and now you have it too! I don’t think any tutorial, video or otherwise, can ever teach you as much as the thousand observations you will make from drawing a thousand hands. There is no substitute for practice. So practice by looking at your hand from the normal vantage point, and from a mirror. Practice from 3D reference like the Handy Art Tool. Practice by copying other artists and animators whose hands appeal to you. Most of all, practice from imagination. PRACTICE! Below is every reference that I can remember that I’ve personally used while practicing hands:

http://www.handyarttool.com/

http://youtu.be/BAQb-5VKxmg

http://nk-chan.deviantart.com/art/mini-hand-tutorial-68320552

http://kibbitzer.deviantart.com/art/Hands-Reference-321600866

http://kibbitzer.deviantart.com/art/Hands-Reference-2-322546252

http://kibbitzer.deviantart.com/art/Hands-Reference-3-330102275

http://kibbitzer.deviantart.com/art/Hands-reference-4-428109721

http://characterdesignnotes.blogspot.com/2010/09/hand-reference.html

http://characterdesignnotes.blogspot.com/2010/09/hand-reference-part-two.html

http://characterdesignnotes.blogspot.com/2010/11/hand-reference-part-three.html

Do me a favor and share this around, will you? We could all use more light shed on this subject. -Aaron


Tags
1 month ago
Art Tutorials By Disney Artists Griz And Norm Lemay

Art tutorials by Disney artists Griz and Norm Lemay


Tags
3 months ago
I Was Asked To Draw A Tutorial On Making The Body Out Of Basic Shapes, And I Realized I Used Line Segments
image
image

I was asked to draw a tutorial on making the body out of basic shapes, and I realized I used line segments for the limbs and spine…but that’s pretty basic, eh?


Tags
Loading...
End of content
No more pages to load
tryingtolearnartsob - LEARNINGTODRAW
LEARNINGTODRAW

72 posts

Explore Tumblr Blog
Search Through Tumblr Tags