
tryingtolearnartsob
72 posts
Latest Posts by tryingtolearnartsob


Weird thing enjoyer found another weird thing to enjoy
Various Frankenstein doodlings. Abt half were from reference half from imagination.
Most of these are related to the Royal Ballet version which I watched a video of the other day. So good and such a wild combination. The elegant medium and the grotesque subject matter.
I also had to draw that amazing puppet version that was made for the Hamburg state opera. lil cutie he is


I made this comp a while ago, maybe before christmas? I've made some more sketchbook pages since but I thought I'd also post this here! Maybe I'll compile the recent ones at another time, though they're far more boring as theyre all black & white lol
and then his boyfriend provides him with blood? :) (please say yes i need this in my life so bad)

whats the point of it all if he doesnt
The Empty House - part 4
-Part One
-Part Two
-Part Three


Holmes is quoting Dante's Inferno - there were so many good lines to choose from, but this one had a little bitchiness to it that felt character appropriate.
This is in the Watson's Sketchbook series!

I don't think we talk about Jopson's leg injury as much as we ought to
man I’ve been feeling so bad about my art lately,,, ahahah…. :’ but hey. looking at my art journal entries here helped a lot… omg…. thank u past self.

sometimes art be like. I have an arm. which I can ref. and I have myself. which I can ref. I forget KDKKDKDKD
COMEBACK….!!!
did have a brief moment yesterday of crippling loss… I think was before yesterday not sure to check but MAN… THE GRIEF THAT HUT ME ABOUT ART… like you know when do art that’s Super Nice and Good and YOU FEEL GOOD ABOUT YOURSLER!!!! AND UR LIKE IM IMPROVING(TM) and you take a week break cuz hand and needed and come back and god. You CANT EVEN!!!! And it feels so like you have regressed so badly and then you do rush art figure prac and THATS SO BAD and you can’t even look at other art people’s art cuz it makes me you sad and then tho you look at ur recent art (thank me for continuedly to move stuff toup to recent so I can see what my recent art is like) ANYWAYS…..!!!!!! like oh. oh OH. it wasn’t necessary amazing first go but I do def remember it not being this frustrating and anyways it at least made me feel better. come today and hey you know what! I felt like art mood! but it wasn’t until I was hit with hey. oh my gosh. DRAW TURTLES AND MY GUY THAT AU?? OJAY!!!! and I was gonna. but then I saw my figure thing and was like what if. warm first cuz you know.
and you know!!!!! I really should do this warm up!!!! It felt much better than the other figure try.
I feel like. doing figure parc after coming out of trying to do a. drawing and it Not Going well and I feel like then I approach my figure parc as well… “seeing that im stilll good at art” but I think it’s more should be relearning and practising and learning etc and picking stuff up again since THATS NOTMAL! And past me wouldn’t be able to pick this up fast as I am now!!!! And ahahah yeah side views back spine it seems is like Being A Point I really need to observe and learn now cuz MY GOSH I need to. Also because MY GOSH I always draw so many side profiles and I need to save my self this grief……!!!!!


Peter and MJ sharing sleepy smiles and cuddles on the plane ride home from London <3
From this deleted scene


[ID in alt]
Tutorial on drawing characters/OCs who have some sort of facial paralysis. It doesn't cover all possible variants because I was using mirror as my main reference lawl
Keep in mind that this is an introductory drawing tutorial and has some generalizations in it, so not every “X is Z” statement will be true for Actual People 👍
Consider supporting me on ko-fi if you find this to be helpful.
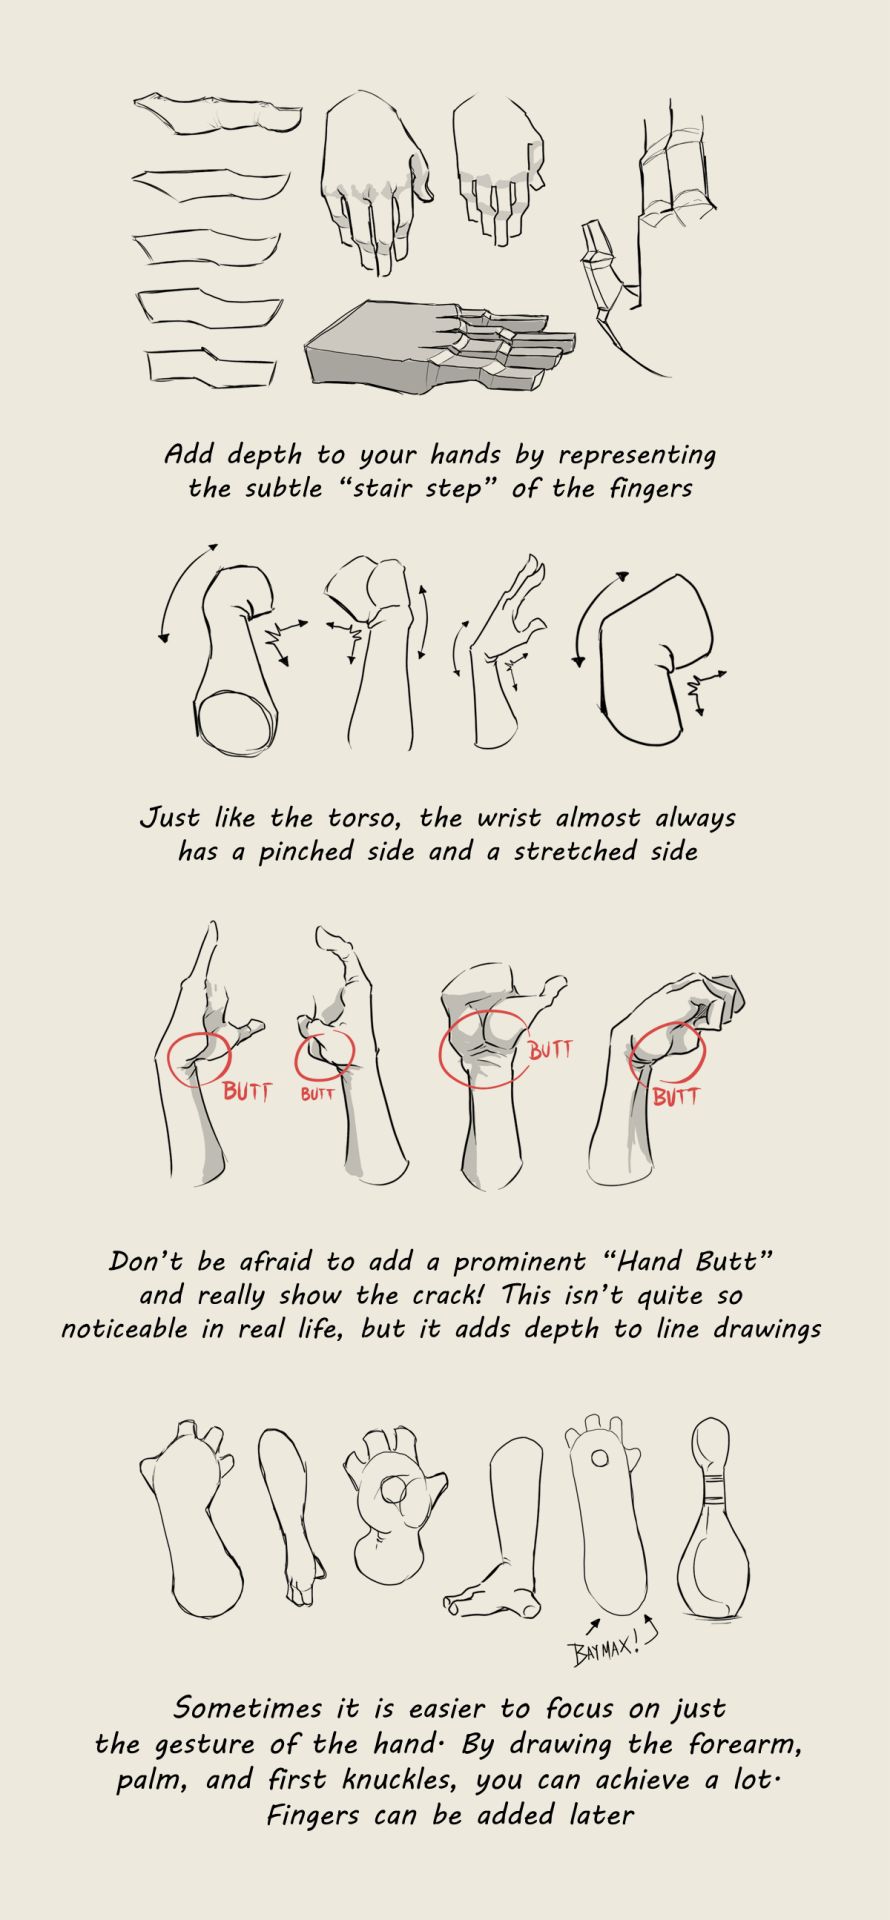
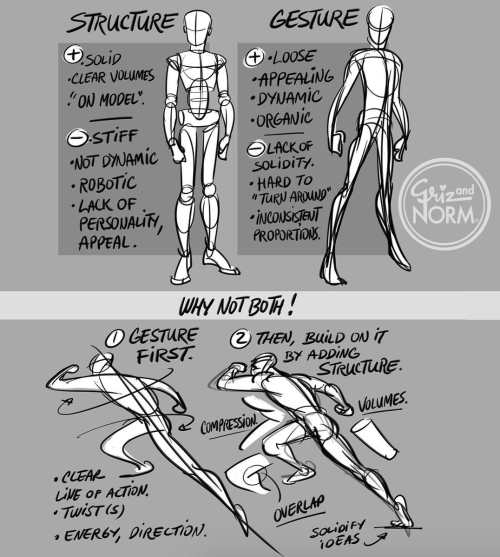
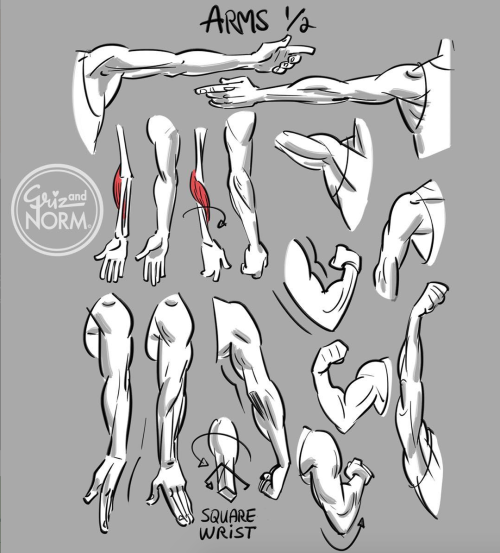
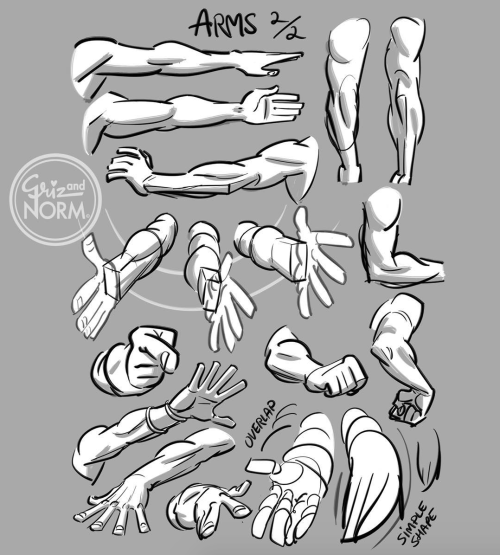
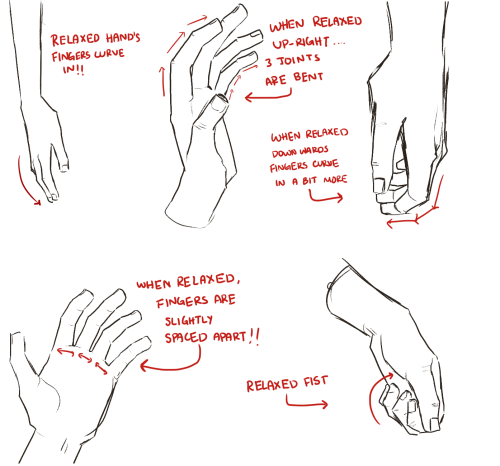
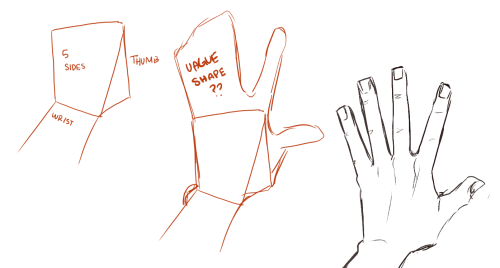
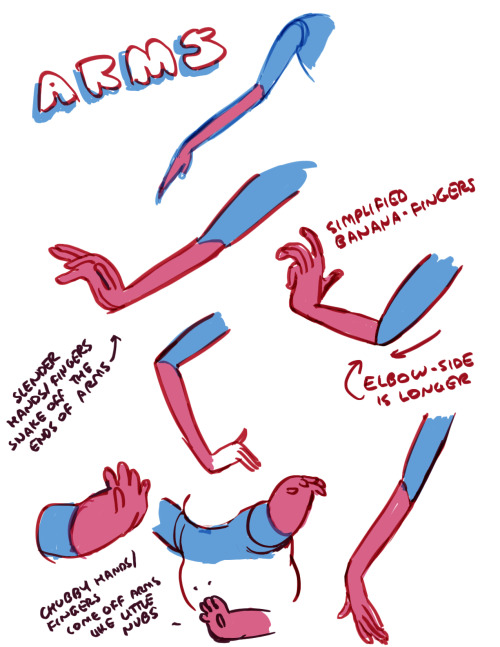
The big post of things about hands!!! I don’t consider myself qualified to teach art at this point in my life, but I don’t see any harm in sharing observations I have made. In learning to draw hands over the past few months I’ve tried to take a lot of notes, with the end goal of hopefully creating a video tutorial one day. I personally learn better from videos than written or illustrated instructions, but I’ve never found any one video that really demystifies drawing hands. I believe that in order to tackle such a difficult subject it is important to understand what makes it difficult, and this is not often addressed. If you understand the problems you can systematically solve them…
Drawing the hand is almost like drawing a whole person. Similar number of “major masses” and a big range of motion.
Because the hand is so versatile, it’s hard to pick a pose when practicing. Most individual body parts are drawn from different angles, whereas the hand must be drawn from different angles and in different poses.
Hands have a lot of moving parts and from any given angle many of these will be partially or wholly obscured by other parts. Drawing “through the form” results in confusing construction lines that are difficult to interpret.
Hands are expressive and give big clues as to what a character is doing. Odd or unnatural hand poses detract heavily from your overall piece. Most people avoid drawing hands because of this.
The thumb flexes along a different plane than the four fingers and sits on its own deviant metacarpal. Drawing the hand in perspective is hard enough, but adding the thumb in relation to the rest of the hand at a convincing angle? Forget about it!
Hands are typically simplified into box and cylinder forms, but almost every part of the hand is a combination of angles and curves. No one simplified form really describes these parts.
Hands interact with other objects, like all the time. They’re tricky enough to draw on their own… this isn’t helping anyone.
Hands have a lot of bony landmarks, veins, and tendons, all visible at the surface level. These are obstacles when trying to render them realistically.
Hands are asymmetrical from every angle. Every part, every time.
I think that about covers the major issues we face when trying to draw hands. Now here are some observations and facts that you can use to fight back!
The width of the first three fingers (index, middle and ring) is the same as the width of the wrist. The pinky and thumb both emanate from the parts of the palm that overhang this line.
The palm of the hand is more of a pentagon than a rectangle (Thanks, Jim Lee!).
The length of the middle finger is approximately the same as the length and width of the palm.
The length of the phalanxes (finger bones in this case) diminishes in size as they get further from the palm. The second (middle) phalanx is 2/3 the length of the first (proximal), and the third (distal) is 2/3 the length of the second. You don’t really notice this since the first knuckle is “inside” the palm and we tend to think of the fingers as starting at the “finger crotch”.
The thumb has no middle phalanx, only a proximal and a distal one.
The thumb is rotated 90 degrees from the angle of the four fingers. So the fingernails point “up” and the thumbnail points “to the side”. This obviously changes depending on the pose, but the thumbnail never really points “up” with the other fingernails unless it is bent backwards, as in poses when all five fingers are pressed against a flat surface. It never really points “down” unless the hand is clamping or pinching… or operating a sock puppet.
The thumb has to sit lower than the palm so that it can flex underneath the hand. The first knuckle of the thumb is almost as far below the index finger as the pinky is far away from the index finger.
The “webbing” of the thumb connects exactly half way up the palm.
Hands are asymmetrical from every angle. Every part, every time.
That is all the knowledge I have so far, and now you have it too! I don’t think any tutorial, video or otherwise, can ever teach you as much as the thousand observations you will make from drawing a thousand hands. There is no substitute for practice. So practice by looking at your hand from the normal vantage point, and from a mirror. Practice from 3D reference like the Handy Art Tool. Practice by copying other artists and animators whose hands appeal to you. Most of all, practice from imagination. PRACTICE! Below is every reference that I can remember that I’ve personally used while practicing hands:
http://www.handyarttool.com/
http://youtu.be/BAQb-5VKxmg
http://nk-chan.deviantart.com/art/mini-hand-tutorial-68320552
http://kibbitzer.deviantart.com/art/Hands-Reference-321600866
http://kibbitzer.deviantart.com/art/Hands-Reference-2-322546252
http://kibbitzer.deviantart.com/art/Hands-Reference-3-330102275
http://kibbitzer.deviantart.com/art/Hands-reference-4-428109721
http://characterdesignnotes.blogspot.com/2010/09/hand-reference.html
http://characterdesignnotes.blogspot.com/2010/09/hand-reference-part-two.html
http://characterdesignnotes.blogspot.com/2010/11/hand-reference-part-three.html
Do me a favor and share this around, will you? We could all use more light shed on this subject. -Aaron


i actually really love drawing hands and only recently have I enjoyed it haha
I’m still not very good at it nor do I understand a single thing about anatomy but here’s some small tips I hope help!!!
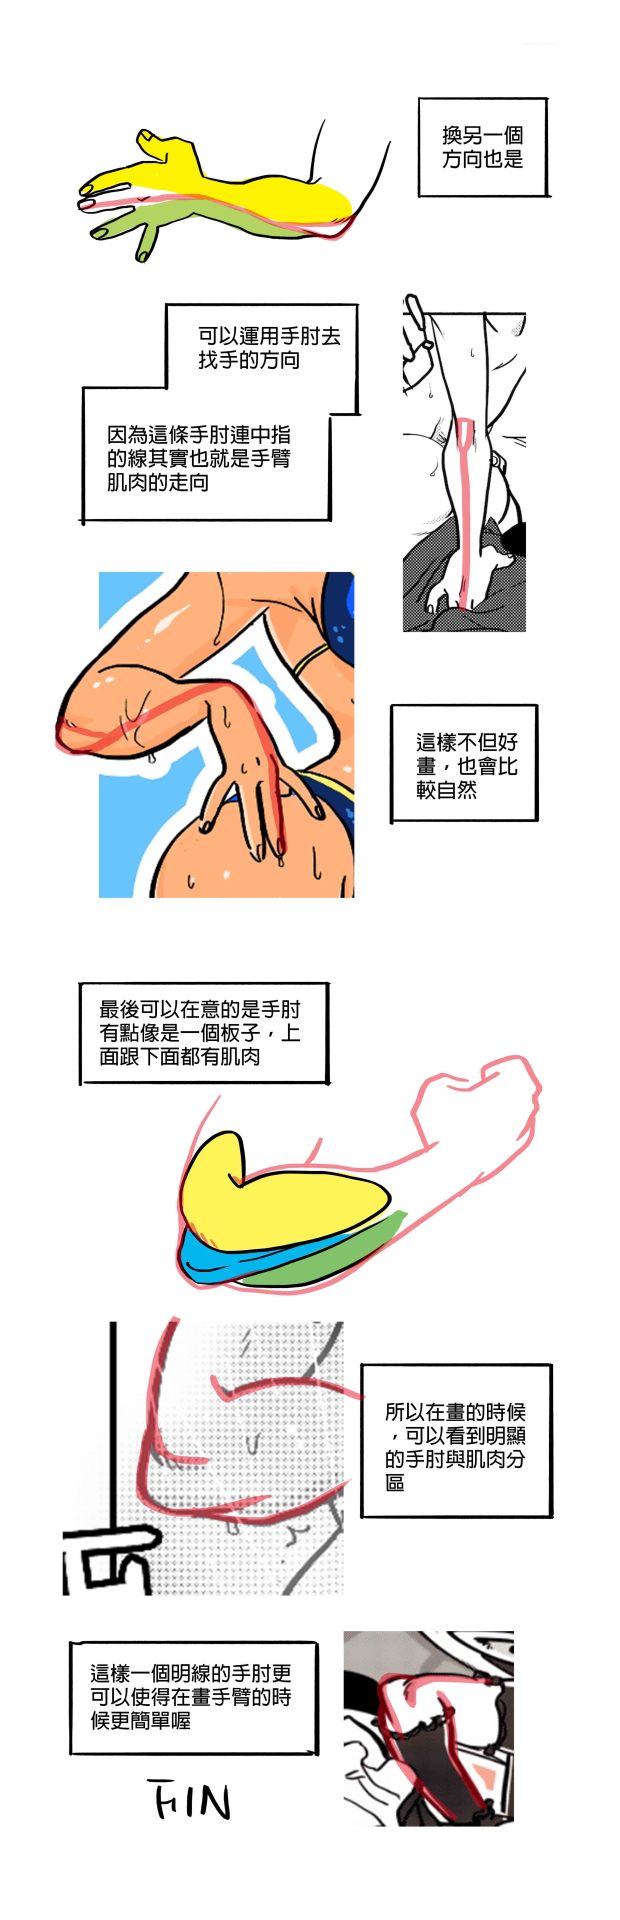
tbh ive been waiting for someone to ask for a hand tutorial


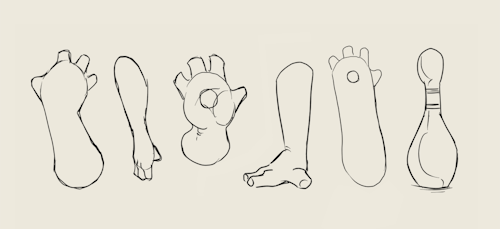
A Classic Houndtails Guide on How to Leg
For @foxy-mirage, a very rough guide on how I draw legs! Obviously there is no correct way of drawing them, and the way I draw them is quite stylised. But I thought I’d post it here in case anyone else wanted some help/a guide on how to draw them! edit: fixed a panel
by any chance could you do a lil tutorial/process of how you draw limbs in different poses? esp. legs/thighs, your legs always look so jaunty and charming i love it but i never know what to, ,, ,,, do with mine, like where to put them so
Okay! I’m going to try to answer this best I can, but before I do, please remember I am just a humble animation student and by no means a professional artist or a seasoned expert, so this might not be the correct way to do things or be extremely accurate. This is just how I do it, and a couple tips I’ve picked up from teachers at school.
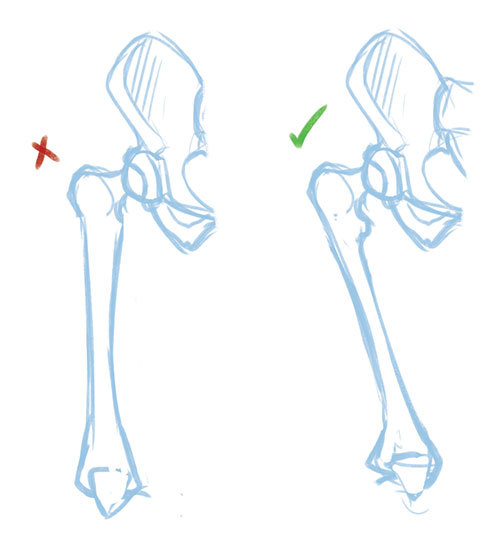
First of all, getting familiar with the anatomy of legs helps a lot! (I know this is the dreaded answer to every art question) I don’t know too much about the muscles of the legs other than the basics, so I don’t talk about them here because I don’t want to look like an idiot. They’re very worth studying though, especially the muscles that form the inside of the thigh and back of the calf.

Those are some leg studies I did from life in class last year, with the key parts labelled.
Chances are you’ve tried to draw legs and??

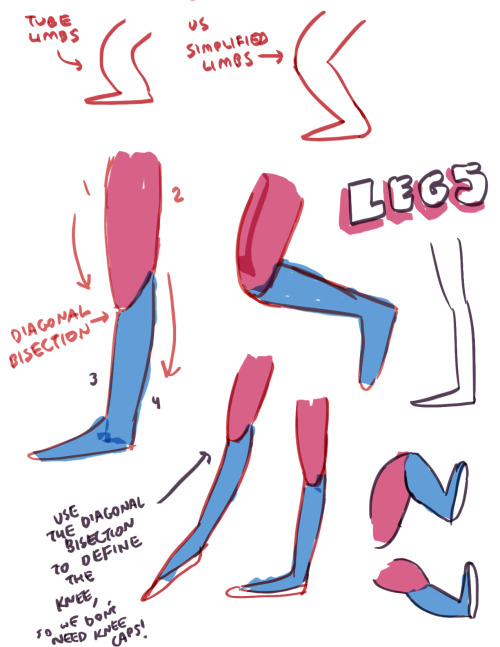
Unless you’re going for a certain style, legs that look like straight tubes or 90 degree angles are gonna look a bit weird.
As you can see with the life drawings above, legs have certain natural curves and rhythms to them! None of the bones in the legs are straight or tubular, so your legs should not be either.
Sorry for the really mediocre pelvis it’s not my strong suit oh god. It’s easy to characterize the legs as something like this:

Remembering that the knee is a hinge joint and that it has a sort of curved offset from the upper leg to the lower leg really helps.

So when you keep that offset in mind and apply some curves over the muscle and fat layered on top of those BEAUTIFULLY RHYTHMIC bones, you get dynamic flow in your legs. The hip (trochanter), kneecap (patella) and ankle (fibula/tibia malleolus) are good landmarks to keep in mind.

So by applying some curves, you get a softer/more dynamic/rhythmic feel to the legs that makes your figure look a lot less static even if they are standing entirely still. It’s also worth noting most people shift their weight onto one hip or another, position their feet weirdly, etc etc.
Hope that helps!
I have two questions! First: have you ever thought of doing a tarot card suit for your characters? I think it'd work really well for them! And two: help me how do I draw legs
@gravitality
Hi!! I’ve absolutely been thinking about that, yeah, in fact I recently talked about that to my boyfriend just recently. It’ll likely happen after october! And to answer your second question! I made a thing on legs that i hope you’ll find useful!!
So. I’ve already explained basics on legs here, but I don’t think it hurts to go through some extra details to help you understand legs some more.

The very basic thing is to imagine legs as teardrops. Again, this has already been covered in said tutorial above, but I figured it’s still good to mention even the most basic thing that I know of. I still highly recommend you check it out to get in more detail and to see some other examples and practices that you do. But basically, think of legs in the shapes of teardrops, when it comes to shape. If you need a simple stick-figure to connect the legs in the first place, make sure that they bend at the knees a bit so that the legs don’t come off as stiff and unnatural.

As you can see, this method works perfectly for realistic legs as it does for stylistic ones. Remember to use these as a guideline, never to be the exact base of the legs you will be drawing. If you draw traditionally, remember not to draw these guides too hard, or they will be hard to erase/do freestyle!

But how do you actually draw out the legs without drawing them perfectly straight, as shown to the left? The trick is to add volume to them, and how you do that can be winged to your own liking. The idea is to think in curves. As no leg is perfectly straight. You may make these curves minimal if you don’t want them to be curvy, but keep in mind, still, that not even your own bones are perfectly straight, so it is highly recommended that you make them bend, at least a little.

It all depends on how you draw them as well. Say you put your legs together, as shown in this picture, what happens to the fat and muscle? Naturally, they press together, much like how thighs squish on the surface when you sit down (I’m sure most people know what I’m talking about). Make sure this shows in your art! This is very important to keep in mind, because it makes it all look more natural and believable. Try to cross your legs or stand up and sit down again for real-life examples!


The same applies for stretching your legs, more or less, except they appear to become more ‘hollow’ and slimmer. They become less soft to the touch, too, and might show. Try stretching your legs and feel where the muscles tense and where it feels ‘hollow’. This is very helpful with your art.

Many leg tutorials talk about legs without mentioning the behind. It requires a tutorial on it’s own, in all honesty, but this is the most simplest way to draw it connecting to the legs. Remember that it comes in many different shapes, and this is just a super basic guide! Two circles overlapping, while following the line and flow of the legs. Remember the muscle/fat as mentioned above!

Okay, so we got the basics of leg shapes figured out? What if you want o draw them in a certain pose, or with a certain silhouette, but perhaps do not have the reference for it? Or you want to blend your style into it? The key is to not shy away from doodling the form. Make mess, draw lightly and don’t care about the anatomy. That way you’ll get everything down without it appearing stiff. You can clean up the sketch later, always, and if you can, use a reference after you have drawn your pose, to correct your drawing.

Remember that the hips do a lot to the pose of the legs! Make sure they are in flow with your legs, so that it can look more natural. Remembers that hips ‘rotate’ with the spine.

I’ve talked about this method before when it comes to posing, and the same applies for the legs. One way to make legs appear ‘steady’ is to picture them standing in a line, and one of those legs need not to stray from the lines too much, making it steady. If you want a dynamic pose despite the steady pose, you can always have the other leg stray from the line, since it only matters that one leg is steady. This method can create good, casual poses without making them appear boring. (also notice how the teardrop shapes are used here, despite the highly stylized legs)

Do you want a highly dynamic pose, or them to appear unsteady, then skip the line entirely and make both legs aim away from it completely. As you can see, the legs appear more moving, in action, as if they’re fighting, falling, or dancing. As you can imagine, this is not a pose that one could stay steady on, suggesting that it’s taken mid-movement. More about posing and this ‘line’ method is talked about in this tutorial.
Hope this helped you, if you have any questions let me know, and if you’d like to check out all my tutorials they can be found here!


jacket/fabric study that i did at the very start of the year turned into a gif bc the material is there already 🙂↕️✌️
trying to actually dissect tension points and movement so i can apply it to jackets from imagination in the future 🥹🥹
I want to draw so badly!!!! But no!!!! forcing my self into this break.
wow… jan25 end…… can’t believe it. already! but also…. it did feel a bit slow but also feels like wow… already end..
anyways! I really did manage to draw something for all of Jan except for one day 😂😂😂 some days more productive than others. but hmm. towards the end… definitely was on slower end.
I need for the next month… gonna take a long break… since ahhh my hand is aching… and I was wondering… why… and while on working on my piece… I realised… ah that’s where I press my pen into….


I was asked to draw a tutorial on making the body out of basic shapes, and I realized I used line segments for the limbs and spine…but that’s pretty basic, eh?
I kinda wanna work…. On the srda hair comic wip…. But im feeling lazy 😔 ngl….. I deserve this break anyways….. I just drew some crazy stuff right after waking up. Immediately. LOL.