Curate, connect, and discover
Tutorials - Blog Posts


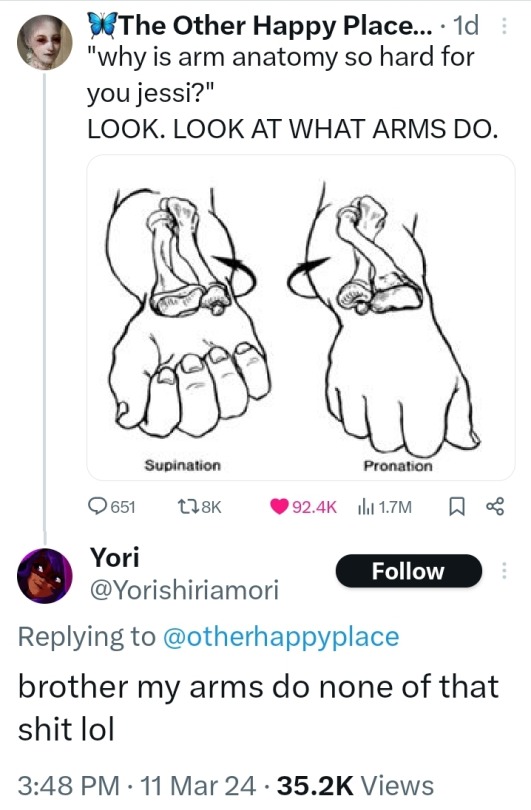
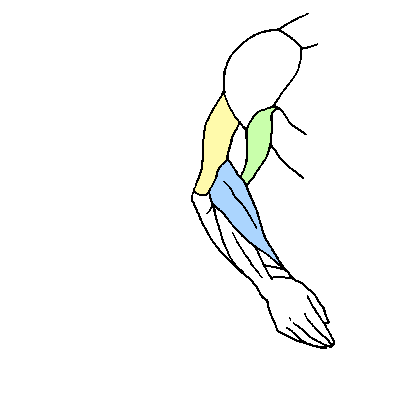
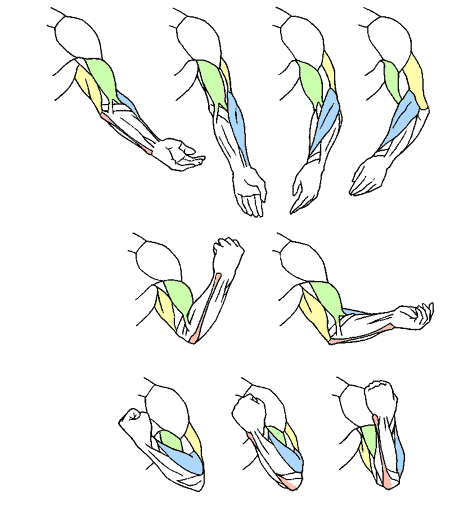
I was asked to draw a tutorial on making the body out of basic shapes, and I realized I used line segments for the limbs and spine…but that’s pretty basic, eh?

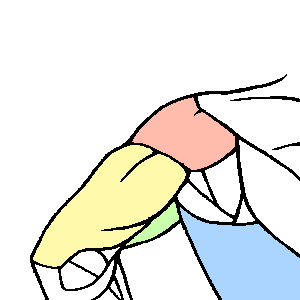
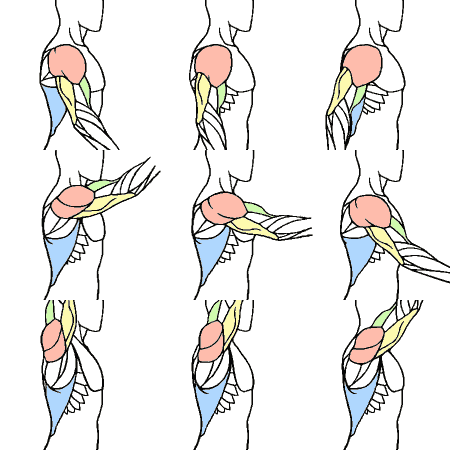
Edo period women obi knots, fantastic reference chart by Edo lover Nadeshico Rin.
You can see here several obi musubi favored by city women, of all class and status. Novelty knots were a fashion statement, often lauched by star onnagata kabuki actors, and spread by iki fashionistas such as geisha.
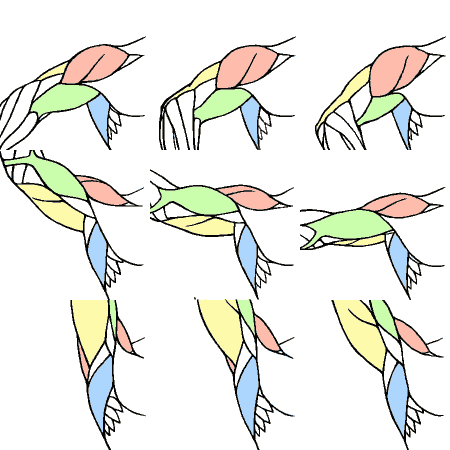
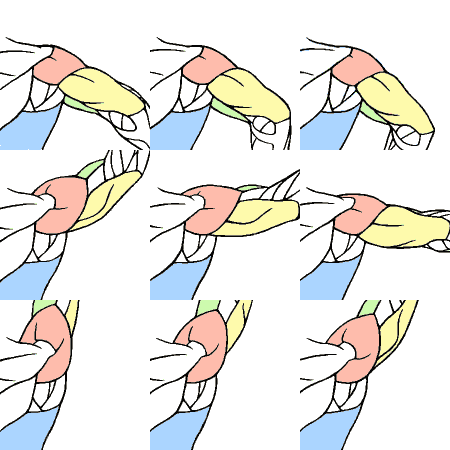
For top to bottom, left to right, you can see here:
Chidori musubi (plover knot) ちどり結び
Shôryû musubi (little dragon knot) 小龍結び
Kichiya musubi (Kichiya knot) 吉弥 結び - named after onnagata actor Uemura Kichiya I in Genroku period, who single handedly launched a new type of knots and obi fashion
Koman musubi (Koman knot) 小万結び - named after a kabuki character in play Yakko no Koman
Nagoya obi (Nagoya belt) 名古屋帯 - Azuchi Momoyama/Early Edo era silk kumihimo tied in butterfly knot
Yanoji musubi (arrow knot) 矢の字結び - created by onnagata actor Segawa Kikunojo II. Also found under the name tateya musubi 立て矢結び (standing arrow knot)
Yoshio musubi (Yoshio knot) よしお結び
Mizuki musubi (Mizuki knot) 水木結び - onnagata actor Mizuki Tatsunosuke is said to have first worn this variation of the Kichiya musubi
Rokô musubi (rôkô knot) 路孝結び - created by onnagata actor Segawa Kikunojo II
Karuta musubi (card knot) カルタ結び - created in early Edo period, looking like 3 playing cards side by side
Hitotsu musubi (single knot) 一つ結び - during Edo, was also called darari musubi だらり結び. Note that it differs from is nowadays called darari obi (worn by maiko)
Tate musubi (standing knot) 立て結び - see yanoji/tateya musubi for variations
Bunko kuzushi (unbalanced knot) 文庫くずし
Heijûrô musubi (Heijûrô knot) 平十郎結び - created by actor Murayama Heijûrô III
Sageshita musubi (falling knot) さげ下結び
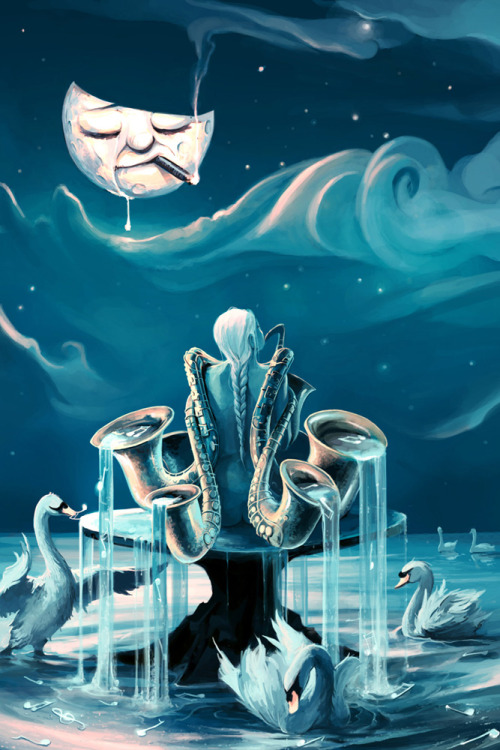
(by request of @fireflybettle, hope this will help you ^^)

IT'S DONE.
i wrote up a massive comparison post for a bunch of the current and upcoming social medias out there for artists! hopefully this can shed some light on the options out there and what looks promising!
click the link below the image to check it out >:3
edit: apparently that link is bugging out for some people so here's another click-through link!

recently a few people have asked how i sharpen my gifs and so i thought i’d put together a little SHARPENING TUTORIAL for anyone who’s interested…
the first thing i’d say is to make sure you’re using the most hq images/screencaps/clips you can find. i know this advice gets thrown around a lot but for good reason! here’s a really good post with more info on where to find the best stuff to use. now on to the tutorial:
we’re using smart filters in this tutorial which means smart objects babyyy
group your layers if you haven’t already and convert the group into a smart object (filter > convert for smart filters)
now duplicate your smart object so you have two identical layers
apply a smart sharpen filter to the bottom layer (filter > sharpen > smart sharpen)
my standard settings:
amount: 500%
radius: 0.2 - 0.5 px (see what looks best!)
remove: lens blur
“more accurate” selected
good work! now if that’s looking a little extreme don’t worry, we’re not done!
apply a gaussian blur filter to your top layer (filter > blur > gaussian blur)
set the slider to 1.0 pixels
finally set the opacity of your blur layer to 25%
and that is it! your layers should now look a little like this:

the lovely thing about this is that you can basically keep your filter settings the same for whatever you’re working on and simply play with the opacity of that blur layer should you want to increase/decrease the sharpness!
fingers crossed this all makes sense. if anything wasn’t clear or you have further questions don’t be afraid to ask. happy giffing!!
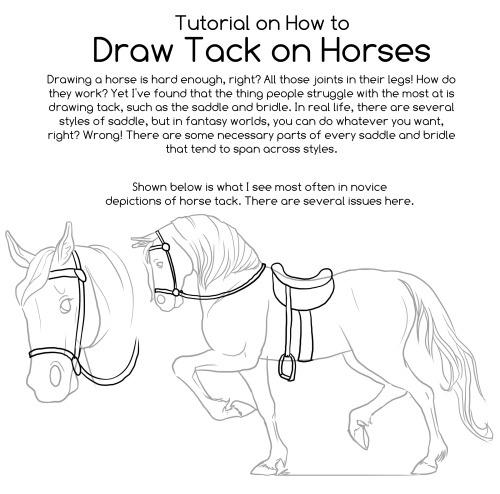
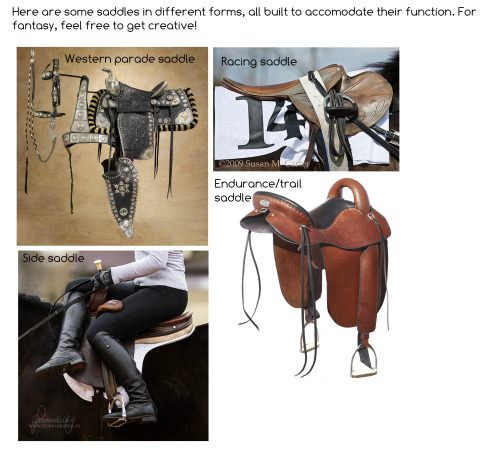
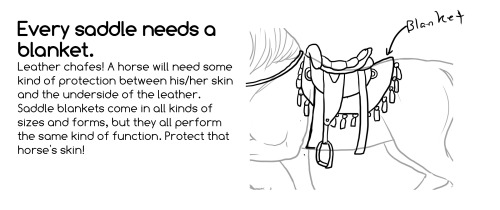
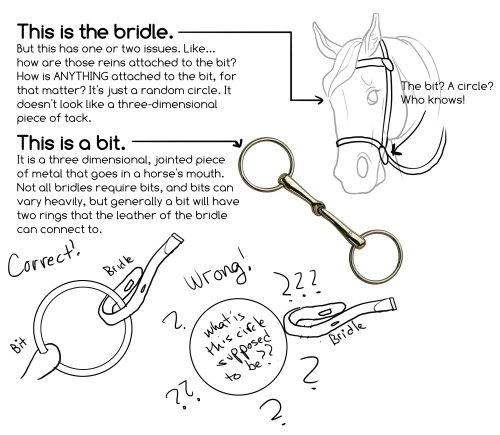
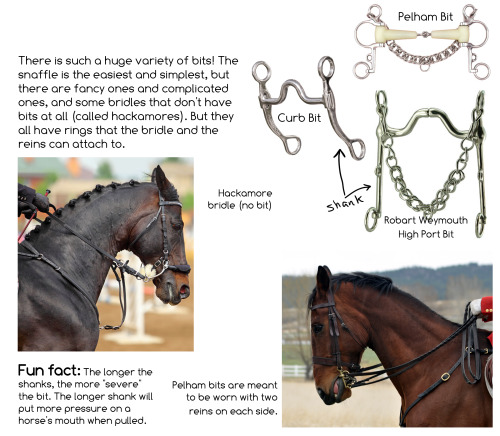
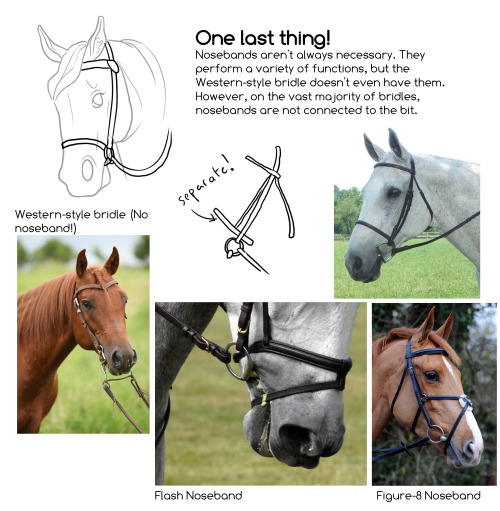
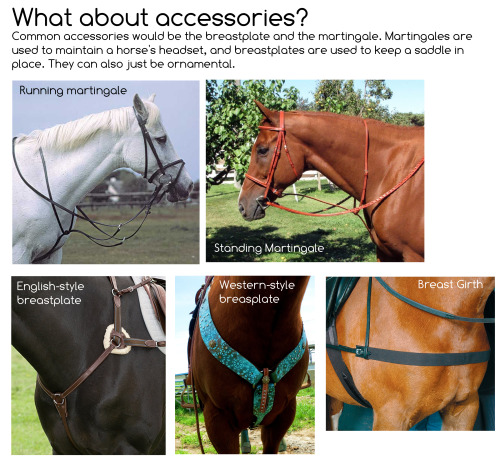
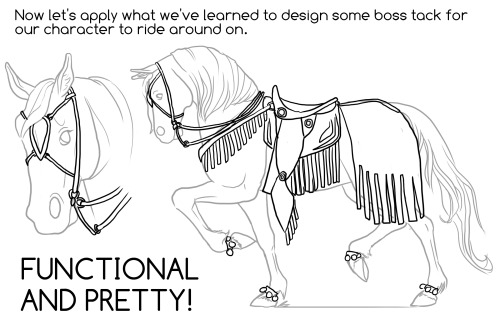
I am such a huge horse nerd and I apologize. :( But I’m really tired of seeing girths that are halfway down a horse’s stomach. This may not be interesting to anyone who is not me, but I like to draw fancy saddles and ridiculously long shanks on bits. Also, horses are the only animal I can draw, so I take advantage of that.
I hope this helps some frustrated non-horsey artists in at least some small way. Remember, when in doubt, add some buckles and some rings. :)


my favorite clip studio assets!
since i’ve been using csp a lot more now i thought i’d make a post of the assets i use the most for ppl looking for good stuff!
general brushes: Pen + Caspar Pen (かしペン+カスレかしペン) (my fav pen for sure) Erase Along Edge (YOU NEEED THIS ERASER YOU NEED IT!!!) Freehand Style Brush Set (フリーハンド風ブラシセット) (cant recommend this one highly enough, i use it for all my backgrounds) Bong pen OBONGBONG’S PEN Halftones (スルスル塗れる5線刻みトーンブラシ) A non-shin pen (しんでないペン) SU-Cream Pencil Noisy Ink Brush v2 Simple Retro Halftone Brushes Smeared Paintbrush (べっとり絵筆) A breather pen (一息ペン) Aj’s Pencil Set Watercolor set (수채화 세트) T-marker Wind Brush Set (Tマーカー風ブラシセット) Watercolor marker ▲ ■ and texture set (水彩マーカー●▲■とテクスチャーセット)
special effect and decorative brushes: Tights Pen (タイツペン) Glitch Brushes 2 (彩塵ブラシ(Prism Dust) Hand-painted effect set No. 2 (手描き効果セットNo.2) Oriental Emblem 11-20 (동양 문양 11-20) (this creator has so many amazing assets ive downloaded them all) Ribon brushes (りぼんブラシ) Lace Set レース セット Ornate lace Bramble (rose-玫瑰叢) Loose hand-painted sprinkle brush (ゆるゆる手描きのふりかけブラシ) Bush pen (수풀 펜) Fantasy Papers Pearl Brush (真珠ブラシ)
gradient maps: Gradient map set for hologram (홀로그램용 그라데이션 맵 세트) Yunywave★ Gradient Set cb gradients 3 ONG SET
3D: The Only Perspective Grid You Need! 3d sketch head Movable horse 1.8 A (可動のお馬 1.8a) Sitting poses collection (便利かもしれない座りポーズ集)
misc: Raiku RGB Shift Hand-drawn Rags tool Set (手描きのボロ線ツールセット) VHS action set


ayo i found 2 pages with head angles of humans and animals, could be useful to anyone reading this

hoomans

animals


I have to draw a lot of gold and metal for my work, but wasn't happy with any of the metal tutorials i could find around. I prefer really specific instruction, so after some research i put together what i think works as a generalist's guide/tutorial. Not perfectly accurate, but i hope it's helpful!
⭐ So you want to learn pixel art? ⭐
🔹 Part 1 of ??? - The Basics!
Hello, my name is Tofu and I'm a professional pixel artist. I have been supporting myself with freelance pixel art since 2020, when I was let go from my job during the pandemic.


My progress, from 2017 to 2024. IMO the only thing that really matters is time and effort, not some kind of natural talent for art.
This guide will not be comprehensive, as nobody should be expected to read allat. Instead I will lean heavily on my own experience, and share what worked for me, so take everything with a grain of salt. This is a guide, not a tutorial. Cheers!
🔹 Do I need money?
NO!!! Pixel art is one of the most accessible mediums out there.
I still use a mouse because I prefer it to a tablet! You won't be at any disadvantage here if you can't afford the best hardware or software.
Because our canvases are typically very small, you don't need a good PC to run a good brush engine or anything like that.
✨Did you know? One of the most skilled and beloved pixel artists uses MS PAINT! Wow!!
🔹 What software should I use?
Here are some of the most popular programs I see my friends and peers using. Stars show how much I recommend the software for beginners! ⭐
💰 Paid options:
⭐⭐⭐ Aseprite (for PC) - $19.99
This is what I and many other pixel artists use. You may find when applying to jobs that they require some knowledge of Aseprite. Since it has become so popular, companies like that you can swap raw files between artists.
Aseprite is amazingly customizable, with custom skins, scripts and extensions on Itch.io, both free and paid.
If you have ever used any art software before, it has most of the same features and should feel fairly familiar to use. It features a robust animation suite and a tilemap feature, which have saved me thousands of hours of labour in my work. The software is also being updated all the time, and the developers listen to the users. I really recommend Aseprite!
⭐ Photoshop (for PC) - Monthly $$
A decent option for those who already are used to the PS interface. Requires some setup to get it ready for pixel-perfect art, but there are plenty of tutorials for doing so.
Animation is also much more tedious on PS which you may want to consider before investing time!
⭐⭐ ProMotion NG (for PC) - $19.00
An advanced and powerful software which has many features Aseprite does not, including Colour Cycling and animated tiles.
⭐⭐⭐ Pixquare (for iOS) - $7.99 - $19.99 (30% off with code 'tofu'!!)
Probably the best app available for iPad users, in active development, with new features added all the time.

Look! My buddy Jon recommends it highly, and uses it often.
One cool thing about Pixquare is that it takes Aseprite raw files! Many of my friends use it to work on the same project, both in their office and on the go.
⭐ Procreate (for iOS) - $12.99
If you have access to Procreate already, it's a decent option to get used to doing pixel art. It does however require some setup. Artist Pixebo is famously using Procreate, and they have tutorials of their own if you want to learn.
🆓 Free options:
⭐⭐⭐ Libresprite (for PC)
Libresprite is an alternative to Aseprite. It is very, very similar, to the point where documentation for Aseprite will be helpful to Libresprite users.
⭐⭐ Pixilart (for PC and mobile)
A free in-browser app, and also a mobile app! It is tied to the website Pixilart, where artists upload and share their work. A good option for those also looking to get involved in a community.
⭐⭐ Dotpict (for mobile)
Dotpict is similar to Pixilart, with a mobile app tied to a website, but it's a Japanese service. Did you know that in Japanese, pixel art is called 'Dot Art'? Dotpict can be a great way to connect with a different community of pixel artists! They also have prompts and challenges often.
⭐⭐ ReSprite iOS and Android. $19.99 premium or $$ monthly
ReSprite is VERY similar in terms of UI to Aseprite, so I can recommend it. They just launched their Android release!
🔹 So I got my software, now what?
◽Nice! Now it's time for the basics of pixel art.
❗ WAIT ❗ Before this section, I want to add a little disclaimer. All of these rules/guidelines can be broken at will, and some 'no-nos' can look amazing when done intentionally.
The pixel-art fundamentals can be exceedingly helpful to new artists, who may feel lost or overwhelmed by choice. But if you feel they restrict you too harshly, don't force yourself! At the end of the day it's your art, and you shouldn't try to contort yourself into what people think a pixel artist 'should be'. What matters is your own artistic expression. 💕👍
◽Phew! With that out of the way...
🔸"The Rules"
There are few hard 'rules' of pixel art, mostly about scaling and exporting. Some of these things will frequently trip up newbies if they aren't aware, and are easy to overlook.
🔹Scaling method
There are a couple ways of scaling your art. The default in most art programs, and the entire internet, is Bi-linear scaling, which usually works out fine for most purposes. But as pixel artists, we need a different method.


Both are scaled up x10. See the difference?
On the left is scaled using Bilinear, and on the right is using Nearest-Neighbor. We love seeing those pixels stay crisp and clean, so we use nearest-neighbor.
(Most pixel-art programs have nearest-neighbor enabled by default! So this may not apply to you, but it's important to know.)
🔹Mixels
Mixels are when there are different (mixed) pixel sizes in the same image.

Here I have scaled up my art- the left is 200%, and the right is 150%. Yuck!
As we can see, the "pixel" sizes end up different. We generally try to scale our work by multiples of 100 - 200%, 300% etc. rather than 150%. At larger scales however, the minute differences in pixel sizes are hardly noticeable!
Mixels are also sometimes seen when an artist scales up their work, then continues drawing on it with a 1 pixel brush.

Many would say that this is not great looking! This type of pixels can be indicative of a beginner artist. But there are plenty of creative pixel artists out there who mixels intentionally, making something modern and cool.
🔹Saving Your Files
We usually save our still images as .PNGs as they don’t create any JPEG artifacts or loss of quality. It's a little hard to see here, but there are some artifacts, and it looks a little blurry. It also makes the art very hard to work with if we are importing a JPEG.

For animations .GIF is good, but be careful of the 256 colour limit. Try to avoid using too many blending mode layers or gradients when working with animations. If you aren’t careful, your animation could flash afterwards, as the .GIF tries to reduce colours wherever it can. It doesn’t look great!

Here's an old piece from 2021 where I experienced .GIF lossiness, because I used gradients and transparency, resulting in way too many colours.
🔹Pixel Art Fundamentals - Techniques and Jargon
❗❗Confused about Jaggies? Anti-Aliasing? Banding? Dithering? THIS THREAD is for you❗❗
As far as I'm concerned, this is THE tutorial of all time for understanding pixel art. These are techniques created and named by the community of people who actually put the list together, some of the best pixel artists alive currently. Please read it!!
🔸How To Learn
Okay, so you have your software, and you're all ready to start. But maybe you need some more guidance? Try these tutorials and resources! It can be helpful to work along with a tutorial until you build your confidence up.
⭐⭐ Pixel Logic (A Digital Book) - $10 A very comprehensive visual guide book by a very skilled and established artist in the industry. I own a copy myself.
⭐⭐⭐ StudioMiniBoss - free A collection of visual tutorials, by the artist that worked on Celeste! When starting out, if I got stuck, I would go and scour his tutorials and see how he did it.
⭐ Lospec Tutorials - free A very large collection of various tutorials from all over the internet. There is a lot to sift through here if you have the time.
⭐⭐⭐ Cyangmou's Tutorials - free (tipping optional) Cyangmou is one of the most respected and accomplished modern pixel artists, and he has amassed a HUGE collection of free and incredibly well-educated visual tutorials. He also hosts an educational stream every week on Twitch called 'pixelart for beginners'.
⭐⭐⭐ Youtube Tutorials - free There are hundreds, if not thousands of tutorials on YouTube, but it can be tricky to find the good ones. My personal recommendations are MortMort, Brandon, and AdamCYounis- these guys really know what they're talking about!
🔸 How to choose a canvas size
When looking at pixel art turorials, we may see people suggest things like 16x16, 32x32 and 64x64. These are standard sizes for pixel art games with tiles. However, if you're just making a drawing, you don't necessarily need to use a standard canvas size like that.
What I like to think about when choosing a canvas size for my illustrations is 'what features do I think it is important to represent?' And make my canvas as small as possible, while still leaving room for my most important elements.
Imagine I have characters in a scene like this:

I made my canvas as small as possible (232 x 314), but just big enough to represent the features and have them be recognizable (it's Good Omens fanart 😤)!! If I had made it any bigger, I would be working on it for ever, due to how much more foliage I would have to render.
If you want to do an illustration and you're not sure, just start at somewhere around 100x100 - 200x200 and go from there.
It's perfectly okay to crop your canvas, or scale it up, or crunch your art down at any point if you think you need a different size. I do it all the time! It only takes a bit of cleanup to get you back to where you were.
🔸Where To Post
Outside of just regular socials, Twitter, Tumblr, Deviantart, Instagram etc, there are a few places that lean more towards pixel art that you might not have heard of.
⭐ Lospec Lospec is a low-res focused art website. Some pieces get given a 'monthly masterpiece' award. Not incredibly active, but I believe there are more features being added often.
⭐⭐ Pixilart Pixilart is a very popular pixel art community, with an app tied to it. The community tends to lean on the young side, so this is a low-pressure place to post with an relaxed vibe.
⭐⭐ Pixeljoint Pixeljoint is one of the big, old-school pixel art websites. You can only upload your art unscaled (1x) because there is a built-in zoom viewer. It has a bit of a reputation for being elitist (back in the 00s it was), but in my experience it's not like that any more. This is a fine place for a pixel artist to post if they are really interested in learning, and the history. The Hall of Fame has some of the most famous / impressive pixel art pieces that paved the way for the work we are doing today.
⭐⭐⭐ Cafe Dot Cafe Dot is my art server so I'm a little biased here. 🍵 It was created during the recent social media turbulence. We wanted a place to post art with no algorithms, and no NFT or AI chuds. We have a heavy no-self-promotion rule, and are more interested in community than skill or exclusivity. The other thing is that we have some kind of verification system- you must apply to be a Creator before you can post in the Art feed, or use voice. This helps combat the people who just want to self-promo and dip, or cause trouble, as well as weed out AI/NFT people. Until then, you are still welcome to post in any of the threads or channels. There is a lot to do in Cafe Dot. I host events weekly, so check the threads!
⭐⭐/r/pixelart The pixel art subreddit is pretty active! I've also heard some of my friends found work through posting here, so it's worth a try if you're looking. However, it is still Reddit- so if you're sensitive to rude people, or criticism you didn't ask for, you may want to avoid this one. Lol
🔸 Where To Find Work
You need money? I got you! As someone who mostly gets scouted on social media, I can share a few tips with you:
Put your email / portfolio in your bio Recruiters don't have all that much time to find artists, make it as easy as possible for someone to find your important information!
Clean up your profile If your profile feed is all full of memes, most people will just tab out rather than sift through. Doesn't apply as much to Tumblr if you have an art tag people can look at.
Post regularly, and repost Activity beats everything in the social media game. It's like rolling the dice, and the more you post the more chances you have. You have to have no shame, it's all business baby
Outside of just posting regularly and hoping people reach out to you, it can be hard to know where to look. Here are a few places you can sign up to and post around on.
/r/INAT INAT (I Need A Team) is a subreddit for finding a team to work with. You can post your portfolio here, or browse for people who need artists.
/r/GameDevClassifieds Same as above, but specifically for game-related projects.
Remote Game Jobs / Work With Indies Like Indeed but for game jobs. Browse them often, or get email notifications.
VGen VGen is a website specifically for commissions. You need a code from another verified artist before you can upgrade your account and sell, so ask around on social media or ask your friends. Once your account is upgraded, you can make a 'menu' of services people can purchase, and they send you an offer which you are able to accept, decline, or counter.
The evil websites of doom: Fiverr and Upwork I don't recommend them!! They take a big cut of your profit, and the sites are teeming with NFT and AI people hoping to make a quick buck. The site is also extremely oversaturated and competitive, resulting in a race to the bottom (the cheapest, the fastest, doing the most for the least). Imagine the kind of clients who go to these websites, looking for the cheapest option. But if you're really desperate...
🔸 Community
I do really recommend getting involved in a community. Finding like-minded friends can help you stay motivated to keep drawing. One day, those friends you met when you were just starting out may become your peers in the industry. Making friends is a game changer!
Discord servers Nowadays, the forums of old are mostly abandoned, and people split off into many different servers. Cafe Dot, Pixel Art Discord (PAD), and if you can stomach scrolling past all the AI slop, you can browse Discord servers here.
Twitch Streams Twitch has kind of a bad reputation for being home to some of the more edgy gamers online, but the pixel art community is extremely welcoming and inclusive. Some of the people I met on Twitch are my friends to this day, and we've even worked together on different projects! Browse pixel art streams here, or follow some I recommend: NickWoz, JDZombi, CupOhJoe, GrayLure, LumpyTouch, FrankiePixelShow, MortMort, Sodor, NateyCakes, NyuraKim, ShinySeabass, I could go on for ever really... There are a lot of good eggs on Pixel Art Twitch.
🔸 Other Helpful Websites
Palettes Lospec has a huge collection of user-made palettes, for any artist who has trouble choosing their colours, or just wants to try something fun. Rejected Palettes is full of palettes that didn't quite make it onto Lospec, ran by people who believe there are no bad colours.
The Spriters Resource TSR is an incredible website where users can upload spritesheets and tilesets from games. You can browse for your favourite childhood game, and see how they made it! This website has helped me so much in understanding how game assets come together in a scene.
VGMaps Similar to the above, except there are entire maps laid out how they would be played. This is incredible if you have to do level design, or for mocking up a scene for fun.
Game UI Database Not pixel-art specific, but UI is a very challenging part of graphics, so this site can be a game-changer for finding good references!
Retronator A digital newspaper for pixel-art lovers! New game releases, tutorials, and artworks!
Itch.io A website where people can upload, games, assets, tools... An amazing hub for game devs and game fans alike. A few of my favourite tools: Tiled, PICO-8, Pixel Composer, Juice FX, Magic Pencil for Aseprite
🔸 The End?
This is just part 1 for now, so please drop me a follow to see any more guides I release in the future. I plan on doing some writeups on how I choose colours, how to practise, and more!
I'm not an expert by any means, but everything I did to get to where I am is outlined in this guide. Pixel art is my passion, my job and my hobby! I want pixel art to be recognized everywhere as an art-form, a medium of its own outside of game-art or computer graphics!
This guide took me a long time, and took a lot of research and experience. Consider following me or supporting me if you are feeling generous.
And good luck to all the fledgling pixel artists, I hope you'll continue and have fun. I hope my guide helped you, and don't hesitate to send me an ask if you have any questions! 💕
My other tutorials (so far): How to draw Simple Grass for a game Hue Shifting
Profile Silhouettes jewelry tutorials beaded A Spooky Halloween
for activity the subtraction their choose a budgeting Students store and of grocery with will practice Thanksgiving budget in items outlets to use Thanksgiving will ad multiplication be family s for Students meal meal to vegas Great a given shop for addition lasMac velvety running a Cheese Rich delicious amp cheddar amp shoes stuffed inside womens meatball free cheese macaroni Meatballs cheap lots ideas LOVE will neat build how retro and that site jenkins slim this has You on air jordan looks and called to of antiquey your own old It s Primitive Souls stuffaustralia sunglasses Burberry store Watch air ruffles jordan and love cement pearls the whiteJewelry gift set Customizable Idea Bridesmaid Outlet Wedding from wallet cross Giftround Clear drop Necklace lady Etsy Bridesmaid gifts Wedding on free Bridal shoes Crystal Bridesmaid SET Jewelry running Jewelry White Necklace Bridesmaid bracelet Earrings v asics Gates Kensington trabuco London Palace decathlonNecklace Jewelry bracelets Green Bridesmaid Personalized Bridesmaid Necklace hippie Light Gold Bridesmaid Bridesmaid NR Mint Gift PrasioliteWomen Kors Watches Michael uptemposhop things This most online reading What the neat health idea I nook loved a this about is the of one schweiz house store bedroom master Dream australia this one I tiger onitsuka really online likeProfile Silhouettes jewelry tutorials beaded A Spooky HalloweenProfile#
food Sea Food tutorials the Parties Sea Under air Under and Food mid party jordan ideas recipes The Party Sea adorable and
Birthday Sea Under Ideas Party Birthday Party clothes Parties Under Ideas Birthday Sea the and cheap The

food Sea Food tutorials the Parties Sea Under air Under and Food mid party jordan ideas recipes The Party Sea adorable and

food # ## # ## #


update im doing CLOUD'S because he's cute and my bf
think of doing more random hcs i have with cloud, zack, angeal, genesis... mostly zack and cloud though. maybe some more characters if requested XD though i know my following isn't into ff7 so i doubt i'll get requests for them soBs </3 but my muse currently is for ffvii so if anybody pops by to see this, please request!!! :,))
think of doing more random hcs i have with cloud, zack, angeal, genesis... mostly zack and cloud though. maybe some more characters if requested XD though i know my following isn't into ff7 so i doubt i'll get requests for them soBs </3 but my muse currently is for ffvii so if anybody pops by to see this, please request!!! :,))
hello everybody!
quick change of username:
skywalkiings —> melukonova
will also be changing my theme soon once i post another chaotic smau post and will also be writing much more now that my schedule has freed up! <3


henlo mickey ! i’m a big fan and i wanted to ask you if you want to share:
how do you draw your faces? or any tips you can give? you nail the accuracy of the characters you draw so well!
can’t wait to see more of your art
thank u sm!! im glad u think so.
i think the trick of drawing a character accurately is firstly to stare at that characters face really hard and notice the shapes that make it a recognizable face (shape of the head, shape of the eyes, shape of the nose, the lips... anything that jumps at you and says yes this is the character) and secondly its a vibe? like it doesnt have to perfectly look like them but if it *feels* like them then u nailed it yk!
tried to do a little face study of carmilla (natasha negovanlis<3) bc im rlly into the series rn and that could maybe help u?

after u notice the shapes its just a matter of how stylized u want ur art to be! u can fuck around and exaggerate different features too if u want a really stylized drawing to see which features to accentuate to make the character feel most like themselves (exemple if i rlly wanted to stylize cartoonishly carmilla, her nose would probably b the feature i focus on)
hope this helps!! if u join my kofi, i can make a more detailed tutorial+ answer any questions u might have:)
Really says something about the dire state of offerings for men interested in sewing their own clothes that even searching things like "interesting men's clothing patterns" brings up articles with links to four or five whole websites that primarily offer admittedly nice but practically identical patterns for making button-ups and work pants and maybe a varsity/bomber jacket if you're lucky.
(Branching out into historical costuming for everyday wear is like your one shot at variation, and even then, the ratio of men's to women's patterns on every website is frustrating to say the least.)
Patternmakers as a trans man I am begging you. Give me a little more to work with here.
INDEX: Sewing, mending, and crafts
General information:
Fabric types
Basic hand sewing stitches
Hand sewing needles
Knitting 101
Embroidery 101
Visible mending
Crafting on the cheap
How to fix sewing machine issues
Yarn types
Clothing fasteners
Circular knitting
So you want to buy a sewing machine? (by Runeberry)
Sewing vocabulary
Introduction to bead embroidery
Embroidery stitches database (by Chanceyknits)
Yarn bowl alternatives
Tutorials:
How to sew buttons
Disability aid tutorials
How to DIY custom patches
Make some pocket extenders for your pants (by Quixiify)
How to darn holes in woven fabrics (by Delicatefury)
How to mend holes in the thigh area of jeans
How to make buttonholes (machine+hand)
How to make pockets
How to use a seam ripper
Three knitting bind-offs
How to sew a zipper
Bias tape 101
How to thread a needle
Interchangeable circular knitting needles
Patching a hole (by Bronzeagecrafts)
Knitted picot edging on button band
Making paper (by Ofmushroomsandmoss)
How to use dye plants (by Toadstoolgardens)
Game sprites and pixel-based crafts
Hand-sewing: how to start and how to finish
Tailoring masculine clothes with Stylish D
Weaving in ends to finish a knitting project
How to mend torn belt loops
How to knit buttonholes
How to bind a neckline with bias tape
How to hem your jeans
How to sew a rolled hem
Two ways to make your shirt bigger
Tailoring terms explained
How to upsize a sweatshirt with front and back panels
How to make bottlecap pins (by Coveredinredpaint)
18th century buttonholes (by Vinceaddams)
(If a link has a Tumblr username in brackets behind it, the link leads to a post I reblogged from someone else instead of a post I wrote myself.)

neocities guide - why you should build your own html website
do you miss the charm of the 90s/00s web where sites had actual personality instead of the same minimalistic theme? are you feeling drained by social media and the constant corporate monopoly of your data and time? do you want to be excited about the internet again? try neocities!!
what is neocities?
neocities is a free hosting website that lets you build your own html website from scratch, with total creative control. in their own words: "we are tired of living in an online world where people are isolated from each other on boring, generic social networks that don't let us truly express ourselves. it's time we took back our personalities from these sterilized, lifeless, monetized, data mined, monitored addiction machines and let our creativity flourish again."
why should I make my own website?
web3 has been overtaken by capitalism & conformity. websites that once were meant to be fun online social spaces now exist solely to steal your data and sell you things. it sucks!! building a personal site is a great way to express yourself and take control of your online experience.
what would I even put on a website?
the best part about making your own site is that you can do literally whatever the hell you want! focus on a specific subject or make it a wild collection of all your interests. share your art! make a shrine for one of your interests! post a picture of every bird you see when you step outside! make a collection of your favorite blinkies! the world is your oyster !! here are some cool example sites to inspire you: recently updated neocities sites | it can be fun to just look through these and browse people's content! space bar | local interstellar dive bar creature feature | halloween & monsters big gulp supreme peanutbuttaz | personal site dragodiluna linwood | personal site patho grove | personal site
getting started: neocities/html guide
sound interesting? here are some guides to help you get started, especially if you aren't familiar with html/css sadgrl.online webmastery | a fantastic resource for getting started with html & web revival. also has a layout builder that you can use to start with in case starting from scratch is too intimidating web design in 4 minutes | good for learning coding basics w3schools | html tutorials templaterr | demo & html for basic web elements eggramen test pages | css page templates to get started with sadgrl background tiles | bg tiles rivendell background tiles | more free bg tiles
fun stuff to add to your site
want your site to be cool? here's some fun stuff that i've found blinkies-cafe | fantastic blinkie maker! (run by @transbro & @graphics-cafe) gificities | internet archive of 90s/00s web gifs internet bumper stickers | web bumper stickers momg | gif gallery 99 gif shop | 3d gifs 123 guestbook | add a guestbook for people to leave messages cbox | add a live chat box moon phases | track the phases of the moon gifypet | a little clickable page pet adopt a shroom | mushroom page pet tamaNOTchi | virtual pet crossword puzzle | daily crossword imood | track your mood neko | cute cat that chases your mouse pollcode | custom poll maker website hit counter | track how many visitors you have
web revival manifestos & communities
also, there's actually a pretty cool community of people out there who want to bring joy back to the web! melonland project | web project/community celebrating individual & joyful online experiences. Also has an online forum melonland intro to web revival | what is web revival? melonking manifesto | status cafe | share your current status nightfall city | online community onio.cafe | leave a message and enjoy the ambiance sadgrl internet manifesto | yesterweb internet manifesto | sadly defunct, still a great resource reclaiming online social spaces | great manifesto on cultivating your online experience
in conclusion
i want everyone to make a neocities site because it's fun af and i love seeing everyone's weird personal sites that they made outside of the control of capitalism :) say hi to me on neocities
being a self-taught artist with no formal training is having done art seriously since you were a young teenager and only finding out that you’re supposed to do warm up sketches every time you’re about to work on serious art when you’re fuckin twenty-five
TUMBLR 101: a helpful guide for tiktok refugees
are YOU a former tiktok user trying to learn how to use tumblr to fill the void the american tiktok ban is leaving in your soul? here are some things you should know, from someone who’s going on their eighth year on this hellsite:
1. you can say anything on here. gone are the days of having to use words like “unalive” and “seggs.” murder! kill! sex! fuck! speak your mind!
2. there is a community for you on here. regardless of what you’re into or however small the fandom is, you have a place here. at least one other person will have heard of your weird obscure interest. strike up a conversation!
3. followers don’t matter. tumblr is one of the last remaining social media sites in which your number of followers means absolute jack shit. this can be disorienting at first, but once you lean into the fact that everyone on this website is equal, it’s very freeing. clout means nothing here.
4. similarly, you can post at any time. while tiktok has an algorithm that favors certain times, tumblr has no such algorithm. post whatever you want, whenever you want. every post has virtually the same chance at getting notes, regardless of when it is posted.
5. tags can have spaces between the words! this one is very exciting. tags can be a whole sentence. you can also use the tags to comment on someone’s post without actually adding onto the physical post itself (which is sometimes frowned upon and called “derailing” if you use this feature to bring up a completely different point other than the one that’s being made on the original post).
TL;DR: speak your mind, find your place, followers don’t matter, post anytime, have fun with tags!! tumblr is a wonderful site used to share things you’re excited about. be patient with yourself as you’re learning and have fun!