Curate, connect, and discover
Art Tutorial - Blog Posts

made this for oomf but you can have it too. a little breakdown of my process with bird wings if anyone finds it useful
Oh my god, could you do a wing tutorial? The way you draw wings is just absolutely incredible 😭😭😭can't stop thinking about it
Hi! Thank you 🧡🧡🧡
I did a little tutorial for you (for the first time in many years), I hope it will be useful


Hey everyone! I had a few people in the past ask how I draw gemstones, so I made a quick tutorial. I hope it helps!


A master post of Thomas Romain’s art tutorials.
There’s not enough space to post all of them, SO here’s links to everything he has posted (on twitter) so far : 1 2 3 4 5 6 7 8 9 10 11 12.
Now that new semesters have started, I thought people might need these. Enjoy your lessons!

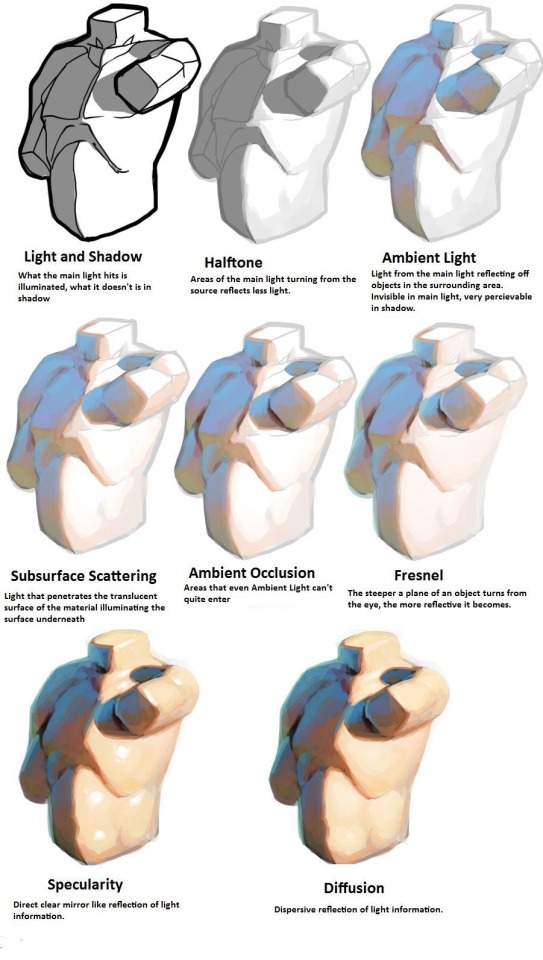

I am so serious when I say if you want to learn about light, you NEED to at least look at modeseven’s tutorials. even if you’re not pursuing a painterly style, this is all essential theory that can be easily adapted to different coloring styles. notice how none of these ever say ‘light with these colors and shade with these colors’? notice how this is teaching how light works on a mechanical level, and reminding the audience to adjust the actual colors they choose by context? THAT is good advice.
(if you’re thinking ‘wow I want to study more of this persons art!’ I encourage you to do so, but proceed with the knowledge that modeseven draws pretty much exclusively weird as hell kink art. sometimes wisdom comes from horny places)
Hello! I’m just here bc I’m a little confused on what you meant by Smythe drawing out “each individual asset” when she was making comics? Now, granted, I can see that it made her file ginormous, but me personally as someone who knows nothing about making online comics but is really wanting to get into it (and also as someone who has a ‘too many layers’ problem myself), is there a way to avoid using too many layers?
My current way of making comics has been to draw the panels individually and then format them (which I know is terrible management wise and also messes with the quality) but I honestly have no other idea of how to do it properly, and seeing how stunning Lore Rekindled looks, I don’t know how you would manage to put all that lighting effects and little details on the same layers. (But also I may be thinking of it wrong so I’ll let you talk qwq)
Ah I can actually give you a visual breakdown of what I meant by that!

So in this you can see there are a TON of layers, and not even all of them are visible because some of them are stuffed into FOLDERS that have been left closed. BUT if you look REEEEALLY carefully-

^^^ These layers right here? That's specifically Minthe from this panel in Episode 61:

(the unique pose here makes it real easy to tell that this is the corresponding panel, you can see the matching body shape with the dark shading that's clipped to the base layer below it!)
So what this means is that Rachel didn't draw all her characters on one base layer, she drew every single character in every single panel separately. Now of course, she could merge all these layers together as working on separate layers helps make it easier to work on elements that collide separately (like one character being 'underneath' another character like Hades is here) but because she has all of those clipping layers with the shading already added in, she likely didn't merge them afterwards because that would actually create MORE problems (because if she merged the Minthe layer in with Hades, then the shading for Minthe that she painted outside of the lines would show up on Hades and then she'd have to erase it which is just a bunch of extra work).
You can also tell all these characters are on their own layer because the layer thumbnail EXCLUSIVELY shows those characters. A layer will show as much canvas length as it needs to cover what's in that layer, so if the thumbnail is only showing one character, that means there's NOTHING ELSE on that layer. If there were more elements on this layer than just Minthe, the layer thumbnail would look more like this:

Now let's compare it to Rekindled's layers! I'll use a completed page to make it fair as we use a lot of extra layers in the post-production phase where we add the texture effects and glow and all that fun stuff, plus I'll even make it a more complicated page like that big nymph explanation spread from Episode 51:


So I'll break it down to make this make more sense:
BG 2 Copy (technically this is supposed to be BG 1) - Basically the panel shapes, what I'll do is mark out the panels with flat blocks and through that we'll add background elements in a clipping layer (usually done by Banshriek). Often times they'll do multiple layers to make the process easier and then merge them all together in the end. With these shapes operating as panels, it means I can just auto select the whole layer, invert the selection, and easily erase whatever's outside of it (such as the lineart and base colors that I put down afterwards). I could just use masking layers like I did in [AFTERBIRTH] but I find this way works better for the process of making Rekindled.
BG 2 - This is where we add objects / foreground elements. So stuff like furniture, interactables, anything that needs to be kept separate from the larger background to make it easier to work with. This can also include "floating" panels that need to be above other panels, such as this:

All of the backgrounds are then nested in a folder for organization purposes (we also sometimes use clipping layers on top of those folders to apply extra effects over anything contained within that folder without affecting other folders, that's a common technique that Banshriek applies)
Then we get into our Characters folder:
BASE - This is where I do the majority of my work, all the characters in every panel on a page are flatted into this layer. Sometimes I do have to create separate layers to, again, make it easier to work with overlapping characters, but usually those layers will be merged before I go into the shading process. I simply shade on a single layer by using the lasso / magic wand tool to select my area for painting, the flat colors make it really easy to do that. Sometimes I need to create a secondary shading layer if I've put down dark colors that start to bleed into the lighter colors, but again, I merge when I'm done into a single shading layer. We also sometimes employ an Add (Glow) layer into the clipping set if we need a glow effect that's exclusive to the characters and doesn't travel outside of their base colors.
There's a (leaves) layer here that I used for the dryad because I needed the leaves to be above the base layer, after that I selected the leaves elements so that I could erase the lineart in the layer above it where needed.

LINEART - It's lineart, enough said haha That said, I do think Rachel actually uses clipping layers for her lineart in places, it seems to be visible in some of her process videos where you can see the lineart present in a clipping layer, and that would explain why there are panels where the lineart suddenly 'cuts off' and doesn't travel outside of the base layer, like so:


GLOW - This is where we do an Add (Glow) layer that isn't restricted to the base layer, it's where we add all the fun lil' glow and sparkle effects over the characters !
The CLOUDS layer is, like the leaves, a background element that needs to be above the base layers rather than constricted to the background.
Above the Characters folder you can see what I mentioned earlier where Banshriek has added more post-production effects that are exclusively clipped to the contents of the Characters folder. This means the effects / blend modes do NOT affect the background layers or anything above it.
The BLUR (Overlay) layer is something we just started doing over the past several episodes, it's a technique I actually picked up from 66 of City of Blank where I merge all the layers into a new visible layer which I then apply a Gaussian Blur to at around 60% and then set to Overlay (and then I adjust the layer opacity until it looks right, usually around 25-35%), it gives it a bit of a softer "dreamier" vibe in the final colors and really helps unify everything!
CANVAS - This is an Overlay layer which is also set to an opacity of 25-35% where I go over the panels with the Add Canvas brush from the Kyle Webster set, unlike the Canvas overlay texture in CSP I can actually choose the colors I want to use which means I can match the canvas texture color to the mood and environment of the scene (ex. I'll use a very light blue for scenes in the Underworld). Not only does it give it that signature texture from S1 of LO, but it also helps balance out the effects of the BLUR layer.
The SKETCH layer sits on top of everything and gets turned off once all the base layers and lineart are down, and ofc the SPEECH folder is just where all the text is kept.
I know everything I just laid out is a LOT but ultimately it's how we operate, it works for us! But it also begs the question of why Rachel operates the way she does because a lot of it seems extremely unnecessary and more likely to bite her in the ass (the more layers there are, the bigger your file size gets, the risk of drawing on the wrong layer increases as well as the risk of posting a panel that's missing elements because the layer was left turned off by mistake, etc.) And it's more so concerning with how she operates with her assistants because if she's still using this many layers when collaborating with other people, hooo boy. Though based on what I've observed of what her assistants contribute, I get a lot more of the sense that she circumvents this by having the artists do the flats separately and then importing them in as separate assets that she then just imports into the page and places them where they need to be. Still not a great workflow IMO because it's what's led to a lot of the issues of characters "floating" rather than feeling like they're actually in the environment-

-but that's still an issue that could be solved by Rachel just taking more time to actually flesh out the backgrounds and lighting to give more of an impression of the characters actually existing in the space. Like that Hestia panel could easily be fixed by just giving the background a bit more detail and putting actual shading underneath her (and lighting from whatever direction it's coming from).
Either way, regardless of whether or not Rachel's process is productive or not, I hope that breakdown helps explain how we do it in Rekindled! Learning how to manage layers is definitely a skill that can be tricky to harness, but once it "clicks" there's a lot you can get away with. Ultimately how you do it is up to you, but my best piece of advice to offer is to just be open to other types of workflows because you don't know how much you might be shooting yourself in the foot doing things the hard way when there are often way easier and more efficient ways to get the same job done. That's basically the vibe I get from observing Rachel's workflow, it seems like she's still using methods that she thinks are working for her (and probably did work just fine for her when it was JUST her) but could be vastly improved for her and her team if she'd just get over the initial hump of stepping outside of her comfort zone. Would probably make for a better comic too LOL
I hope that helps! Good luck! ( ´ ∀ `)ノ~ ♡

Hey! I wrote a whole post about how I go from script to finished comic page, you can see it on my Patreon for $3!! Along with a bunch of other posts about my planning/design process AND early access to chapter 2 pages as I draw them!
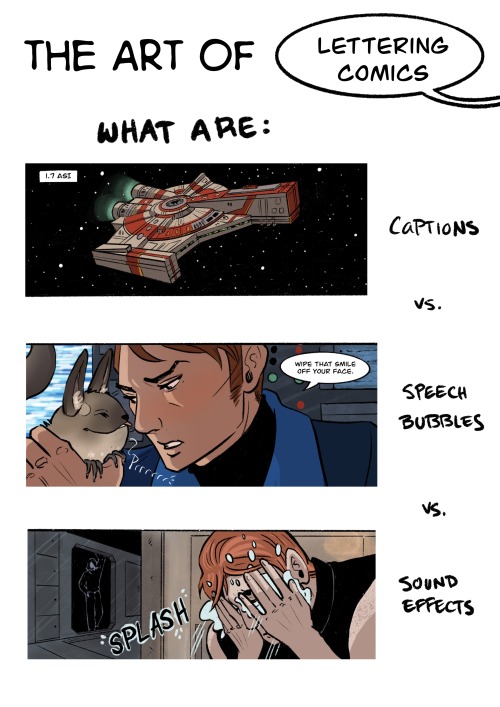
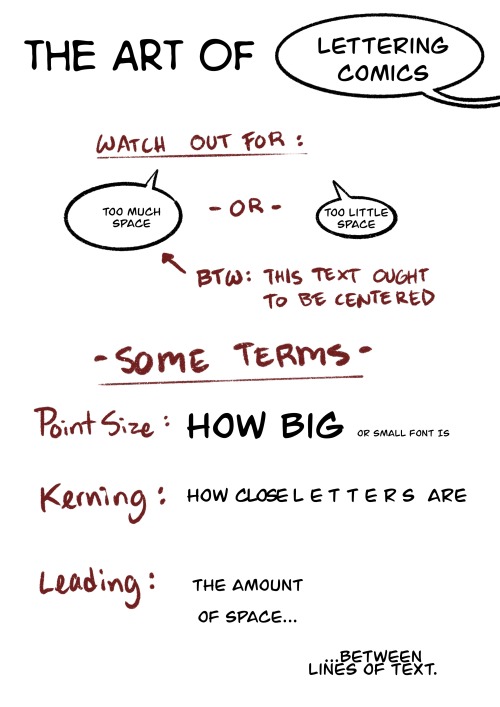
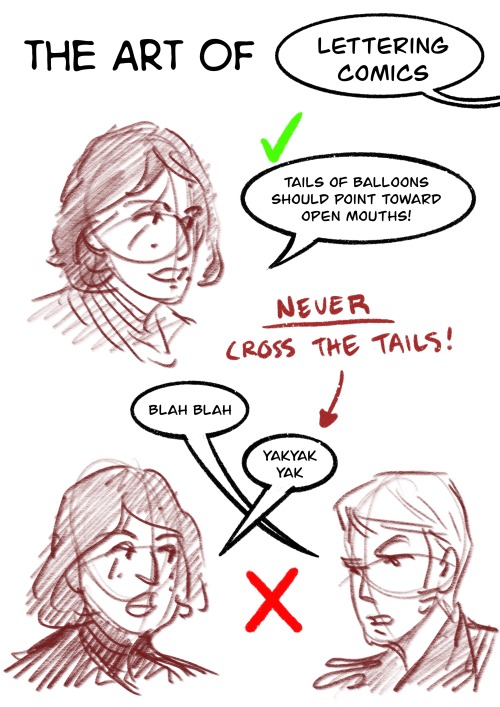
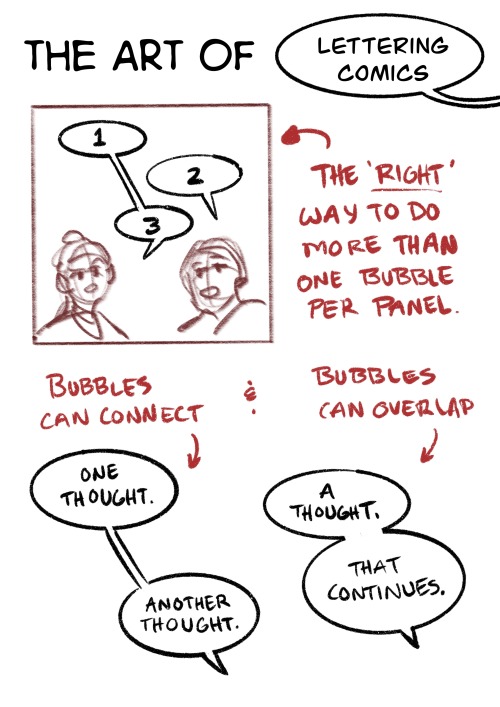

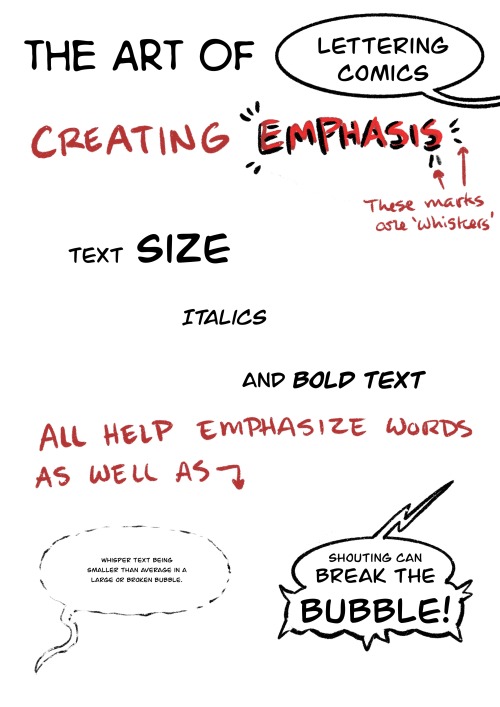
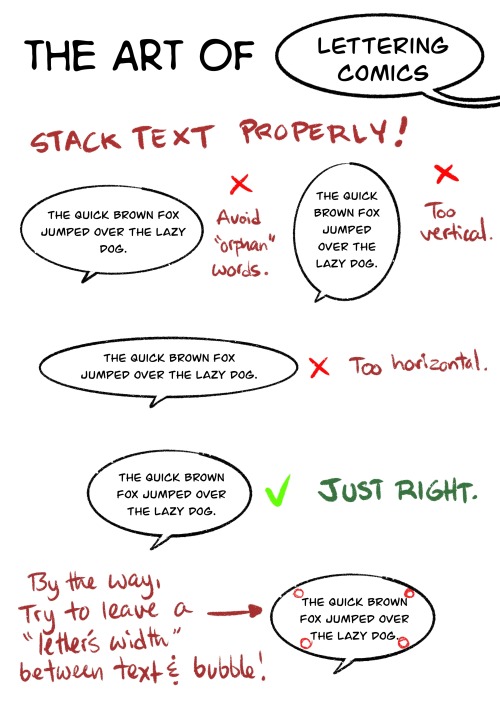
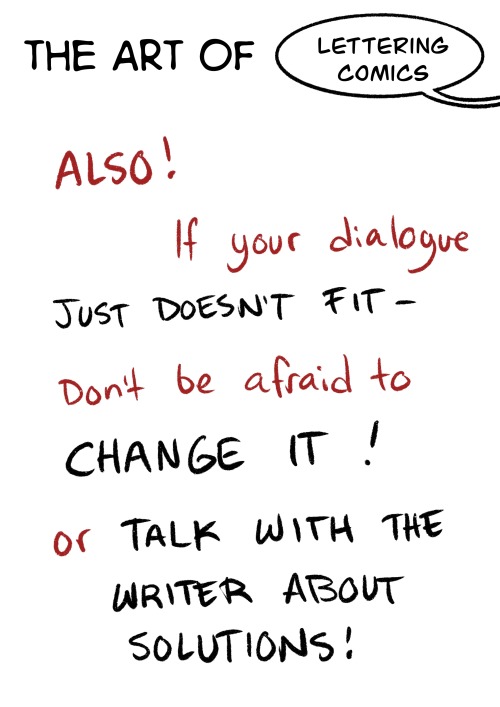
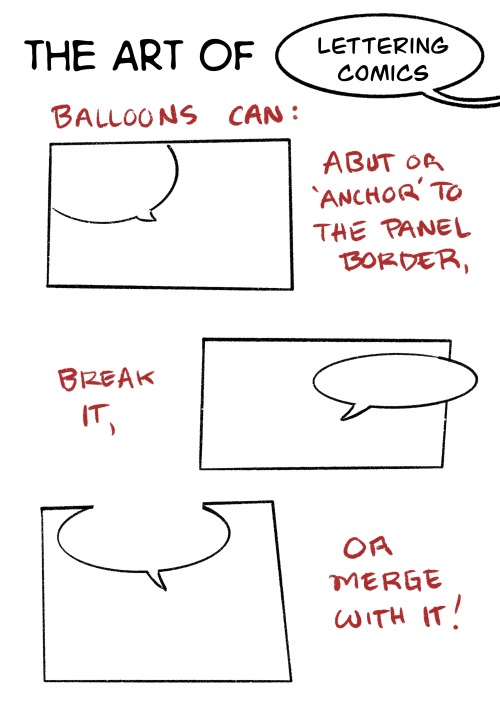
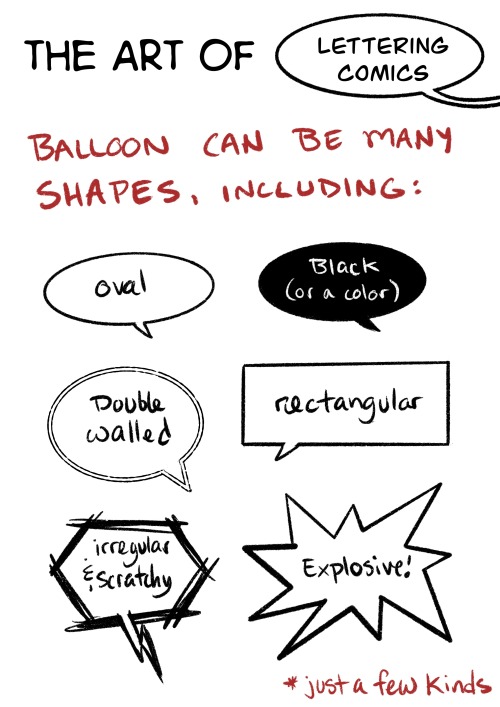
Here’s the first half of slides from my comic class on Lettering!
Rest of the slides: https://gingersnappish.tumblr.com/post/616487287636803584/the-rest-of-the-comic-lettering-slides-first
Note to Self - Convert a Physical Page to Online Scrolling
(No spoilers, don’t worry)
Little Nemo in Slumberland (February 17, 1907)

The original full vertical page is 800px by 7680px, but split into 8 images via Croppy (using the Line Webtoon option) to preserve image quality and get around upload limitations
On sites like Webtoon the seam between images is not visible, but Tumblr introduces a few pixels of padding between each image
Vertical scrolling takes advantage of spacing between panels to make time appear to slow down for the reader, since it artificially increases the time it takes to read the page. For the sake of curiosity, we will expand the last three panels of Nemo floating through space to emphasis how lost he feels and how sudden his return is


How to Webcomic!
A solid book that I’ve been enjoying

Some sample pages:


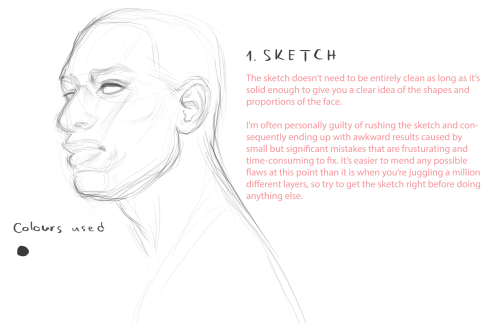

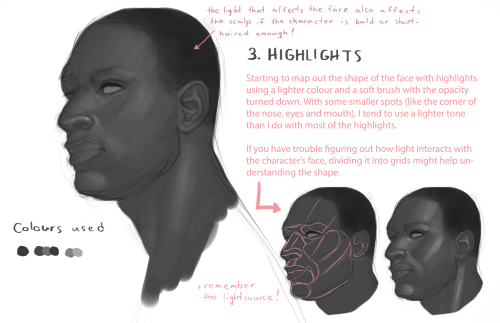

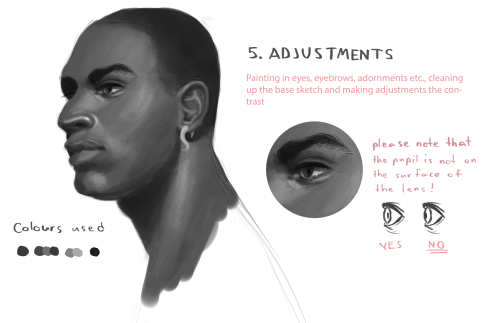


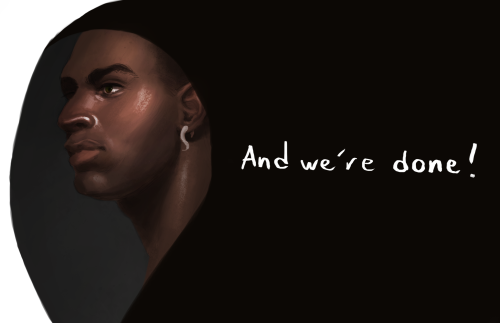
A few people have asked about this recently so I tried to break down my method of painting faces to the best of my ability. I personally like to use gritty chalky brushes, and this particular painting was mainly done with this brush by Mark Winters.

Please tell me if any of the links aren’t working
Faces:
Face Tutorial
How to Draw the Human Face
Quick Face Tutorial
How to Sketch Faces
Profile Anatomy
Drawing Heads
Basic Head Layout
How to Draw Ears
Basic Ear Tutorial
Ears and Noses
Drawing Noses
How To Draw Mouths
Mouth Tutorial
Lips
Lips Ref
Semi-Realistic Eye Tutorial
Tips for Drawing Eyes
Manga Eye Tutorial
Pixel Eye
Eyes in Different Angles
Expressions
Step by Step Expressions
How to Avoid the Same Face
Head Angles
Beards
Neck Help
Skull Tutorial
How to Draw a Skull
Hair:
How To Draw Braids
Headband Braid Tutorial
How To Draw Hair
Hair Tutorial
Another Hair Tutorial
Also Another Hair Tutorial
Tutorial: Hair
Tutorial for Hair
Simple Hair Tutorial
Hairstyle Tutorial
50 Male Hairstyles Revamped
Let’s Do Hair!
Female Hair Tutorial
Curls
Pixel Hair Tutorial
Manga Boys Hair Tutorial
Bodies:
A Guide to Drawing the Human Body
How To Draw Hands
Hand Tutorial
Hand Gestures
More Hand Gestures
Arm Tutorial
Feet Drawing Guide
Foot Tutorial
Drawing Feet
Knees
Sitting Poses
Drawing Torsos
Abs Tutorial
Clothes and Accessories:
Clothing Tutorial (Notes)
How to Draw Flower Crowns
Helmets and Hats
Hoods
Fashion
How to Draw Tights
Jeans
Boot Tutorial
Plaid Tutorial
Lace Tutorial
Armour Tutorial
Creatures:
Wings
Folded Wings
Thoughts on Wings
Tutorial on Creature Design
Bat Wings on Humans
Pegasus Wings
Animal Legs on Humans
Dragon Tutorial
Dragon Wing Tutorial
Dragon Hands and Feet Tutorial
Dragon Mouth Tutorial
Dragon Head Tutorial
Dragon Scales
Clawed Hand Tutorial
Basic Horn Tutorial
Sauropod Tutorial
How to Draw Centaurs
Werewolf Anatomy
Animals/insects:
Animal Noses
Basic Animal Anatomy
Paw Tutorial
Fur Tutorial
Pixel Fur Tutorial
Painting Fur
Fur Painting Tutorial
Horse Tutorial
Horse Proportions
Horse Hooves
Horse Legs
Dog Anatomy
Simple Dog Tutorial
Wolf Paw Tutorial
Wolf Head Tutorial
Drawing a Wolf
Canine Leg Tutorial
Feline Comparison
Big Cat Paw Tutorial
Lion Head Tutorial
Cat Faces Tutorial
Snow Leopard Tutorial
Tiger Tutorial
Fox Tutorial
Rabbit Drawing Tips
Butterfly Tutorial
Rat Tutorial
Owl Anatomy
Feather Tutorial
Bear Anatomy
Objects:
Glowing Stuff
How to Draw 3D Rooms
Gun Ref
Slime Tutorial
Chain Tutorial
Gemstone Tutorial
Bullet Metal Tutorial
Lightsaber Tutorial
Gold Coin Tutorial
Jewel Tutorial
Nature/Food:
Tree Tutorial
How to Create Stars (With Photoshop)
Stars Tutorial
How to Draw Clouds
How to Draw a Rose
Simple Roses
Grass Tutorial
Another Grass Tutorial
Quick Grass Tutorial
Bush Tutorial
Rain Tutorial
Water Tutorial
Underwater Tutorial
Fire Tutorial
Snow Tutorial
Light Tutorial
Light Sparkle Tutorial
Mountain Tutorial
Another Mountain Tutorial
Moon Tutorial
How to Draw a Apple
Strawberry Tutorial
Colours:
The Psychology of Colour
Basic Colour Theory
Colour Theory 101
Quick Colour Reference Sheet for Designers
The Art of Colour Coordination
Colour Profiles and Printing Explained
The Colour Strata
The Art of Harmonious Colour Schemes
The Ten Commandments of Colour Theory
How to Use Colour in Your Design Scheme
Colour Theory: The ABC’s of RGB
RGB vs CMYK
The Business of Colour Psychology
The Psychology of Colour
The Psychology of Logo Colour and Font Style
What Colours Communicate
A Colour Guide for Designers
Colour Theory: What People Really Think
Colour ROI
The Colours of the Web
Colour Design
Colour Help
How To Colour
Colour Blender
Colour Scheme Designer
Colour Meanings For Roses
Colour Palette Generator
Upload an Image and Get a Colour Palette
Another Colour Palette Generator
Color Hex
Colour Harmony
Skin Colour Palette
Pastel Colours
Greyscale Tutorial
Colouring Cloth
Hair Colouring
Photoshop Colouring Tutorial
Other:
How to Draw Dimension
Pixel Art Tutorial
Another Pixel Art Tutorial
Photoshop Brushes
Photoshop Layers Tutorial
Glitch Effect (with Photoshop)
Gimp Soft Shading
Blending Tutorial
Free Digital Sculpting Tool
Skeleton Drawing Tool
Repeating Pattern Tutorial
Free Art Programs
Silk - Interactive Generative Art
Creativity Cards
Don’t Know What to Draw?


[ID in alt]
Tutorial on drawing characters/OCs who have some sort of facial paralysis. It doesn't cover all possible variants because I was using mirror as my main reference lawl
Keep in mind that this is an introductory drawing tutorial and has some generalizations in it, so not every “X is Z” statement will be true for Actual People 👍
Consider supporting me on ko-fi if you find this to be helpful.
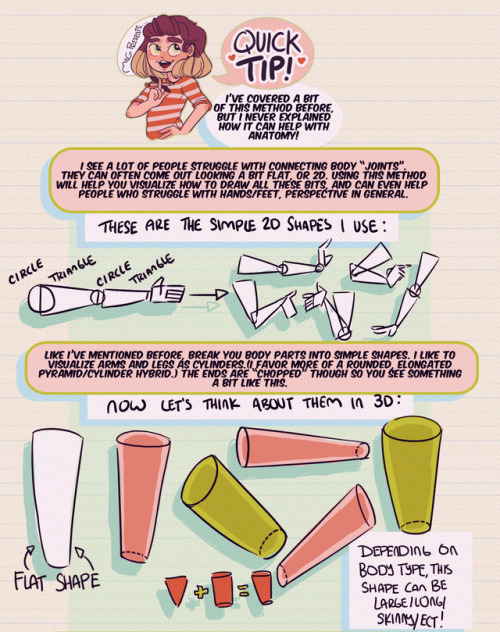
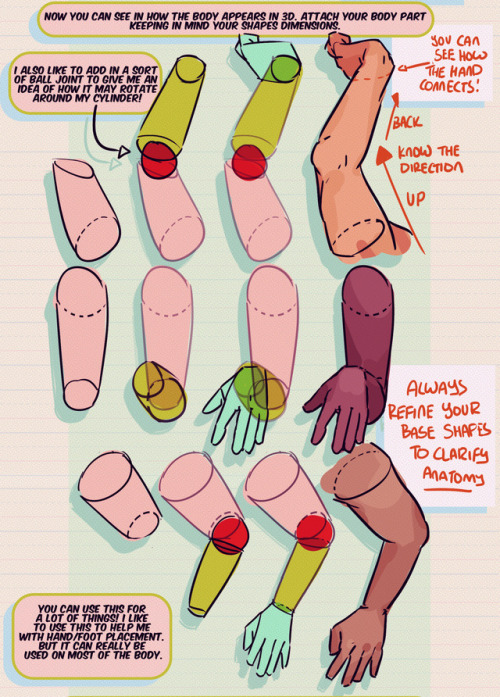
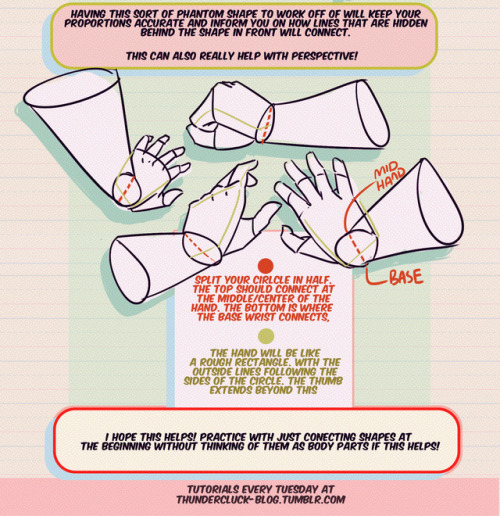
Hey friends!
Meg here for this week’s TUTOR TUESDAY! This week I go over just a little trick that I like to use when drawing and connecting arms/hands/legs/feet ect. This helps me with foreshortening as well. I hope it helps you folks as well! I have tutorials that talk more specifically about hand/foot/leg anatomy here. If you have any tutorial recommendations send ‘em in here or my personal. Now go forth and I’ll see you next week!
i hate that every time i look for color studies and tips to improve my art and make it more dynamic and interesting all that comes up are rudimentary explanations of the color wheel that explain it to me like im in 1st grade and just now discovering my primary colors
Character Design tips when creating a Hijabi Muslim OC


Note: Sleeves or a head appearing is okay IN CERTAIN SITUATIONS. Like working in a garden and rolling up your sleeves OR going to the hair salon OR checking up in a hospital. In other Mazhab or fiqh, it's much more lenient and it's okay to show ankles or neck. (depends on country or Mazhab)

Note: Camel Hump hijab in certain tafsir could mean a haughty attitude rather than the camel hump shaped hijab, but there are also others that take it literally too, so it depends on the person.


So you might be saying: Lion why a guide on drawing black people? Well young blood it’s because a lot of people cant…seem…to draw…black people..Amazing I know.

Racist (caricatures) portrayals of black people have been around forever, and to this day people can’t seem to draw black people like they are human. If your artwork resembles any of the above even remotely your artwork is racist and offensive. If you try to excuse that as a stylistic choice you’re not only a terrible artist, but racist too!!! Congrats.

Whitewashing is also a problem. A lot of people refuse to draw black features on canonly black characters. While this example isn’t colored, lightening the skin-tone of a character is also considered whitewashing. So lets start with features!

Now all black people have different noses thats a no-brainer, but black noses tend to have flatter bridges, and wider nostrils. Please stay from triangular anime noses and small button noses. Your drawings should not depict black people with abnormally large noses. (Especially if you do not draw other characters this way)

If you feel like the way you draw lips on black characters is offensive or resembles a caricature,it probably does and you should change it. ABSOLUTELY AVOID PLACING LIPS AT THE BOTTOM OF THE FACE.

Hair is so diverse! Please get used to drawing braids, locs,kinks and coils! If you can learn to draw ringlets and long waves you can learn how to draw black hairstyles.

Add clips! Learn how to draw baby-hairs and never be afraid to add color Pinterest and Google are free my dudes! Also try using square brushes for blocking in coils.
OK THAT’S ALL YOU GUYS

This feels ~downy ~, how lovely that would be.


Wing Tutorial is HERE 🦅, now available on my Patreon✨ It includes full speedpaints, a step-by-step of the painting process, drawing tips + more!

Wanted to try out a new technique.

So I wanted to understand colours better because essentially I sucked at it. I watched Emilyena's tutorial and she does a good job at explaining the concept!!!
Definitely learned some new thing to incorporate into my drawings now.
THANK YOU SO MUCH!! Will be using these!!


HII my character & shape design tips PDF is now available! ^_^ hope you enjoy !!
BUY HERE or HERE
[ID in alt]
Tutorial on drawing characters/OCs who have some sort of facial paralysis. It doesn't cover all possible variants because I was using mirror as my main reference lawl
Keep in mind that this is an introductory drawing tutorial and has some generalizations in it, so not every “X is Z” statement will be true for Actual People 👍
Consider supporting me on ko-fi if you find this to be helpful.
How do you draw the alien & dragony feet so well?? I can never get the toes right, any advice?
Sure do! I usually start with a human-ish shape then extend the toes into a dragony shape. Knowing the basics helps when you want to make something new:


A lot of times you can get away with just drawing the basic shape and some nonsense lines to mimic muscles/tendons and it’ll look good!
If you want to know more about how legs work on the inside I’d suggest looking at the legs of emu, ostrich, big cats, deer, and horses. Emu and ostrich legs will give you a look at that scalie/fleshy toe texture. The tendons in big cat paws are very dramatic and have that perfect little M shape to their toes because of their retractable claws. Looking at the leg bones of horses and deer, especially the hind legs, will help you better understand how digitigrade(”backwards” bending) legs work.


The Lip Tutorial~~~
The final part is on my Livestream the first minute is me trying to remember how to use it.
I also answered some asks:
Read More

I see this kinda advice passed around all the time here is the thing: shading with black will indeed look bad if you don’t know what you are doing. However, telling people not to do things without explaining why is terrible advice.
Shadows are the opposite of light, this includes in colour.
This means that if you have light in one colour, the shadow will be of the opposing hue, saturation, and value.

Unless the object is white, it has its own local colour - the object’s true colour, how it would appear if the light were pure white.
The colour of the light influences the local colour of the object. so if you had yourself a brown cube and a blue light, the colours would get bluer and pinker.

now the reason shadows do not tend to be black is because pure white light is hard to find in nature.
the closest you will get to pure white light is during a really overcast day and the sun is filtering through the clouds, but even then it’ll lean towards yellow so the shadows will be slightly blue.
During a clear day, the shadows will pick up a lot of bounce light from the blue sky and have a blue tinge. You can learn more about this in this tutorial: [http://artbyriana.deviantart.com/art/Why-shadows-aren-t-gray-321656856]
But! None of this means you are never allowed to use black.
realistically shadows will have a hint of a colour to them, but stylistically you might be going for, say, a film noir look and deep black shadows are needed for impact for example.
The more you know about how light works, the more informed decisions you can make about shading and the more options you have.
If someone tells you that you can’t do something, they’re wrong! you can do what you like!
yes, black is hard to use and if you just mix a colour with black it’ll get muddy, but thats easily resolved by choosing your colours manually - which ideally you want to do regardless bc the computer doesnt have your eyes & cant choose the colours you like

basically if someone gives you some art advice and says you can’t do something, they’re wrong! you can, you just might need to study a little to figure out how to make things work.
I mean for example, people will say you must make your composition follow the rule of thirds and never align centrally, but while the rule of thirds makes it easy to create visual interest, Mad Max Fury Road is a testament to the fact that central composition can and will work if you experiment.
there are no rules in art! there are theories based on reality, this has been a post on colour theory & light theory, but they exist to inform you, not to restrict you.
Do what you like! Trust your eyes, if you think something looks good, then great! If you don’t, then research & experiment until you do.
Also if you wanna learn more abt colour theory, I go into it in a lot more depth over yonder: http://helpfulharrie.tumblr.com/post/131822744966/ http://helpfulharrie.tumblr.com/post/131958395841/
^Really helpful skin painting tutorial^
Awesome resource submitted by the lovely @girlymisticbaest! Be sure to go follow them!
Thanks for reading! ❤️
More useful articles and resources / support Art-Res | my art tumblr