Trying To Prove A Point To The Boys At School
trying to prove a point to the boys at school
reblog this if you believe trans men are real men like this if you dont
More Posts from Wingedhumangirl and Others
Stan Angel Dust

8-foot giant squid pillow.
You’ll need:
2 yards of felt
1 yard of patterned fabric (I suggest a polka dot-type pattern so it looks like suction cups)
1 medium piece of black felt, 1 medium piece of white felt (for the eyes)
white thread, black thread and thread of the same color as the felt you’re using
pins
about 5 lbs. of stuffing
a couple big sheets of paper to draw your pattern
First, you need to draw out your patterns. Here’s a basic template to get you started, although most of the measurements are reasonably fudgeable. If in the likely event you don’t have any four-foot-long pieces of paper lying around, just tape a few pieces together.

Once you’ve drawn out your eight patterns, it’s time to cut the fabric. Pin the pattern to the fabric, laid flat, and cut out the following, leaving a half an inch or so of extra fabric around the edge of the pattern:
FOR THE ARMS: 8 felt and 8 fabric cutouts of piece 1
FOR THE, UH, LONGER ARMS: 2 felt and 2 fabric cutouts of piece 2
FOR THE BODY: 2 felt cutouts of piece 3
FOR THE FIN: 4 felt cutouts of piece 4
FOR THE HEAD: 1 felt cutouts of piece 6
FOR THE EYES: 2 white felt cutouts of piece 7 and 2 black felt cutouts of piece 8
So now you’ve got all your pieces ready, it’s time to start sewing them together. I did mine by hand because my sewing machine is busted and I get a kind of Zen buzz from sewing by hand, but if you have a non-busted one I recommend that you use it as it will be MUCH EASIER. You’re going to be sewing everything with the nice side of the fabric facing in, then turning it inside out to stuff it.
THE ARMS: (To make a quilted pattern that looks like suckers, see this other post). Pin together one patterned fabric piece 1 and one felt piece 1 (with the nice sides facing the inside). Sew down around the U-shape and back up, leaving the top open. Then turn the arm inside out, stuff it (it’s easiest to do both of these things if you sort of scrunch it up like you’re trying to put on a pair of tights, excuse the non-dude-friendly reference) and sew the top closed. Do the same for the other seven arms and rejoice in the fact that this is the most tedious part. Same deal with the two long arms, they’re just harder to stuff.
THE FINS: Pin together two of your piece 4s and sew together the curvy outer edge. Turn the piece inside out, so the seam you just sewed is on the inside, and start sewing up the other side, stuffing gradually as you go along. You should end up with a triangle-ish puffy thing. Repeat for the other two piece 4s.

THE BODY: Put down one piece 3, then place the two fins you have down with the point up and the curvy side pointing in, then make a sandwich by putting the other piece 3 down on top. Pin it all together and sew around the edges with the two fins still inside, as shown. Turn it inside out and move on to…
THE HEAD: So take piece 6 and the ten arms you’ve already done. Lay the arms, fabric side facing you, out with the arms’ top seams in a line half an inch from the top of piece 6. The order should be arm arm arm arm BIG ARM arm arm arm arm BIG ARM. The legs should be almost entirely covering piece 6. Pin them in place and sew a straight line through the individual legs seams to attach the legs to piece 6.
When you pick up the other side of piece 6, you now have something resembling a really weird untied hula skirt. Sew together the two 9-inch ends of piece 6 with the fabric side of the arms on the outside, and keep it inside out for the moment.
PUTTING IT ALL TOGETHER: Fit the open end of the body through the arms (still fabric side facing out) and pull the edge all the way through the felt cylinder so it’s even with the edge that DOESN’T have arms attached to it. Sew around the diameters of the head cylinder and the body cylinder to attach them, then pull the legs down over the head and you’re almost done!
Stuff the body, then seal it off by sewing piece 5 over the open end (even if you do have a functional sewing machine, you’ll probably have to do this part by hand).
THE EYES: Sew the black circles on the white circles and whipstitch the eyes onto the head. You do this last because you can’t tell where they’re going to end up on the end product if you put them on before stuffing the body.

Ah, If only I had money and was actually cute. Stunning clothing!
![LolitaWardrobe - [-🌟🌟-The Best Place To Shop #Constellation Themed Lolita Outfits-🌟🌟-]](https://64.media.tumblr.com/61877ee41ca3c280f2449ef10ebc3208/tumblr_pat5vbea8s1vrz6y9o2_500.jpg)
![LolitaWardrobe - [-🌟🌟-The Best Place To Shop #Constellation Themed Lolita Outfits-🌟🌟-]](https://64.media.tumblr.com/d4b2233f32ff01f73bf6d47b9d4a21c5/tumblr_pat5vbea8s1vrz6y9o1_500.jpg)
![LolitaWardrobe - [-🌟🌟-The Best Place To Shop #Constellation Themed Lolita Outfits-🌟🌟-]](https://64.media.tumblr.com/e37d25538ae83106bc24d73c60475aa2/tumblr_pat5vbea8s1vrz6y9o3_500.jpg)
![LolitaWardrobe - [-🌟🌟-The Best Place To Shop #Constellation Themed Lolita Outfits-🌟🌟-]](https://64.media.tumblr.com/8e21bc6da13f5b622a5a9ee74892f78d/tumblr_pat5vbea8s1vrz6y9o7_640.jpg)
![LolitaWardrobe - [-🌟🌟-The Best Place To Shop #Constellation Themed Lolita Outfits-🌟🌟-]](https://64.media.tumblr.com/067779e6584916d4bdfb2ace1a3e22a4/tumblr_pat5vbea8s1vrz6y9o4_500.jpg)
![LolitaWardrobe - [-🌟🌟-The Best Place To Shop #Constellation Themed Lolita Outfits-🌟🌟-]](https://64.media.tumblr.com/fc1aaa5b9d7b0a59e6cbd8ca9b24a4d3/tumblr_pat5vbea8s1vrz6y9o5_500.jpg)
![LolitaWardrobe - [-🌟🌟-The Best Place To Shop #Constellation Themed Lolita Outfits-🌟🌟-]](https://64.media.tumblr.com/22079c489ea25d11ad52ef567431d86c/tumblr_pat5vbea8s1vrz6y9o6_640.jpg)
![LolitaWardrobe - [-🌟🌟-The Best Place To Shop #Constellation Themed Lolita Outfits-🌟🌟-]](https://64.media.tumblr.com/a43491eb747be398926a1e3523233988/tumblr_pat5vbea8s1vrz6y9o8_500.jpg)
![LolitaWardrobe - [-🌟🌟-The Best Place To Shop #Constellation Themed Lolita Outfits-🌟🌟-]](https://64.media.tumblr.com/3fe967e65de195830ba67a23ff87806c/tumblr_pat5vbea8s1vrz6y9o9_500.jpg)
![LolitaWardrobe - [-🌟🌟-The Best Place To Shop #Constellation Themed Lolita Outfits-🌟🌟-]](https://64.media.tumblr.com/6764f16c394beb7f300f960dc039a0dd/tumblr_pat5vbea8s1vrz6y9o10_500.jpg)
LolitaWardrobe - [-🌟🌟-The Best Place To Shop #Constellation Themed Lolita Outfits-🌟🌟-]
◆ Collection Link >>> https://www.lolitawardrobe.com/c/constellation-themed-lolita-dresses-and-accessories-from-brands_0427?&Sort=3d
@quethenogard I don't understand but. ..OK.
skeletons
AMAZING¬!!!!!!!!!!!!!!!!!!!!!!!!!!


I have got a few dragon linearts in my sketchbook that I want to do something with. So, I guess I’m asking for advice. Which ones should I color and which ones should I leave for now? I’m gonna color them all eventually. Also! Marker or pencil? Marker is brighter but I can mix colors better with pencil and shade better.
if you can’t catch the stream, if you’re having a bad day/night or just wanna have a laugh, enjoy this video of @therealjacksepticeye doing an interpretive dance to ocean man😂
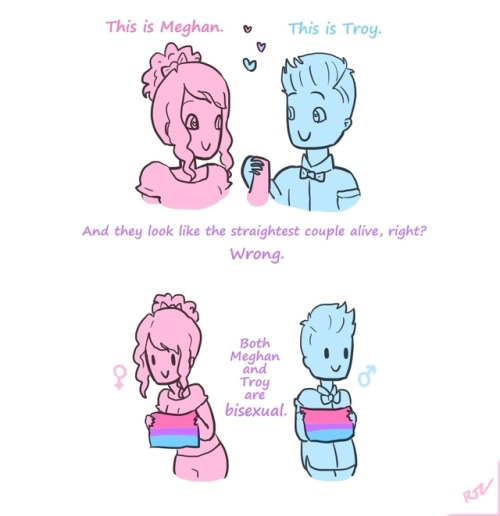

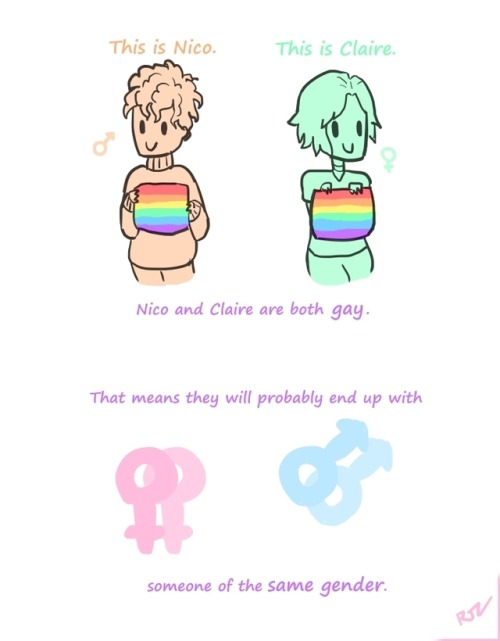

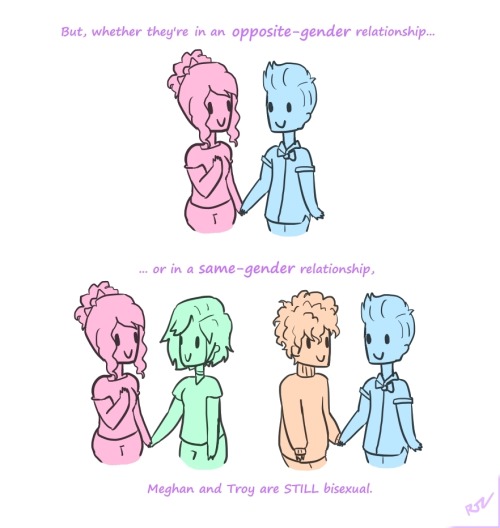

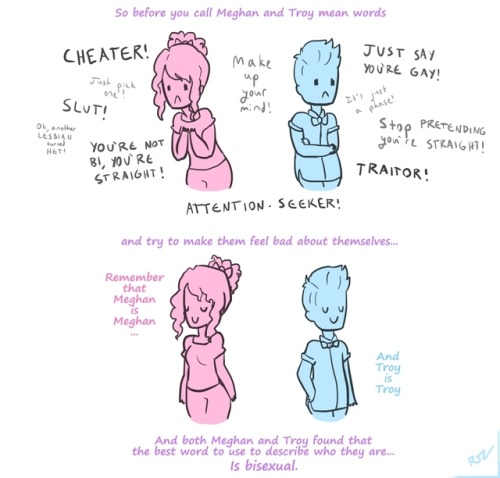

Bisexuality is a concept too often misunderstood 💖💜💙

This fandom is dead. (No pun intended.)


…you’re lucky I’m a stubborn asshole because these took way longer to make than I’d like to admit.


Mini M&M Cookies
-
 breadheaddoodles liked this · 2 weeks ago
 -
 weaverpop reblogged this · 2 weeks ago
 -
weaverpop liked this · 2 weeks ago
-
 redthedeadhazard reblogged this · 2 weeks ago
 -
redthedeadhazard reblogged this · 2 weeks ago
-
 niko-oramiratsinatrenchcoat reblogged this · 3 weeks ago
 -
 songfuljam07 reblogged this · 3 weeks ago
 -
 crowdrinkingcoffee liked this · 3 weeks ago
 -
crowdrinkingcoffee reblogged this · 3 weeks ago
-
 the-rambling-robot reblogged this · 3 weeks ago
 -
 crazed-transbian-lunatic reblogged this · 3 weeks ago
 -
 aussietransgirl reblogged this · 3 weeks ago
 -
aussietransgirl liked this · 3 weeks ago
-
 mentally-unstable-thoughts reblogged this · 3 weeks ago
 -
 mindsofjade reblogged this · 3 weeks ago
 -
mindsofjade liked this · 3 weeks ago
-
 winter-depressed-belle reblogged this · 3 weeks ago
 -
 kipthetgirl reblogged this · 3 weeks ago
 -
 pinkypkmntrainer reblogged this · 3 weeks ago
 -
 apolloinaplaguemask reblogged this · 3 weeks ago
 -
apolloinaplaguemask liked this · 3 weeks ago
-
 too-cringe-to-die reblogged this · 3 weeks ago
 -
 approved-sacrifice liked this · 3 weeks ago
 -
 gregoriahseaslug reblogged this · 3 weeks ago
 -
 motziee reblogged this · 3 weeks ago
 -
 fuckingponydrugs reblogged this · 3 weeks ago
 -
 pati-patter reblogged this · 4 weeks ago
 -
 sugarcube589 reblogged this · 4 weeks ago
 -
 pringlesdifferent reblogged this · 4 weeks ago
 -
 catacombs-of-paper reblogged this · 4 weeks ago
 -
catacombs-of-paper liked this · 4 weeks ago
-
 mewhenigettosilly liked this · 4 weeks ago
 -
 ye-olde-ace reblogged this · 4 weeks ago
 -
 bloodied-hands-in-the-night-sky reblogged this · 4 weeks ago
 -
bloodied-hands-in-the-night-sky liked this · 4 weeks ago
-
 mel0maan1ac reblogged this · 4 weeks ago
 -
 vexishereandveryqueer reblogged this · 4 weeks ago
 -
 sw33tl1f3 reblogged this · 4 weeks ago
 -
 riverissilly reblogged this · 4 weeks ago
 -
 daringcrafter reblogged this · 4 weeks ago
 -
daringcrafter liked this · 4 weeks ago
-
 ender-afton reblogged this · 4 weeks ago
 -
 theultimaterewatcher reblogged this · 4 weeks ago
 -
 axolotlmage47 reblogged this · 4 weeks ago
 -
 acrobat-harunii liked this · 4 weeks ago
 -
 wolfthedrolf reblogged this · 4 weeks ago
 -
 angelik-mori reblogged this · 4 weeks ago
 -
 bees-with-a-camera reblogged this · 4 weeks ago
 -
 tillythemenace liked this · 4 weeks ago