Mandy’s Baka Guide To Draw Japanese Sleeves Or Something

Mandy’s baka guide to draw Japanese sleeves or something
More Posts from Zelo-ref and Others


Turn-arounds for Cephias…or anyone who needs them.
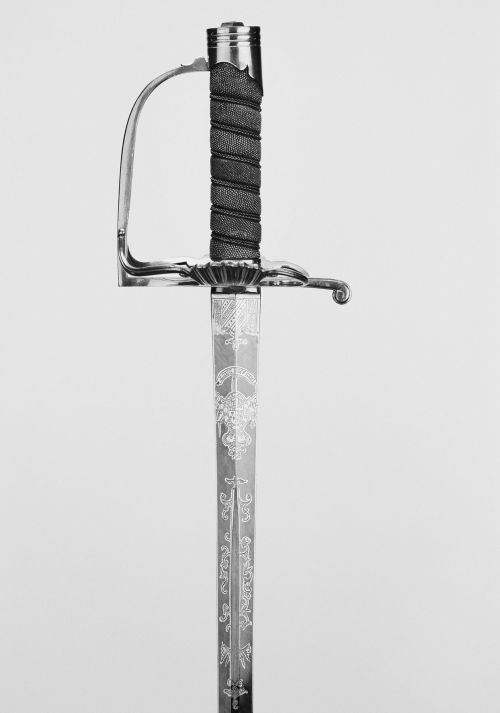

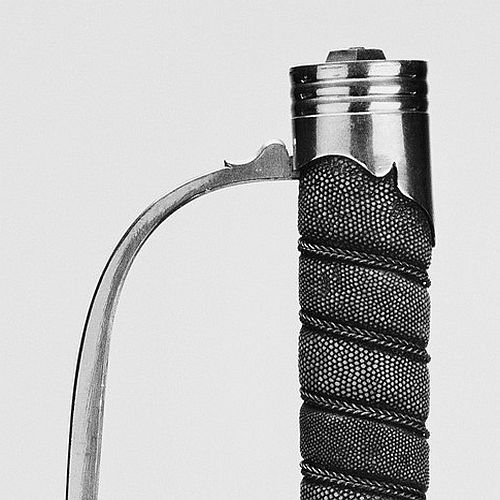
Military Dress Sword
Dated: circa 1787-91
Culture: English
Medium and techniques: gilt brass, wood, fish skin, silver wire, gilt, blued steel/etched
Measurements: overall length 95cm; blade length 62cm
The sword has a gilt/brass hilt with an oval pommel cap. The oval wooden grip is covered in grey fishskin bound with herringbone of silver wire. The straight steel two-edged blade features etched gilt and blued panels decorated with Royal Arms and military trophy.
Source: Copyright © 2016 Royal Collection Trust/Her Majesty Queen Elizabeth II


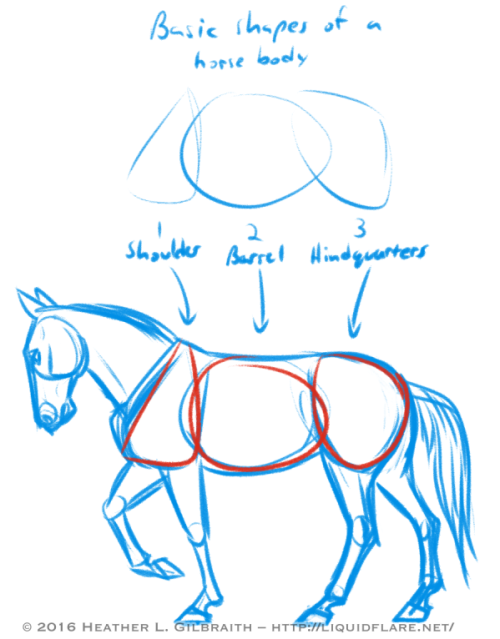

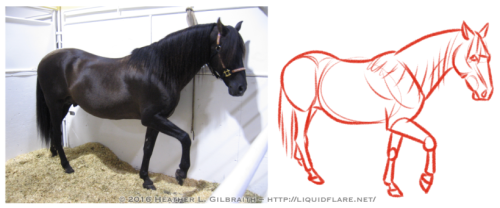
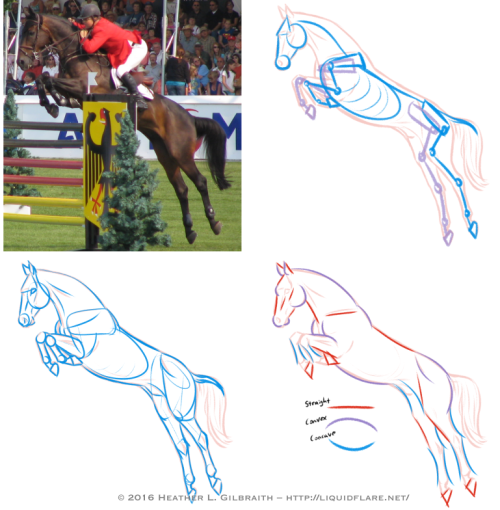
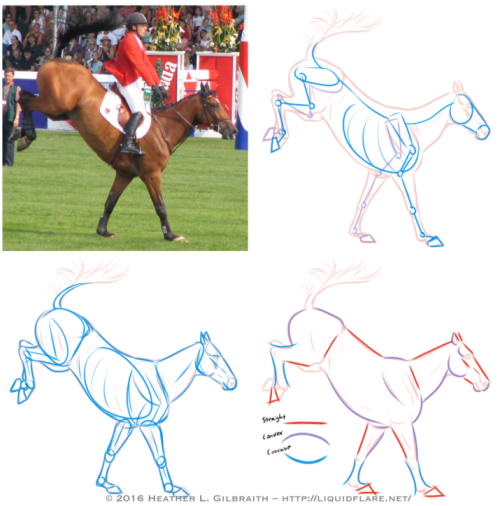
– Horse Drawing Tips –
Hello, all! I thought I’d put this together to try and give people a place to start when trying to learn about and understand horse anatomy. Drawing horses, like anything else, definitely requires some work and observation to be able to draw confidently, but some of the these ideas/tips can help you find ways of analyzing references and simplifying forms to make the journey easier. Drawing horses doesn’t have to be scary! Read on for some notes on the drawings above…
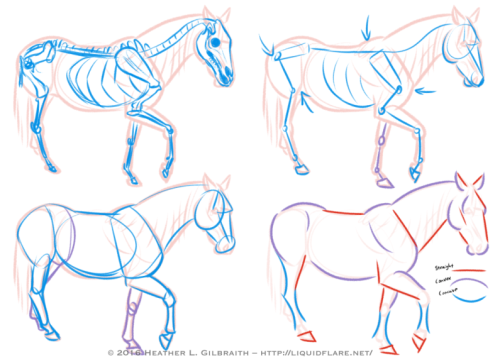
Basic Shapes of a horse body:
Use these shapes to help you block in the body forms of your horse and to help you simplify the anatomy of the horses you draw. When you study photos of horses, try to see how these shapes move/stretch in relation to the horse’s pose/action.
Horse Anatomy Studies:
1) Standing/Walking:
a. Reference photo – Start with a photograph that you’d like to study. Try to choose a clear one with visible anatomy (obscured as little as possible) and interesting shapes.
b. Outline – The outline gives me a point to start from to analyze the anatomy of the horse from the photograph. I use it as a guide for the next few steps.
c. Skeleton – The skeleton usually takes too much time to do with every photograph, but it’s very helpful to be aware of the bones of a horse, so you know what you’re working with. Do a few of these with a drawing/photograph of a horse skeleton for reference and familiarize yourself!
d. Simplified Skeleton – Then draft out a quick, “simplified” skeleton. Try to block out the important angles, joints, and important anatomy reference points, such as the shoulder/elbow bones and the hip/knee bones. These angles will go a long way to helping you get the proper feel for a horse and the way its body naturally moves.
e. Simple Block Shapes – From there, block out the forms of the horse. Keep the skeleton in mind, but be aware of the masses of muscle and fat that moves with and covers the bones. Find ways to simplify the shapes that work for you, and try using these shapes in the future when blocking in a drawing of a horse.
f. Curves vs. Straights – Juxtaposing curved (both concave and convex) and straight lines helps to emphasize the anatomy, and add a pleasing sense of rhythm to your drawing. Experiment with emphasizing convex curves vs. concave curves, or straights against curves, etc., to get a look that is pleasing to you and also compliments the horse’s anatomy.
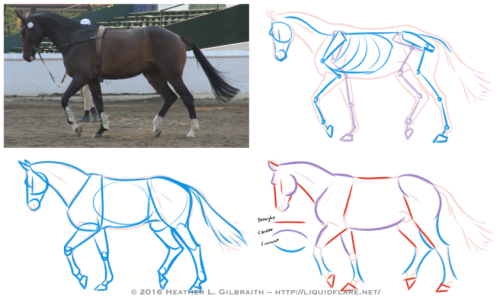
2) The Trot: The trot is a horse’s natural “jogging” gait, the next gait up from a walk. When trotting, the horse almost always has at least one, usually two, hooves on the ground at any moment. Remember that in most cases, horses walk/trot/canter/etc. with opposite legs moving together or in sequence; for example, right front leg raised, and left back leg raised, while the other two legs (left front leg and right front leg) are bearing the weight. Remember this when sketching your horse’s pose! (The exceptions to this are pacers and Icelandic horses doing the “tolt”, feel free to look them up!) When drawing this gait, it is sometimes helpful to emphasize the two opposing legs that mirror each other; with two legs straight/weight-bearing, and too legs extended/bent/moving. Keep the opposing legs in tandem with one another and you’ll have this gait down!
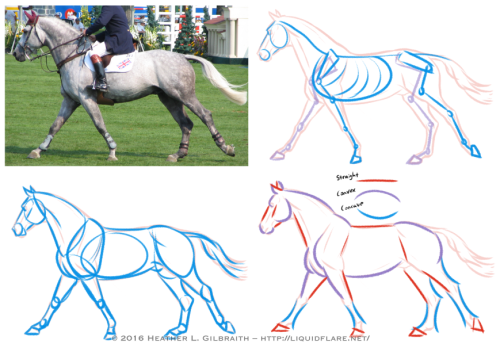
3) The Canter/gallop: Cantering is a horse’s natural running gait. In this gait it’s possible for all of a horse’s hooves to leave the ground for a moment with each stride. If a canter is a horse’s equivalent a human’s run, then a gallop is a sprint; in a gallop a horse reaches its maximum stride length and speed, though they don’t have the endurance to keep a full-on gallop up for long. When drawing the canter, watch out for which legs are bearing the weight and use that the guide you. (In my photo example, the right back leg and the left front leg are currently bearing the weight, with the right front leg about to take the weight to allow the left front leg to raise. Ugh, complicated…!)
4) The Jump: It’s when jumping that a horse reaches its maximum “stretch”! Keep in mind that a horse’s back is not very flexible (which is what makes them great to ride!), so try to keep that spine straighter/stiffer than you would for a dog or a cat. Bending the horse’s spine too much will start to make it look broken, or at the very least, very old and decrepit, as horse’s spine starts to bend/sag with age.
5) The Landing: To emphasize the weight of a horse coming down on its front hooves, be sure to bend it’s “toe joint”, or pastern, so that its fetlock or knuckle joint is nearly touching the ground. Let that joint bend to absorb the shock of the landing!

Try to avoid these common anatomy mistakes when drawing horses. Study photos and the horse’s skeleton/anatomy to avoid these! (And seriously, please forgive how horrible these drawings are! I literally whipped them up in only a few minutes, haha…)
Afficher davantage


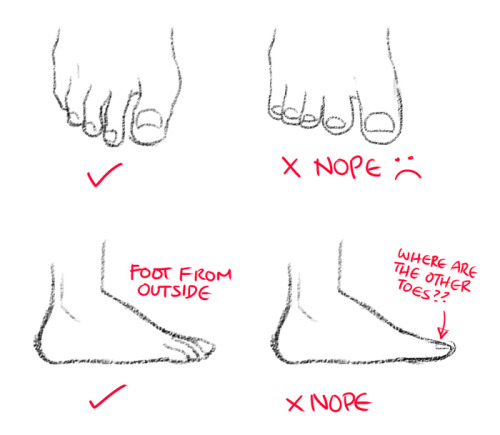


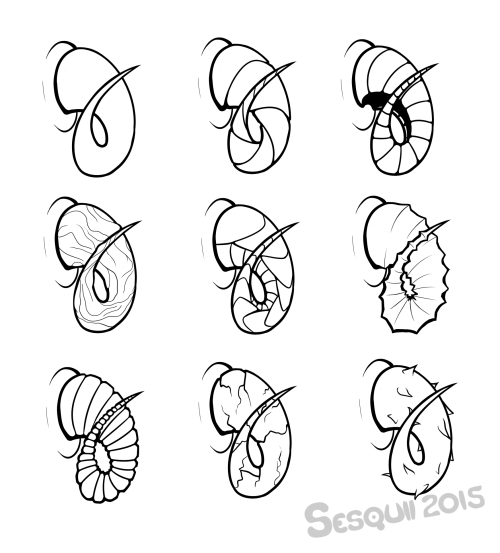
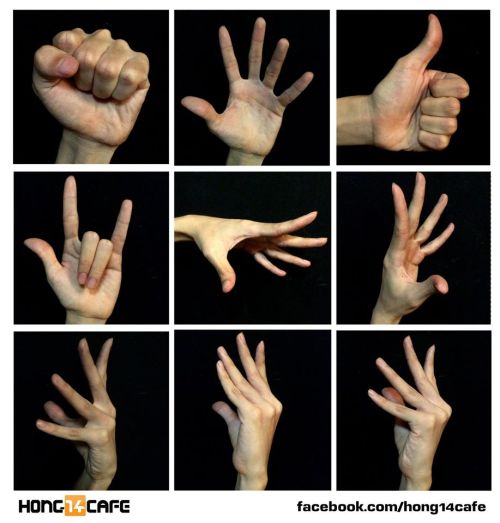
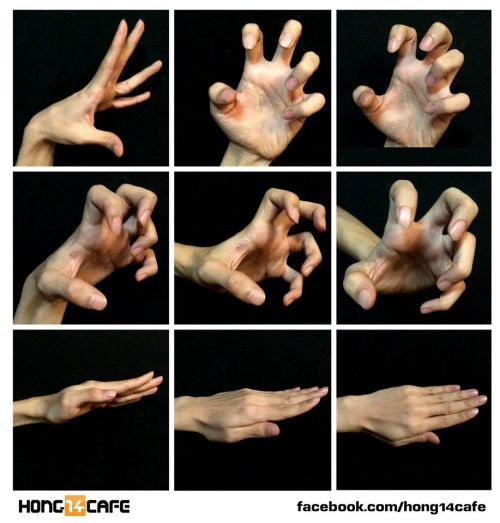
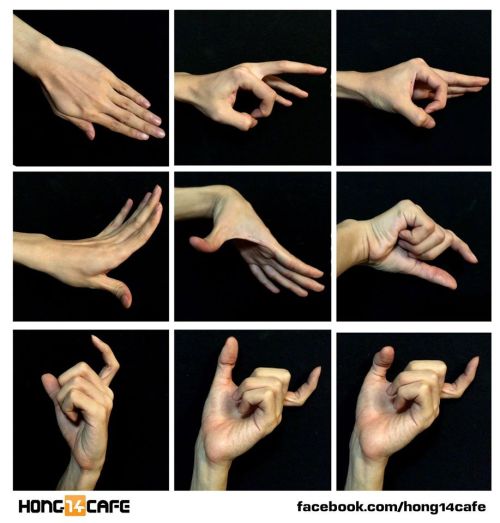
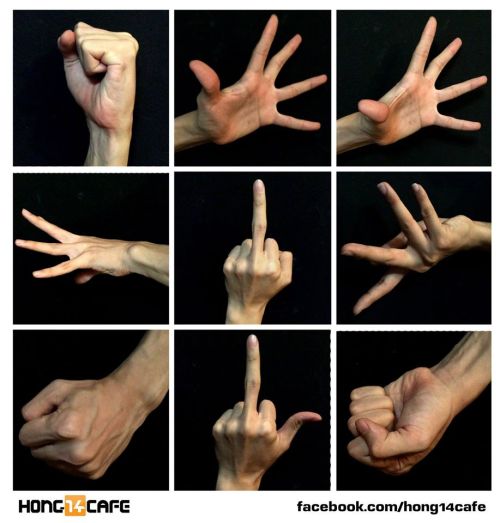
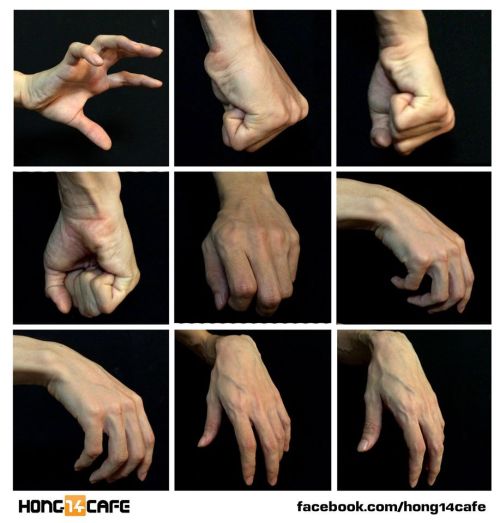
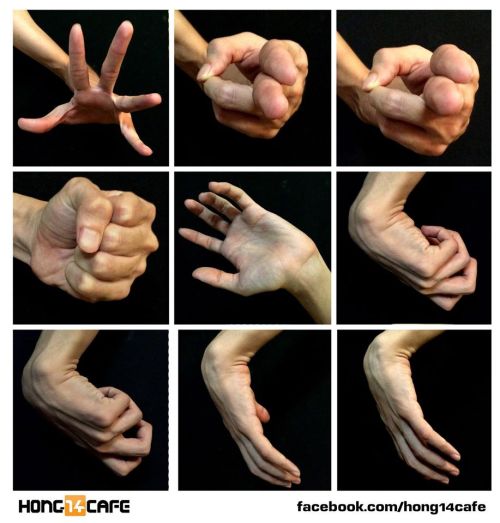
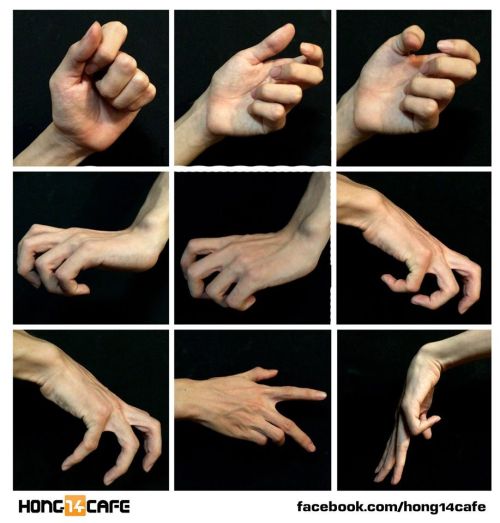
How to draw feet

BASIL SODA Couture Fall/Winter 2017


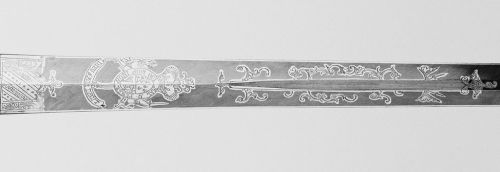
Rapier with Scabbard
Dated: 1575-1583
Geography: made in Dresden, Saxony, Germany, Europe
Medium: engraved steel [blade]; blackened iron, pierced and engraved silver, wood, silver wire [hilt]; pierced and engraved silver, wood, leather [scabbard]
Measurements: pommel: 2 ½ × 2 13/16 inches (6.3 × 7.1 cm); blade: 11/16 × 42 3/8 inches (1.8 × 107.6 cm); width (quillons): 9 15/16 inches (25.2 cm); depth: 5 13/16 inches (14.8 cm); scabbard: 2 ½ inches × 7/8 inches × 3 feet 2 ½ inches, 8.1 ounces (6.4 × 2.3 × 97.8 cm, 230g)
The blade of the sword was made by bladesmith Andrea Ferrara, Italian (active Belluno), active 1550 - 1583. The sword features silver mounts of rapier and scabbard probably by silversmith Wendel unter den Linden, German (active Dresden), active 1566 - 1593, died before 1610.
Source: Copyright © 2016 Philadelphia Museum of Art

-
 frosty-tian liked this · 3 months ago
 -
 illtakethatroad liked this · 1 year ago
 -
 lovelyllamasblog liked this · 1 year ago
 -
 dogeisprobablyonfire liked this · 1 year ago
 -
 crowdoesart21 reblogged this · 1 year ago
 -
 martialwriter liked this · 1 year ago
 -
 hydrangeahelper reblogged this · 1 year ago
 -
 curemario liked this · 2 years ago
 -
 anvampiricwolf liked this · 2 years ago
 -
 leafandluke liked this · 2 years ago
 -
 emgee-art liked this · 2 years ago
 -
 hka2003 liked this · 2 years ago
 -
 moonplanetary liked this · 3 years ago
 -
 hyggeinbound liked this · 3 years ago
 -
 mouthlog-moved liked this · 3 years ago
 -
 nijahlyttle liked this · 3 years ago
 -
 a-straw-hat-pirate liked this · 3 years ago
 -
 are-uwu liked this · 4 years ago
 -
 roses-seek-poison liked this · 4 years ago
 -
 satan-general-irl liked this · 4 years ago
 -
 annoying-persona liked this · 4 years ago
 -
 pinkkojiro liked this · 4 years ago
 -
 halcyonmirage liked this · 5 years ago
 -
 kathleen-lyons-the-writer liked this · 5 years ago
 -
 ssilverscale liked this · 5 years ago
 -
 h0neyb1rd liked this · 5 years ago
 -
 meowsly reblogged this · 5 years ago
 -
 tomboyjessie13 reblogged this · 5 years ago
 -
tomboyjessie13 liked this · 5 years ago
-
 references-upon-tutorials reblogged this · 5 years ago
 -
 yadedaj liked this · 5 years ago
 -
 dromaeo-sauridae liked this · 5 years ago
 -
 arthelpcollections reblogged this · 6 years ago
 -
 sad-little-nerd liked this · 6 years ago
 -
 serendipitouslover liked this · 6 years ago
 -
 sternengalerie liked this · 6 years ago
 -
 slimeyclown-blog liked this · 6 years ago
 -
 krismoiji liked this · 6 years ago
 -
 darrowl2 reblogged this · 6 years ago
 -
darrowl2 liked this · 6 years ago
-
 cutiekekematsu liked this · 6 years ago
 -
 librajac liked this · 6 years ago
 -
 wyvernseeker reblogged this · 6 years ago
 -
 emgy805 liked this · 6 years ago
 -
 mothsandhopes reblogged this · 6 years ago