Animated Font Tutorial
Animated Font Tutorial
Today, I will be showing you how to make this !! ^^ By the end of this tutorial, I HOPE you will learn to make this!

Keep reading
More Posts from Zelo-ref and Others


Several ornate pistols, photographed by my friend Hovercraft at the Forsvarsmuseet in Oslo. Captions, in order: Spanish snaplock pistol; German wheellock pistol; Scots flintlock pistol; 17th-century wheellock pistols; flintlock pistol.
I LOVE this fashion, but do you know of any ways this style can be incorporated into a more modern way...?

Great question! First of all, I’d like to point out that wearing hanfu does not require fancy hair, makeup, or accessories - it can be worn casually as you would any other clothing.
That said, there are many ways to incorporate hanfu styles in a more “modern” flavor. You can always mix-and-match hanfu separates into your usual wardrobe. There’s also an entire offshoot of hanfu called “hanyuansu/汉元素”, which refers to designs that utilize elements from traditional hanfu. Here are some of my suggestions/inspiration for incorporating hanfu style:
1) Shortening sleeves and/or hemlines can produce a more “modern” look.

2) Layer on a Beizi/褙子 (jacket) - Beizi are extremely versatile, and come in all lengths and materials, for all seasons. (note: the pics below are “hanyuansu”; real hanfu doesn’t have modern pockets)

3) Put on a Banbi/半臂 (half-sleeve jacket) or Bijia/比甲 (sleeveless jacket) - Similar to Beizi, but with shorter/no sleeves, these can be worn like cardigans/t-shirts/vests. 1st row: banbi, 2nd row: bijia.


4) Hanfu skirts - Try wearing a hanfu skirt with your outfit. Left: Ming Dynasty-style, Right: Tang Dynasty-style.

5) Song-style pants/宋裤 - These pants were popular with women during the Song Dynasty. Try adding them to your outfit. (note: the right pic is a modified, “shorts” version)

6) Doupeng/斗篷 (cloaks/capes) make a nice accessory during the colder months, and come in various lengths and designs.

These are only just a few ways to incorporate hanfu elements; there are a lot more ideas and designs out there. I hope this helps in providing inspiration :)
(edit: links to clothing are in this post)
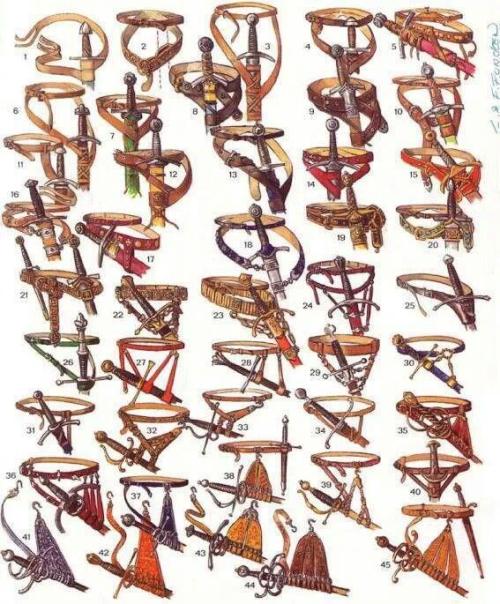
@History_Pics: Different ways to hang your sword. http://pic.twitter.com/3966S3BAzo
need refs/inspo for period clothing?
here you go:
Medieval (9th-15th century):
10th century and earlier
Romance (1000-1250)
11th century
12th century
13th century
more 13th century
14th century
more 14th
15th century
and more 15th century
Gothic (1150-1550)
Renaissance (1520-1650)
16th & 17th century
16th century
more 16th
Tudors (1500-1550)
more Tudors
Elizabethan Period (1558-1603)
Jacobean Era (1603-1625)
17th century
more 17th century
and again
and even more
this won’t stop
Baroque (1600-1750)
Georgian Period (1714-1830):
18th century
more 18th century
18th century women’s fashion
18th century men’s fashion
Rococo (1720-1770)
Classicism (1770-1790)
children 18th-19th century
Regency Preiod (1811-1820)/ Empire (1800-1820s):
1790-1820s
more stuff on regency and georgian era
even more
that’s not enough regency
and more
how is there so much
early 19th century men’s wear
early 19th century women’s wear
Victorian Period (1837-1901):
Romantic Era (1820-1840s)
Civil War Era/1850-1860s
1870-1890s
more victorian
Edwardian Period (1901-1910):
1900-1910s
Belle Epoque (1880-1910s)
more edwardian/belle époque
Modern:
1910s-1920s [Fashion between the World Wars]
1920s
more roaring 20s
so much 20s
1920s hairstyles
1930s
1930-1940s
1930-1950s
1950s
more 50s
1960s
1960-1970s
1980s
lots of periods in one spot/fashion through centuries:
here, here, and here is almost everything (and properly ordered)
also here with lots of historic fashion magazines
historic fashion
costumes of antiquity
more historical clothing
history of fashion
more history of fashion
“vintage” clothing
historic costumes
children’s historical fashion/toys
details
historic wedding dresses
historic assecoires (hats, shoes…)
hats
masks
parasols
lots of embroidery/jewlery
it indeed is western/european centric, I’m sorry for that, but for other cultures I simply don’t have so many references


Balmain F/W 2016 Menswear Paris Fashion Week


JX3 qixiu martial art school || Coser: 唐八狗 PHX:@十二岁萝莉 Photoshop@我左青龙右白虎腰间纹个米老鼠 @盯叮叮丁 Backup: @悠司Yuuji_ @鬼才Kisai


– Horse Drawing Tips –
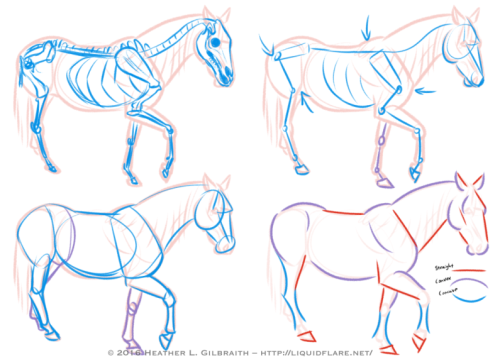
Hello, all! I thought I’d put this together to try and give people a place to start when trying to learn about and understand horse anatomy. Drawing horses, like anything else, definitely requires some work and observation to be able to draw confidently, but some of the these ideas/tips can help you find ways of analyzing references and simplifying forms to make the journey easier. Drawing horses doesn’t have to be scary! Read on for some notes on the drawings above…
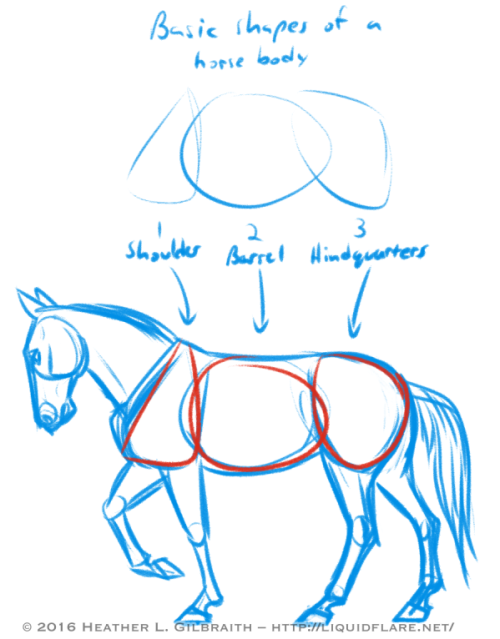
Basic Shapes of a horse body:
Use these shapes to help you block in the body forms of your horse and to help you simplify the anatomy of the horses you draw. When you study photos of horses, try to see how these shapes move/stretch in relation to the horse’s pose/action.
Horse Anatomy Studies:
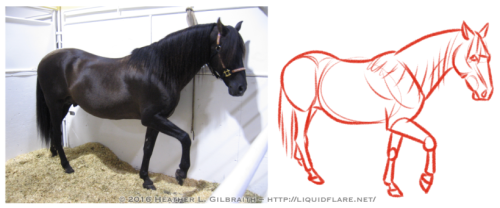
1) Standing/Walking:
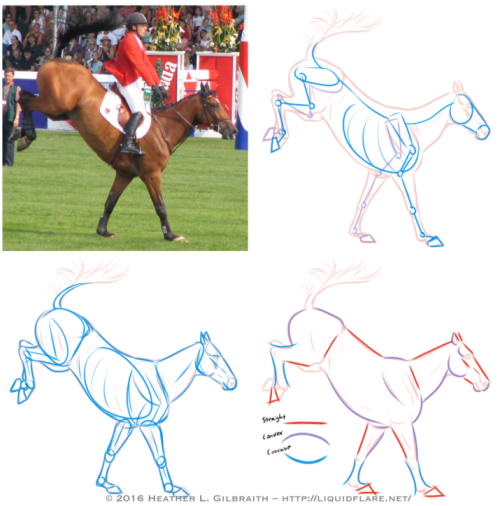
a. Reference photo – Start with a photograph that you’d like to study. Try to choose a clear one with visible anatomy (obscured as little as possible) and interesting shapes.
b. Outline – The outline gives me a point to start from to analyze the anatomy of the horse from the photograph. I use it as a guide for the next few steps.
c. Skeleton – The skeleton usually takes too much time to do with every photograph, but it’s very helpful to be aware of the bones of a horse, so you know what you’re working with. Do a few of these with a drawing/photograph of a horse skeleton for reference and familiarize yourself!
d. Simplified Skeleton – Then draft out a quick, “simplified” skeleton. Try to block out the important angles, joints, and important anatomy reference points, such as the shoulder/elbow bones and the hip/knee bones. These angles will go a long way to helping you get the proper feel for a horse and the way its body naturally moves.
e. Simple Block Shapes – From there, block out the forms of the horse. Keep the skeleton in mind, but be aware of the masses of muscle and fat that moves with and covers the bones. Find ways to simplify the shapes that work for you, and try using these shapes in the future when blocking in a drawing of a horse.
f. Curves vs. Straights – Juxtaposing curved (both concave and convex) and straight lines helps to emphasize the anatomy, and add a pleasing sense of rhythm to your drawing. Experiment with emphasizing convex curves vs. concave curves, or straights against curves, etc., to get a look that is pleasing to you and also compliments the horse’s anatomy.
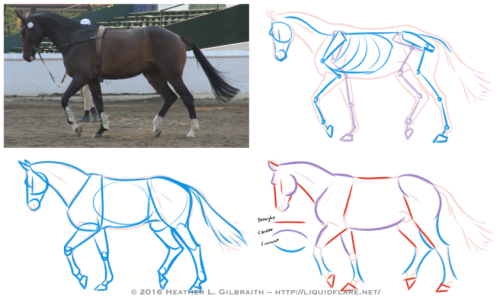
2) The Trot: The trot is a horse’s natural “jogging” gait, the next gait up from a walk. When trotting, the horse almost always has at least one, usually two, hooves on the ground at any moment. Remember that in most cases, horses walk/trot/canter/etc. with opposite legs moving together or in sequence; for example, right front leg raised, and left back leg raised, while the other two legs (left front leg and right front leg) are bearing the weight. Remember this when sketching your horse’s pose! (The exceptions to this are pacers and Icelandic horses doing the “tolt”, feel free to look them up!) When drawing this gait, it is sometimes helpful to emphasize the two opposing legs that mirror each other; with two legs straight/weight-bearing, and too legs extended/bent/moving. Keep the opposing legs in tandem with one another and you’ll have this gait down!
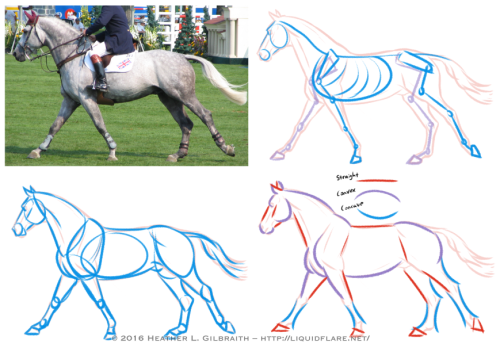
3) The Canter/gallop: Cantering is a horse’s natural running gait. In this gait it’s possible for all of a horse’s hooves to leave the ground for a moment with each stride. If a canter is a horse’s equivalent a human’s run, then a gallop is a sprint; in a gallop a horse reaches its maximum stride length and speed, though they don’t have the endurance to keep a full-on gallop up for long. When drawing the canter, watch out for which legs are bearing the weight and use that the guide you. (In my photo example, the right back leg and the left front leg are currently bearing the weight, with the right front leg about to take the weight to allow the left front leg to raise. Ugh, complicated…!)
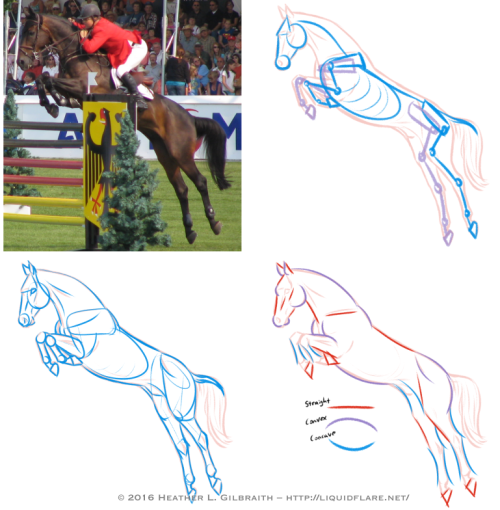
4) The Jump: It’s when jumping that a horse reaches its maximum “stretch”! Keep in mind that a horse’s back is not very flexible (which is what makes them great to ride!), so try to keep that spine straighter/stiffer than you would for a dog or a cat. Bending the horse’s spine too much will start to make it look broken, or at the very least, very old and decrepit, as horse’s spine starts to bend/sag with age.
5) The Landing: To emphasize the weight of a horse coming down on its front hooves, be sure to bend it’s “toe joint”, or pastern, so that its fetlock or knuckle joint is nearly touching the ground. Let that joint bend to absorb the shock of the landing!

Try to avoid these common anatomy mistakes when drawing horses. Study photos and the horse’s skeleton/anatomy to avoid these! (And seriously, please forgive how horrible these drawings are! I literally whipped them up in only a few minutes, haha…)
Afficher davantage
-
 0914kg liked this · 3 years ago
 -
 klauswalz reblogged this · 3 years ago
 -
 souvcnirs reblogged this · 3 years ago
 -
 sunniss liked this · 3 years ago
 -
 starslake liked this · 4 years ago
 -
 flaresources reblogged this · 4 years ago
 -
 freiahs liked this · 4 years ago
 -
 ucielavadonia liked this · 4 years ago
 -
 aiyhun liked this · 5 years ago
 -
 cozybrushes liked this · 6 years ago
 -
 redsources reblogged this · 6 years ago
 -
 puppiexp liked this · 6 years ago
 -
 lightningmckillme liked this · 6 years ago
 -
 eddebrock liked this · 6 years ago
 -
 nerdysassyxx reblogged this · 6 years ago
 -
 pastel-apostle liked this · 6 years ago
 -
 whoffaldi liked this · 6 years ago
 -
 travelling-backwards reblogged this · 6 years ago
 -
travelling-backwards liked this · 6 years ago
-
 jjewels-photography reblogged this · 6 years ago
 -
 pnchingwalls101 reblogged this · 6 years ago
 -
pnchingwalls101 liked this · 6 years ago
-
 yogorette liked this · 7 years ago
 -
 daethnotes liked this · 7 years ago
 -
 celestieaels liked this · 7 years ago
 -
 nostalgia-art liked this · 7 years ago
 -
 jazzislame liked this · 7 years ago
 -
 intergalactic-space-dummy-blog liked this · 7 years ago
 -
 info-dumb reblogged this · 7 years ago
 -
 pixie-lixie liked this · 7 years ago
 -
 ygo-gx liked this · 7 years ago
 -
 namjinfinite liked this · 7 years ago
 -
 bunnyhouseresources-blog reblogged this · 7 years ago
 -
bunnyhouseresources-blog liked this · 7 years ago