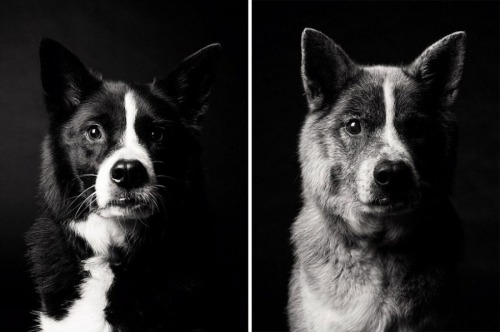
Source: FOERVRAENGD


Source: FOERVRAENGD
List of tutorials that helped me with environmental painting: “How to make your own Perspective Grid in PS” <—- this one is the best thing I’ve ever discovered. Srsly CHECK IT OOOOUUUUT! Snuffen’s Background Tutorial P1More or less ALL tutorials by Griffsnuff is awesome, so make sure to check out the rest of them! More or less ALL tutorials made by AquaSixio! List of youtube channels that also helped and inspired me: FZDSCHOOL - More or less one of the most known concept art-related resources I know on youtube. It’s great to sit and draw and just listen to the talking. SinixDesign- This guy is also great! He has some design workshops ever now and then where the viewers can send in their stuff for critique! very encouraging and inspiring! moatddtutorials- This guy is more into drawing than painting, and has a more cartoony style. He has interesting methods when it comes to perspective. And he also challenge himself in some of his videos (the engine block video is a great example of this) foxOrian- Also known here on dA for his awesome perspective and composition tutorials. He has a youtube channel where he posts some videos that might be interesting as well.
More Posts from Zelo-ref and Others


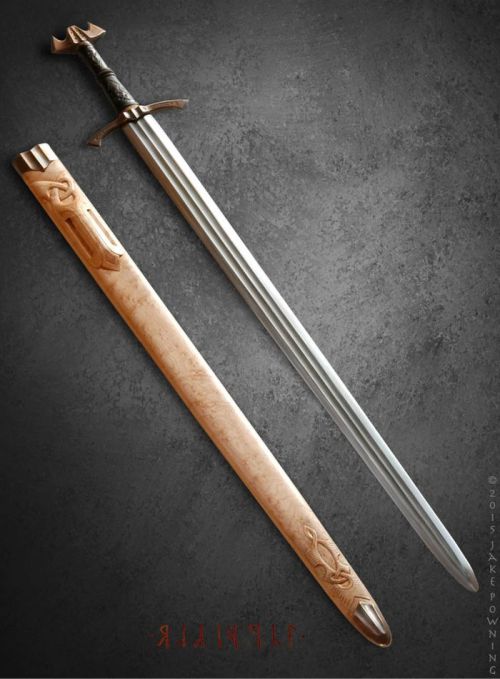

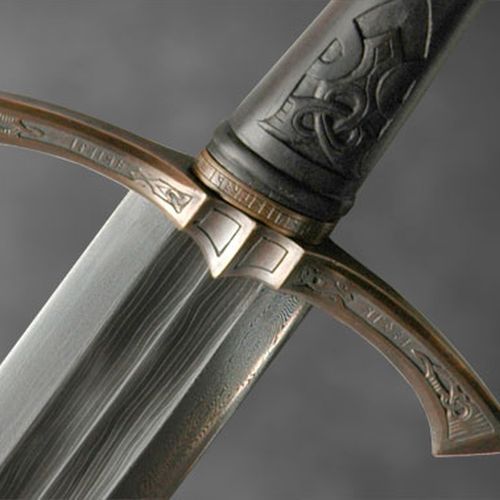
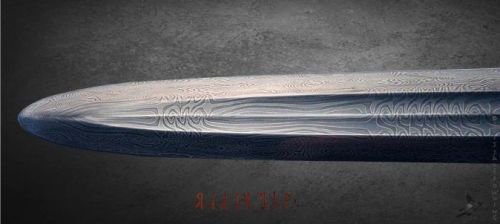
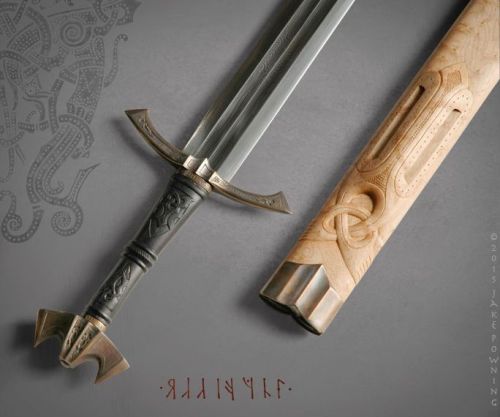

Handmade Swords: Dagfinnr – Day Finder — Dragon Slayer’s Sword
Maker: Jake Powning
Medium: hilt – bronze, blackwood; blade - pattern welded 1075/8670m; scabbard – quilted maple wood lined with sheered sheep fleece, bronze
Measurements: overall length 113cm / 44.5 inches, width at the strong 5cm / 2 inches; blade length 93cm / 36.6 inches; hilt length 20cm / 7.9 inches; weight 1548g / 3.4lbs
This is a dragon slayer’s sword, it represents years of research into myth and Germanic material culture and is the culmination of a 20 year career as a swordsmith. The blade is constructed from two nine layer twisted strands in the core and an edge of over 600 layer forlded steel.
Source: Copyright © 2016 Jake Powning


Handmade Swords - Earil
By Peter Lyon of Weta Workshop
Edition Size: 1
Measurements: blade length 915mm (36"); overall length 1217mm (48"); weight 1.94Kg (4 pounds 4 ounces); balance point 71mm (2.8") along the blade, measured from the shoulder of the blade
The sword has been made especially for the Weta Cave and Weta’s Online Shop to sell to the public. It is similar to late medieval European longswords, but with design flourishes transform it into a piece of art as well. A longsword is light enough and balanced to be used with one hand, but it can also be used two handed for powerful cutting blows. The blade is broad for much of its length, making for strong cuts, but comes to an acute point for effective thrusts, making this a true cut-and-thrust sword.
The individual parts have shapes and detail lines that blend into each other and continue into the next component, so that shapes continue even as the materials change, and the shapes of all the hilt parts draw the eye towards the diamond shaped bosses in the centre of the grip, filled with polished Paua (New Zealand abalone) shell each side. At the same time there is a strong central line through the hilt and along the blade, emphasising the straight and symmetrical shapes of the sword.
This sword has many nautical features which led me to the name, “Aearil”, which in Elvish means “Gleaming Ocean”.
The straight blade is ground from spring steel bar, and has been heat treated to give the best possible combination of toughness and edge hardness. Historically blades were forged into shape and to remove flaws in the steel, but the consistency and high specifications of modern steels mean this is no longer necessary.
The bevelled edge is blunted for safety and display, but could just as easily be sharpened for cutting tests. The tang of the blade is strong and wide, and passes through the cross guard, grip and pommel, and is peened over the end of the pommel for maximum strength.
The cross guard is cut from a block of mild steel. From the centre block it projects along the blade and towards the ends, which are split into a fork. This is an unusual feature which I don’t recall being used on a sword before. The cross is set onto the shoulders of the blade for extra strength and stability, as was done on medieval European swords to prevent the cross becoming loose and rattling through use.
The grip is made of beech wood, covered with leather. Thin cords under the leather create the designs, and the leather has been carefully tooled to fit into all the shapes created by the cords. The grip was mostly drilled out then fitted by heating the tang and burning out the remaining wood for a tight fit, and finally glued in place. It is a two handed grip; the foregrip is straight to give a strong gripping surface, while the waisted shape of the upper grip encourages the second hand to nestle into the inside curves of the pommel.
The mild steel pommel is also a counterweight for the blade. It is shaped somewhat like a fish tail, with curved and recessed faces to add interesting shapes, and also to remove weight and get the best possible balance for the sword overall. The pommel was set tight onto the tapering tang before the end was peened over.
Source: Copyright © 2016 Weta Ltd.


Beating Brush Lag in Manga Studio

Booooooooo… what is this, Photoshop?!
Lagging brushes are an occasional problem in any illustration software. Here’s a troubleshooting guide for Manga Studio if your tools are acting like molasses. (Some settings may be different on Windows or if you’re running the Clip Studio Paint branding of the software. For what it’s worth, I’m running Manga Studio 5.0.3 on Mac OS 10.7.5. Yup, I’m behind the times.)
There are a few options to beat the lag:
1. Quit Stuff Bye bye, YouTube. See ya, Skype. Later, Tumblr.
Save your computer’s processor by quitting RAM-hogging apps and tasks while painting. Streaming audio/video will drastically reduce performance, but even leaving browsers open can slow things down, so best to just close it up. Guess that rules out Spotify, but then there’s always ye olde Zune. Gotta love cringing through those high school playlists while working.
2. Change Preferences Easier than changing your mind, and quicker too.
Check under the hood of Manga Studio’s Preferences for a few speed boosts. Do the following in these sub menus:
Preferences/Tablet/Tablet Settings: Change from 1 to 6 (I believe this option is Mac only).

Preferences/Performance/Undo: Lower the Undo count. Try taking it down 10-15 notches from default. You could also turn up that long-titled setting (“Delay before recognizing new object…”) by 100 ms, but I haven’t figured out what that does exactly…
Preferences/Cursor/Display Position of Reversed Cursor: Make sure to check “No Delay”.
After changing preferences, it’s a good idea to close and reopen Manga Studio.
3. Modify Brush Tool Settings Your brushes may take it personally, but remember you’re in charge here.
The Tool Settings window is a wealth of options for customizing brushes. Some are more processor-intensive than others. Here are a few of the best ones to modify: (Note: the look and behavior of brushes may be affected. You may want to duplicate and/or export a brush before changing its settings.)
Tool Settings/Anti-Aliasing: Turn down to “Little” or “None”
Tool Settings/Brush Tip: Reduce the number of materials on your brush.
Tool Settings/Stroke/Space: Increase spacing, but not too much. Brushes are essentially a string of material stamps. A low space setting means a smoother brush, but more work for your computer. Picture it frantically scrubbing a rubber stamp across your canvas. On that note, also make sure Continuous Spraying is not on.

Tool Settings/Watercolor Border: If your brush uses this setting, turn on the “Process After Drag” option. This renders the effect after each brush stroke and saves computing power.
Tool Settings/Correction: Turn off (or decrease) Stabilization, Post Correction, and Brush Stroke.
Tool Settings/Starting and Ending: Turn off all this stuff. Pfffft, who needs it, right?
Here’s a speed test after fiddling with some settings:

Woooooooo! We’re getting faster! Still a bit laggy, which leads to one last tip:
4. Rework The Canvas Might as well rework my life goals too.
Okay, disclosure: The two gifs in this post were recorded on a 4500x3000 canvas at 300dpi with a size 500 brush to emphasize lag. This third one is recorded on a 1080x720 canvas at 72dpi with a size 100 brush:

Yes! We’re cruising now!
Canvas sizing and resolution has a big affect on brush performance. It’s a bit of a conundrum. Getting the best image quality means working at a minimum resolution of 300dpi, which can be taxing for brushes on large canvases. So what to do? Just like traditional paintings start with thumbnail sketches, digital work can start on a low-resolution canvas. Here’s the method:
Set up your canvas normally at the full target resolution. But before drawing anything on the canvas, use the handy tool under Edit/Change Image Resolution. Reduce Resolution to 72dpi. Use this smaller canvas for rough sketching, background filling, blocking in large areas of color, etc. Then increase resolution to 144dpi for building up the body of the painting, still keeping it loose. (I’d recommend switching Interpolate to Hard Outline when increasing resolution.) Finally, blow it up to full resolution and get into the nitty gritty of rendering. This is where you’ll do the crisp line work, highlights, details, etc.

The idea here is to work big to small. This will keep away brush lag by using large brushes on small canvases. As the canvas resolution increases, decrease brush size and work smaller, tightening things up in the process. NOTE: Increasing canvas resolution causes pixilation. Don’t worry about it. This can be cleaned up in the final stages of painting.
Hope this guide is helpful! If lagging persists, remember to check drivers and tablet settings as well. If all else fails, Google’s a good friend ;)
-Armin
why you should make a webcomic and why you can make a webcomic
why should you make a webcomic?
it’s regular drawing practice
you get to draw and develop the universe your OCs live in
you could draw your OCs making out with context
see number 3
how can you make a webcomic?
make a new tumblr
install this theme https://www.tumblr.com/theme/37061
post comics as you would on any other tumblr they show up on their own webcomic site
what if nobody sees my webcomic :(
too bad you got to draw your OCs making out and nobody can appreciate your artistic genius obviously the world is not ready for this webcomic genius


Photographer Kilian Schönberger takes us on a journey into the scary tales of the Brothers Grimm. This fascinating series of photographs was shot by Kilian as he traveled through the remote middle areas of Europe, the same areas that inspired the Brothers Grimm to write their series of eerie tales.
(x)
-
 cheesecake-crisis liked this · 1 month ago
 -
 sir-marly liked this · 2 months ago
 -
 niarduh liked this · 4 months ago
 -
 daeyeoubi liked this · 4 months ago
 -
 9wpm liked this · 4 months ago
 -
 ochretones reblogged this · 4 months ago
 -
 karykca liked this · 4 months ago
 -
 lmaojune reblogged this · 4 months ago
 -
 fandom-trash-goblin reblogged this · 4 months ago
 -
 gatorkid509 liked this · 6 months ago
 -
 cheesy-che reblogged this · 7 months ago
 -
 redstring-resources reblogged this · 7 months ago
 -
 currybox reblogged this · 8 months ago
 -
 sylphee liked this · 9 months ago
 -
 dr34m-c4st liked this · 11 months ago
 -
 ryanryanryanwe-blog liked this · 1 year ago
 -
 therefgarden reblogged this · 1 year ago
 -
 huginnseye liked this · 1 year ago
 -
 speedysketchdigitalarthairdo liked this · 1 year ago
 -
 kiris-poprock reblogged this · 1 year ago
 -
kiris-poprock liked this · 1 year ago
-
 vanillany liked this · 1 year ago
 -
 bookmarkin-art-stuff-lol reblogged this · 1 year ago
 -
 artking-4 reblogged this · 1 year ago
 -
 tevinter liked this · 1 year ago
 -
 ladyofmisfortune liked this · 1 year ago
 -
 randomlyappearingartist liked this · 1 year ago
 -
 corvus-castle reblogged this · 1 year ago
 -
artking-4 reblogged this · 1 year ago
-
 izumi-yami liked this · 1 year ago
 -
 redmagus77 reblogged this · 1 year ago
 -
 some-artist-thingie reblogged this · 1 year ago
 -
 theandroidshinx liked this · 1 year ago
 -
 starstruckwolfsong liked this · 1 year ago
 -
 millie-saurus liked this · 1 year ago
 -
 cynicalwonders liked this · 1 year ago
 -
 theaustinstollhaus liked this · 1 year ago
 -
 sarifel-corrisafid-ilxhel liked this · 1 year ago
 -
 doodlee-a reblogged this · 1 year ago
 -
 flailingwings reblogged this · 1 year ago
 -
 chuchushoot liked this · 1 year ago
 -
 mr-monster-maker reblogged this · 1 year ago
 -
 harkmorper liked this · 1 year ago
 -
 mortphilippa liked this · 1 year ago
 -
 thejackalfiend reblogged this · 1 year ago
 -
thejackalfiend liked this · 1 year ago
-
 emjoyy liked this · 1 year ago