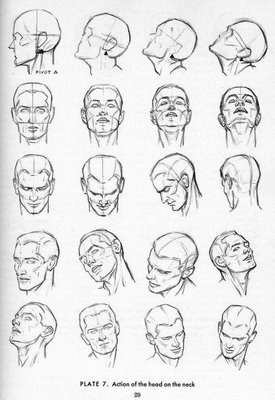
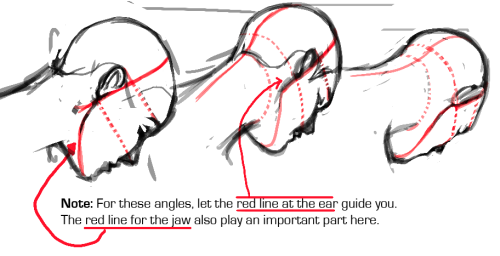
Hello! I'm A Self Taught Artist Who Wants To Get Better At Shading/lighting And Backgrounds Especially.
Hello! I'm a self taught artist who wants to get better at shading/lighting and backgrounds especially. But whenever I try to do a background study, I can't break it down and it ends up looking terrible. Do you know of anything that would help?

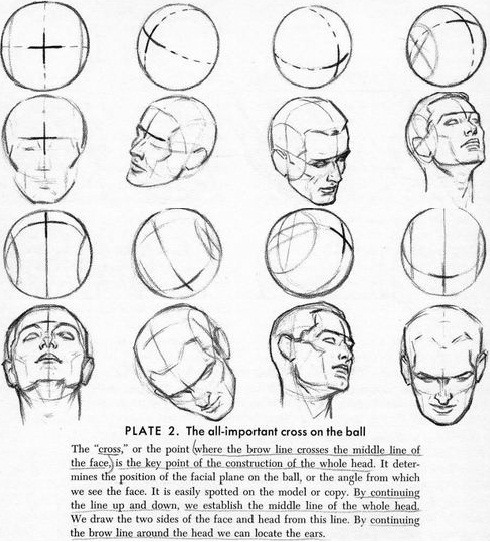
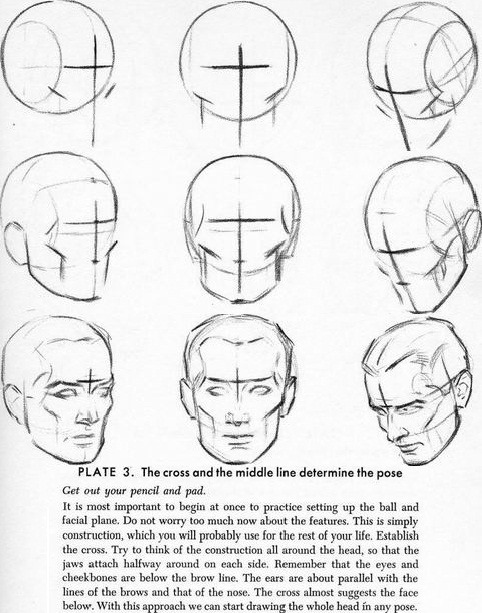
Hi! I would like to talk a little bit of the thought process behind photo study and the importance of simplicity.

It is really important to break down an image to chunks of value rather than seeing the detail first, which can lead to over-complicated mush of colors with no constructed value.
These are some of the artists that inspired me to get used to breaking down images in the most simplest way possible:

Notice how super simple and straight-on-point his thumbs are? And this is how his colorscript for Moana looks like:


Zero detail. Yet you have all the information you need!
I personally think these thumb studies are super important to train your eyes to break down an image in values and colors and therefore be able to organize and design your painting better.
More Posts from Zelo-ref and Others


8 Wedding Veil Styles
1. Angle
The Angle is a type of wedding veil that can be worn to the side of the head giving you a slight angle to the front (or to the back of the crown). This particular example features soft illusion netting and is finished with bobby pin loops for easy addition to a fascinator (fascinator example shown in photo below, right).

2. Bavolet
A Bavolet veil has a blusher veil on the front with a back snood style (snood refers to a type of garment worn at the back of a woman’s head). These two types of veils – the blusher and the snood – are sewn together to create one veil. In this particular example, the front veil can be flipped for the reception to provide another look.

3. Blusher
A blusher veil is very versatile and can be worn on the side of the head, back of the head, or flipped for a snooded look at the reception.

4. Elbow Length
This next style offers a dramatic look with fullness. An elbow length veil traditionally hits at your elbow and this particular example measures 32″ in length; it also features a corded edge. Elbow length wedding veils can be one-tiered (as shown) or two-tiered for additional fullness.

5. Fingertip Length
The fingertip length veil is a traditional choice and, as shown below, can be made in a two-tiered style for added volume. The second tier can be used as a blusher when you walk down the aisle, which can be then worn back during the reception. As the name suggests, this veil measures approximately to the length of your fingertips.

6. Cap
The cap refers to the portion of the veil that sits atop the head and frames the face. This particular example, for instance, uses ribbon to create a capped look that is simply timeless.

7. Mantilla
A mantilla veil is one that is lined with a wide edging of lace. This example below uses Alencon lace to frame your face beautifully.

8. Cathedral
The Cathedral veil makes a statement with its floor-length elegance. This veil can measure between lengths of 6 feet, 7 feet, 8 feet, or even 9 feet.


DIY 2 Body Chains - one with hex nuts and the other with coins.
Body Armor Jewelry is still trending, but I haven’t seen many DIYs for body chains, harnesses,or headpieces on DIY blogs. The jewelry itself is really cheap to make, especially if you find the right chain and can buy it by the foot.
For pages of DIY Chain Handpieces or Panjas go here.
Bottom Photos: DIY Body Chain Tutorial from Letters and Beads here. She used a belly dancing hip decoration for the chains and decoration.
Top Photo: Find the tutorial for this DIY Hex Nut Body Chain from A Little Fashion here. You can also check out the video below.
Find my 12 Body Armor DIYs Roundup on Tumblr here.


My artwork for a location on the new World Of Warcraft Legion Expansion Pack is now released online,
http://us.battle.net/wow/en/legion/#media
Here’s the visual development.


-
 mkplafy liked this · 1 month ago
 -
 artostratusphere reblogged this · 1 month ago
 -
 alokiasaltwater liked this · 1 month ago
 -
alokiasaltwater reblogged this · 1 month ago
-
 corvikari liked this · 1 month ago
 -
 silliestcheezecat liked this · 2 months ago
 -
 axomothl liked this · 2 months ago
 -
 darradreamer reblogged this · 2 months ago
 -
darradreamer reblogged this · 2 months ago
-
darradreamer liked this · 2 months ago
-
 whataduck reblogged this · 2 months ago
 -
 curruidcoinhenn liked this · 2 months ago
 -
 comrade-slugcat reblogged this · 2 months ago
 -
 tantlemimes reblogged this · 2 months ago
 -
 boomersm liked this · 2 months ago
 -
 bluesflying reblogged this · 2 months ago
 -
 phoenixtamer liked this · 2 months ago
 -
 owlerism liked this · 2 months ago
 -
 aniixor liked this · 2 months ago
 -
 handercover liked this · 2 months ago
 -
 plague-203 reblogged this · 2 months ago
 -
plague-203 liked this · 2 months ago
-
 thegreatdot liked this · 2 months ago
 -
 lidge-soup liked this · 2 months ago
 -
 exhalesx liked this · 2 months ago
 -
 crunchyspositivybubble liked this · 2 months ago
 -
 satansdoggy reblogged this · 2 months ago
 -
satansdoggy liked this · 2 months ago
-
 deliriouslyparanoid liked this · 2 months ago
 -
godzillasmash liked this · 2 months ago
-
 sanzoumon liked this · 2 months ago
 -
 awkwardsocialfailure liked this · 2 months ago
 -
 agallonofmilky liked this · 2 months ago
 -
 justpickupthatpen reblogged this · 2 months ago
 -
 nochnye-vedmy liked this · 2 months ago
 -
thesoulfirerevolution liked this · 3 months ago
-
 fourthquarkile reblogged this · 3 months ago
 -
 milomoony-blog reblogged this · 4 months ago
 -
milomoony-blog liked this · 4 months ago
-
 v2xe reblogged this · 4 months ago
 -
v2xe liked this · 4 months ago
-
 fifteenpoundsofpissedoffbees reblogged this · 4 months ago
 -
fifteenpoundsofpissedoffbees liked this · 4 months ago
-
 cookies-and-doom reblogged this · 4 months ago
 -
cookies-and-doom liked this · 4 months ago
-
 maximiliano-otamendi liked this · 5 months ago
 -
 hausmakes liked this · 6 months ago
 -
 nemofodder reblogged this · 7 months ago
 -
 fablenaught reblogged this · 7 months ago
 -
 tinywintersnake liked this · 8 months ago