So Happy To Finally Be Able To Share This! It’s Some Early Concept Art Of Aloy, The Lead Character
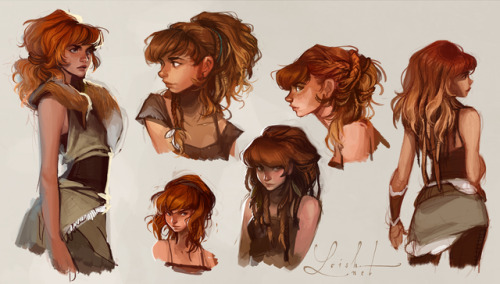
So happy to finally be able to share this! It’s some early concept art of Aloy, the lead character of Horizon: Zero Dawn. I worked on this character together with the rest of the character team for a few months in 2013. It was a huge honor working with Guerrilla Games and their inspiring, talented team. I loved working on this character! These images can be seen in this neat featurette about Aloy: www.youtube.com/watch?v=bw5Jnh… as well as in the artbook that comes with the collector’s edition of the game! Images © Sony and Guerrilla Games.
More Posts from Zelo-ref and Others


Audrey Fry - https://www.facebook.com/fryillustration - https://www.etsy.com/shop/fryillustration - http://audreyfry.blogspot.com.es
Beating Brush Lag in Manga Studio

Booooooooo… what is this, Photoshop?!
Lagging brushes are an occasional problem in any illustration software. Here’s a troubleshooting guide for Manga Studio if your tools are acting like molasses. (Some settings may be different on Windows or if you’re running the Clip Studio Paint branding of the software. For what it’s worth, I’m running Manga Studio 5.0.3 on Mac OS 10.7.5. Yup, I’m behind the times.)
There are a few options to beat the lag:
1. Quit Stuff Bye bye, YouTube. See ya, Skype. Later, Tumblr.
Save your computer’s processor by quitting RAM-hogging apps and tasks while painting. Streaming audio/video will drastically reduce performance, but even leaving browsers open can slow things down, so best to just close it up. Guess that rules out Spotify, but then there’s always ye olde Zune. Gotta love cringing through those high school playlists while working.
2. Change Preferences Easier than changing your mind, and quicker too.
Check under the hood of Manga Studio’s Preferences for a few speed boosts. Do the following in these sub menus:
Preferences/Tablet/Tablet Settings: Change from 1 to 6 (I believe this option is Mac only).

Preferences/Performance/Undo: Lower the Undo count. Try taking it down 10-15 notches from default. You could also turn up that long-titled setting (“Delay before recognizing new object…”) by 100 ms, but I haven’t figured out what that does exactly…
Preferences/Cursor/Display Position of Reversed Cursor: Make sure to check “No Delay”.
After changing preferences, it’s a good idea to close and reopen Manga Studio.
3. Modify Brush Tool Settings Your brushes may take it personally, but remember you’re in charge here.
The Tool Settings window is a wealth of options for customizing brushes. Some are more processor-intensive than others. Here are a few of the best ones to modify: (Note: the look and behavior of brushes may be affected. You may want to duplicate and/or export a brush before changing its settings.)
Tool Settings/Anti-Aliasing: Turn down to “Little” or “None”
Tool Settings/Brush Tip: Reduce the number of materials on your brush.
Tool Settings/Stroke/Space: Increase spacing, but not too much. Brushes are essentially a string of material stamps. A low space setting means a smoother brush, but more work for your computer. Picture it frantically scrubbing a rubber stamp across your canvas. On that note, also make sure Continuous Spraying is not on.

Tool Settings/Watercolor Border: If your brush uses this setting, turn on the “Process After Drag” option. This renders the effect after each brush stroke and saves computing power.
Tool Settings/Correction: Turn off (or decrease) Stabilization, Post Correction, and Brush Stroke.
Tool Settings/Starting and Ending: Turn off all this stuff. Pfffft, who needs it, right?
Here’s a speed test after fiddling with some settings:

Woooooooo! We’re getting faster! Still a bit laggy, which leads to one last tip:
4. Rework The Canvas Might as well rework my life goals too.
Okay, disclosure: The two gifs in this post were recorded on a 4500x3000 canvas at 300dpi with a size 500 brush to emphasize lag. This third one is recorded on a 1080x720 canvas at 72dpi with a size 100 brush:

Yes! We’re cruising now!
Canvas sizing and resolution has a big affect on brush performance. It’s a bit of a conundrum. Getting the best image quality means working at a minimum resolution of 300dpi, which can be taxing for brushes on large canvases. So what to do? Just like traditional paintings start with thumbnail sketches, digital work can start on a low-resolution canvas. Here’s the method:
Set up your canvas normally at the full target resolution. But before drawing anything on the canvas, use the handy tool under Edit/Change Image Resolution. Reduce Resolution to 72dpi. Use this smaller canvas for rough sketching, background filling, blocking in large areas of color, etc. Then increase resolution to 144dpi for building up the body of the painting, still keeping it loose. (I’d recommend switching Interpolate to Hard Outline when increasing resolution.) Finally, blow it up to full resolution and get into the nitty gritty of rendering. This is where you’ll do the crisp line work, highlights, details, etc.

The idea here is to work big to small. This will keep away brush lag by using large brushes on small canvases. As the canvas resolution increases, decrease brush size and work smaller, tightening things up in the process. NOTE: Increasing canvas resolution causes pixilation. Don’t worry about it. This can be cleaned up in the final stages of painting.
Hope this guide is helpful! If lagging persists, remember to check drivers and tablet settings as well. If all else fails, Google’s a good friend ;)
-Armin
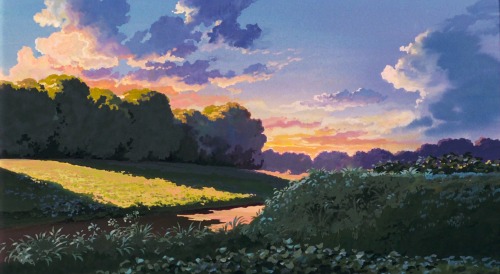
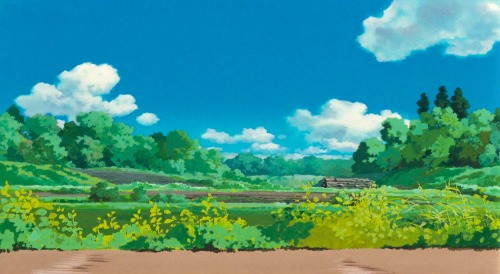
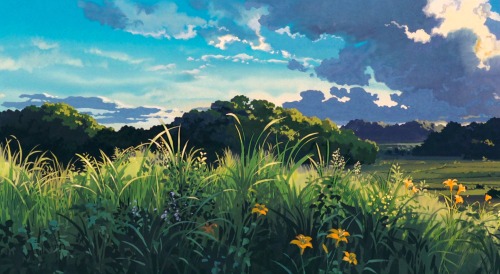
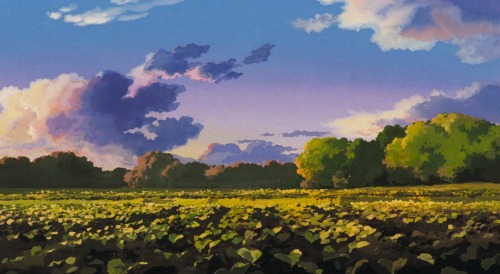

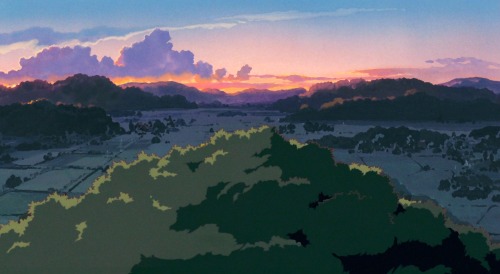
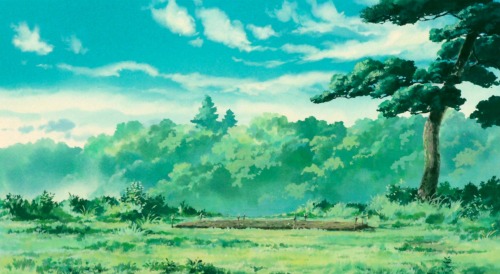


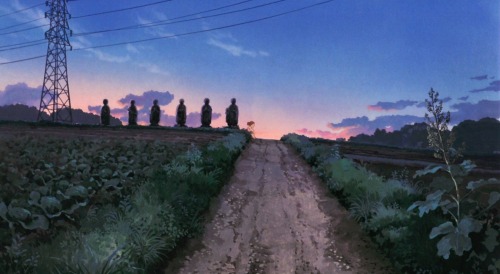
Cloud Strewn Skies Of My Neighbor Totoro - Art Director Kazuo Oga (1988)

Jacket
Elsa Schiaparelli, 1937
The Philadelphia Museum of Art


Yinqing Yin Spring/Summer 2013 Haute Couture


Vilnius University Library


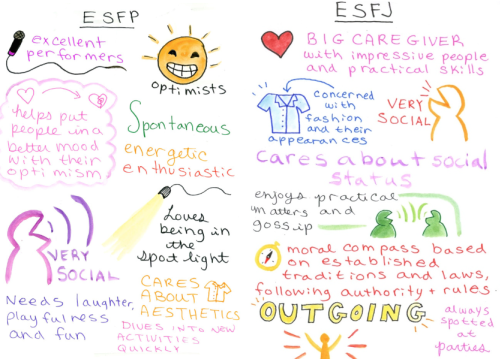
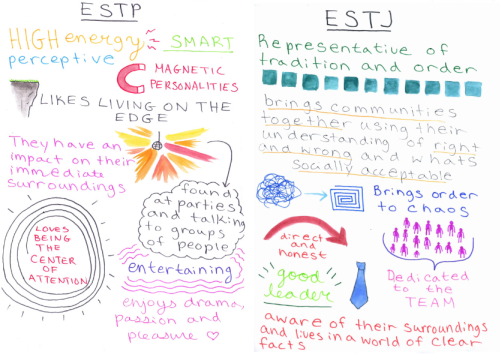
All of the 16 personality type descriptions together. You can find the complete images and descriptions for each type on my blog here X


These are all the characters I designed for Spera: Ascension of the Starless Vol 1 (now available in stores: Amazon/bookstores etc). Enjoy!
-
 alexchavez64 liked this · 3 months ago
 -
 okami-117 reblogged this · 7 months ago
 -
okami-117 liked this · 7 months ago
-
 megaraye reblogged this · 7 months ago
 -
 thiefofhope555 reblogged this · 7 months ago
 -
thiefofhope555 liked this · 7 months ago
-
 cosmicdrawss liked this · 7 months ago
 -
 thatkidisevil liked this · 8 months ago
 -
 writermml liked this · 10 months ago
 -
 indiemitchell liked this · 1 year ago
 -
 misstabris liked this · 1 year ago
 -
 stuckinaliminalstate reblogged this · 1 year ago
 -
 hammer-tiime reblogged this · 1 year ago
 -
 neonacidtrip liked this · 1 year ago
 -
 solarstormflare liked this · 1 year ago
 -
solarstormflare reblogged this · 1 year ago
-
 rocket-dog-sighting liked this · 1 year ago
 -
 escaped-goat liked this · 1 year ago
 -
 kiddraws12 liked this · 1 year ago
 -
 aleph-sharp liked this · 1 year ago
 -
 hartlesshart liked this · 1 year ago
 -
 burdensfeather liked this · 2 years ago
 -
 imarileina liked this · 2 years ago
 -
 artimies6 liked this · 2 years ago
 -
 faceplanted-cat reblogged this · 2 years ago
 -
 tess-adness liked this · 2 years ago
 -
 quiche-quibbles liked this · 2 years ago
 -
 nanamistuff liked this · 2 years ago
 -
 pepa16 liked this · 2 years ago
 -
 kingsleeeee liked this · 2 years ago
 -
 mooglesandstuff reblogged this · 2 years ago
 -
 ides-aelfscyne reblogged this · 2 years ago
 -
 cassiaray liked this · 2 years ago
 -
 scumbcgs liked this · 3 years ago
 -
 bellamatto reblogged this · 3 years ago
 -
bellamatto liked this · 3 years ago
-
 cranberrie07 liked this · 3 years ago
 -
 skyler-of-waffles liked this · 3 years ago
 -
 sailordust67 liked this · 3 years ago
 -
 slpyblue liked this · 3 years ago
 -
 bycharlotteh-blog liked this · 3 years ago
 -
 art-designappreciation liked this · 3 years ago
 -
 wolfwassuretofollow liked this · 3 years ago
 -
 doe-eyed-idiot liked this · 3 years ago
 -
 arachnidprincess liked this · 3 years ago
 -
 book-full-of-dreams reblogged this · 3 years ago
 -
 kaptainandy reblogged this · 3 years ago
 -
kaptainandy liked this · 3 years ago