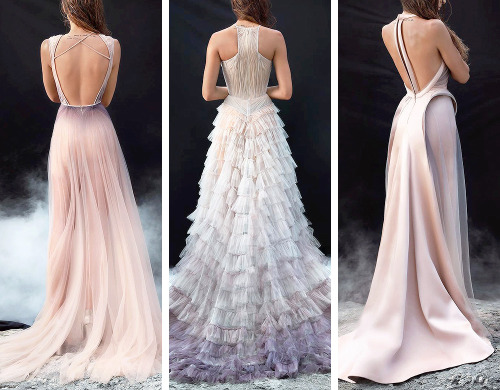
Row 4 _ Right, (Source)


Row 4 _ Right, (Source)
Everything Else, (Source)
More Posts from Artrefforsteph and Others


NEW AVAILABLE ART PROGRAM
It seems to be a mix between SAI and photoshop, simplified. It even has a stabalizer that works even with the mouse.
Best of all, it’s free, and works for both Mac and Windows.
To give it a try, head right on down to http://firealpaca.com/
If you have no idea what to draw...

its like having all the money you wanted ,but you dont know what to buy. Making this to look at when I get stuck with lame ideas. These are all suggestions from my followers:
Taking a break: No option for me but it surely can be good for other overworked peeps
Exploring new art forms: depending on your art style, surrealism would be something I’ve never tried before.
Shape game: Either sketching blindly and connecting the dots or sketching random shapes and fill them with faces or whatever comes to your mind.
Draw something you never drew before: …a good picture…
Draw a shark: How to draw a shark by Will Terrell
Read books: Let your mind to the picture first and then your hand.
Poses: Action poses - freestyle dancing - fight styles - (dancing people in general)- life drawing - online 3D model
Redoing Artwork: Either your old stuff or from your favorite artists, your way.
Reverse storyboarding: take your fav movie and sketch the the shots after every camera change.
Screencaps: study them, draw them, look at composition
Characters: Let your OC’s do extreme expressions, let them do things (driving,cleaning,running,etc)
Concepts: How people could look like on other planets. Look at Character Design
Planing an art project: A comic in my case, thinking about environments and characters etc.
Drawing upside down: ¿¿¿¿¿¿¿¿¿¿¿¿¿¿¿¿¿¿¿¿¿¿¿¿¿¿
Fanart: Illustrate your favorite book, series,Manga ,etc
Sideblog: Gathering all the references for all your needs


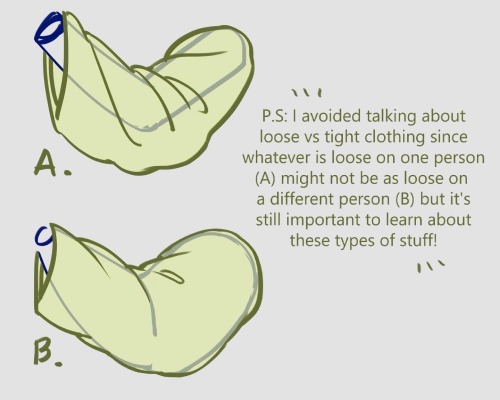
My first shot at creating a sort of tutorial/guide, telling how I do things. On this initial chapter we’re going over the handy matter of Hands. Not meaning to be an encyclopedic explanation, only showing my own methods and self-taught clues. Hoping somebody finds it useful! :3 I’ll do more if this one is received well. So let me know~
My thanks also to the supporters in my Patreon campaign, who helped me decide which themes to focus on for a start. And are actually allowing this to happen. :D Cheers!
I forgot I have to be active here so here’s my Twitter tutorial on how to draw folds I made a while back to help a friend!


All this time. ALL THIS TIME i had no idea SAI had perspective transform capabilities.
Copic Marker Walkthrough
Lately many people have been asking me how to create a space nebula effect with markers. The process is relatively simple, but it’s not easy to explain simply with words alone. So in this walkthrough I’m going to show step by step how it’s done.

First things first. This is the list of supplies I used. -Strathmore Mixed Media 5.5 x 8.5 sketchbook-Pink and White Colored Pencil-White Gel Pen-13 Copic Marlers (12 colors and a colorless blender, which I’ll explain how to use later.) I should point out now that you aren’t required to use the exact brands I used to create the drawing. I use these materials because they’re what I’m most accustomed to.The techniques I demonstrate can be done with whatever markers and paper you’re comfortable using. What matters is that you understand the technique because when you do you can apply it to anything.

I begin by making some abstract cloud-like shapes with E50 (Eggshell), which is a very faint yellow. There’s no pencil sketch here because space nebula (as well as atmospheres and natural landscapes) can be easily created by layering abstract shapes on top of each other.

Using Y21 (Buttercup Yellow) and G20 (Wax White) I basically repeat the first step. Still working very light. I realized after the fact that Buttercup Yellow was a bit too intense for this drawing so I stopped using it there. This is why it’s important to have a sheet of scratch paper nearby to test out colors before you apply them. Because once they’re down, they’re DOWN.

Next I use R20 (Blush) to start defining the shapes of the gases in the nebula. Then I go back to Eggshell. It’s probably hard to see what I did here, but I used the brush tip end (on its side) to swipe inward, from all sides, towards the center of the nebula. The reason being is that the brush tip is more saturated than the chisel tip. This helps intensify the lighter shade of yellow that’s already on the paper. If also makes crossfading colors easier because the sideways swipe motion creates a soft gradient that tapers towards the edge. I’ll use this technique multiple times throughout the drawing..

Now with B000 (Pale Porcelain Blue) I layer over the gases in the center while working my way outwards. Again I’m pulling my strokes inward because I know the surrounding space will be deep blue and I want the transition to be a smooth one.

With E04 (Lipstick Natural) I’m finally beginning to put in some of the darker colors. At this point the drawing sill looks like a random mess. Sometimes you’ll get the urge to rush and make the drawing look like something, but you have to be patient and take your time.

Using B32 (Pale Blue) and R20 again, I’m going around the nebula detailing and adding layers of color. I’m also leaving some white spaces which will later become stars. My Pale Blue is actually beginning to dry out, but here in able to make that work to my advantage because it streaks from the chisel end create a dry brush effect which helps add to the glow. The nebula portion of the drawing is beginning to take shape.

Working my way around the perimeter with Pale Blue. From here you can see the importance of working light to dark. Build your colors gradually and avoid the urge to go too dark too early. You want to have room for error and you don’t want create more work for yourself.

With B04 (Tahitian Blue) I fill the surrounding space completely. I’m not too concerned with trying to get an even layer because I know that I’m going to add darker shades of blue next.

Here I used B00 (Frost Blue) to start cleaning up some of the edges around the nebula. I also used BG15 (Aqua) to add some pockets of color in the surrounding space.

Adding darker layers to surrounding space with B14 (Light Blue), which surprisingly a pretty dark shade of blue. Then I used B97 (Night Blue) to add the last layer, which is the darkest layer in this drawing.

Now it’s time for the final details. 0 is the Colorless Blender. But it’s not necessarily used to blend. Instead it almost acts like an eraser because the ink pushes colors away when you put it down. Because of this I generally don’t use it. But it works great for things like water, landscapes and atmospheres. Or in this case, space in which I used it to pull out highlights in and around the nebula. The colorless blender is odd, but it occasionally has its uses.

This is the final step and my personal favorite. Highlights and small details. I used the pink and white pencils to color around the edges of the brightest stars to make them look as if they’re glowing. Then I used the a white gel pen to color inside those stars to make them shine and pop off the page.

And here’s the finished drawing. This was hastily put together, but hope y'all found this to be informative and easy to follow. I’ll try to do more marker walkthroughs on different subjects in the future. Until then thanks for all your support and encouragement!


-
 royalbs liked this · 3 years ago
 -
 a-cowboy-in-space liked this · 3 years ago
 -
 reference-side reblogged this · 3 years ago
 -
 jessferences reblogged this · 3 years ago
 -
 bassclarineko liked this · 3 years ago
 -
 wiserdeafartistic reblogged this · 3 years ago
 -
 selkhetti liked this · 3 years ago
 -
 im-flashtoo liked this · 3 years ago
 -
 bigf101 liked this · 3 years ago
 -
 ilhamiman liked this · 3 years ago
 -
 archives-chan reblogged this · 3 years ago
 -
 chrysoulazk liked this · 3 years ago
 -
 coldhearteddragonfire liked this · 3 years ago
 -
 ikykik liked this · 3 years ago
 -
 alex134t liked this · 3 years ago
 -
 webstjes000 liked this · 3 years ago
 -
 nervousgarbage reblogged this · 3 years ago
 -
nervousgarbage liked this · 3 years ago
-
 psychoranebula liked this · 3 years ago
 -
 glazzyglaz liked this · 3 years ago
 -
 possiblyoctopus liked this · 3 years ago
 -
 punkocalypse liked this · 3 years ago
 -
 marinecorvid reblogged this · 3 years ago
 -
 anyhowsou liked this · 3 years ago
 -
 littletimorousbeastie liked this · 3 years ago
 -
 cosmichorrorsol liked this · 3 years ago
 -
 ricosuave-seduction liked this · 3 years ago
 -
 lightwithinthenightsky liked this · 3 years ago
 -
 cutedub liked this · 3 years ago
 -
 theninjafoxxart reblogged this · 3 years ago
 -
 crunchyspositivybubble liked this · 3 years ago
 -
 mjbsketchbook reblogged this · 3 years ago
 -
mjbsketchbook liked this · 3 years ago
-
 unicornonacob reblogged this · 3 years ago
 -
unicornonacob liked this · 3 years ago
-
 mist-the-husky-mix liked this · 3 years ago
 -
 bastardofharrenhal liked this · 3 years ago
 -
 breezemoonriver reblogged this · 3 years ago
 -
breezemoonriver liked this · 3 years ago
-
 miss-m-winks liked this · 3 years ago
 -
 justpickupthatpen reblogged this · 3 years ago
 -
 tutoriarts reblogged this · 3 years ago
 -
 aumonierceltique liked this · 4 years ago
 -
 soupsquad4chemist liked this · 5 years ago
 -
 megasillyellie liked this · 8 years ago
NSFW because there will probably be nude refs | this is a side blog to sort all of the art stuff I need | none of it is mine
151 posts