I Absolutely Adore Your Art Style I Was Wondering If You Could Explain How You Draw Faces And Like Heads
I absolutely adore your art style I was wondering if you could explain how you draw faces and like heads cause I have a lot of difficulty with constructing the face without having it look like an utter disaster sorry if your busy you don't have to do this but I was just wondering if you could help a young artist out thanks :D
Aww, thanks, anon. I’m pretty haphazard with things, but I’ll try to help.
This is your new best friend!!

The friendly neighborhood scribbly circle here is your foundation for drawing heads from any angle.

Like, any angle.

Because even when viewed in perspective, the head still has the same amount of volume.
As for actually constructing a face and placement of features, you can see that when jotting down a face, I generally lay down those guidelines [here in green] so I have something to work off of when I’m expanding upon a sketch. I would mostly recommend being aware of the underlying structure of the face.

If you’re going for super-anatomically-correct, you can see that facial features line up in specific, symmetrical ways. For real though, nobody’s symmetrical and sometimes noses are long or ears are small and faces are asymmetrical or just plain different. So this is a foundation but not a cast iron rule.
I will say that the more you do it, the easier it will become! It all just takes practice. And I totally tried to screen record a sketch, but my computer is being hella slow and it keeps freezing up, so I give up. In lieu of something new, here’s an older process gif that I think shows things pretty well:

YUP. Hope this helps. o/
More Posts from Arttuti and Others
(If you haven't answered this before) how do you do shading?
i havent !! and. i cant say this is gonna be any help but heres some of the things i try to keep in mind when im shading stuff

so youve got your flats on your initial drawing, the thing thats getting the business

then youve got find out where the light is coming from ! your light source is gonna determine where all the highlights and shadows are cast, and while it doesnt have to be EXACT, its generally a good rule to keep it pretty consistent through the drawing - sometimes youll probably have to deal with multiple sources, and each ones gonna be casting its own light and shadow ( and color by extension )

the intensity and sharpness of your shadows generally also reflects the brightness or closeness of the light ! basically if you wanna make something look BRIGHT, you gotta make sure the shadows are dark enough to get the idea across

so the actual shading part - the way i shade is by getting a brush on a very low opacity, picking the color i want for shadows and then layering the strokes over and over until i get about the darkness i want ( because im LAZY and i dont actually work with complex backgrounds a bunch, i can usually get away with drawing the shadows directly on the locked flat colors layer so theres nothing to clean up after )

afterwards i clean it up a little if i need to, add highlights while keeping in mind where the light is coming from, and start on the Detail Work ( it also might be helpful to keep in mind that highlights dont always go on the EDGE of things, but rather where the curve of something is - where the light would catch. this can help add a little depth and make flat things look rounded out ! )

and THEN its basically me zooming into the drawing at least 200%, putting another layer over the top of everything, and going over the outlines with a tiny brush so the harsh black is mostly gone ! there shouldnt be anything along the edge thats darker than the darkest part of the shadow ( with exceptions like the eyes and nostrils )
and thats mostly it ! i picked red for the shadow color, but picking your shading ( and flats ! ) based on the colors in your background can go a LONG way into making it seem like your character is actually in the environment

reflective light is also an important thing to keep in mind when choosing shadows and highlights - light and color doesnt always just hit an object and stay there, and even in the shade there could be light bouncing back from stuff like water or grass creating smaller, subtle highlights along the edges of things close by
not everything reflects the same way either ! something like a piece of wood is going to react differently than say, a metal ball

so you get your light source, basic highlights and shadows, not bad ! but then theres ALSO the light reflecting from the rest of the environment along the edge of the ball, and then finally the color from both the dragon and the ball reflecting a bit on each other
honestly though these arent RULES of drawing and more just guidelines i work with sometimes, and maybe your style of shading and highlighting looks completely different than this and thats ok !! - im still figuring a bunch of stuff out about light and reflections myself, and the great thing about art is that you can do whatever the hell you want with it


Painting & Rendering Tips

If you’re looking to start working in a painterly style, or have trouble finishing your work in it, I’ve compiled some tips for it. I love talking about painting so this got a bit long. Lots of image examples await…
Also whether you’re using digital or traditional mediums, all of this stuff can be applied to both. I’ll separate general tips from ones about rendering with headings so it’s easier to navigate this.
Keep reading


Hair Tip #1 - When drawing hair, start with the hairline and hair part(s). Then keep the flow and volume in mind while you add details!
I’m not the best at drawing or painting hair, but someone on instagram requested that I make a post about it so hopefully this will help someone! This is the first of 3 tips I’m going to share.


Need a bigger serving of practice? Check out the 19-paged worksheet and .psd practice file!
The difference between a beginner’s comic and an experienced artist’s comic comes down to the details, and one of the biggest “invisible” details is proportion.
How does an artist utilize page and panel layout, negative space, word balloons and composition to their best advantage? This Shingworks tutorial covers all of this information, and the 19-page supplement worksheet and comic proportion analysis template .psd takes it a step further and teaches you how to analyze real comics so that you can apply these principles to your own comics :]
My Patreon tutorials are unlocked to the public 6 months after their original publication month. You can find the full high-resolution archive of monthly tutorials at my Patreon! Thanks again to my Patrons for supporting me in the creation of my own comics, The Meek and Mare Internum.
My recent free-to-read tutorials on Tumblr:
Worldbuilding!
Understanding Patreon & Building A Patreon
Grow Your Brand
Acting for Comics
Researching for Comics
Writing for Webcomics
Coloring with Masks
This month’s Patreon tutorial: Webcomics 101
And as usual, thanks very much for not deleting my text~~
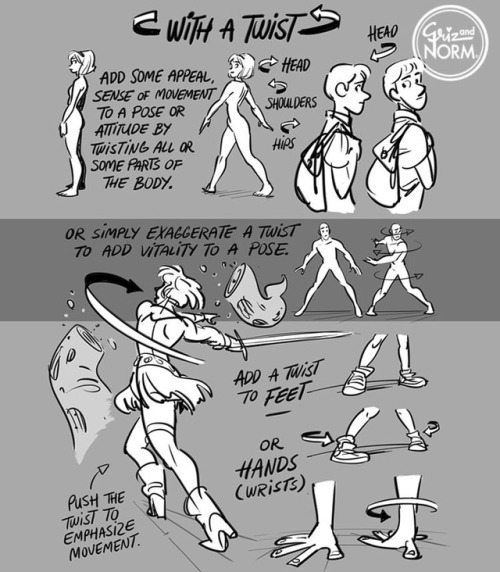
Tuesday Tips - With a Twist! Add some vitality to a pose by twisting parts of the body. A little or a lot. Give it a shot. #Norm #100tuesdaytips #WithATwist #grizandnorm #arttips #arttutorial
-
 currentlysl33py liked this · 5 months ago
 -
 crobrown liked this · 1 year ago
 -
 beetle-ze-bub liked this · 1 year ago
 -
 kingdom-dance liked this · 1 year ago
 -
 butterkik liked this · 1 year ago
 -
 nutzgunray-lvt reblogged this · 1 year ago
 -
 little-known001 liked this · 2 years ago
 -
 anonymusuko liked this · 2 years ago
 -
 spideyladman liked this · 2 years ago
 -
 gamerzdj17 liked this · 2 years ago
 -
 nakinari liked this · 3 years ago
 -
 mintandtea liked this · 3 years ago
 -
 tuturialreblog reblogged this · 3 years ago
 -
 hoard-of-inspiration reblogged this · 3 years ago
 -
 impossibleclair liked this · 3 years ago
 -
 perfectlyloudstudent liked this · 4 years ago
 -
 hydrangeahelper reblogged this · 4 years ago
 -
 waroninfinity liked this · 4 years ago
 -
 atsume-no-nettie reblogged this · 4 years ago
 -
 nerdyfuturismcookingpatrol liked this · 4 years ago
 -
 beachsekai reblogged this · 4 years ago
 -
beachsekai liked this · 4 years ago
-
 catatan-rahasia liked this · 4 years ago
 -
 dunes-moon liked this · 4 years ago
 -
 rustic-knight liked this · 4 years ago
 -
 hvitingr liked this · 5 years ago
 -
 that-one-soft-fry liked this · 5 years ago
 -
 depvotee liked this · 5 years ago
 -
 anniebbx liked this · 5 years ago
 -
 loser5550123 reblogged this · 5 years ago
 -
 violetixdigo reblogged this · 5 years ago
 -
violetixdigo liked this · 5 years ago
-
 iloveartrefs reblogged this · 5 years ago
 -
 xairete liked this · 5 years ago
 -
baby-b-stuff-blog liked this · 5 years ago
-
 bullred liked this · 5 years ago
 -
jmp-m2 reblogged this · 5 years ago
-
 stungunkim reblogged this · 5 years ago
 -
 girlyteengirl57 liked this · 5 years ago
 -
 in-pursuit-of-the-fleek reblogged this · 6 years ago
 -
 blk93kng liked this · 6 years ago
 -
 wildflowers-and-a-nap liked this · 6 years ago
 -
 starbright7 liked this · 6 years ago
