Did A Total Revamp Of Teru And Changed Up His Back Story. He Still Likes To Felt Animals Though! Also,
Did a total revamp of Teru and changed up his back story. He still likes to felt animals though! Also, I just got an iPad which means TIME LAPSES YEEAAH. Takes way less steps than when I do it on my desktop.
More Posts from Arttuti and Others
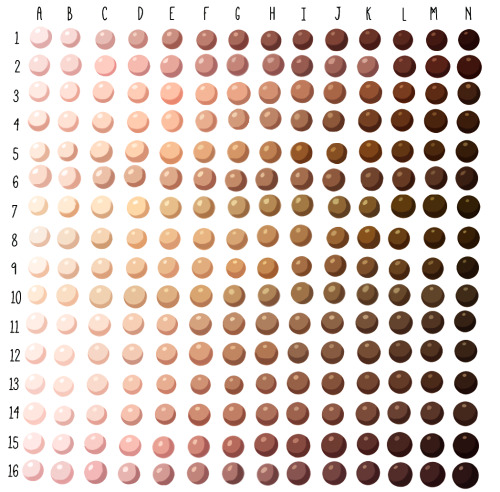
Skin tone swatches, for use as a resource.
Spudfuzz on Deviantart made the original resource, which I modified to be a bit more realistic. She gave me permission to post this.
☛These swatches, like all art resources, should be used as a “jumping off point!” All colours are relative, and change with lighting conditions. As they are now, these swatches work best for adoptables, character lineups, and other art where local colour is important. ☚
[DA]


![Robot(?) Leggings By Balenciaga. [Source]](https://64.media.tumblr.com/866ad6086243511f29ed053237711273/tumblr_mmzhe7J65h1rjgurvo1_540.jpg)
![Robot(?) Leggings By Balenciaga. [Source]](https://64.media.tumblr.com/98eca19ecc18c7cb3107797e67e17287/tumblr_mmzhe7J65h1rjgurvo5_540.jpg)
![Robot(?) Leggings By Balenciaga. [Source]](https://64.media.tumblr.com/6e1921bac17e73c7639905d8e00624bd/tumblr_mmzhe7J65h1rjgurvo3_500.jpg)
![Robot(?) Leggings By Balenciaga. [Source]](https://64.media.tumblr.com/831e8cd52fa1b1f7d901b3ec873e5394/tumblr_mmzhe7J65h1rjgurvo4_500.jpg)
How to do “extra” facial expressions!
Drawing basic facial expressions is not the hardest. Most people can draw a sad face, a happy face, angry etc., but making more multidimensional expressions is more of a challenge. I have gotten a lot of compliments on how I draw facial expressions, (specifically “angsty ones”) telling me that they are very dramatic and well… expressive! And there are actually only a few things I think about when I draw faces that take them to the next level, so I thought i’d illustrate them all here!
SUPER IMPORTANT TIP BEFORE WE START: Look at your own face when you draw faces. Even making the face when you are drawing (you don’t even have to look at it), will give you some sense of how the face muscles pull and where things fold and stretch, because you can feel it. You are the best reference when it comes to facial expressions!
Angles
Draw the head in an angle that matches the expressions you want to make. It is not a requirement, but is going to add to the effect.

Symmetry vs asymmetry
A face is rarely symmetric. Unless the face the character is making is 100 % relaxed or even dissociating, the eyebrows, mouth and facial muscles will have different placements of their respective side. This image shows the dramatic impact asymmetry has on a face:

That’s the difference between a smile and a smirk!

The first one’s like “oh yeah?” and the second is like “oH YEAH??”
The “balloon squishing principle”
This is something I did subconsciously, and I didn’t know about until I made this tutorial. And this principle goes hand in hand with an asymmetric face. Basically, if you squish one part of the face, you need to even out the empty space by “inflating” the other part of the face so that it doesn’t appear shrunken. The picture hopefully explains it:

Teeth
Don’t forget to add the gum when the mouth is open to its full potential!

Squinting and folding
Adding folds around the eyes when a character is squinting makes a HUGE difference. It makes a smile more genuine and a growl more intimidating. Adding folds to the face in general makes your characters more lifelike and ‘visually relatable’. Like, they look human, and less plastic or fake.


and so on..
Pupils and irises
The placement of the iris and pupil in relation to the eyelids is very important! The less of the white you see, the more relaxed the character is.

And then of course eyebrows and eyes go hand in hand!


Gestures, spitting, sweating…
Adding more elements than just a face is key to making the character actually look like they are feeling what you want them to feel. Just the tiniest sweat drop adds to their anxiety, spitting adds frustration to their rage, slouching shoulders, waving hands, a double chin, extreme angles, the list goes on! Add whatever and see what kind of impact it makes! Does it do the trick? Great! Add it!
Over exaggeration!!
Remember that you can almost always exaggerate more. Don’t be afraid to do draw “too much” because you’re just experimenting. See what works and what doesn’t. What do you like to exaggerate?


Now that you know some theory, it’s time to practice!
Practicing!!
The 25 Essential Expressions (a classic! I’ve done it multiple times)

And the one I do when I’m bored:
Fill a page with circles and fill them in with different expressions. Try and exaggerate as much as you can!


This is mostly for experimenting. They are quicker to draw than complete faces, but the same rules should apply!
And that’s about it!
I don’t know if I covered everything in this tutorial, since some things might be obvious for me, and this post perhaps only scratches the surface. So feel free to send me a message if you want an explanation about something more in depth! Thank you for reading! And now DRAW!!! ✨🎨


A selection of reference imagery showing how a hooded sweater will crease and fold in various poses.
The full size image can be downloaded here:
http://jesterman.deviantart.com/art/Hooded-Top-Clothing-Reference-484552908 I recommend using this only for folds, not as an anatomy reference, due to the quality of the camera used, which has distorted some of the proportions from this distance. If you have any suggestions for items of clothing you want to see referenced, drop me a comment!
Sorry if someone has already asked this but can you show us a colouring tutorial please?

ya take a babi

color da babi

make a fuckin uhhh multiply/shade layer then u take ur fuckin sai marker brush
pick a shading color or something

cel shade that motherfucker
but be messy with it, literally just go fucking ham, dont be too precise and don’t make it look so clean
ysee that residue there? yea man, it looks really messy but it also kinda looks like a painting right

make a screen/luminosity layer on top of the multiply layer
then ya pick a lighting color

then u do the same thing as earlier

bam you got,,, a child
this is the simple n easy way i do it, i got more complicated ways but hewe u go
OH YEAH HERE’S MY PEN SETTINGS


How I Animate

The Technique:
I draw the frames and then I use the liquify tool to push the lines into the next frame and redraw them where I need to. This allows me to keep the lines consistent, but gives me the control of frame by frame animation bc I am still making each frame manually! I also use 3d models as reference to help me with the angles! Super important to use reference while you animate (and with art in general), if youre no good handling 3d models then act it out and record yourself!

The Theory:
i think most people are at least loosely familiar with the 12 principles of animation (if youre not, heres a 2.5 minute video showcasing them!), but may not necessarily know how to employ them. the main 3 i tend to focus on when I animate is rhythm, telegraphing, and inertia so ill cover those there 👍
1. Timing & Rhythm
Timing is how you space out your frames both in how long an individual frame is held for, and also when you drawn an inbetween of two frames you can favour one frame slightly more than the other instead of drawing the exact average of the cels, giving the favoured cel more timing weight.

Left line has the cels evenly spaced out on the timeline, right holds the first cel for longer and the second cel slightly favours the last frame. It creates a more interesting rhythm to the animation! Rhythm is how I think of animation timing. Theres a beat like a song to every animation I make, and creating an interesting beat is what makes an animation fun to watch (for me, anyway):

2. Anticipation / Telegraphing

Before I animate a big change in movement, I like to telegraph that its coming. Usually this is doing a little counter movement in the opposite direction, but thats not the only way to telegraph a motion, e.g. eye movement can telegraph a head turn!

3. Follow-through / Overshoot / Inertia


Unless the movement is mechanical, it wont come to a hard stop and will have some level of bounce or easing out to it. How much "bounce" you add will have a big impact on how the animation feels, but a very subtle bounce will add a natural feeling to the end of a motion.

Secondary animations will use a lot of this, note that the head and the hand have a small amount of continuous motion (primary animation), and then the hair has a lot of bounce and inertia (secondary animation which reacts to the primary animation). Note the different amounts applied to the braid vs the sideburn vs the bangs
anyway! I hope this was insightful ❤️ if you like my art you can commission me by the by :)
-
 tuttldragon reblogged this · 2 years ago
 -
tuttldragon liked this · 2 years ago
-
 im-beccccc liked this · 3 years ago
 -
 sea-hipster-wolf liked this · 4 years ago
 -
 razzleberriesss liked this · 4 years ago
 -
 moonstar42069 liked this · 4 years ago
 -
 sanforth liked this · 4 years ago
 -
 fluffy-fluffy-clouds liked this · 5 years ago
 -
 colega1120 liked this · 5 years ago
 -
 bug-in-a-porchlight liked this · 5 years ago
 -
 hornyspicyhardcandy liked this · 5 years ago
 -
 hungrypartypenguin liked this · 5 years ago
 -
 theadinu01-blog liked this · 5 years ago
 -
 boogeyalltheway liked this · 5 years ago
 -
 justifiedapocalypse liked this · 5 years ago
 -
 chikachikicha liked this · 5 years ago
 -
 she-who-dreams liked this · 5 years ago
 -
 batfamilysworld liked this · 5 years ago
 -
 doomcathedral liked this · 5 years ago
 -
 sunflowershitposts liked this · 5 years ago
 -
 avaraydrake liked this · 5 years ago
 -
 dzikiekombajny liked this · 5 years ago
 -
 tastefulprojector liked this · 5 years ago
 -
 starryeyedastronaut liked this · 5 years ago
 -
 daewithmon liked this · 5 years ago
 -
 tan-67 liked this · 5 years ago
 -
 dead-account-lowkey liked this · 5 years ago
 -
 boopityloopity liked this · 5 years ago
 -
 cakeittillyoubreak-blog liked this · 5 years ago
 -
 fastestb-tchalive liked this · 5 years ago
 -
 alien-soop-spam liked this · 5 years ago
 -
 alternativesunsetofficial liked this · 5 years ago
 -
 kugurimidh liked this · 6 years ago
 -
 saltyburrsir liked this · 6 years ago
 -
 sweetrosei liked this · 6 years ago
 -
 gandalfxd liked this · 6 years ago
 -
 ilikepie2000 liked this · 6 years ago
 -
 kikinmf liked this · 6 years ago
 -
 owl-eyed-moonlight liked this · 6 years ago
 -
 toxixchemical liked this · 6 years ago
 -
 transbuckdiaz liked this · 6 years ago
 -
 reinarouge liked this · 6 years ago
 -
 markwatneythespacepirate liked this · 6 years ago
