Very Happy To Finally Post My Second Tutorial ! You Guys Have Been So Kind The Last Time And I Really


Very happy to finally post my second tutorial ! You guys have been so kind the last time and I really hope this helps some of you in your art path 🙇♀️
More Posts from Basket-of-references and Others
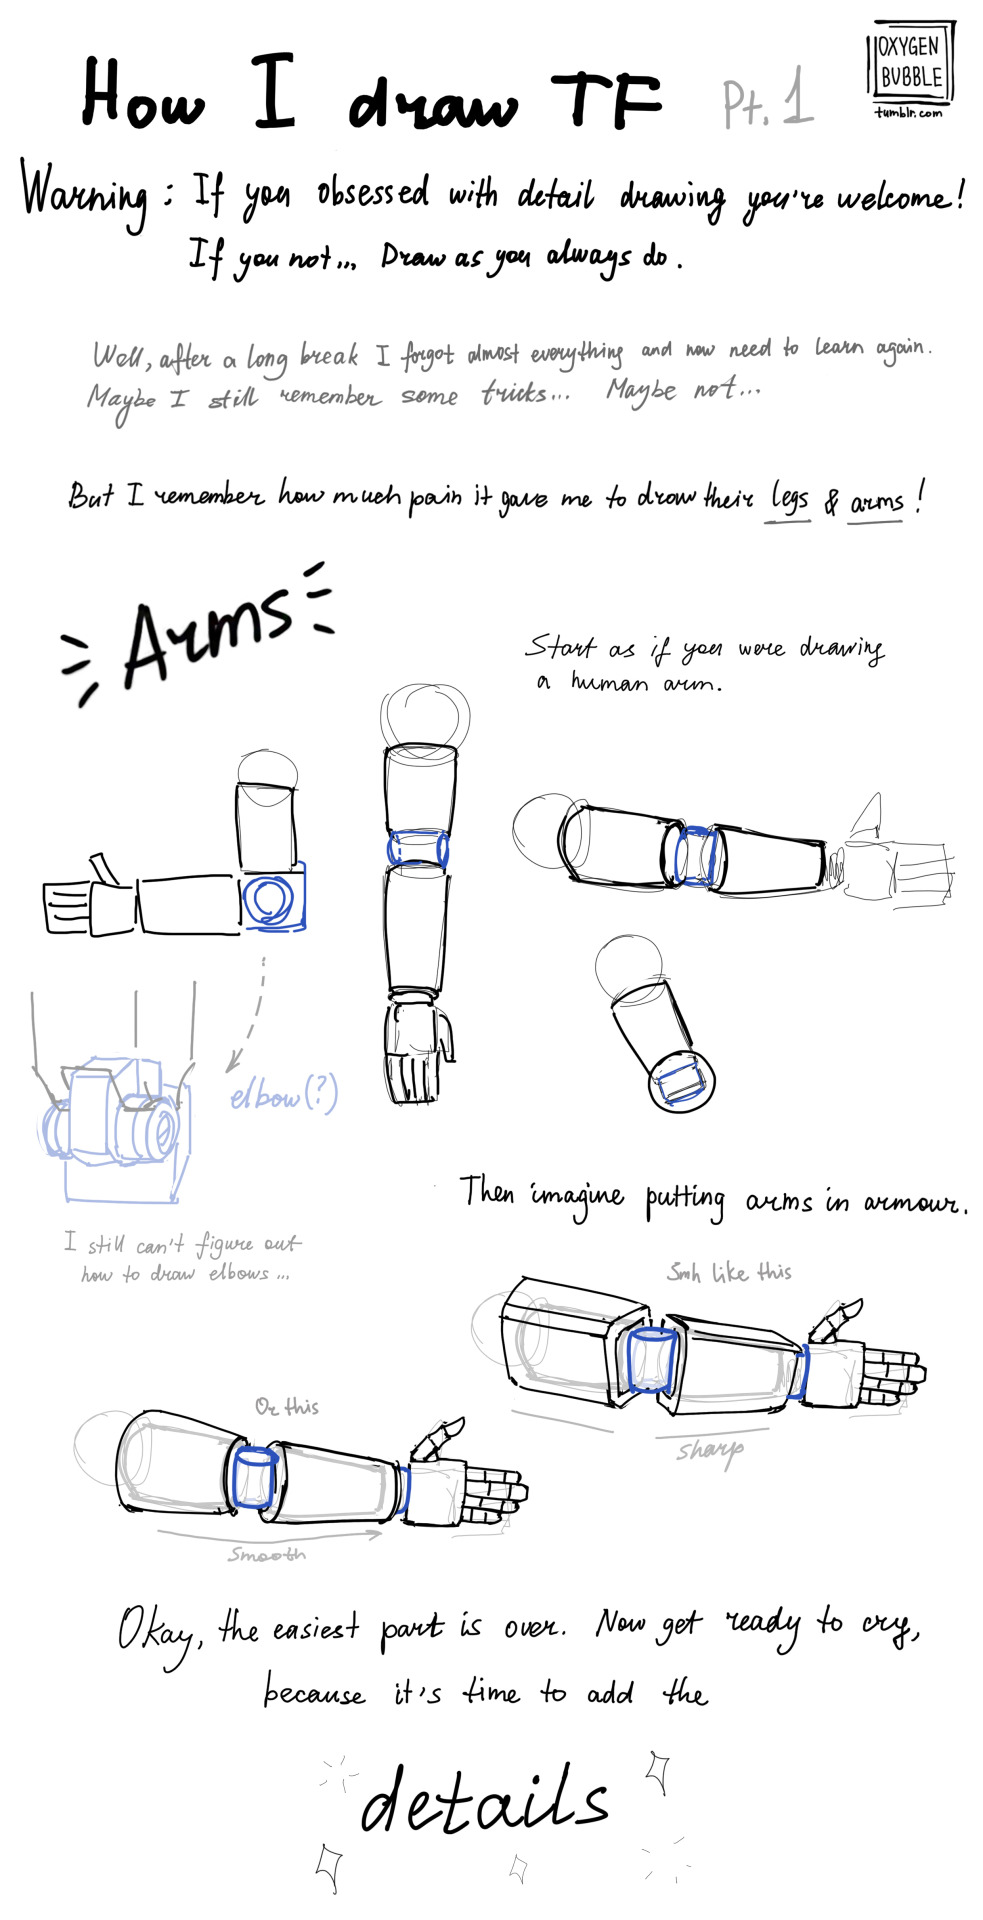

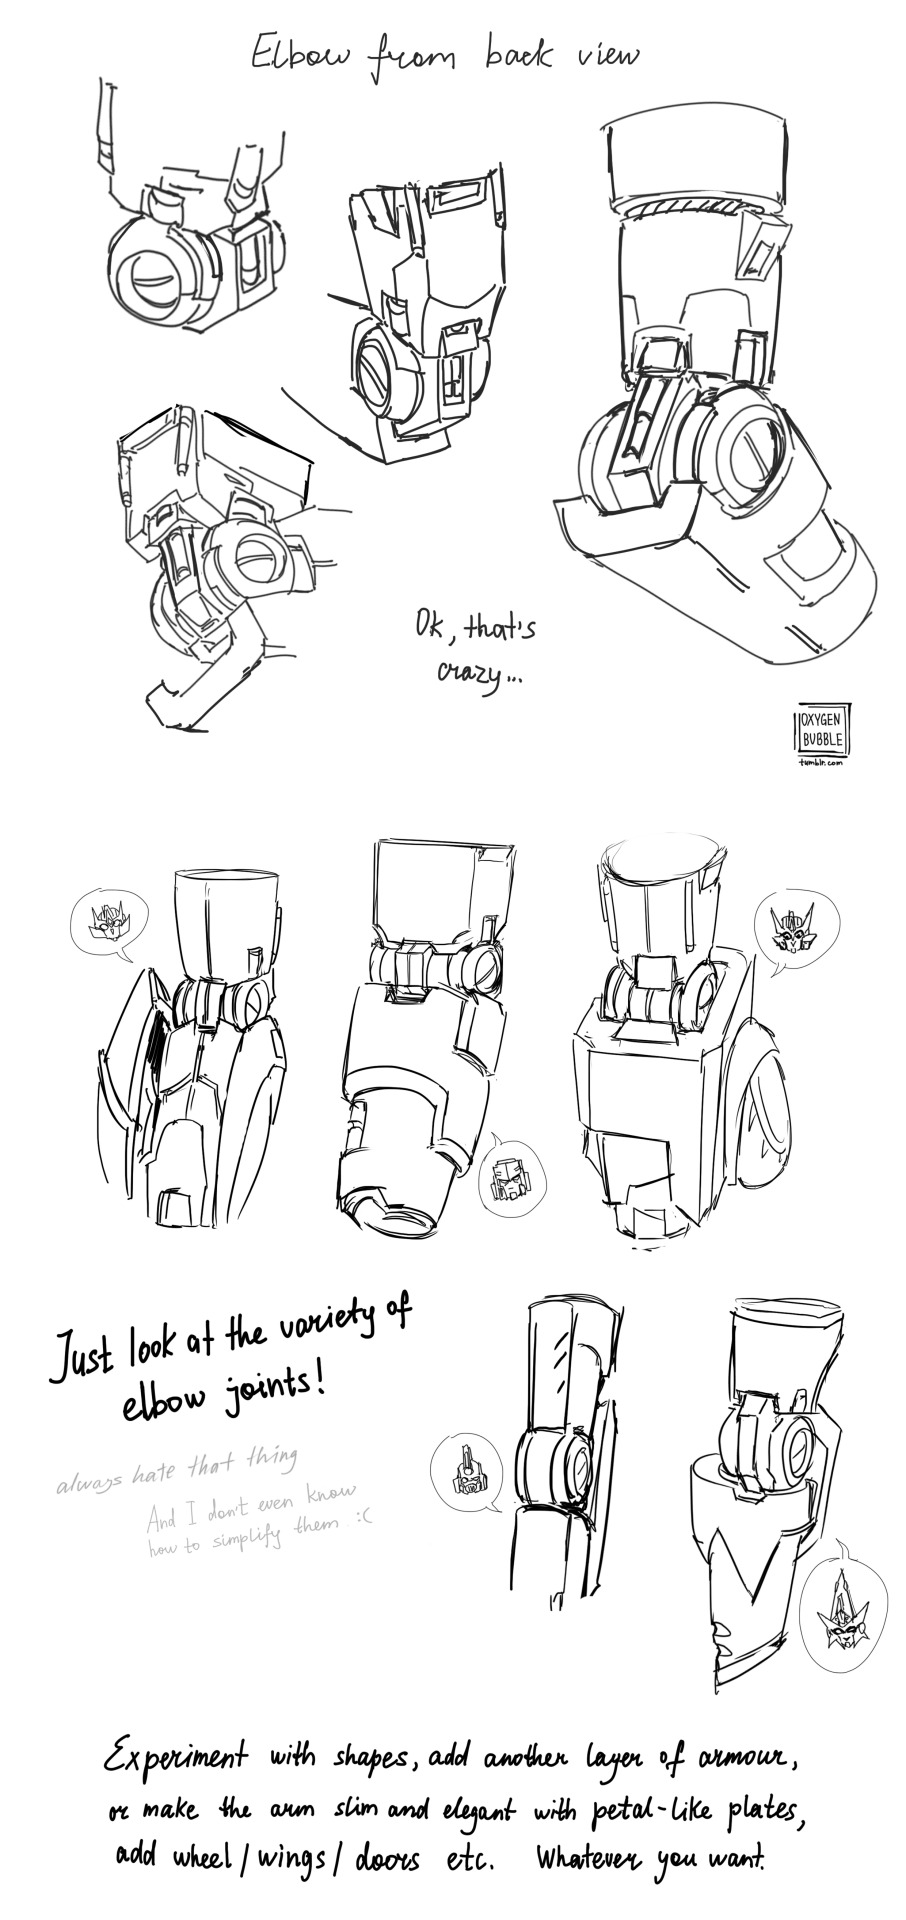

This is just a reference of what the most complicated parts of the TF look like.
There is not and will not be a step-by-step drawing here, because you have to figure out for yourself how this or that part of the robot works just by looking at the drawing.
If you found this post helpful, well, good for you)
“How do I become a better artist?”
By knowing what you want to become better at making art of and practicing.
”uh- that’s a really vague answer actually and [indignant response about how artists should be better at helping that hasn’t been original since that one post talked about it years ago etc etc]”
Okay and that’s fair but can I in response then request people ask less vague questions? Because, coming from an anonymous messenger, whom I know nothing about, not what their current level is, not what their end goal is, not what art style exactly they want to get better in… how are we supposed to help someone who seems to ask what the magic secret is to unlock their artist powers is? Which none of us know either! That’s something that’s deeply personal and subjective, something everyone has to figure out for themselves.
It’s completely different from when someone asks us for advice or tips on something specific, like how light falls on different objects, how to recreate that in different art styles and with different media. Or tips for drawings faces that are more realistic or more cartoony or more anime, etc. Or tips for drawing landscapes. Maybe a step by step guide of how a specific artist draws their specific style. What tips did we follow when we were starting out, what helped us to get to the style we use today. You can ask most of your favourite artists for any specific tips, and they’ll give them to you happily!
But this whole thing of artists getting shit because anons ask them vaguely how is become artist gooder…. We don’t know the secret either! We give you the secret we DO know: know what you want, do research, practice until it’s second nature. That YOU don’t accept that as a good enough answer is because you might not have been specific enough. And it’s unfair that artists have to take shit because of it.
Wdym by distinctive nose?
(this was what i said was one of my "signature" OC traits in some tags awhile back)
noses are one of my favorite features to draw, so i put all my Best Shapes in the nose. i try to give each character a different one (unless they're related), because it's fun!

noses (੭ ˊᵕˋ)੭


so a lot of artists talk abt same face syndrome and like yeah practice diverse faces but nobody talks about same body syndrome nearly as much like…if all you can draw are twiggy skinny boys with no variation other then height and only draw hourglass girls with big boobs then like…you’re not a great artist and you really need to practice other body types because when i see a line up of characters that are all twinks and hourglass figure girls and theres no fat characters theres no muscular characters theres nothing but just skinny twiggy boys and girls with wide hips and big boobs then its like wheres the flavor wheres the variation not everyone looks like that and if anyone bitches and whines about “ohhh its hard to draw fat people” “ohhh its hard to draw big strong burly men” “oh its hard to draw a fat strong woman” “its hard drawing a muscular girl!” then fucking practice. you arnt going to learn to draw these body types if all you draw are skinny boys and hourglass girls and you’ll never improve and i dont feel any sympathy for you
Can't afford art school?
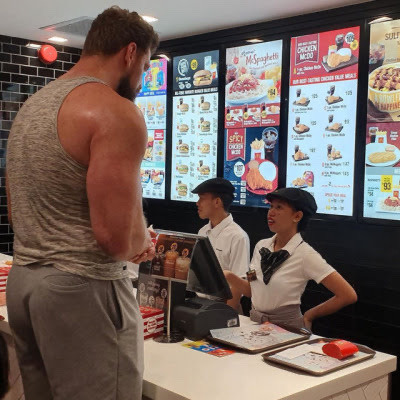
After seeing post like this 👇

And this gem 👇
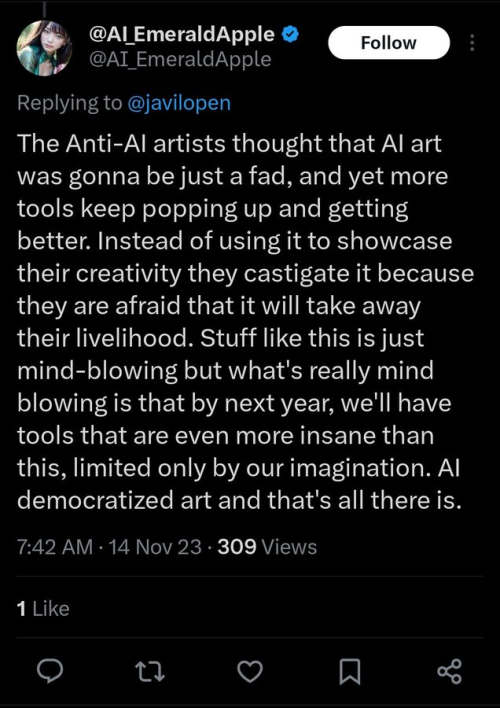
As well as countless of others from the AI generator community. Just talking about how "inaccessible art" is, I decided why not show how wrong these guys are while also helping anyone who actually wants to learn.
Here is the first one ART TEACHERS! There are plenty online and in places like youtube.
📺Here is my list:
Proko (Free)
Marc Brunet (Free but he does have other classes for a cheap price. Use to work for Blizzard)
Aaron Rutten (free)
BoroCG (free)
Jesse J. Jones (free, talks about animating)
Jesus Conde (free)
Mohammed Agbadi (free, he gives some advice in some videos and talks about art)
Ross Draws (free, he does have other classes for a good price)
SamDoesArts (free, gives good advice and critiques)
Drawfee Show (free, they do give some good advice and great inspiration)
The Art of Aaron Blaise ( useful tips for digital art and animation. Was an animator for Disney)
Bobby Chiu ( useful tips and interviews with artist who are in the industry or making a living as artist)
Second part BOOKS, I have collected some books that have helped me and might help others.
📚Here is my list:
The "how to draw manga" series produced by Graphic-sha. These are for manga artist but they give great advice and information.
"Creating characters with personality" by Tom Bancroft. A great book that can help not just people who draw cartoons but also realistic ones. As it helps you with facial ques and how to make a character interesting.
"Albinus on anatomy" by Robert Beverly Hale and Terence Coyle. Great book to help someone learn basic anatomy.
"Artistic Anatomy" by Dr. Paul Richer and Robert Beverly Hale. A good book if you want to go further in-depth with anatomy.
"Directing the story" by Francis Glebas. A good book if you want to Story board or make comics.
"Animal Anatomy for Artists" by Eliot Goldfinger. A good book for if you want to draw animals or creatures.
"Constructive Anatomy: with almost 500 illustrations" by George B. Bridgman. A great book to help you block out shadows in your figures and see them in a more 3 diamantine way.
"Dynamic Anatomy: Revised and expand" by Burne Hogarth. A book that shows how to block out shapes and easily understand what you are looking out. When it comes to human subjects.
"An Atlas of animal anatomy for artist" by W. Ellenberger and H. Dittrich and H. Baum. This is another good one for people who want to draw animals or creatures.
Etherington Brothers, they make books and have a free blog with art tips.
As for Supplies, I recommend starting out cheap, buying Pencils and art paper at dollar tree or 5 below. For digital art, I recommend not starting with a screen art drawing tablet as they are more expensive.
For the Best art Tablet I recommend either Xp-pen, Bamboo or Huion. Some can range from about 40$ to the thousands.
💻As for art programs here is a list of Free to pay.
Clip Studio paint ( you can choose to pay once or sub and get updates)
Procreate ( pay once for $9.99)
Blender (for 3D modules/sculpting, ect Free)
PaintTool SAI (pay but has a 31 day free trail)
Krita (Free)
mypaint (free)
FireAlpaca (free)
Libresprite (free, for pixel art)
Those are the ones I can recall.
So do with this information as you will but as you can tell there are ways to learn how to become an artist, without breaking the bank. The only thing that might be stopping YOU from using any of these things, is YOU.
I have made time to learn to draw and many artist have too. Either in-between working two jobs or taking care of your family and a job or regular school and chores. YOU just have to take the time or use some time management, it really doesn't take long to practice for like an hour or less. YOU also don't have to do it every day, just once or three times a week is fine.
Hope this was helpful and have a great day.
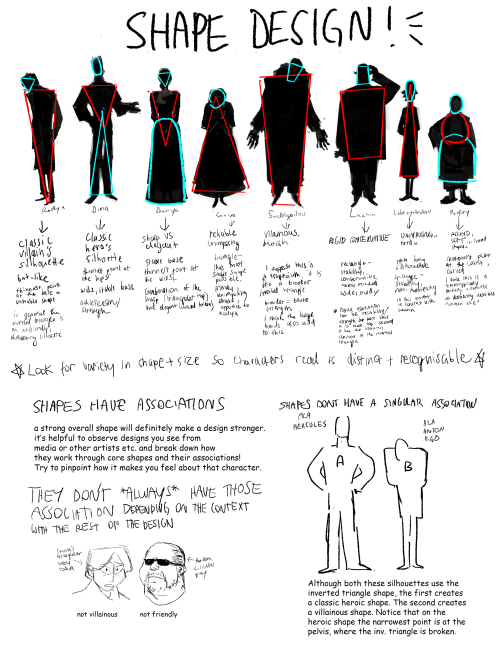
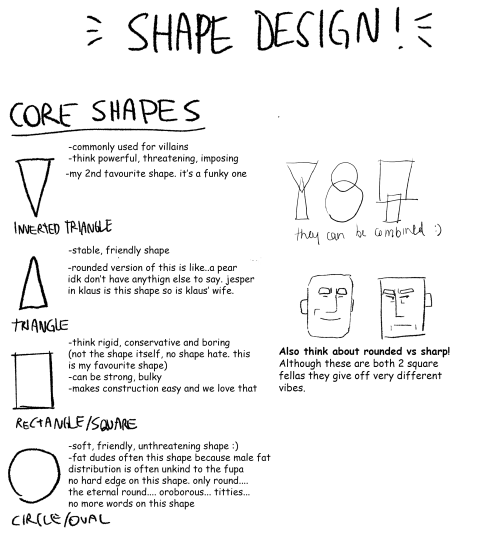
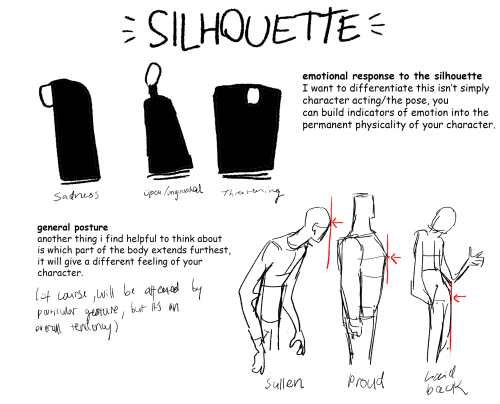
Part 2 of cino art tips is some basic tips on shape and silhouette design which are also principles I think about a lot :)
(also i'm so sorry i chose comic sans to write this in idk what i was thinking but i already flattened the layers)
i don't have any other obvious tips off the top of my head rn but feel free to ask anything you are curious about! i love getting asks uwu

If life is a never ending loop of dirty dishes and laundry then that means life is a never ending loop of home cooked meals and comfy clean clothes
Digital Painting: tips for beginners
Heyo! I got asked if I could make a tutorial on digital painting so I’m gonna throw together some advice meant for people who are starting out and want to figure out exactly how this stuff all works. Because it’s hard! What I hope to accomplish here is to make painting more approachable for you.
Firstly, I have put together something like this before, so for archival purposes here it is: http://holy-quinity.tumblr.com/post/89594801811/i-dont-know-how-much-of-this-kind-of-thing-you
For those of you who don’t wanna bother reading that, here are the main points:
1. Learn your program and its tools, from brush properties to layer styles. And I mean learn them. Make a cheatsheet that shows you exactly what each button and scale does, both in isolation and in conjunction with other buttons and scales. Refer to this as much as possible until it is intuitive. The end goal is to know exactly what to do to your brush’s settings to achieve a given effect.
2. It’s perfectly okay to use your sketches, linearts, and other forms of line in your paintings. They can help guide the form and there’s no need to make something fully “lineless”! I never make things “lineless.”
3. Study other people’s art and try to think how they could have possibly achieved the effects they did. You can learn a lot just by observing and mentally recreating the process stroke by stroke—muscle memory is a powerful tool at your disposal. This becomes easier to do once you’ve started doing item 1 above.
OKAY!
So where the heck do you even begin?
What I’m gonna do is try to make digital painting as approachable as possible for someone who’s never really done it. The main idea here is that digital painting is just like real painting. So if you’ve ever done real painting, you already kinda know what’s coming.
I’m gonna assume you know the basics of digital art: you can sketch, line those sketches using layers and opacity changes, and fill the lines with color, maybe even opting to add some shading…and you’ll get something like this:

You know, cell-shaded, or maybe the shading’s blended, but you’ve still obviously a line drawing with color put down on layers beneath the lines.
The next intuitive step is to try going “lineless”…but when you remove the lines you get this:

idk about you but I’m laughing at how stupid this looks
When I was first teaching myself to paint digitally, I didn’t really know how to deal with this. Without lines, the form of the subject vanished or became a mess like the above. Even if I was meticulous and careful about placing down the color such that without the lines layer turned on, the shapes fit together, it didn’t look quite right. There’d be gaps, I wouldn’t know how to incorporate the subject into a background, the contrast wouldn’t be high enough, or it’d just in general look too much like a screenshot from Super Mario 64.
Painting requires a different process than the above. You’ll have to let go of some of your habits and conventions. Such as staying in the lines. Such as fully relying on the lines. Like, I love my lines, I love my sketches—but in painting, they are guides for form, and are not the form itself. So let me go through how I approach a given painting:

My painting process starts with a sketch (here a boring portrait for demonstrative purposes). I make the opacity of the sketch layer something like 30%, and then throw down my base colors on a new layer underneath. I’m not being meticulous about the sketch itself, because again it’s just meant to guide my placement of color. I’m also not meticulous about my placement of the color.
We’re essentially sketching with color. Because ultimately what we want is for the color to take on the form and shapes conveyed by the sketch.
There’s a lot going into this about how to use value, how to shade, how to use color, etc. that I’m kinda skipping over because it takes a lot of time to explain…but there are hundreds of tutorials out there on those topics so please, google around! I found some helpful tuts that way when I was starting out.
Something I find v useful is to keep selecting colors that already exist in your image for shading and hue adjustment. This is why I start with really blendy, low-opacity brushes when throwing down color on top of the background. I can then select colors within there that are a mix of the two.
For instance, I’ll select the color of the lines here:

…and use that to shade:

And maybe I’ll select one of the darker shades around his eye, but not the darkest, to make the shading a smoother gradient…and so on.
What I do in general at this point is go over the shapes and lines of the sketch. Such that I can turn off the sketch layer and see this:

I’m replacing the lines with shading and value. I’ll continue to do this as I keep adding color.

This is all super loose. I am not dedicated to any particular stroke. I just want the colors and shading and light source to be right. I’ll use overlay layers to boost contrast or add a hue.
Here are other examples where I used this process:


I am constantly changing brushes and brush settings as I paint. It really depends on what effect I want where. I am also constantly selecting new colors and applying or blending those in. I don’t believe in having some uniformly applied base color and then shading with only one or two…that’s what I’d do if I was cell-shading like the first drawing I showed you here, but painting should be about messing with color and opacity and blending to make millions of hues!
Good rule of thumb: Hard, opaque brushes for applying color. Soft, dilute brushes for blending colors. Sometimes hard, dilute brushes can make some cool blending effects! I personally prefer harder edges on my shading so that’s a brush I use often.
This is getting a bit long so I’m gonna split it up into multiple parts, but really what I want you to get from this is:
1. learn the tools at your disposal until they are intuitive
2. sketch and line are guides for form, not the form itself
3. rather, hue and value will produce the form
And of course, practice makes perfect!!! Every drawing you make, every painting you make, will bring you one step closer to the artist you want to be, and thus every drawing and every painting, no matter what, is a success.
-
 coolcakebaker35 liked this · 1 week ago
 -
 tintasdeluna reblogged this · 1 month ago
 -
 jhunhuujj liked this · 1 month ago
 -
 fermisparadoxlost liked this · 1 month ago
 -
 anarchyspider liked this · 2 months ago
 -
 augustnugs liked this · 2 months ago
 -
 murkylurka liked this · 2 months ago
 -
 pressedbetweenthepages reblogged this · 3 months ago
 -
 honey-bell-aint-well liked this · 3 months ago
 -
 saturnshifts liked this · 3 months ago
 -
 coffeeworldsasaki liked this · 3 months ago
 -
 iocassandra liked this · 3 months ago
 -
iocassandra reblogged this · 3 months ago
-
 craftyphantombanana liked this · 3 months ago
 -
 veone liked this · 3 months ago
 -
 fgfirenation reblogged this · 3 months ago
 -
fgfirenation liked this · 3 months ago
-
 tealisandra reblogged this · 3 months ago
 -
 sunnyissleeping liked this · 3 months ago
 -
 disability-multiplicity liked this · 3 months ago
 -
 quantifiableme liked this · 4 months ago
 -
 we-dont-talk-about-potato-nonono reblogged this · 4 months ago
 -
 lisandraii liked this · 4 months ago
 -
 kazradel liked this · 4 months ago
 -
 scandalcabbage liked this · 4 months ago
 -
 sugarplanet reblogged this · 4 months ago
 -
 zero-energy-counters reblogged this · 4 months ago
 -
 literallygoldrush liked this · 4 months ago
 -
 smockenscroll liked this · 4 months ago
 -
 fieryrawnbite liked this · 4 months ago
 -
 aaaaasneakattack reblogged this · 4 months ago
 -
 autisticdrizzt liked this · 4 months ago
 -
 nilihim-him reblogged this · 4 months ago
 -
nilihim-him liked this · 4 months ago
-
 beetle-ze-bub liked this · 4 months ago
 -
 cybercakeshop liked this · 4 months ago
 -
 nayxolotl liked this · 4 months ago
 -
 utopians liked this · 4 months ago
 -
 iloverobots239999 reblogged this · 4 months ago
 -
iloverobots239999 liked this · 4 months ago
-
 somewhatsoggy reblogged this · 4 months ago
 -
 ye-old-references reblogged this · 4 months ago
 -
 grimaussiewitch liked this · 4 months ago
 -
 multieyedlizard liked this · 4 months ago
 -
 lemony1cricket reblogged this · 4 months ago
 -
 goofygooberton reblogged this · 4 months ago
 -
goofygooberton liked this · 4 months ago
-
 doodle-bob-haunts-me reblogged this · 4 months ago
