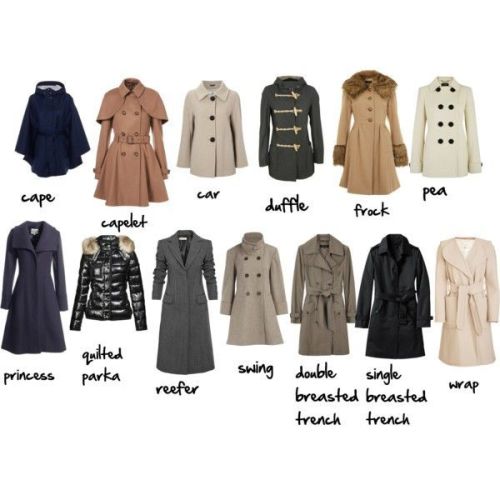
basket-of-references
here I stash art refs
110 posts
Latest Posts by basket-of-references


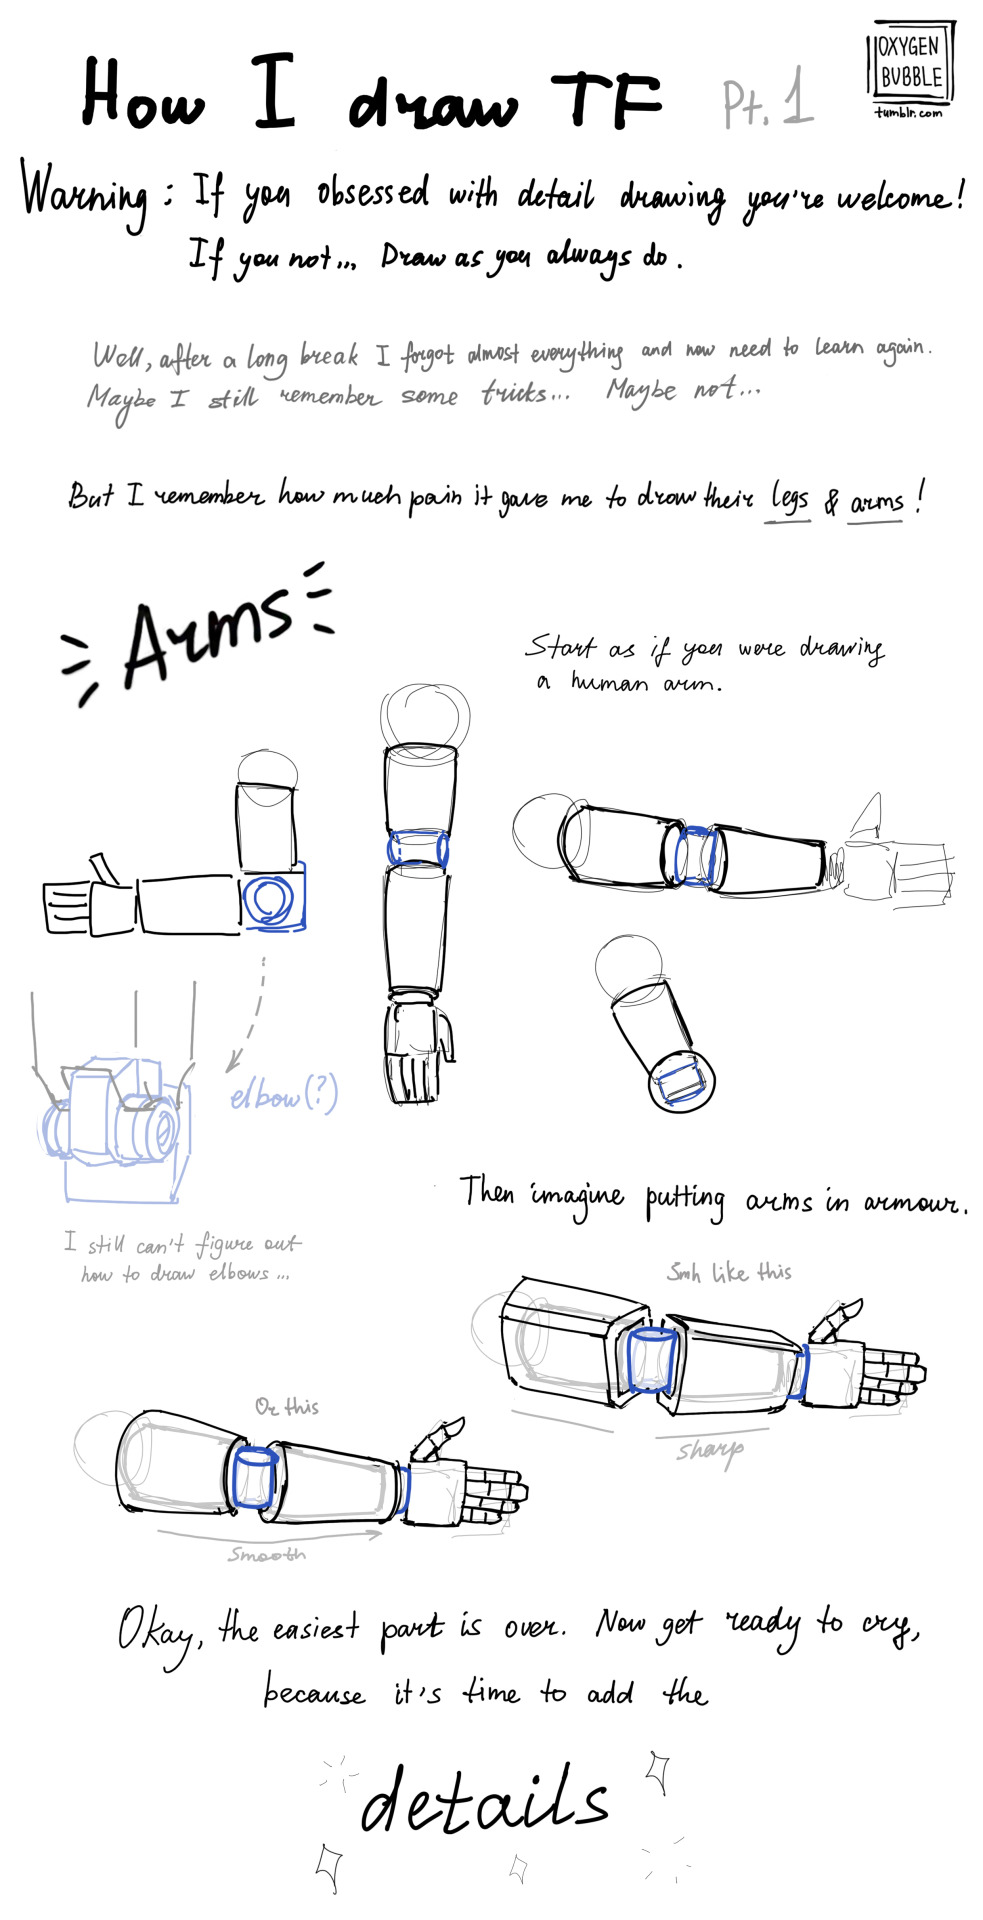

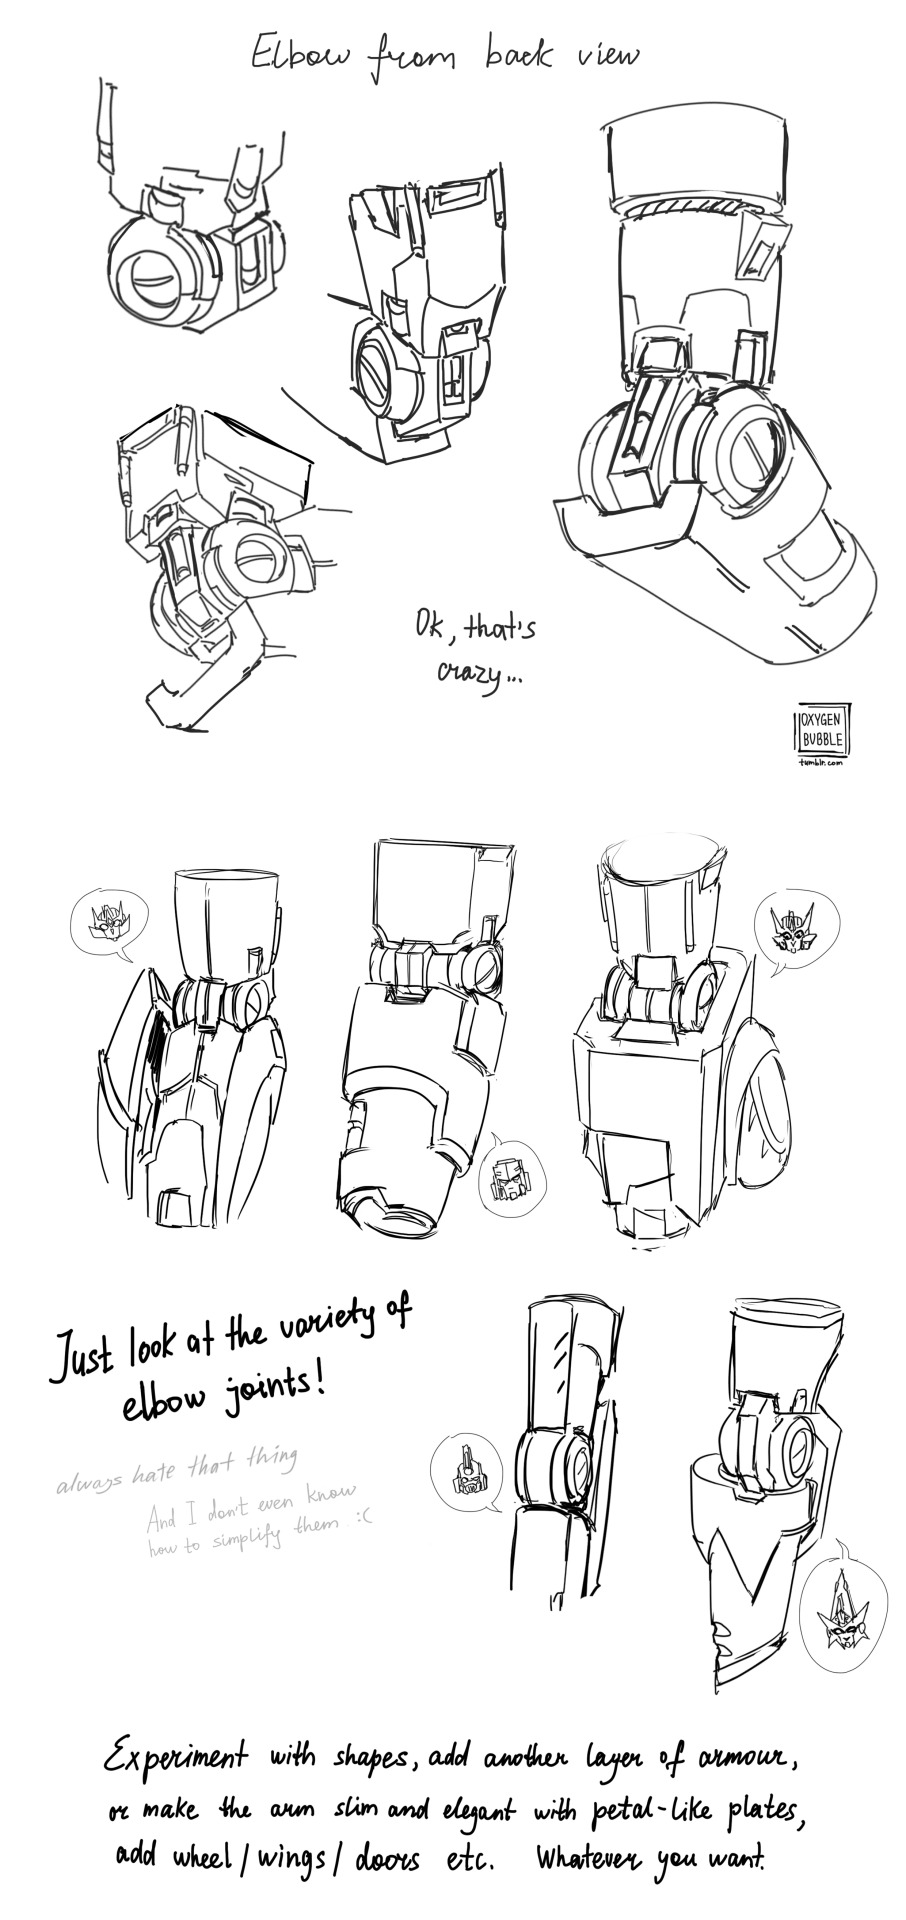

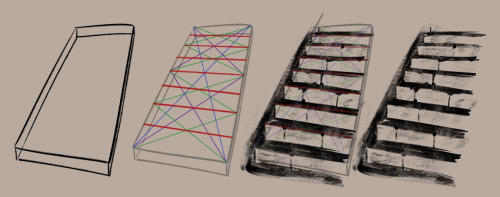
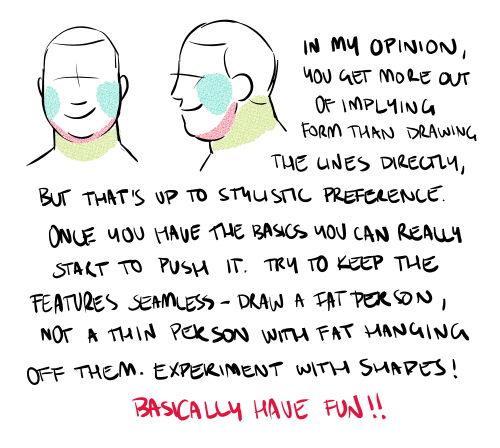
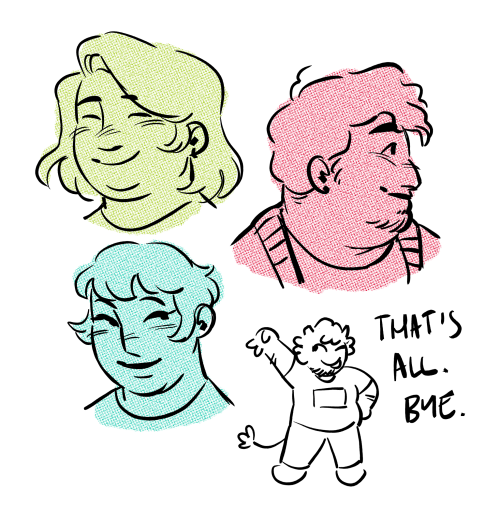
This is just a reference of what the most complicated parts of the TF look like.
There is not and will not be a step-by-step drawing here, because you have to figure out for yourself how this or that part of the robot works just by looking at the drawing.
If you found this post helpful, well, good for you)
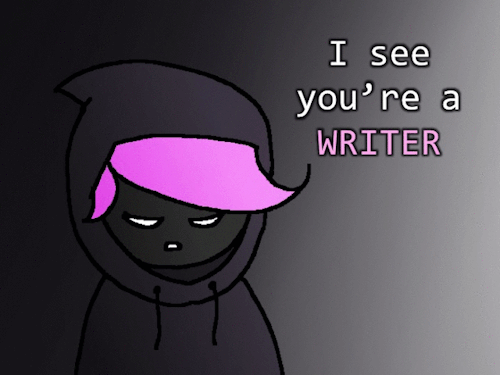
WHY YOU SHOULD WRITE HORRIBLY:
1. You’ll never write anything if you don’t

Repeat after me:
The first draft just needs to exist
The second draft needs to be functional
The third draft needs to be effective
The first draft just needs to exist
The second draft needs to be functional
The third draft needs to be effective
The first draft just needs to exist
The second draft needs to be functional
The third draft needs to be effective
Remember, the second and third can't happen if you don't have something to work with. Your first draft will always be shit compared to your third, but at least it exists. The worst first draft is an unfinished one. The best first draft is a just completed one.
You read books/stories not in their first draft form-- only in their finished form (third, fourth, sometimes fifteenth draft). So stop comparing your first draft with a final one.
So, just write--you can make it better later. Perfectionism is the greatest weight a creator can carry.
AI disturbance overlays for those who don't have Ibis paint premium. found them on tiktok

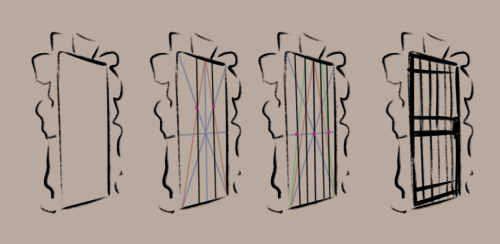
really helpful technique ^ once you know how to divide by halves and thirds it makes drawing evenly spaced things in perspective waaay easier:

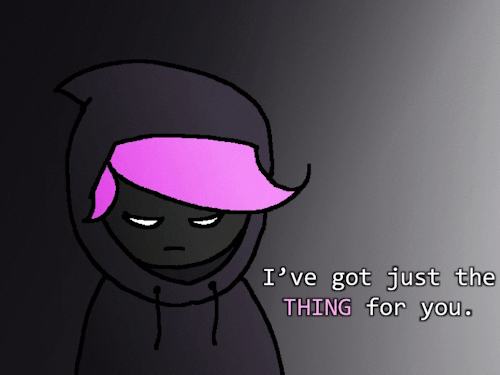
So, let me guess– you just started a new book, right? And you’re stumped. You have no idea how much an AK47 goes for nowadays. I get ya, cousin. Tough world we live in. A writer’s gotta know, but them NSA hounds are after ya 24/7. I know, cousin, I know. If there was only a way to find out all of this rather edgy information without getting yourself in trouble…
You’re in luck, cousin. I have just the thing for ya.
It’s called Havocscope. It’s got information and prices for all sorts of edgy information. Ever wondered how much cocaine costs by the gram, or how much a kidney sells for, or (worst of all) how much it costs to hire an assassin?
I got your back, cousin. Just head over to Havocscope.
((PS: In case you’re wondering, Havocscope is a database full of information regarding the criminal underworld. The information you will find there has been taken from newspapers and police reports. It’s perfectly legal, no need to worry about the NSA hounds, cousin ;p))
Want more writerly content? Follow maxkirin.tumblr.com!
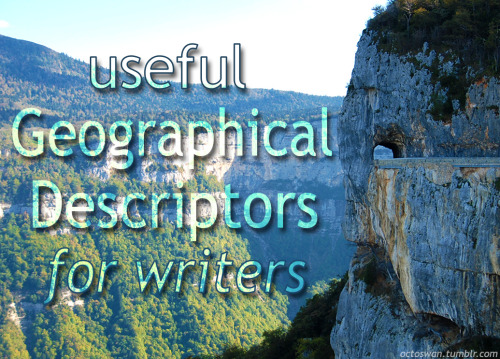


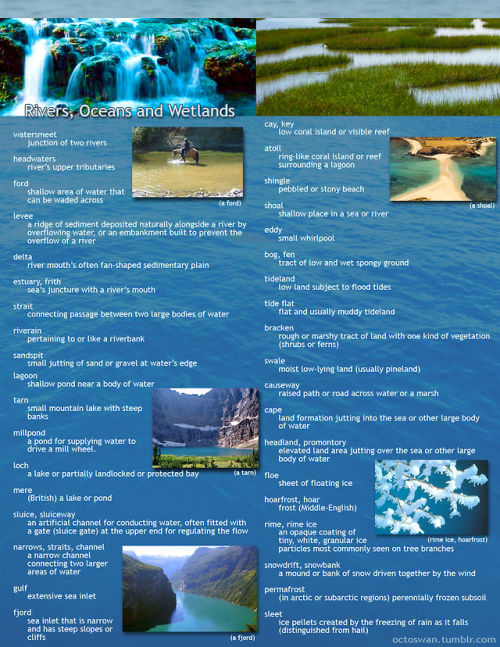
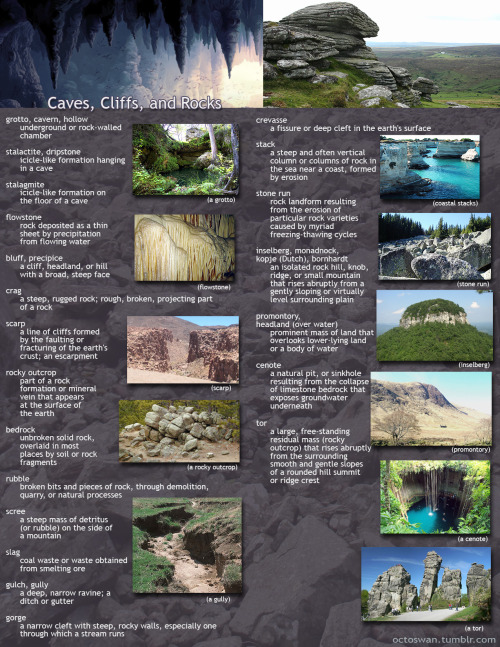
I made these as a way to compile all the geographical vocabulary that I thought was useful and interesting for writers. Some descriptors share categories, and some are simplified, but for the most part everything is in its proper place. Not all the words are as useable as others, and some might take tricky wording to pull off, but I hope these prove useful to all you writers out there!
(save the images to zoom in on the pics)

So you might be saying: Lion why a guide on drawing black people? Well young blood it’s because a lot of people cant…seem…to draw…black people..Amazing I know.

Racist (caricatures) portrayals of black people have been around forever, and to this day people can’t seem to draw black people like they are human. If your artwork resembles any of the above even remotely your artwork is racist and offensive. If you try to excuse that as a stylistic choice you’re not only a terrible artist, but racist too!!! Congrats.

Whitewashing is also a problem. A lot of people refuse to draw black features on canonly black characters. While this example isn’t colored, lightening the skin-tone of a character is also considered whitewashing. So lets start with features!

Now all black people have different noses thats a no-brainer, but black noses tend to have flatter bridges, and wider nostrils. Please stay from triangular anime noses and small button noses. Your drawings should not depict black people with abnormally large noses. (Especially if you do not draw other characters this way)

If you feel like the way you draw lips on black characters is offensive or resembles a caricature,it probably does and you should change it. ABSOLUTELY AVOID PLACING LIPS AT THE BOTTOM OF THE FACE.

Hair is so diverse! Please get used to drawing braids, locs,kinks and coils! If you can learn to draw ringlets and long waves you can learn how to draw black hairstyles.

Add clips! Learn how to draw baby-hairs and never be afraid to add color Pinterest and Google are free my dudes! Also try using square brushes for blocking in coils.
OK THAT’S ALL YOU GUYS

Someone on discord asked how I was making pins with bottle caps so here goes nothing

you need
bottle caps (the ones made of metal obv)
pliers
safety pins
paper
glue
optional acrylic paint
optional paint varnish (the kind you would spray on top of an acrylic painting)

I'm only saying "optional" because sometimes you just like what's already printed on the bottle cap. I mean look at this puffin, it's so cute. But you should probably spray the print with varnish anyway if you don't want it to disappear too quickly (that cap on the left was in my pocket for like 3 months and the print has already disappeared around the edge)

pinch the edge of the cap with the pliers and turn it slightly toward the top side of the cap. Continue to do so around the entire cap but don't try to flatten it all in one go cause it's kinda hard. It should only take two minutes or so anyway

almost there

there, it's flat now. If you want to paint or write something on it, add a couple of layers of acrylic paint on it before you paint/write what you actually want on the pins

I wanted skeleton parts on mine because I saw someone with pins like that and idk where they bought them

I drew them with a Pitt pen on top of 4 layers of white acrylic

spray a coat of varnish on them but PLEASE do that outside, you do NOT want to breathe that stuff. Then wait a few hours for it to dry

on the back, add 1) glue 2) one safety pin 3) a thin paper across the pin - squish the paper against the wet glue. When it's dry, add another layer of glue on top. Just drown the back of the pin in crystal glue otherwise it's gonna break too easily. Just make sure the safety pin can still open and close easily
let it dry until the next day just to be sure. Tug on the safety pin a bit to make sure it's glued correctly

congrats you've made pins with bottle caps


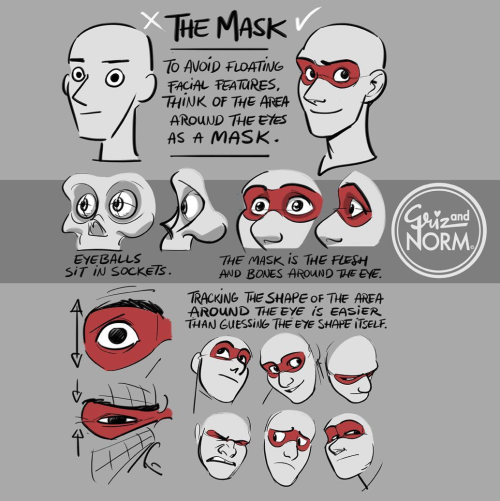
I made a mini tutorial on how I approach Those Face Angles in my art, for free!
I've got a few more mini tutorials on my patreon if you'd like to support me too :D Patreon Link!
How to avoid White Room Syndrome
by Writerthreads on Instagram
A common problem writers face is "white room syndrome"—when scenes feel like they’re happening in an empty white room. To avoid this, it's important to describe settings in a way that makes them feel real and alive, without overloading readers with too much detail. Here are a few tips below to help!
Focus on a few key details
You don’t need to describe everything in the scene—just pick a couple of specific, memorable details to bring the setting to life. Maybe it’s the creaky floorboards in an old house, the musty smell of a forgotten attic, or the soft hum of a refrigerator in a small kitchen. These little details help anchor the scene and give readers something to picture, without dragging the action with heaps of descriptions.
Engage the senses
Instead of just focusing on what characters can see, try to incorporate all five senses—what do they hear, smell, feel, or even taste? Describe the smell of fresh bread from a nearby bakery, or the damp chill of a foggy morning. This adds a lot of depth and make the location feel more real and imaginable.
Mix descriptions with actions
Have characters interact with the environment. How do your characters move through the space? Are they brushing their hands over a dusty bookshelf, shuffling through fallen leaves, or squeezing through a crowded subway car? Instead of dumping a paragraph of description, mix it in with the action or dialogue.
Use the setting to reflect a mood or theme
Sometimes, the setting can do more than just provide a backdrop—it can reinforce the mood of a scene or even reflect a theme in the story. A stormy night might enhance tension, while a warm, sunny day might highlight a moment of peace. The environment can add an extra layer to what’s happening symbolically.
Here's an example of writing a description that hopefully feels alive and realistic, without dragging the action:
The bookstore was tucked between two brick buildings, its faded sign creaking with every gust of wind. Inside, the air was thick with the scent of worn paper and dust, mingling with the faint aroma of freshly brewed coffee from a corner café down the street. The wooden floorboards groaned as Ella wandered between the shelves, her fingertips brushing the spines of forgotten novels. Somewhere in the back, the soft sound of jazz crackled from an ancient radio.
Hope these tips help in your writing!
i hate that every time i look for color studies and tips to improve my art and make it more dynamic and interesting all that comes up are rudimentary explanations of the color wheel that explain it to me like im in 1st grade and just now discovering my primary colors
Other Words for "Look" + With meanings | List for writers
Many people create lists of synonyms for the word 'said,' but what about the word 'look'? Here are some synonyms that I enjoy using in my writing, along with their meanings for your reference. While all these words relate to 'look,' they each carry distinct meanings and nuances, so I thought it would be helpful to provide meanings for each one.
Gaze - To look steadily and intently, especially in admiration or thought.
Glance - A brief or hurried look.
Peek - A quick and typically secretive look.
Peer - To look with difficulty or concentration.
Scan - To look over quickly but thoroughly.
Observe - To watch carefully and attentively.
Inspect - To look at closely in order to assess condition or quality.
Stare - To look fixedly or vacantly at someone or something.
Glimpse - To see or perceive briefly or partially.
Eye - To look or stare at intently.
Peruse - To read or examine something with great care.
Scrutinize - To examine or inspect closely and thoroughly.
Behold - To see or observe a thing or person, especially a remarkable one.
Witness - To see something happen, typically a significant event.
Spot - To see, notice, or recognize someone or something.
Contemplate - To look thoughtfully for a long time at.
Sight - To suddenly or unexpectedly see something or someone.
Ogle - To stare at in a lecherous manner.
Leer - To look or gaze in an unpleasant, malicious way.
Gawk - To stare openly and stupidly.
Gape - To stare with one's mouth open wide, in amazement.
Squint - To look with eyes partially closed.
Regard - To consider or think of in a specified way.
Admire - To regard with pleasure, wonder, and approval.
Skim - To look through quickly to gain superficial knowledge.
Reconnoiter - To make a military observation of a region.
Flick - To look or move the eyes quickly.
Rake - To look through something rapidly and unsystematically.
Glare - To look angrily or fiercely.
Peep - To look quickly and secretly through an opening.
Focus - To concentrate one's visual effort on.
Discover - To find or realize something not clear before.
Spot-check - To examine something briefly or at random.
Devour - To look over with eager enthusiasm.
Examine - To inspect in detail to determine condition.
Feast one's eyes - To look at something with great enjoyment.
Catch sight of - To suddenly or unexpectedly see.
Clap eyes on - To suddenly see someone or something.
Set eyes on - To look at, especially for the first time.
Take a dekko - Colloquial for taking a look.
Leer at - To look or gaze in a suggestive manner.
Rubberneck - To stare at something in a foolish way.
Make out - To manage to see or read with difficulty.
Lay eyes on - To see or look at.
Pore over - To look at or read something intently.
Ogle at - To look at in a lecherous or predatory way.
Pry - To look or inquire into something in a determined manner.
Dart - To look quickly or furtively.
Drink in - To look at with great enjoyment or fascination.
Bask in - To look at or enjoy something for a period of time.


🌸Describing Scents For Writers 🌸| List of Scents
Describing aromas can add a whole new layer to your storytelling, immersing your readers in the atmosphere of your scenes. Here's a categorized list of different words to help you describe scents in your writing.
🌿 Fresh & Clean Scents
Crisp
Clean
Pure
Refreshing
Invigorating
Bright
Zesty
Airy
Dewy
Herbal
Minty
Oceanic
Morning breeze
Green grass
Rain-kissed
🌼 Floral Scents
Fragrant
Sweet
Floral
Delicate
Perfumed
Lush
Blooming
Petaled
Jasmine
Rose-scented
Lavender
Hibiscus
Gardenia
Lilac
Wildflower
🍏 Fruity Scents
Juicy
Tangy
Sweet
Citrusy
Tropical
Ripe
Pungent
Tart
Berry-like
Melon-scented
Apple-blossom
Peachy
Grape-like
Banana-esque
Citrus burst
🍂 Earthy & Woody Scents
Musky
Earthy
Woody
Grounded
Rich
Smoky
Resinous
Pine-scented
Oak-like
Cedarwood
Amber
Mossy
Soil-rich
Sandalwood
Forest floor
☕ Spicy & Warm Scents
Spiced
Warm
Cozy
Inviting
Cinnamon-like
Clove-scented
Nutmeg
Ginger
Cardamom
Coffee-infused
Chocolatey
Vanilla-sweet
Toasted
Roasted
Hearth-like
🏭 Industrial & Chemical Scents
Metallic
Oily
Chemical
Synthetic
Acrid
Pungent
Foul
Musty
Smoky
Rubber-like
Diesel-scented
Gasoline
Paint-thinner
Industrial
Sharp
🍃 Natural & Herbal Scents
Herbal
Aromatic
Earthy
Leafy
Grass-like
Sage-scented
Basil-like
Thyme-infused
Rosemary
Chamomile
Green tea
Wild mint
Eucalyptus
Cinnamon-bark
Clary sage
🎉 Unique & Uncommon Scents
Antique
Nostalgic
Ethereal
Enigmatic
Exotic
Haunted
Mysterious
Eerie
Poignant
Dreamlike
Surreal
Enveloping
Mesmerizing
Captivating
Transcendent
I hope this list can help you with your writing. 🌷✨
Feel free to share your favorite scent descriptions in the replies below! What scents do you love to incorporate into your stories?
Happy Writing! - Rin T.
12 Red Herrings to Keep Your Readers Distracted
I’ve seen mystery/thriller authors use the same handful of red herrings too many times to count. So here are some (hopefully not as common) red herrings for your writing.
1. The Unreliable Narrator's Bias
Your narrator can play favourites and scheme and twist the way your readers interpret the story. Use this to your advantage! A character portrayed as untrustworthy can really be someone innocent the narrator framed, vice versa.
2. The Loyal Traitor
A character with a history of betrayal or questionable loyalty is an obvious suspect. They did it once, they could do it again, right? Wrong! They’ve actually changed and the real traitor is someone you trusted.
3. The Conflicted Expert
An expert—like a detective, scientist, or historian—analyses a piece of evidence. They’re ultimately wrong, either due to bias, missing data, or pressure to provide quick answers.
4. The Overly Competent Ally
You know that one sidekick or ally who’s somehow always ahead of the curve? They’re just really knowledgeable, your characters know this, but it makes it hard to trust them. Perfection is suspicious! But in this case, they’re actually just perfect.
5. The Misleading Emotional Clue
Maybe one of your characters is seen crying, angry, or suspiciously happy after xyz event. Characters suspect them, but turns out they’re just having a personal issue. (People have lives outside of yours MC smh). Or it could be a cover-up.
6. A Misleading Alibi
At first this character’s alibi seems perfect but once the protag digs into it, it has a major hole/lie. Maybe they were in a different location or the person they claimed to be with was out of town.
7. The Odd Pattern
Have a seemingly significant pattern—symbols left at crime scenes, items stolen in a specific order, crimes on specific dates. Then make it deliberately planted to mislead.
8. The Misinterpreted Relationship
A character was secretly close to a victim/suspect, making them a suspect. Turns out they were hiding a completely unrelated secret; an affair, hidden family connection, etc.
9. A Forgotten Grudge
Create a grudge or past feud and use it to cast suspicion on an innocent character. Introducing an aspect of their past also helps flesh out their character and dynamics as a group + plant distrust.
10. The Faked Death
Luke Castellan, need I say more (I will)? A supposedly innocent character dies, but turns out they faked it and were never a victim in the first place. They just needed to be out of the picture.
11. The Mistaken Eavesdropper
A character overhears a threat, argument, etc. They suspect B based on this convo, but turns out they just came to a false conclusion. (Or did they?)
12. The Forgetful Alibi
Someone confesses to hearing/seeing a clue, but turns out they were mistaken. Maybe they thought they heard a certain ringtone, or saw xyz which C always wears, but their memory was faulty or influenced by stress.
Looking For More Writing Tips And Tricks?
Check out the rest of Quillology with Haya; a blog dedicated to writing and publishing tips for authors!
Instagram Tiktok
5 editor’s secrets to help you write like a pro
1. Sentences can only do one thing at a time.
Have you ever heard a four-year-old run out of breath before she can finish her thought? I edit a lot of sentences that work the same way. You need a noun, you need a verb, you might need an object. Give some serious thought to stopping right there.
Sentences are building blocks, not bungee cords; they’re not meant to be stretched to the limit. I’m not saying you necessarily want a Hemingway-esque series of clipped short sentences, but most writers benefit from dividing their longest sentences into shorter, more muscular ones.
2. Paragraphs can only do one thing at a time.
A paragraph supports a single idea. Construct complex arguments by combining simple ideas that follow logically. Every time you address a new idea, add a line break. Short paragraphs are the most readable; few should be more than three or four sentences long. This is more important if you’re writing for the Web.
3. Look closely at -ing
Nouns ending in -ing are fine. (Strong writing, IT consulting, great fishing.) But constructions like “I am running,” “a forum for building consensus,” or “The new team will be managing” are inherently weak. Rewrite them to “I run,” “a forum to build consensus,” and “the team will manage.” You’re on the right track when the rewrite has fewer words (see below).
(If for some insane reason you want to get all geeky about this, you can read the Wikipedia article on gerunds and present participles. But you don’t have to know the underlying grammatical rules to make this work. Rewrite -ing when you can, and your writing will grow muscles you didn’t know it had.)
4. Omit unnecessary words.
I know we all heard this in high school, but we weren’t listening. (Mostly because it’s hard.) It’s doubly hard when you’re editing your own writing—we put all that work into getting words onto the page, and by god we need a damned good reason to get rid of them.
Here’s your damned good reason: extra words drain life from your work. The fewer words used to express an idea, the more punch it has. Therefore:
Summer months Regional level The entire country On a daily basis (usually best rewritten to “every day”) She knew that it was good. Very (I just caught one above: four-year-old little girl)
You can nearly always improve sentences by rewriting them in fewer words.
5. Reframe 90% of the passive voice.
French speakers consider an elegantly managed passive voice to be the height of refinement. But here in the good old U.S. (or Australia, Great Britain, etc.), we value action. We do things is inherently more interesting than Things are done by us. Passive voicemuddies your writing; when the actor is hidden, the action makes less sense.
Bonus: Use spell-check
There’s no excuse for teh in anything more formal than a Twitter tweet.
Also, “a lot” and “all right” are always spelled as two words. You can trust me, I’m an editor.
Easy reading is damned hard writing. ~ Nathaniel Hawthorne


I really, and I mean, really LOVE the way you draw robots! If's so mechanical and just eye-pleasing honestly.
I want to try drawing robots myself as you've inspired me! Do you have any tips on doing so?

Sorry for taking so long to respond, I’m really glad I inspired you! these are a few things I use in nearly every robot design/drawing
I think it’s super important to know how your robot moves and these common joints are a great way to start!
And remember these are just suggestions go wild with your robot designs! They can be anything and do anything you can think of :D


hot artists don't gatekeep
I've been resource gathering for YEARS so now I am going to share my dragons hoard
Floorplanner. Design and furnish a house for you to use for having a consistent background in your comic or anything! Free, you need an account, easy to use, and you can save multiple houses.
Comparing Heights. Input the heights of characters to see what the different is between them. Great for keeping consistency. Free.
Magma. Draw online with friends in real time. Great for practice or hanging out. Free, paid plan available, account preferred.
Smithsonian Open Access. Loads of free images. Free.
SketchDaily. Lots of pose references, massive library, is set on a timer so you can practice quick figure drawing. Free.
SculptGL. A sculpting tool which I am yet to master, but you should be able to make whatever 3d object you like with it. free.
Pexels. Free stock images. And the search engine is actually pretty good at pulling up what you want.
Figurosity. Great pose references, diverse body types, lots of "how to draw" videos directly on the site, the models are 3d and you can rotate the angle, but you can't make custom poses or edit body proportions. Free, account option, paid plans available.
Line of Action. More drawing references, this one also has a focus on expressions, hands/feet, animals, landscapes. Free.
Animal Photo. You pose a 3d skull model and select an animal species, and they give you a bunch of photo references for that animal at that angle. Super handy. Free.
Height Weight Chart. You ever see an OC listed as having a certain weight but then they look Wildly different than the number suggests? Well here's a site to avoid that! It shows real people at different weights and heights to give you a better idea of what these abstract numbers all look like. Free to use.
i watched one (1) video on how to draw hands that changed my life forever. like. i can suddenly draw hands again

these were all drawn without reference btw. i can just. Understand Hands now (for the most part, im sure theres definitely inaccuracies). im a little baffled


I've had this little idea in my head for a while now, so I decided to sit down and plot it out.
Disclaimer: This isn't meant to be some sort of One-Worksheet-Fits-All situation. This is meant to be a visual representation of some type of story planning you could be doing in order to develop a plot!
Lay down groundwork! (Backstory integral to the beginning of your story.) Build hinges. (Events that hinge on other events and fall down like dominoes) Suspend structures. (Withhold just enough information to make the reader curious, and keep them guessing.)
And hey, is this helps... maybe sit down and write a story! :)
Writing advice from my uni teachers:
If your dialog feels flat, rewrite the scene pretending the characters cannot at any cost say exactly what they mean. No one says “I’m mad” but they can say it in 100 other ways.
Wrote a chapter but you dislike it? Rewrite it again from memory. That way you’re only remembering the main parts and can fill in extra details. My teacher who was a playwright literally writes every single script twice because of this.
Don’t overuse metaphors, or they lose their potency. Limit yourself.
Before you write your novel, write a page of anything from your characters POV so you can get their voice right. Do this for every main character introduced.
Can't afford art school?
After seeing post like this 👇

And this gem 👇
As well as countless of others from the AI generator community. Just talking about how "inaccessible art" is, I decided why not show how wrong these guys are while also helping anyone who actually wants to learn.
Here is the first one ART TEACHERS! There are plenty online and in places like youtube.
📺Here is my list:
Proko (Free)
Marc Brunet (Free but he does have other classes for a cheap price. Use to work for Blizzard)
Aaron Rutten (free)
BoroCG (free)
Jesse J. Jones (free, talks about animating)
Jesus Conde (free)
Mohammed Agbadi (free, he gives some advice in some videos and talks about art)
Ross Draws (free, he does have other classes for a good price)
SamDoesArts (free, gives good advice and critiques)
Drawfee Show (free, they do give some good advice and great inspiration)
The Art of Aaron Blaise ( useful tips for digital art and animation. Was an animator for Disney)
Bobby Chiu ( useful tips and interviews with artist who are in the industry or making a living as artist)
Second part BOOKS, I have collected some books that have helped me and might help others.
📚Here is my list:
The "how to draw manga" series produced by Graphic-sha. These are for manga artist but they give great advice and information.
"Creating characters with personality" by Tom Bancroft. A great book that can help not just people who draw cartoons but also realistic ones. As it helps you with facial ques and how to make a character interesting.
"Albinus on anatomy" by Robert Beverly Hale and Terence Coyle. Great book to help someone learn basic anatomy.
"Artistic Anatomy" by Dr. Paul Richer and Robert Beverly Hale. A good book if you want to go further in-depth with anatomy.
"Directing the story" by Francis Glebas. A good book if you want to Story board or make comics.
"Animal Anatomy for Artists" by Eliot Goldfinger. A good book for if you want to draw animals or creatures.
"Constructive Anatomy: with almost 500 illustrations" by George B. Bridgman. A great book to help you block out shadows in your figures and see them in a more 3 diamantine way.
"Dynamic Anatomy: Revised and expand" by Burne Hogarth. A book that shows how to block out shapes and easily understand what you are looking out. When it comes to human subjects.
"An Atlas of animal anatomy for artist" by W. Ellenberger and H. Dittrich and H. Baum. This is another good one for people who want to draw animals or creatures.
Etherington Brothers, they make books and have a free blog with art tips.
As for Supplies, I recommend starting out cheap, buying Pencils and art paper at dollar tree or 5 below. For digital art, I recommend not starting with a screen art drawing tablet as they are more expensive.
For the Best art Tablet I recommend either Xp-pen, Bamboo or Huion. Some can range from about 40$ to the thousands.
💻As for art programs here is a list of Free to pay.
Clip Studio paint ( you can choose to pay once or sub and get updates)
Procreate ( pay once for $9.99)
Blender (for 3D modules/sculpting, ect Free)
PaintTool SAI (pay but has a 31 day free trail)
Krita (Free)
mypaint (free)
FireAlpaca (free)
Libresprite (free, for pixel art)
Those are the ones I can recall.
So do with this information as you will but as you can tell there are ways to learn how to become an artist, without breaking the bank. The only thing that might be stopping YOU from using any of these things, is YOU.
I have made time to learn to draw and many artist have too. Either in-between working two jobs or taking care of your family and a job or regular school and chores. YOU just have to take the time or use some time management, it really doesn't take long to practice for like an hour or less. YOU also don't have to do it every day, just once or three times a week is fine.
Hope this was helpful and have a great day.