Someone On Discord Asked How I Was Making Pins With Bottle Caps So Here Goes Nothing
Someone on discord asked how I was making pins with bottle caps so here goes nothing

you need
bottle caps (the ones made of metal obv)
pliers
safety pins
paper
glue
optional acrylic paint
optional paint varnish (the kind you would spray on top of an acrylic painting)

I'm only saying "optional" because sometimes you just like what's already printed on the bottle cap. I mean look at this puffin, it's so cute. But you should probably spray the print with varnish anyway if you don't want it to disappear too quickly (that cap on the left was in my pocket for like 3 months and the print has already disappeared around the edge)

pinch the edge of the cap with the pliers and turn it slightly toward the top side of the cap. Continue to do so around the entire cap but don't try to flatten it all in one go cause it's kinda hard. It should only take two minutes or so anyway

almost there

there, it's flat now. If you want to paint or write something on it, add a couple of layers of acrylic paint on it before you paint/write what you actually want on the pins

I wanted skeleton parts on mine because I saw someone with pins like that and idk where they bought them

I drew them with a Pitt pen on top of 4 layers of white acrylic

spray a coat of varnish on them but PLEASE do that outside, you do NOT want to breathe that stuff. Then wait a few hours for it to dry

on the back, add 1) glue 2) one safety pin 3) a thin paper across the pin - squish the paper against the wet glue. When it's dry, add another layer of glue on top. Just drown the back of the pin in crystal glue otherwise it's gonna break too easily. Just make sure the safety pin can still open and close easily
let it dry until the next day just to be sure. Tug on the safety pin a bit to make sure it's glued correctly

congrats you've made pins with bottle caps
More Posts from Basket-of-references and Others


I don’t know if I even did this right it seems too complicated lmao
Anyways a couple of of you guys have asked me for help on drawing robot bodies cause your confused on mechs a femmes I guess I’ll call them. I used Transformers Prime robots cause they’re not too blocky but not too human looking either. This isn’t a tutorial on how to detail them just how to draw the basic shapes. I hope this at least helps a little bit. sorry for my awful handwriting lol. my text thing doesn’t work on my photoshop
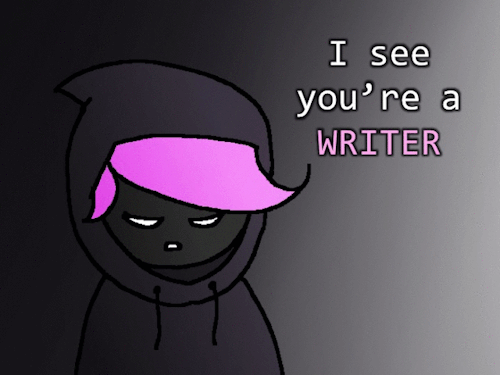

So, let me guess– you just started a new book, right? And you’re stumped. You have no idea how much an AK47 goes for nowadays. I get ya, cousin. Tough world we live in. A writer’s gotta know, but them NSA hounds are after ya 24/7. I know, cousin, I know. If there was only a way to find out all of this rather edgy information without getting yourself in trouble…
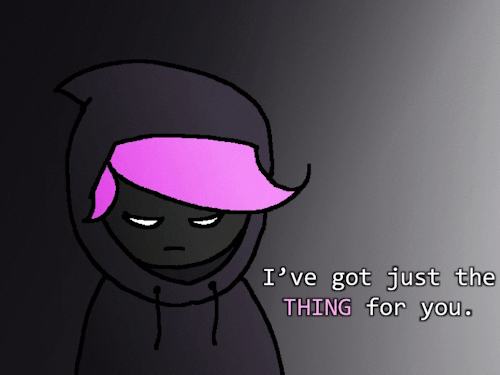
You’re in luck, cousin. I have just the thing for ya.
It’s called Havocscope. It’s got information and prices for all sorts of edgy information. Ever wondered how much cocaine costs by the gram, or how much a kidney sells for, or (worst of all) how much it costs to hire an assassin?
I got your back, cousin. Just head over to Havocscope.
((PS: In case you’re wondering, Havocscope is a database full of information regarding the criminal underworld. The information you will find there has been taken from newspapers and police reports. It’s perfectly legal, no need to worry about the NSA hounds, cousin ;p))
Want more writerly content? Follow maxkirin.tumblr.com!
U use colors in such a enrichening way, how do you do that may I ask??
thank you so much! 💕
this answer is going to be a little long.
the first thing, i think, is that it's very common to think of color as a means to an end, as just another type of information about a drawing: i'm using brown on the hair to show that the hair is brown, i'm using green to show that the characters are standing in grass.
but if color is information, then we can use it to say a lot more than just the basic facts of a drawing!
if you love drawing but want to get better with color, you have to learn to love color, too.
to want to know everything about how color works, to explore what different colors mean to you, to try and try and try again.
because, and this is the kicker:
ALL COLORS ARE RELATED TO EACH OTHER!

[from this post about how to use a color wheel]
i think it's common for people to talk about complementary colors and that's helpful when you're starting out with coloring, but i feel that it can become very limiting when it's treated like a rule and can obscure the fact that all colors are related to each other. it's called a color wheel because there is no beginning or end!

for example, take this drawing:

in this drawing, i'm using colors from all over:

but by just rearranging them slightly and throwing them against a black background like in the drawing, you can see how they're actually relating to each other and not nearly as random as they may seem at first glance!

[these notes are from this post where i break down how muted or "ugly" colors pull an image together] all colors are related to each other in some way, and that means that
YOU MUST DETERMINE WHAT EACH COLOR MEANS TO YOU, AND IT IS YOUR RESPONSIBILITY TO CONVEY THAT MEANING TO YOUR AUDIENCE.


for example, to me green can be uncomfortable and overwhelming, energetic and edgy, calm and natural, or fearful and tense. but no matter how it makes me feel, it's my responsibility to convey my relationship to green to whoever even glances at my drawing.
sure you can use commonly held ideas about colors [red = angry, blue = sad], but this shorthand is also limiting. if everyone used these commonly held ideas about color, there would be no room for experimentation or interesting, wild color choices! and colors mean different things to everyone-- that's what makes everyone's colorful art so different and so cool!!
another thing to note about those green drawings: each one is using a specific type of green.
the one with reigen leans blue-green, which creates a cool-colored image. meanwhile, reigen is warmer tones, which almost makes it seem like he's overheating when he's thrown against such a cool-toned background, which further expresses his discomfort!
the dimple!mob drawing is like a sprite or mountain dew-green, which encourages the feeling of electricity or energy. it's a cool yellowish-green.
the one of mob floating is a warmer yellowish-green, to suggest sunny warmth without drawing sun rays.
the divine tree arc drawing is a lot of reddish-greens, which can suggest a sickliness.
experiment with color combinations and different shades and hues! explore what these different types of colors mean to you!
so now let's get into the nitty gritty of color choice. the following images are from my free pdf about color, composition, and intuitive drawing:


the main takeaways from these pages are:
consider simplifying your colors! more colors does not necessarily equal a better drawing.
see how much a single color can do! can you use it in multiple places on your drawing? what meaning can you ascribe to the colors you're using?
consider creating a concept for your colors and a few rules to guide your piece! a lot of great drawings can fall apart because the coloring concept was too vague or because there weren't enough rules or guidelines to keep the image coherent.
are your colors saturated enough? are the different colors you're using fighting for the viewer's attention? do you have focal points in your art, and if so, are the colors you're using reinforcing those focal points?
use the tools at your disposal! color-picking, color balance, overlay layers. it can feel important to try to prove something by hand-picking every color, but even when i hand-pick my colors i almost always check them with color balance anyway to make sure i'm picking the best colors possible.
YOU DO NOT HAVE TO SUFFER FOR ART. PLEASE use everything that is available to you, and make sure that you are aligned with what brings you joy when you're making art!
i wanted to show an example of a drawing i've done that is doing way too much vs a drawing that is simpler but more balanced:


on the left, the colors are interesting but the background is too strong and is competing with the actual drawing for attention. on the right, the clear background and simple coloring create a cute, easy to read, successful image! this is what i mean when i say that colors can fight for the viewer's attention and mess up a good drawing.
my final secret is that i rarely shade with or use white, black, or grays. i don't think this is a rule that you have to follow, but i like it because it pushes me to figure out what colors will go best with each other, and i think this single tip has strengthened my understanding of color immensely. however, there are a lot of beautiful art styles that shade with and use pure white, black, and gray. you have to decide what you love!
and
STUDY!!!
look at other people's art, color pick it, and make a palette based on their art! look at how they represent values through color, how they shade, etc. study your favorite artists' work!! you will learn so much!!
i hope this was helpful! if you have any more follow-up questions or if there's something that you want to know that i didn't explain here, please don't hesitate to ask!


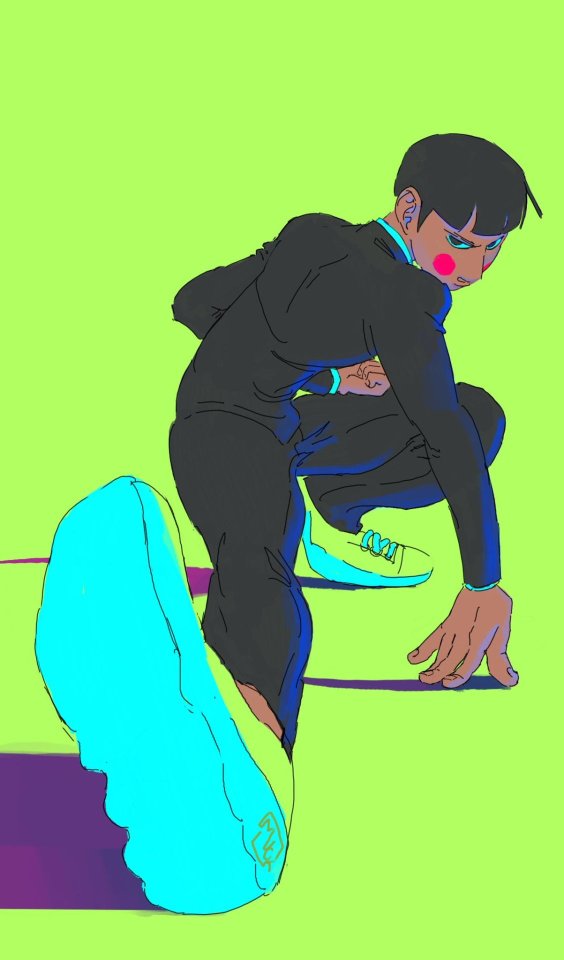
following my meme post the other day, and talking to friends further on the subject of fat characters in art, especially in fandom, i figured some people might like a tutorial on how to draw them.
Other Words for "Look" + With meanings | List for writers
Many people create lists of synonyms for the word 'said,' but what about the word 'look'? Here are some synonyms that I enjoy using in my writing, along with their meanings for your reference. While all these words relate to 'look,' they each carry distinct meanings and nuances, so I thought it would be helpful to provide meanings for each one.
Gaze - To look steadily and intently, especially in admiration or thought.
Glance - A brief or hurried look.
Peek - A quick and typically secretive look.
Peer - To look with difficulty or concentration.
Scan - To look over quickly but thoroughly.
Observe - To watch carefully and attentively.
Inspect - To look at closely in order to assess condition or quality.
Stare - To look fixedly or vacantly at someone or something.
Glimpse - To see or perceive briefly or partially.
Eye - To look or stare at intently.
Peruse - To read or examine something with great care.
Scrutinize - To examine or inspect closely and thoroughly.
Behold - To see or observe a thing or person, especially a remarkable one.
Witness - To see something happen, typically a significant event.
Spot - To see, notice, or recognize someone or something.
Contemplate - To look thoughtfully for a long time at.
Sight - To suddenly or unexpectedly see something or someone.
Ogle - To stare at in a lecherous manner.
Leer - To look or gaze in an unpleasant, malicious way.
Gawk - To stare openly and stupidly.
Gape - To stare with one's mouth open wide, in amazement.
Squint - To look with eyes partially closed.
Regard - To consider or think of in a specified way.
Admire - To regard with pleasure, wonder, and approval.
Skim - To look through quickly to gain superficial knowledge.
Reconnoiter - To make a military observation of a region.
Flick - To look or move the eyes quickly.
Rake - To look through something rapidly and unsystematically.
Glare - To look angrily or fiercely.
Peep - To look quickly and secretly through an opening.
Focus - To concentrate one's visual effort on.
Discover - To find or realize something not clear before.
Spot-check - To examine something briefly or at random.
Devour - To look over with eager enthusiasm.
Examine - To inspect in detail to determine condition.
Feast one's eyes - To look at something with great enjoyment.
Catch sight of - To suddenly or unexpectedly see.
Clap eyes on - To suddenly see someone or something.
Set eyes on - To look at, especially for the first time.
Take a dekko - Colloquial for taking a look.
Leer at - To look or gaze in a suggestive manner.
Rubberneck - To stare at something in a foolish way.
Make out - To manage to see or read with difficulty.
Lay eyes on - To see or look at.
Pore over - To look at or read something intently.
Ogle at - To look at in a lecherous or predatory way.
Pry - To look or inquire into something in a determined manner.
Dart - To look quickly or furtively.
Drink in - To look at with great enjoyment or fascination.
Bask in - To look at or enjoy something for a period of time.


These brushes aren’t the most complex, but they are what I made on the fly to make drawing hair easier, instead of hand drawing every detail like I’ve done most of my life lmao.
You can find the png files for a bitmap here, along with screenshots of my settings [I use this brush in Medibang Paint Pro, a free art program]. My settings use it as a scatter watercolour, I think it works well with the watercolor for color blending but you could theoretically use it just as a scatter.
Though, the brush settings are something not that important: the size, particle size, scatter strength, opacity, compliment, and color mixing are all things I change frequently when working.
Free to use, just don’t claim as your own. If you want to support me, you can leave a tip at my Kofi.


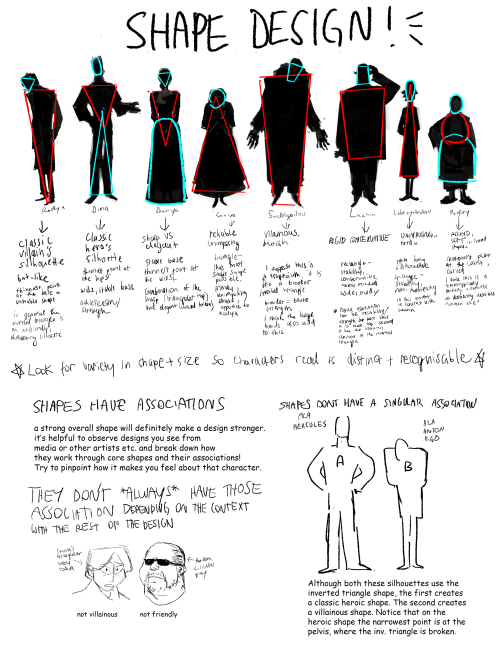
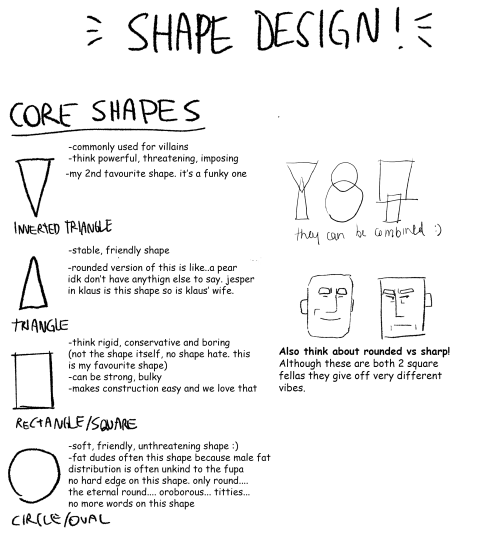
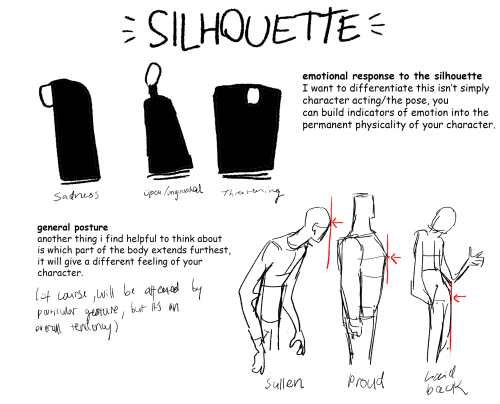
Part 2 of cino art tips is some basic tips on shape and silhouette design which are also principles I think about a lot :)
(also i'm so sorry i chose comic sans to write this in idk what i was thinking but i already flattened the layers)
i don't have any other obvious tips off the top of my head rn but feel free to ask anything you are curious about! i love getting asks uwu
Repeat after me:
The first draft just needs to exist
The second draft needs to be functional
The third draft needs to be effective
The first draft just needs to exist
The second draft needs to be functional
The third draft needs to be effective
The first draft just needs to exist
The second draft needs to be functional
The third draft needs to be effective
Remember, the second and third can't happen if you don't have something to work with. Your first draft will always be shit compared to your third, but at least it exists. The worst first draft is an unfinished one. The best first draft is a just completed one.
You read books/stories not in their first draft form-- only in their finished form (third, fourth, sometimes fifteenth draft). So stop comparing your first draft with a final one.
So, just write--you can make it better later. Perfectionism is the greatest weight a creator can carry.
-
 fyeahsteampunkgamers reblogged this · 2 weeks ago
 -
 rybredaaator liked this · 2 weeks ago
 -
 craftincreature reblogged this · 2 weeks ago
 -
 hopeisstrongerthandispair reblogged this · 2 weeks ago
 -
 wordlessmelodies liked this · 2 weeks ago
 -
 st4r-killer liked this · 3 weeks ago
 -
hopeisstrongerthandispair reblogged this · 3 weeks ago
-
hopeisstrongerthandispair reblogged this · 3 weeks ago
-
 threetimestrue liked this · 1 month ago
 -
 moth-whisperer liked this · 1 month ago
 -
 youngpyromaniac liked this · 1 month ago
 -
 thejabber-talkey reblogged this · 1 month ago
 -
 cheezette-gazette reblogged this · 1 month ago
 -
 fandomextraordinaire reblogged this · 1 month ago
 -
fandomextraordinaire liked this · 1 month ago
-
 hakozu-com liked this · 1 month ago
 -
 aligoo reblogged this · 1 month ago
 -
aligoo liked this · 1 month ago
-
 spes-proxima reblogged this · 1 month ago
 -
 hello-leeanne123 reblogged this · 1 month ago
 -
hello-leeanne123 liked this · 1 month ago
-
 pyroglycerinecreampufff reblogged this · 1 month ago
 -
 seerofthebluedesert liked this · 1 month ago
 -
 trippymini reblogged this · 1 month ago
 -
 irlbop liked this · 1 month ago
 -
 sakuraspoke liked this · 1 month ago
 -
 d3dw1tch reblogged this · 1 month ago
 -
d3dw1tch liked this · 1 month ago
-
 blondehairedarchaeologist liked this · 1 month ago
 -
 beanbag00 liked this · 1 month ago
 -
 mystetrope liked this · 1 month ago
 -
 incredibly-cold reblogged this · 1 month ago
 -
incredibly-cold liked this · 1 month ago
-
 cryptidplantboy reblogged this · 1 month ago
 -
cryptidplantboy liked this · 1 month ago
-
 peccolias liked this · 1 month ago
 -
 alexa-owo liked this · 1 month ago
 -
 b1y7h3shifter reblogged this · 1 month ago
 -
b1y7h3shifter liked this · 1 month ago
-
 infant-tyrone liked this · 1 month ago
 -
 the-ginger-is-loose-again reblogged this · 1 month ago
 -
 k0zzy-w0zzy reblogged this · 1 month ago
 -
 saritasoyyo liked this · 1 month ago
 -
 unchargedlife reblogged this · 1 month ago
 -
unchargedlife liked this · 1 month ago
-
 kos-ire liked this · 1 month ago
 -
 federersroger liked this · 1 month ago
 -
 gudetama-tamad reblogged this · 1 month ago
 -
 secret-crow-syndicate reblogged this · 1 month ago
 -
secret-crow-syndicate liked this · 1 month ago
