How To Avoid White Room Syndrome
How to avoid White Room Syndrome
by Writerthreads on Instagram
A common problem writers face is "white room syndrome"—when scenes feel like they’re happening in an empty white room. To avoid this, it's important to describe settings in a way that makes them feel real and alive, without overloading readers with too much detail. Here are a few tips below to help!
Focus on a few key details
You don’t need to describe everything in the scene—just pick a couple of specific, memorable details to bring the setting to life. Maybe it’s the creaky floorboards in an old house, the musty smell of a forgotten attic, or the soft hum of a refrigerator in a small kitchen. These little details help anchor the scene and give readers something to picture, without dragging the action with heaps of descriptions.
Engage the senses
Instead of just focusing on what characters can see, try to incorporate all five senses—what do they hear, smell, feel, or even taste? Describe the smell of fresh bread from a nearby bakery, or the damp chill of a foggy morning. This adds a lot of depth and make the location feel more real and imaginable.
Mix descriptions with actions
Have characters interact with the environment. How do your characters move through the space? Are they brushing their hands over a dusty bookshelf, shuffling through fallen leaves, or squeezing through a crowded subway car? Instead of dumping a paragraph of description, mix it in with the action or dialogue.
Use the setting to reflect a mood or theme
Sometimes, the setting can do more than just provide a backdrop—it can reinforce the mood of a scene or even reflect a theme in the story. A stormy night might enhance tension, while a warm, sunny day might highlight a moment of peace. The environment can add an extra layer to what’s happening symbolically.
Here's an example of writing a description that hopefully feels alive and realistic, without dragging the action:
The bookstore was tucked between two brick buildings, its faded sign creaking with every gust of wind. Inside, the air was thick with the scent of worn paper and dust, mingling with the faint aroma of freshly brewed coffee from a corner café down the street. The wooden floorboards groaned as Ella wandered between the shelves, her fingertips brushing the spines of forgotten novels. Somewhere in the back, the soft sound of jazz crackled from an ancient radio.
Hope these tips help in your writing!
More Posts from Basket-of-references and Others


Someone on discord asked how I was making pins with bottle caps so here goes nothing

you need
bottle caps (the ones made of metal obv)
pliers
safety pins
paper
glue
optional acrylic paint
optional paint varnish (the kind you would spray on top of an acrylic painting)

I'm only saying "optional" because sometimes you just like what's already printed on the bottle cap. I mean look at this puffin, it's so cute. But you should probably spray the print with varnish anyway if you don't want it to disappear too quickly (that cap on the left was in my pocket for like 3 months and the print has already disappeared around the edge)

pinch the edge of the cap with the pliers and turn it slightly toward the top side of the cap. Continue to do so around the entire cap but don't try to flatten it all in one go cause it's kinda hard. It should only take two minutes or so anyway

almost there

there, it's flat now. If you want to paint or write something on it, add a couple of layers of acrylic paint on it before you paint/write what you actually want on the pins

I wanted skeleton parts on mine because I saw someone with pins like that and idk where they bought them

I drew them with a Pitt pen on top of 4 layers of white acrylic

spray a coat of varnish on them but PLEASE do that outside, you do NOT want to breathe that stuff. Then wait a few hours for it to dry

on the back, add 1) glue 2) one safety pin 3) a thin paper across the pin - squish the paper against the wet glue. When it's dry, add another layer of glue on top. Just drown the back of the pin in crystal glue otherwise it's gonna break too easily. Just make sure the safety pin can still open and close easily
let it dry until the next day just to be sure. Tug on the safety pin a bit to make sure it's glued correctly

congrats you've made pins with bottle caps
A couple art tips I wish someone had told me when I was starting out:
FOR ALL AGES BECAUSE YOU CAN START ART WHENEVER YOU WANT AND YOU DON'T HAVE TO BE YOUNG
If you want to draw people then one of the best ways to improve is to become a little narcissistic and repeatedly draw yourself. You are someone that you'll always have reference to and don't need to feel bad about lacking skill when drawing.
If you want to draw in a cartoon or anime style then first draw realistically so you can form a better understanding of proportions, movement, and perspective. This may not be true for or helpful to everyone but I know many that it has been helpful for.
Quit looking up poses on the internet and model your own poses, you coward! You can choose the angle of the camera and the exact position you want each piece of your body in!
Don't fully render an image in your mind. Think of one or two elements of the piece and let the rest flow for best results. Not many people can replicate what was in their head, you'll be less upset if you keep your ideas and inspiration vague.
i love love love the way you paint back lighting!! do you have any tips/ a step by step for the way you do it?
ended up making a whole painting just to break it down and explain my general process for subjects lit from behind so heres that + a timelapse!

main thing for drawing anything with a strong light source behind is to make the main subject Darker and more desaturated to convey that the light is behind them rather than to their sides (face cant be properly lit if the light is behind). Also making the Main highlight the brightest hue in the image helps to intensify it. I tend to use teeth/eyes as a good comparison point

some people have a tendency to make the sclera white out of habit but darkening that+ the rest of the whites helps the image read as Darker compared to the brighter highlight
did you know moa (the hatoful boyfriend creator) has a blog page solely for references of hands?
well now you do, and here it is!

Heres a MEGA folder filled with art book pdfs, if anyone has some others that you'd like me to add to it thats missing, please let me know and send me the link
EDIT 1: If you're a bit new to art and you're super overwhelmed by the options and you don't know where to start, I highly recommend the morpho series of books
Edit 2:No more Google Drive, just the MEGA folder now, so don't panic if the stuff on Google ain't there no more, its still up, just in a different location


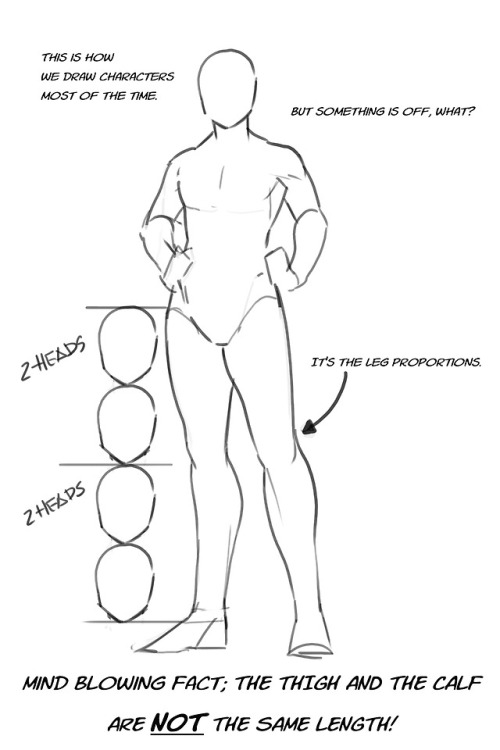
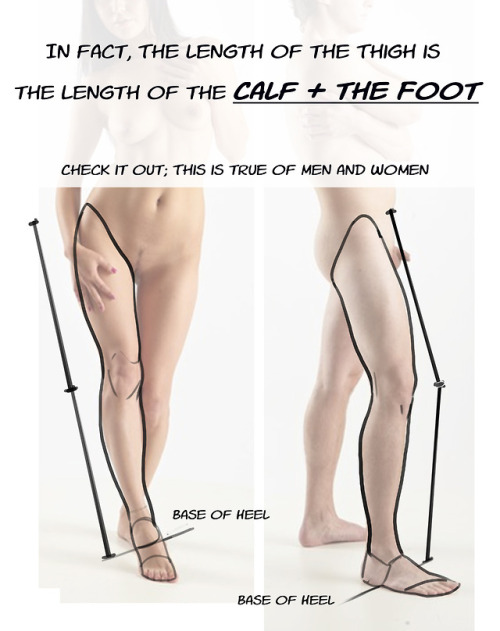
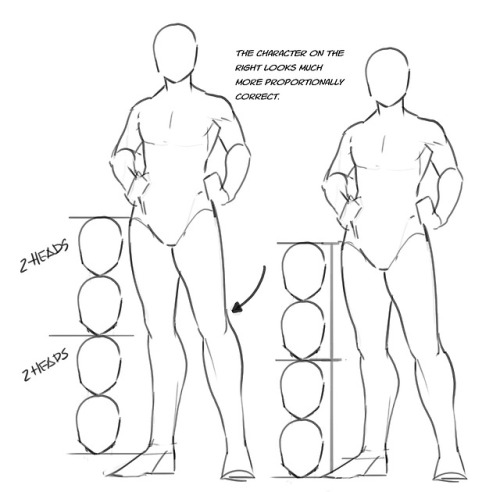
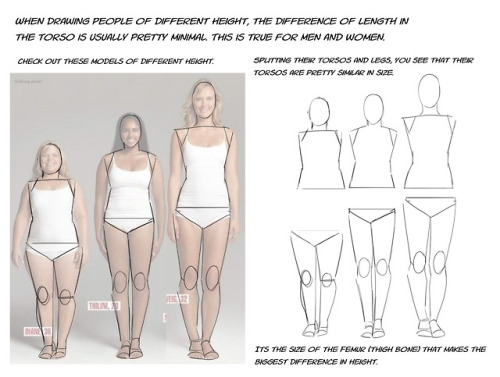
Just a quick thing I put together. This blew my fucking MIND when my anatomy teacher pointed it out. My drawings instantly got better. You might know it (good for you, I wish I knew it before too T_T) or you might not and it might help you get better.
so a lot of artists talk abt same face syndrome and like yeah practice diverse faces but nobody talks about same body syndrome nearly as much like…if all you can draw are twiggy skinny boys with no variation other then height and only draw hourglass girls with big boobs then like…you’re not a great artist and you really need to practice other body types because when i see a line up of characters that are all twinks and hourglass figure girls and theres no fat characters theres no muscular characters theres nothing but just skinny twiggy boys and girls with wide hips and big boobs then its like wheres the flavor wheres the variation not everyone looks like that and if anyone bitches and whines about “ohhh its hard to draw fat people” “ohhh its hard to draw big strong burly men” “oh its hard to draw a fat strong woman” “its hard drawing a muscular girl!” then fucking practice. you arnt going to learn to draw these body types if all you draw are skinny boys and hourglass girls and you’ll never improve and i dont feel any sympathy for you
-
 goggleperspective liked this · 3 days ago
 -
 hottubraccoon reblogged this · 3 days ago
 -
 pendwick liked this · 3 days ago
 -
 thewriteflame reblogged this · 3 days ago
 -
 lorddeath liked this · 3 days ago
 -
 thewozzler liked this · 3 days ago
 -
 kayinspo reblogged this · 3 days ago
 -
 pepper-fandom-things liked this · 3 days ago
 -
 leo-sharks-struggles reblogged this · 3 days ago
 -
 zmwrites reblogged this · 4 days ago
 -
 alwaysoneworldaway liked this · 4 days ago
 -
 despirte liked this · 4 days ago
 -
 komorebi-ne liked this · 5 days ago
 -
 ashishere0w0 liked this · 5 days ago
 -
 shotofstress liked this · 5 days ago
 -
 animalfarmgames liked this · 5 days ago
 -
 zanuloveart liked this · 6 days ago
 -
 pixie-in-trebleland reblogged this · 6 days ago
 -
pixie-in-trebleland liked this · 6 days ago
-
 anemonehydrogen liked this · 6 days ago
 -
 miasarah liked this · 1 week ago
 -
 softcactus liked this · 1 week ago
 -
 nightmaretalesofpain reblogged this · 1 week ago
 -
 asirenbyanyothername liked this · 1 week ago
 -
 ericka-kinney reblogged this · 1 week ago
 -
 bunniesharks reblogged this · 1 week ago
 -
 berryblu-soda reblogged this · 1 week ago
 -
 iknowthesunwillriseagain liked this · 1 week ago
 -
 thatonekreachur liked this · 1 week ago
 -
 pureheartneedscontrol liked this · 1 week ago
 -
 thebatsgreatestfailure liked this · 1 week ago
 -
 starheavenly liked this · 1 week ago
 -
 boyakishan reblogged this · 1 week ago
 -
 flurostate liked this · 1 week ago
 -
 buchanandreams liked this · 1 week ago
 -
 matt-theater liked this · 1 week ago
 -
 flinx009 liked this · 1 week ago
 -
 herjhoqe liked this · 1 week ago
 -
 berryblu-arts liked this · 1 week ago
 -
 milkygastrobones reblogged this · 1 week ago
 -
 naokatsu liked this · 1 week ago
 -
 zenzenzenith reblogged this · 1 week ago
 -
 astridatthedisco liked this · 1 week ago
 -
 iosyncratic reblogged this · 2 weeks ago
 -
 geypanther liked this · 2 weeks ago
 -
 huiii8lookingfortips reblogged this · 2 weeks ago
 -
 nerdy-wonderland-collectors-blog liked this · 2 weeks ago
 -
 goonoodlestitch liked this · 2 weeks ago
 -
 ronjastolemysalami reblogged this · 2 weeks ago
