I Really, And I Mean, Really LOVE The Way You Draw Robots! If's So Mechanical And Just Eye-pleasing Honestly.
I really, and I mean, really LOVE the way you draw robots! If's so mechanical and just eye-pleasing honestly.
I want to try drawing robots myself as you've inspired me! Do you have any tips on doing so?

Sorry for taking so long to respond, I’m really glad I inspired you! these are a few things I use in nearly every robot design/drawing
I think it’s super important to know how your robot moves and these common joints are a great way to start!
And remember these are just suggestions go wild with your robot designs! They can be anything and do anything you can think of :D
More Posts from Basket-of-references and Others


I don’t know if I even did this right it seems too complicated lmao
Anyways a couple of of you guys have asked me for help on drawing robot bodies cause your confused on mechs a femmes I guess I’ll call them. I used Transformers Prime robots cause they’re not too blocky but not too human looking either. This isn’t a tutorial on how to detail them just how to draw the basic shapes. I hope this at least helps a little bit. sorry for my awful handwriting lol. my text thing doesn’t work on my photoshop
5 editor’s secrets to help you write like a pro
1. Sentences can only do one thing at a time.
Have you ever heard a four-year-old run out of breath before she can finish her thought? I edit a lot of sentences that work the same way. You need a noun, you need a verb, you might need an object. Give some serious thought to stopping right there.
Sentences are building blocks, not bungee cords; they’re not meant to be stretched to the limit. I’m not saying you necessarily want a Hemingway-esque series of clipped short sentences, but most writers benefit from dividing their longest sentences into shorter, more muscular ones.
2. Paragraphs can only do one thing at a time.
A paragraph supports a single idea. Construct complex arguments by combining simple ideas that follow logically. Every time you address a new idea, add a line break. Short paragraphs are the most readable; few should be more than three or four sentences long. This is more important if you’re writing for the Web.
3. Look closely at -ing
Nouns ending in -ing are fine. (Strong writing, IT consulting, great fishing.) But constructions like “I am running,” “a forum for building consensus,” or “The new team will be managing” are inherently weak. Rewrite them to “I run,” “a forum to build consensus,” and “the team will manage.” You’re on the right track when the rewrite has fewer words (see below).
(If for some insane reason you want to get all geeky about this, you can read the Wikipedia article on gerunds and present participles. But you don’t have to know the underlying grammatical rules to make this work. Rewrite -ing when you can, and your writing will grow muscles you didn’t know it had.)
4. Omit unnecessary words.
I know we all heard this in high school, but we weren’t listening. (Mostly because it’s hard.) It’s doubly hard when you’re editing your own writing—we put all that work into getting words onto the page, and by god we need a damned good reason to get rid of them.
Here’s your damned good reason: extra words drain life from your work. The fewer words used to express an idea, the more punch it has. Therefore:
Summer months Regional level The entire country On a daily basis (usually best rewritten to “every day”) She knew that it was good. Very (I just caught one above: four-year-old little girl)
You can nearly always improve sentences by rewriting them in fewer words.
5. Reframe 90% of the passive voice.
French speakers consider an elegantly managed passive voice to be the height of refinement. But here in the good old U.S. (or Australia, Great Britain, etc.), we value action. We do things is inherently more interesting than Things are done by us. Passive voicemuddies your writing; when the actor is hidden, the action makes less sense.
Bonus: Use spell-check
There’s no excuse for teh in anything more formal than a Twitter tweet.
Also, “a lot” and “all right” are always spelled as two words. You can trust me, I’m an editor.
Easy reading is damned hard writing. ~ Nathaniel Hawthorne

12 Red Herrings to Keep Your Readers Distracted
I’ve seen mystery/thriller authors use the same handful of red herrings too many times to count. So here are some (hopefully not as common) red herrings for your writing.
1. The Unreliable Narrator's Bias
Your narrator can play favourites and scheme and twist the way your readers interpret the story. Use this to your advantage! A character portrayed as untrustworthy can really be someone innocent the narrator framed, vice versa.
2. The Loyal Traitor
A character with a history of betrayal or questionable loyalty is an obvious suspect. They did it once, they could do it again, right? Wrong! They’ve actually changed and the real traitor is someone you trusted.
3. The Conflicted Expert
An expert—like a detective, scientist, or historian—analyses a piece of evidence. They’re ultimately wrong, either due to bias, missing data, or pressure to provide quick answers.
4. The Overly Competent Ally
You know that one sidekick or ally who’s somehow always ahead of the curve? They’re just really knowledgeable, your characters know this, but it makes it hard to trust them. Perfection is suspicious! But in this case, they’re actually just perfect.
5. The Misleading Emotional Clue
Maybe one of your characters is seen crying, angry, or suspiciously happy after xyz event. Characters suspect them, but turns out they’re just having a personal issue. (People have lives outside of yours MC smh). Or it could be a cover-up.
6. A Misleading Alibi
At first this character’s alibi seems perfect but once the protag digs into it, it has a major hole/lie. Maybe they were in a different location or the person they claimed to be with was out of town.
7. The Odd Pattern
Have a seemingly significant pattern—symbols left at crime scenes, items stolen in a specific order, crimes on specific dates. Then make it deliberately planted to mislead.
8. The Misinterpreted Relationship
A character was secretly close to a victim/suspect, making them a suspect. Turns out they were hiding a completely unrelated secret; an affair, hidden family connection, etc.
9. A Forgotten Grudge
Create a grudge or past feud and use it to cast suspicion on an innocent character. Introducing an aspect of their past also helps flesh out their character and dynamics as a group + plant distrust.
10. The Faked Death
Luke Castellan, need I say more (I will)? A supposedly innocent character dies, but turns out they faked it and were never a victim in the first place. They just needed to be out of the picture.
11. The Mistaken Eavesdropper
A character overhears a threat, argument, etc. They suspect B based on this convo, but turns out they just came to a false conclusion. (Or did they?)
12. The Forgetful Alibi
Someone confesses to hearing/seeing a clue, but turns out they were mistaken. Maybe they thought they heard a certain ringtone, or saw xyz which C always wears, but their memory was faulty or influenced by stress.
Looking For More Writing Tips And Tricks?
Check out the rest of Quillology with Haya; a blog dedicated to writing and publishing tips for authors!
Instagram Tiktok
i watched one (1) video on how to draw hands that changed my life forever. like. i can suddenly draw hands again

these were all drawn without reference btw. i can just. Understand Hands now (for the most part, im sure theres definitely inaccuracies). im a little baffled
HELP TO MY BELOVED ARTISTS
References is the artist best friend!!!
so here it is some resources for you to use! Please share, so you can help more artist uwu.
i can update this post if i find new things.
LAY FIGURE:
JustSketchMe
Magic Poser Web
Design Doll (this one isn't online, and you have to download)
Easy Pose on Steam (this one isn't a free app, and is more focused on "anime art style")
3D MODEL:
Female body - Sketchfab
Male body - Sketchfab
a lot of poses - POSEMANIACS
Reference Angle
Head Construction - guidelines - by Marc Brunet.
BACKGROUND:
Room Sketcher
SketchUp
BLOGS THAT HELP A LOT:
this amazing post made by starrify-everything
Pose Reference
BONUS:
this amazing hands brushes made by poxamarquinhos
a lot of pinterest bases
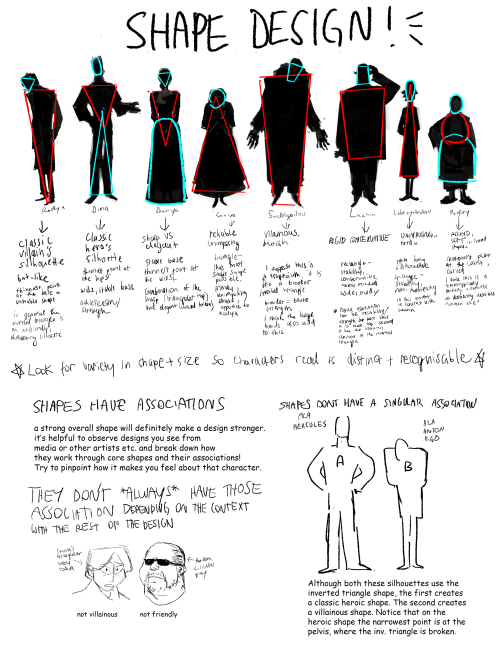
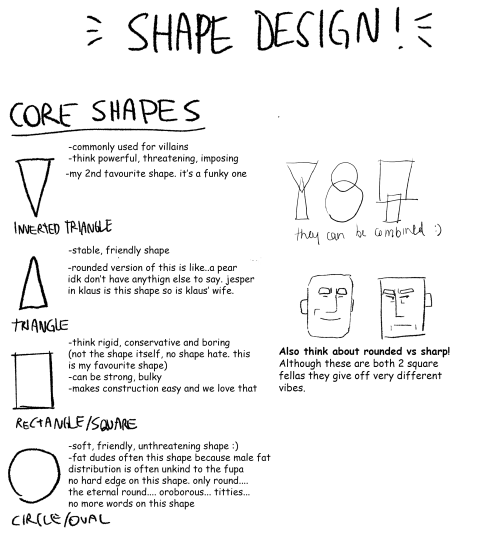
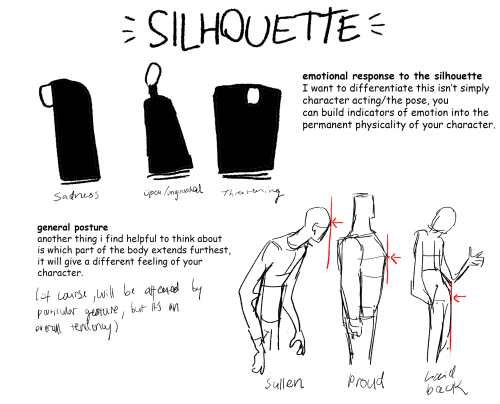
Part 2 of cino art tips is some basic tips on shape and silhouette design which are also principles I think about a lot :)
(also i'm so sorry i chose comic sans to write this in idk what i was thinking but i already flattened the layers)
i don't have any other obvious tips off the top of my head rn but feel free to ask anything you are curious about! i love getting asks uwu


got a couple of questions on ig about how i choose colors and i spent way too long putting these together so!! here’s a small color picking guide 🎨✨
hopefully this’ll be helpful to someone, but really i think the most important thing is having fun and experimenting to find what you like best!
![[ Download Link ]](https://64.media.tumblr.com/5f429d178bb1fe4870a8c6931415c38e/1c195b3b919b6bc0-22/s500x750/9f3e89788ae15eab900a39fc63f99bd7a543868d.jpg)
![[ Download Link ]](https://64.media.tumblr.com/6dd33d9a47c84fae4004c3891a069032/1c195b3b919b6bc0-70/s500x750/7a350518ca98cd34cd6e5fa9cd463fb933dbcf11.jpg)
![[ Download Link ]](https://64.media.tumblr.com/c6bcee52d8e78ba0e31e786b91f81fc1/1c195b3b919b6bc0-03/s500x750/735d52cfd62421cf43e46a8a710f76dad2c52707.jpg)
![[ Download Link ]](https://64.media.tumblr.com/87c3f0ff1da8e8a917485898808bd63b/1c195b3b919b6bc0-64/s500x750/62e90c66492ac189a3325bbd25965dd635cc65b7.jpg)
![[ Download Link ]](https://64.media.tumblr.com/133564050990bca016611a68fa71a2de/1c195b3b919b6bc0-c1/s500x750/87ea85696f416c49b91f8f64754306f4208b6726.jpg)
![[ Download Link ]](https://64.media.tumblr.com/9a2582c5d3abc3f5cf6ce4587482f493/1c195b3b919b6bc0-c5/s500x750/19c8f03ee111f028acd365ae95b24a04a72e60d9.png)
[ Download Link ]
As promised, it’s finally here! Thank you to all of my patrons for not only the support that made this possible, but for giving me the confidence to work on a big project like this.
Rather than providing any drawing instruction, what this writeup aims to do is help you learn to unpack the decisions being made in a given composition, and articulate what elements in a piece are responsible for its impact. Being able to isolate these qualities in your own art and art that inspires you opens up avenues for improvement regardless of medium, style, or technical skill. This is the first of hopefully many PWYW art ‘tutorials’ from me.
I hope you all enjoy!


-
 paper-starz liked this · 2 weeks ago
 -
 jikon42 reblogged this · 2 weeks ago
 -
jikon42 liked this · 2 weeks ago
-
 stalker-material liked this · 3 weeks ago
 -
 stuffsnstuffs liked this · 1 month ago
 -
 rosemirmir liked this · 3 months ago
 -
 bugba-bugbee liked this · 4 months ago
 -
 yourdearestaliengerbil liked this · 4 months ago
 -
 orisretr0 reblogged this · 4 months ago
 -
orisretr0 liked this · 4 months ago
-
 fandomsfordays21 reblogged this · 4 months ago
 -
fandomsfordays21 liked this · 4 months ago
-
 honey-bell-aint-well reblogged this · 4 months ago
 -
honey-bell-aint-well liked this · 4 months ago
-
 shortsightedmoon reblogged this · 4 months ago
 -
 basket-of-references reblogged this · 4 months ago
 -
 burningsoup1 liked this · 6 months ago
 -
 goopieslop liked this · 6 months ago
 -
 viiiiiiiiiiiiiiiien liked this · 8 months ago
 -
 v0idbird reblogged this · 8 months ago
 -
 birboom liked this · 8 months ago
 -
 jenllyfish liked this · 8 months ago
 -
 tree-mans liked this · 9 months ago
 -
 robotcove reblogged this · 9 months ago
 -
 bonnie-gore liked this · 9 months ago
 -
 smiling-sketch liked this · 9 months ago
 -
 decepticonscavengersaura liked this · 10 months ago
 -
 thatweirdstemrat liked this · 10 months ago
 -
 possiblevisualart reblogged this · 10 months ago
 -
 electronicgirl3 liked this · 10 months ago
 -
 flugame-mp3 liked this · 10 months ago
 -
 creeping-mollusk liked this · 10 months ago
 -
 aroacekea liked this · 10 months ago
 -
 komodocomics liked this · 10 months ago
 -
 garageinkspill liked this · 10 months ago
 -
 sapphirecereal liked this · 11 months ago
 -
 ender--gaming reblogged this · 11 months ago
 -
 its-needles liked this · 11 months ago
 -
 starsketchez liked this · 11 months ago
 -
 prophetic-synthetic liked this · 11 months ago
 -
 lju05 liked this · 11 months ago
 -
 arttimeoccasionallyimtired liked this · 1 year ago
 -
 dancingharlequin liked this · 1 year ago
