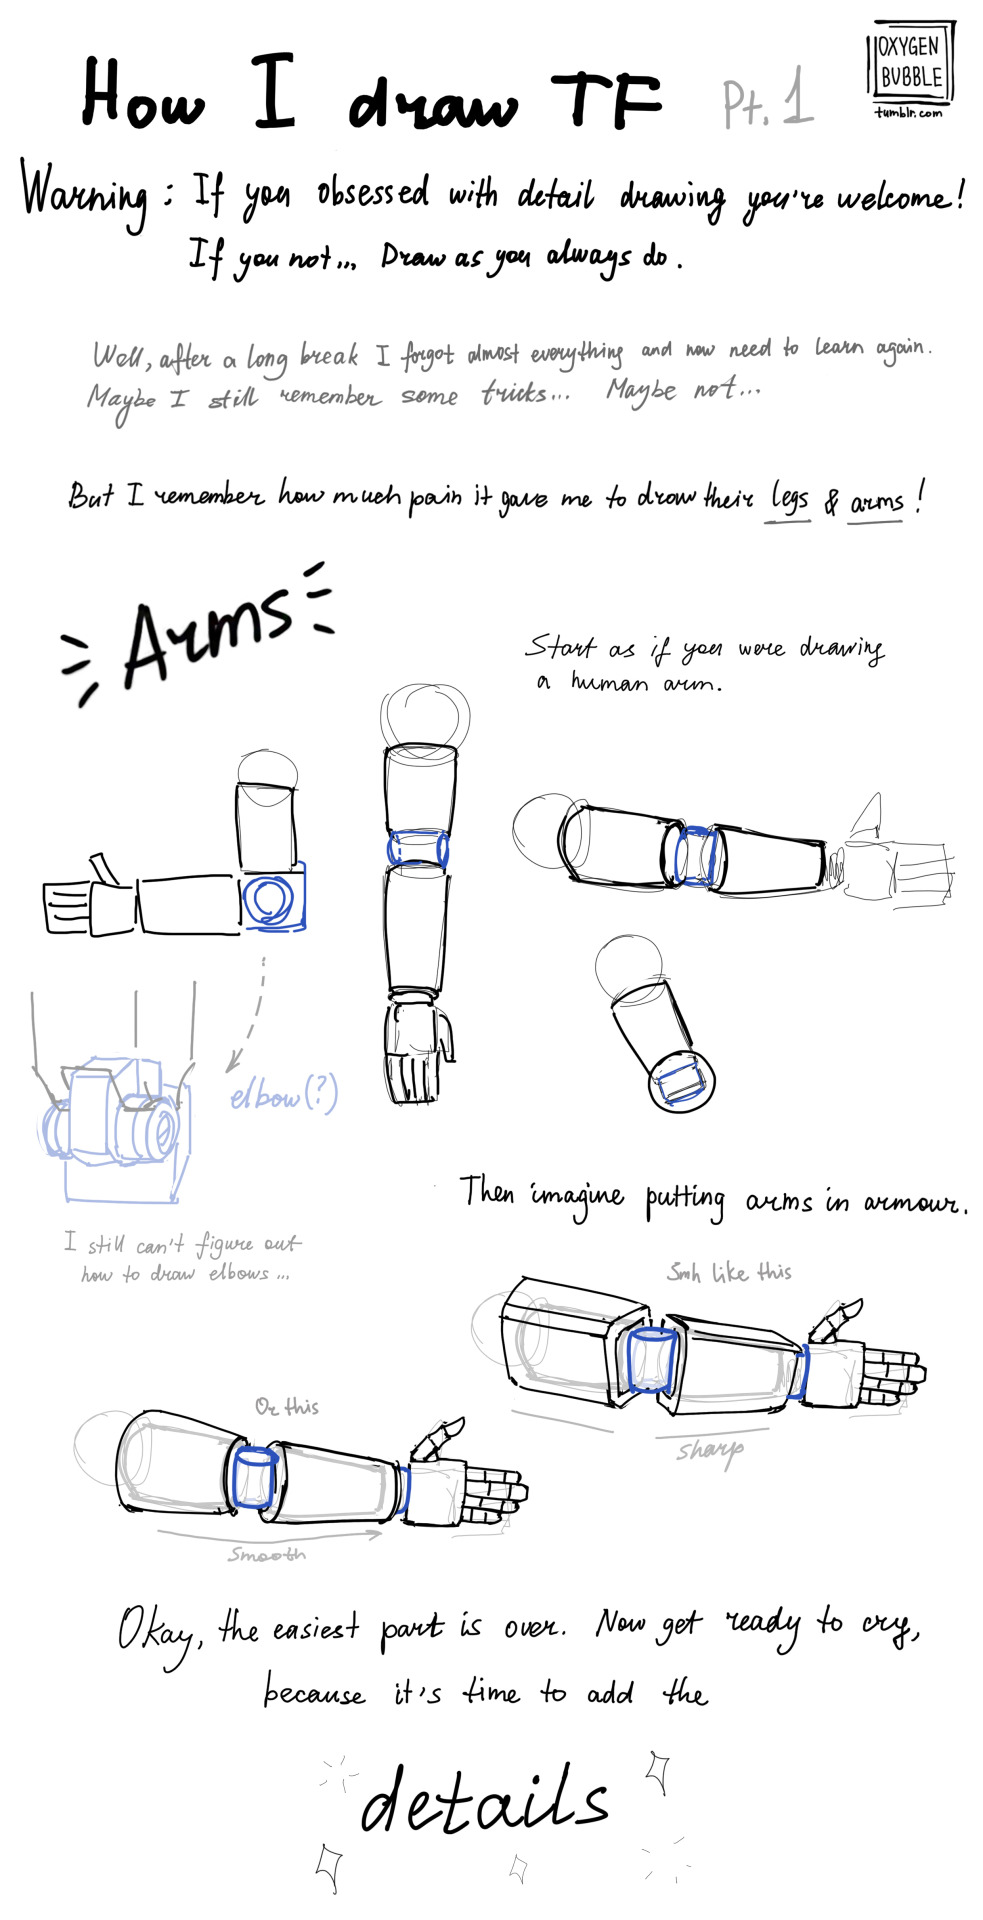
Received A Few Asks About How I Draw Tf Characters And So Finally I Sat Down And Started Scratching Out
received a few asks about how i draw tf characters and so finally i sat down and started scratching out some notes :))
i'll add more later on if more people are interested and when i have some time,, but i hope these are somewhat informative ?? of at least my own thought processes when it comes to drawing the robot guys


More Posts from Basket-of-references and Others


The thing with a “main character”, is that the reader see the story/world from that characters point of view - we can often read the characters thoughts and feelings more than other characters in the story. You can also use the perspective to increase this “effect”.
You can use the eye-level to display the world seen from the main character. Look at the two pictures above, the characters have the same size on both pictures - the only difference I’ve made is to switch eye-level. And by just doing this, we switch between the adult and the kids point of view - even though they both look at the same thing.
So, when you are doing a perspective, FIRST decide the eye-level and after that start placing out all those annoying guidelines.


following my meme post the other day, and talking to friends further on the subject of fat characters in art, especially in fandom, i figured some people might like a tutorial on how to draw them.


I've had this little idea in my head for a while now, so I decided to sit down and plot it out.
Disclaimer: This isn't meant to be some sort of One-Worksheet-Fits-All situation. This is meant to be a visual representation of some type of story planning you could be doing in order to develop a plot!
Lay down groundwork! (Backstory integral to the beginning of your story.) Build hinges. (Events that hinge on other events and fall down like dominoes) Suspend structures. (Withhold just enough information to make the reader curious, and keep them guessing.)
And hey, is this helps... maybe sit down and write a story! :)


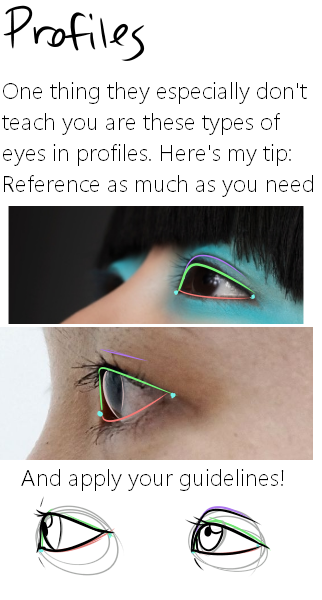
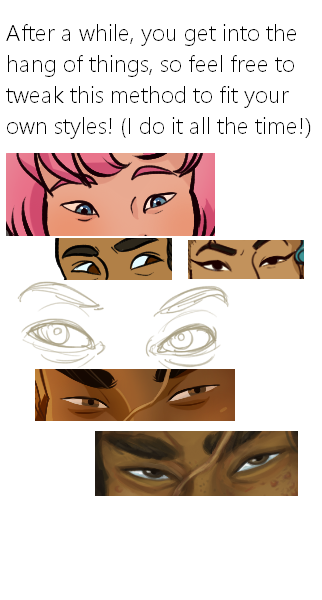
Here it is, my long winded tutorial, complete with some step by step action. I see a lot of people talk about wanting to diversify their artwork but not knowing how. This is my help to you. You really should take the time to invest in learning diverse eye shapes as diverse artwork always makes you a better artist. And frankly I’m really tired of drawing tutorials that talk up character diversity but only have the stereotypical “one Asian eye”.
I did some step by steps for those three diagrams, but I actually got them from this blog which has 14 of those examples! (Bonus: it’s a makeup blog so if you need help with that or want some idea of how to shade these eyes, there ya go)


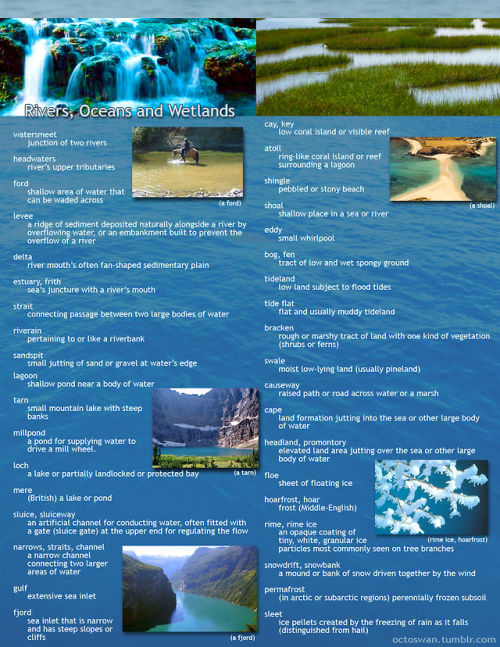

I made these as a way to compile all the geographical vocabulary that I thought was useful and interesting for writers. Some descriptors share categories, and some are simplified, but for the most part everything is in its proper place. Not all the words are as useable as others, and some might take tricky wording to pull off, but I hope these prove useful to all you writers out there!
(save the images to zoom in on the pics)
5 editor’s secrets to help you write like a pro
1. Sentences can only do one thing at a time.
Have you ever heard a four-year-old run out of breath before she can finish her thought? I edit a lot of sentences that work the same way. You need a noun, you need a verb, you might need an object. Give some serious thought to stopping right there.
Sentences are building blocks, not bungee cords; they’re not meant to be stretched to the limit. I’m not saying you necessarily want a Hemingway-esque series of clipped short sentences, but most writers benefit from dividing their longest sentences into shorter, more muscular ones.
2. Paragraphs can only do one thing at a time.
A paragraph supports a single idea. Construct complex arguments by combining simple ideas that follow logically. Every time you address a new idea, add a line break. Short paragraphs are the most readable; few should be more than three or four sentences long. This is more important if you’re writing for the Web.
3. Look closely at -ing
Nouns ending in -ing are fine. (Strong writing, IT consulting, great fishing.) But constructions like “I am running,” “a forum for building consensus,” or “The new team will be managing” are inherently weak. Rewrite them to “I run,” “a forum to build consensus,” and “the team will manage.” You’re on the right track when the rewrite has fewer words (see below).
(If for some insane reason you want to get all geeky about this, you can read the Wikipedia article on gerunds and present participles. But you don’t have to know the underlying grammatical rules to make this work. Rewrite -ing when you can, and your writing will grow muscles you didn’t know it had.)
4. Omit unnecessary words.
I know we all heard this in high school, but we weren’t listening. (Mostly because it’s hard.) It’s doubly hard when you’re editing your own writing—we put all that work into getting words onto the page, and by god we need a damned good reason to get rid of them.
Here’s your damned good reason: extra words drain life from your work. The fewer words used to express an idea, the more punch it has. Therefore:
Summer months Regional level The entire country On a daily basis (usually best rewritten to “every day”) She knew that it was good. Very (I just caught one above: four-year-old little girl)
You can nearly always improve sentences by rewriting them in fewer words.
5. Reframe 90% of the passive voice.
French speakers consider an elegantly managed passive voice to be the height of refinement. But here in the good old U.S. (or Australia, Great Britain, etc.), we value action. We do things is inherently more interesting than Things are done by us. Passive voicemuddies your writing; when the actor is hidden, the action makes less sense.
Bonus: Use spell-check
There’s no excuse for teh in anything more formal than a Twitter tweet.
Also, “a lot” and “all right” are always spelled as two words. You can trust me, I’m an editor.
Easy reading is damned hard writing. ~ Nathaniel Hawthorne

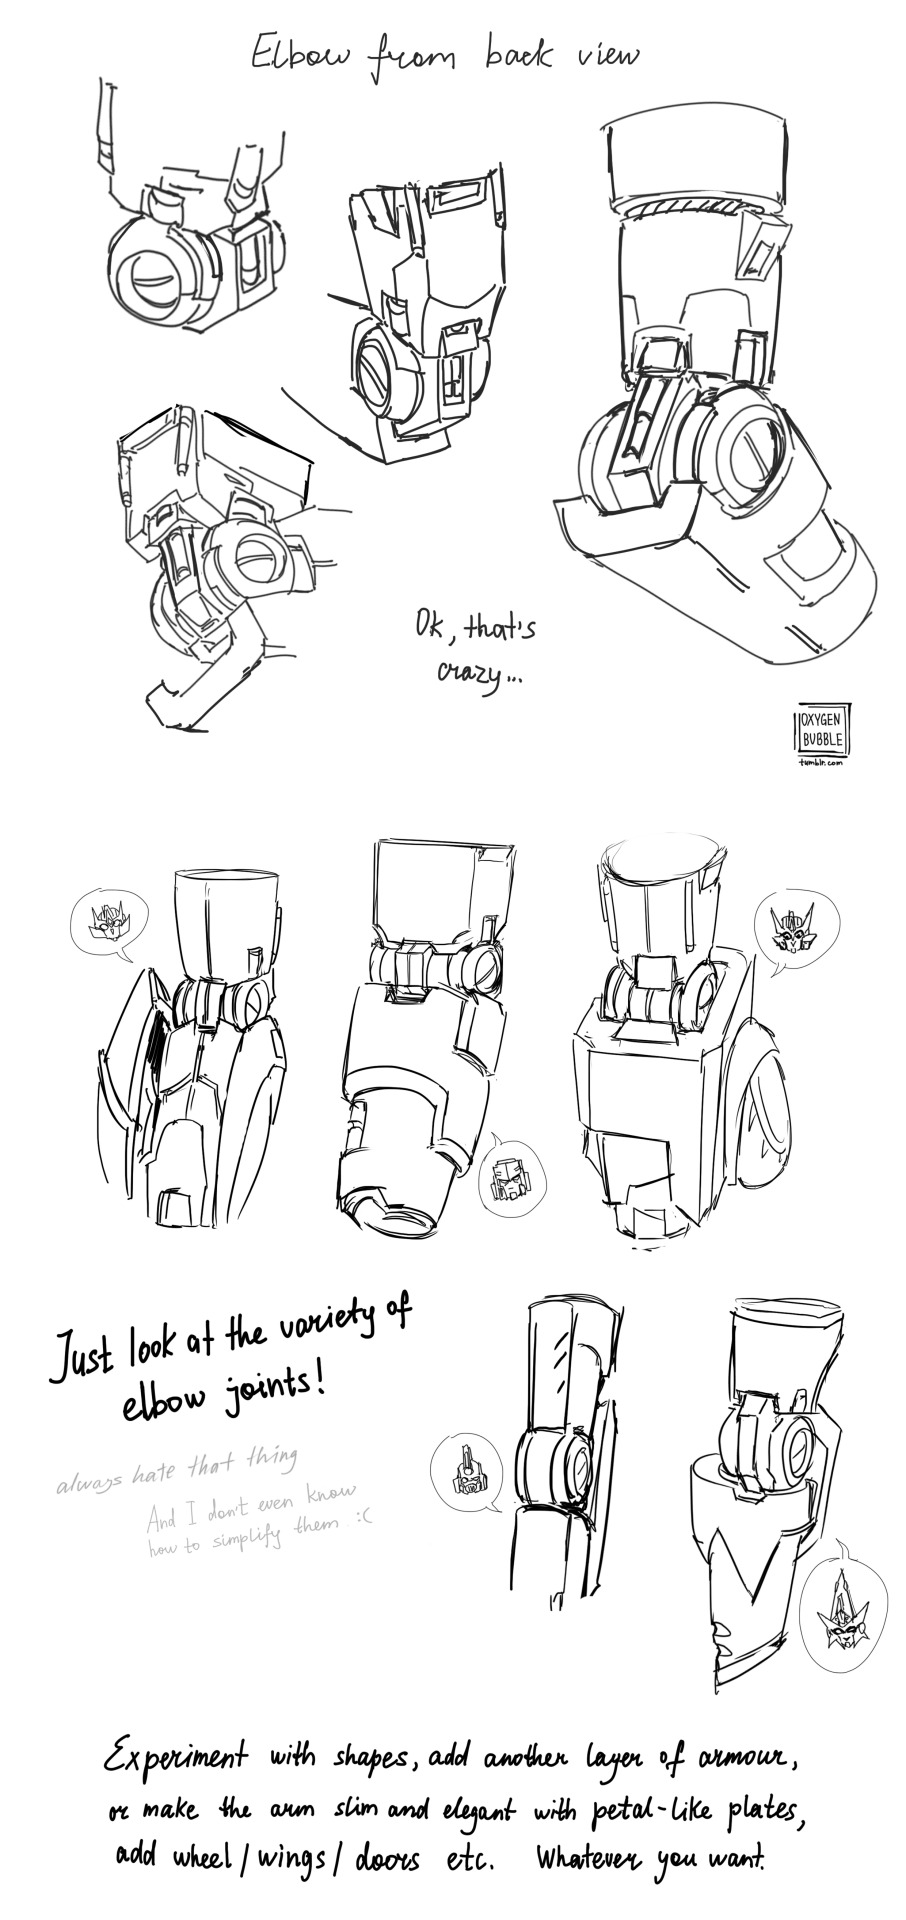

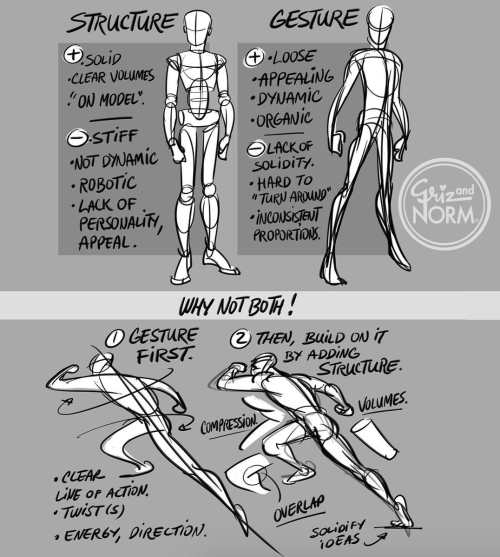
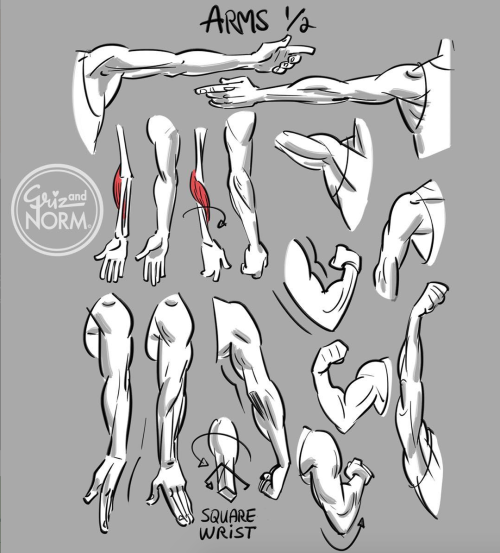
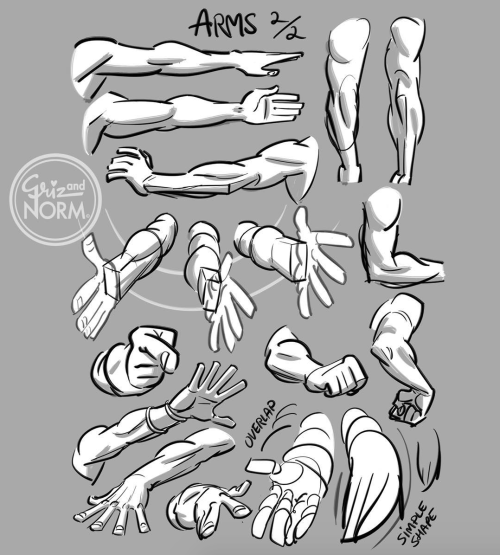
This is just a reference of what the most complicated parts of the TF look like.
There is not and will not be a step-by-step drawing here, because you have to figure out for yourself how this or that part of the robot works just by looking at the drawing.
If you found this post helpful, well, good for you)
-
 chocokillerkiller liked this · 2 weeks ago
 -
 chaoticconfetti liked this · 2 weeks ago
 -
 sevenheaven7011 liked this · 2 weeks ago
 -
 kelpo-cereal liked this · 2 weeks ago
 -
 thewormsinthefloorboards liked this · 2 weeks ago
 -
 orphines liked this · 2 weeks ago
 -
 tooturtly liked this · 2 weeks ago
 -
 briar-aria reblogged this · 2 weeks ago
 -
briar-aria liked this · 2 weeks ago
-
 ichigomiso liked this · 2 weeks ago
 -
 achillesheelarrow liked this · 3 weeks ago
 -
 stick-smeren liked this · 3 weeks ago
 -
 saturnkt4 liked this · 3 weeks ago
 -
 angelus-knight626 liked this · 3 weeks ago
 -
 prism-tears liked this · 3 weeks ago
 -
 theindexasaurus reblogged this · 3 weeks ago
 -
 144xp liked this · 3 weeks ago
 -
 aethelora liked this · 3 weeks ago
 -
 lowmac liked this · 3 weeks ago
 -
 era-of-rosemary liked this · 3 weeks ago
 -
 sillyrebloggy reblogged this · 3 weeks ago
 -
 konawiz8 reblogged this · 3 weeks ago
 -
konawiz8 liked this · 3 weeks ago
-
 napkin-g liked this · 3 weeks ago
 -
 only-the-coolest-apples reblogged this · 3 weeks ago
 -
 meowmeowmagazine liked this · 3 weeks ago
 -
 fuc370 liked this · 3 weeks ago
 -
 blossomleo liked this · 3 weeks ago
 -
 galacticgarlicbread liked this · 3 weeks ago
 -
 enchantingsirenpeacock liked this · 3 weeks ago
 -
 sky-dr1fter liked this · 3 weeks ago
 -
 theirlblueblur liked this · 3 weeks ago
 -
 not-california liked this · 3 weeks ago
 -
 catnipandmint reblogged this · 3 weeks ago
 -
 peachesandscream56 liked this · 3 weeks ago
 -
 cardinalcompass liked this · 3 weeks ago
 -
 scrumptiousjellyfishsalad liked this · 3 weeks ago
 -
 megatronsbathwater liked this · 3 weeks ago
 -
 getrope1 reblogged this · 3 weeks ago
 -
getrope1 liked this · 3 weeks ago
-
 redacted9185 liked this · 3 weeks ago
 -
 doctor-doctor-gimme-the-news liked this · 3 weeks ago
 -
 fandomswitcher liked this · 4 weeks ago
 -
 hi-there-from-gallifrey liked this · 4 weeks ago
 -
 centipedesarecuteasf liked this · 4 weeks ago
 -
 misa09 liked this · 4 weeks ago
 -
 jellyfishcave liked this · 4 weeks ago
 -
 oh-how-i-have-fallen reblogged this · 4 weeks ago
 -
 r-k-9000-batim liked this · 4 weeks ago
