So Here Are My Tips For Drawing Side Profile Views And Study People’s Faces! I Wish I Could Explain


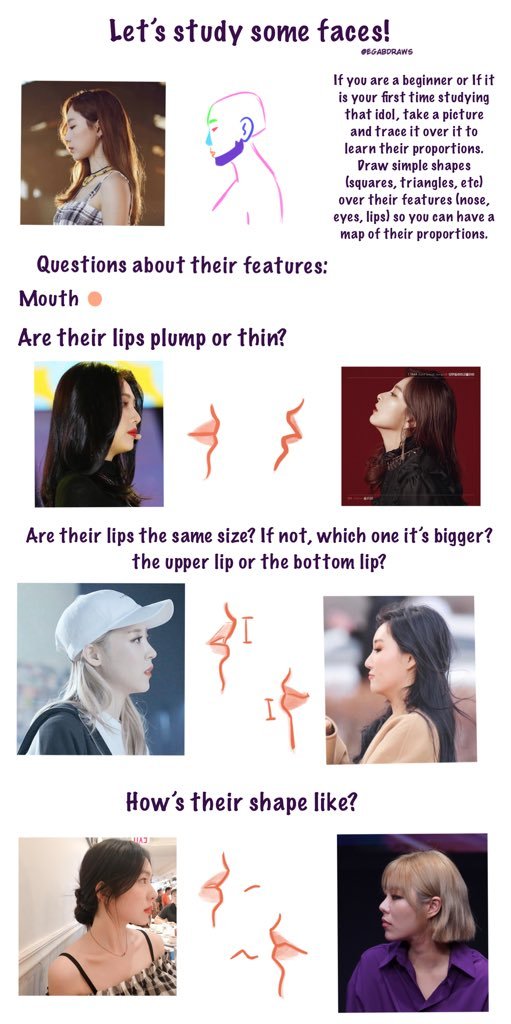

So here are my tips for drawing side profile views and study people’s faces! I wish I could explain more but I’m all over the place I’m sorry ㅠㅠㅠㅠ but well, I hope this can be useful for someone!
More Posts from Lilhaileyfoofoo and Others

morning pikacho doodles
this might be weird to ask, but how do I critically look at another person's writing and implement what I like in their writing in my own writing? I've been having trouble improving in my writing, and frankly Im not sure how to go about doing that, even. It's easy to see what I like about another person's writing, but hard to pinpoint exactly why...
THIS IS NOT WEIRD TO ASK. It is, in fact, the most important question EVER.
How to Read Like a Writer
Re-read. If you get halfway into a chapter and think, Wow this chapter is super creepy–I wonder how they did that. Or get to the end of a book and think, I feel the poignancy of the fragility of human life in an inherently volatile economic system–I wonder how the writer made me feel that way… Go back and re-read that shit.
Read slowly. When you read like a reader, you read pretty fast. When you go in for your second, or third, or fourth re-read of a passage, chapter, or book that you want to know more about, read it slowly. Really. Slowly.
Read for technique, not content. Readers read for content (”In this paragraph, Damien gave Harold a classified envelope.”). Writers read for technique. (”In this paragraph, the writer made me feel curious about the contents of the envelope by giving sensory details about its appearance and weight.”)
Ask the right questions. They usually start with HOW: How did the writer make me feel? How did they accomplish that?
Read small. Did a chapter make you feel sad? Find out WHERE EXACTLY. What paragraph, sentence, or WORD did it for you? Was it a physical detail? A line of dialogue? A well-placed piece of punctuation? Stories are made of words and sentences. Narrow it down.
Practice. Reading like a writer is a skill that takes time to develop. Over time, you’ll get better at it!
How about y’all? Anything to add to this list? I made it off the top of my head so I’m sure I’m forgetting something. What have been your experiences with learning to read like a writer?
Hope this helps!
//////////////
The Literary Architect is a writing advice blog run by me, Bucket Siler. For more writing help, check out my Free Resource Library or get The Complete Guide to Self-Editing for Fiction Writers. xoxo


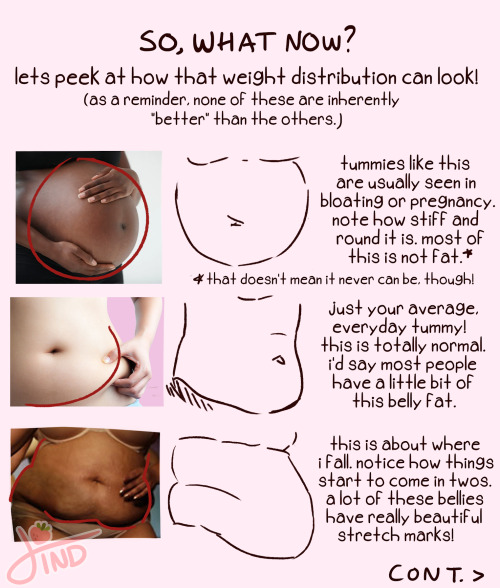


as requested- my zine about fat and plus size body types from instagram!💖 happy drawing everyone!
So Max opened donations on his twitch channel yesterday and people were being crazy generous, and when someone donated $100 he got kinda emotional. I wanted to give him a huge hug.
Thank you Max for everything that you do. You make so many people happy and cheer us up on our darkest days, we can’t thank you enough.
i’m on to you drake


artistically-gay’s Hair Tutorial

So! before we begin, I wanna state that the program I use is Fire Alpaca, though this tutorial can be applied to different art programs as well! Some brushes and filters may work a bit differently from program to program.

First, we need to go over the brush checklist! These are the brushes you’re going to be working with: - Watercolor 1 (Turn ON size by pressure) - Watercolor 2 (Turn OFF size by pressure) - Airbrush
We’ll start off with a base color. A lightish color is the easiest to work with when you start out. A caramel color should work best for practice.

You’re going to want to duplicate the color layer. The duplicated layer is where most of the coloring is going to be done. Lock the first layer to make sure you don’t accidentally work on the wrong layer. I’ve had this accident several times and ended up wasting an hour or two.
You’ll need to have an understanding of color theory for this, but I’ll be linking a post at the end that can help give some guidance on shading with the say I do it!
We’ll be shading our caramel-colored strip with a dark red, and making highlights with a light and pale yellow!

Take Watercolor 2 and start creating strokes with varying pressure. Try and go lighter with the shading in where you want your highlights to be, and go heavier where the shadows will be.
Using Watercolor 2 gives you a guideline to follow before using Watercolor 1, which is where detailing will come in.
Now you start using Watercolor 1. Try and have it small, since this is the detailing brush and you’re trying to mimic the visuals of having individual hair strands. Remember to have lighter pressure where the highlights will be and heavier where shadows will be.

Duplicate this layer again with Watercolor 1, and then repeat this process with your highlighting color, in this case the yellow! After this, you can adjust the opacity oh this layer until you feel satisfied with how the highlights look!
Now it’s time to clip and merge the layers! After this, we’ll be moving on to the final steps, these steps involving the airbrush tool.

Returning to our dark red shading color, use the Airbrush tool to place some soft shading depending on your picture’s light source. After that, use the layer filter settings and either apply Multiply or Hard Light, it really depends on your preference*. Adjust opacity to your preference as well.
*personally, I like to use Hard Light more than Multiply.
Repeat this process with your highlight color. Use the layer filter settings and choose either Overlay or Soft Light. Again, you can go with whichever you prefer.

And that’s my hair tutorial! Feel free to practice and experiment with this method in any way that you like! I hope that I was able to be of help to the people who were interested!
Here you can find the post I mentioned about shading!
sometimes i need to remind myself that i'm writing fanfiction for free and i'm allowed to have a shitty sentence or two
I love seeing these memes out of context! I need to watch the movies again, haven’t seen them in years.


-
 3city2 liked this · 4 months ago
 -
 ilamacorn reblogged this · 6 months ago
 -
ilamacorn liked this · 6 months ago
-
 gloryraiin reblogged this · 8 months ago
 -
 somerandomfollower reblogged this · 8 months ago
 -
 eddis-not-eeddis liked this · 8 months ago
 -
 telluricdog liked this · 8 months ago
 -
 xptobie liked this · 9 months ago
 -
 nothing-than-bleep liked this · 9 months ago
 -
gloryraiin liked this · 10 months ago
-
 burningbibliophilecomicbear liked this · 11 months ago
 -
somerandomfollower reblogged this · 1 year ago
-
 skelepen reblogged this · 1 year ago
 -
 leanderp liked this · 1 year ago
 -
 beetle-ze-bub liked this · 1 year ago
 -
 n22456 liked this · 1 year ago
 -
 dalmatiaspencil reblogged this · 1 year ago
 -
 super-metroid liked this · 1 year ago
 -
 saurian-official reblogged this · 1 year ago
 -
saurian-official liked this · 1 year ago
-
 diatarcmaropho liked this · 1 year ago
 -
 invaderskoodge liked this · 1 year ago
 -
 a-drays-mind reblogged this · 1 year ago
 -
a-drays-mind liked this · 1 year ago
-
 therebelknights reblogged this · 1 year ago
 -
 kali-cormac liked this · 1 year ago
 -
 ernyapoode liked this · 1 year ago
 -
 artutorialcollection reblogged this · 1 year ago
 -
 softiejing liked this · 1 year ago
 -
 youreiludida liked this · 1 year ago
 -
 hopelessromantic9 liked this · 1 year ago
 -
 is2unny liked this · 1 year ago
 -
 kitdreamzing liked this · 1 year ago
 -
 snikkeler liked this · 1 year ago
 -
 pixie-mask liked this · 1 year ago
 -
 oatmealstreetfighter reblogged this · 1 year ago
 -
 azura-fox reblogged this · 1 year ago
 -
 mariposasmonarch liked this · 1 year ago
 -
 theworldiswhispering liked this · 1 year ago
 -
 artimies6 reblogged this · 1 year ago
 -
 reputxtion13 reblogged this · 1 year ago
 -
 daslulilaan liked this · 1 year ago
 -
 starkitters liked this · 1 year ago
 -
 skyyism liked this · 1 year ago

I mostly reblog writing and art related resources here. BLMMy main account is FoofsterRoonie. My art blog is FoofsterArtAnd my writing blog is Foofsterwriting:)
197 posts