“We Wear Culture” Is A Collaboration Between Google And More Than 180 Museums, Schools, Fashion Institutions,

“We Wear Culture” is a collaboration between Google and more than 180 museums, schools, fashion institutions, and other organizations from all parts of the globe. It’s part of Google’s Arts & Culture platform, which is digitizing the world’s cultural treasures, and functions as a searchable guide to a collective archive of some 30,000 fashion pieces that puts “three millennia of fashion at your fingertips,” Google says.
But it isn’t just a database. Google has worked with curators to create more than 450 exhibits on different topics—say, how the cheongsam changed the way Chinese women dress—making the site an endlessly entertaining, educational portal filled with stunning imagery touching on everything from modern Japanese streetwear to the clothes worn at the court of Versailles.
i can already tell this has made writing for historical fandoms – the worst part of which, for me, is absofuckinglutely hands-down the clothing – much easier.
More Posts from Scrapbox-in-the-attic and Others

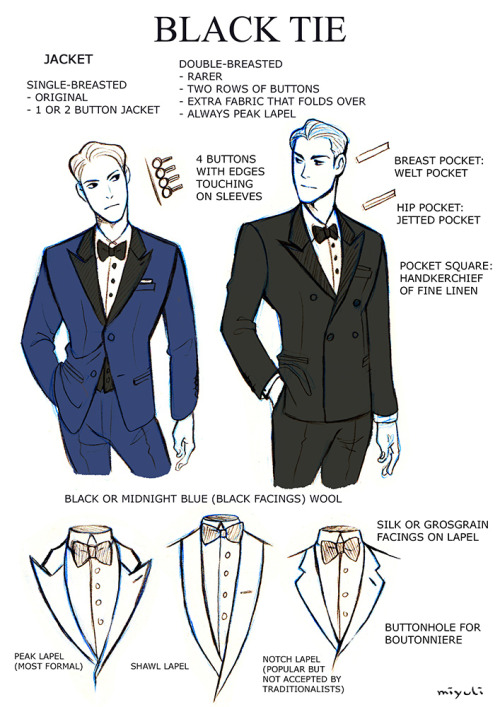
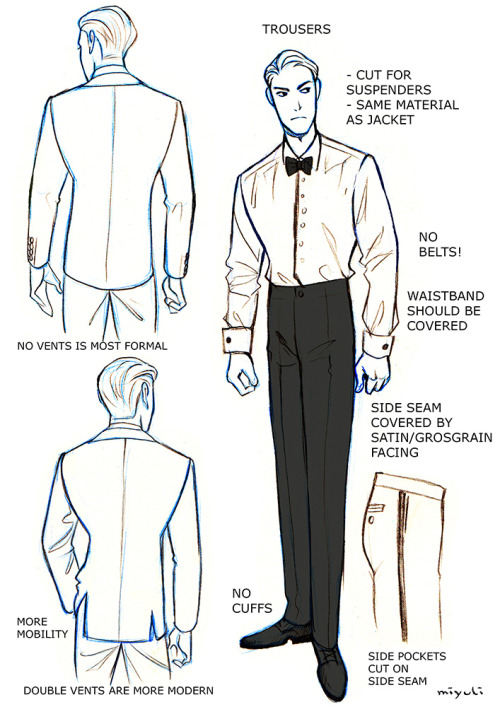

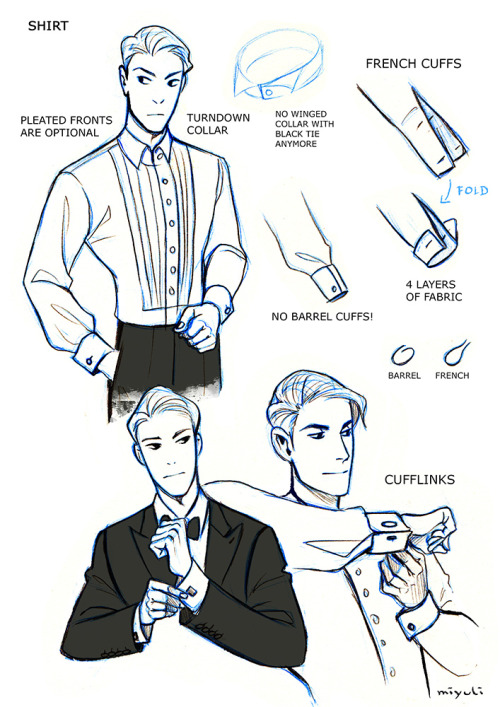
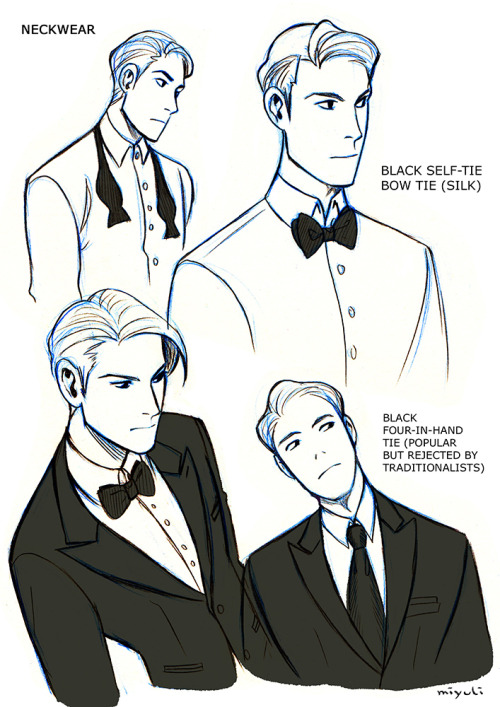
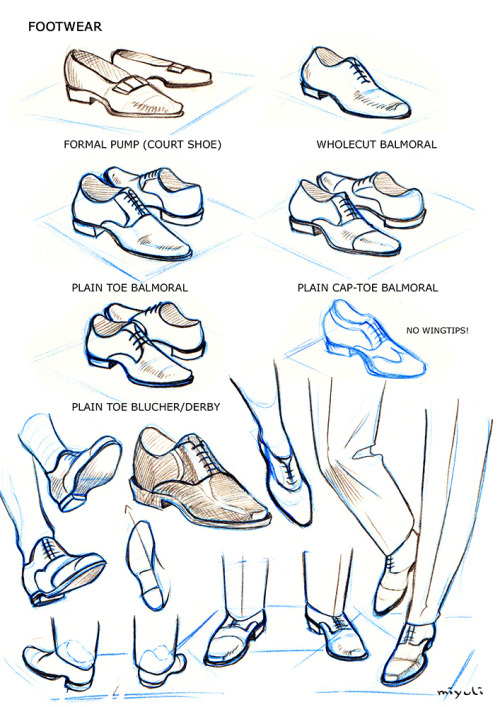
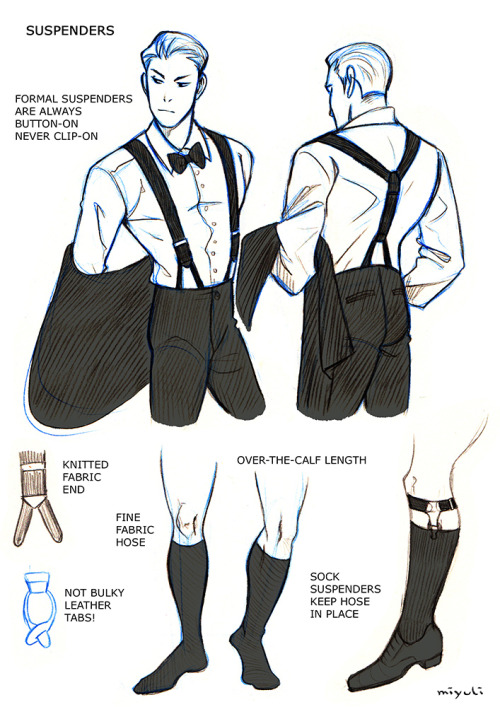
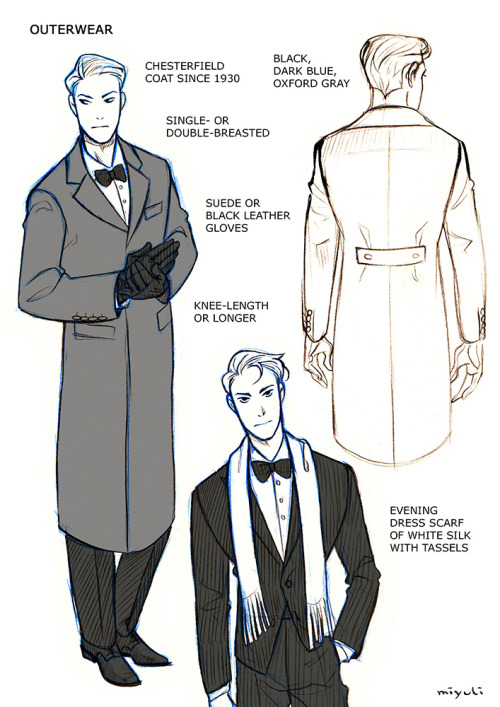
I’ve been studying the classic black tie dress code (mainly from here) so I thought I could share my notes. Maybe they can be helpful to someone else, too. If I made any mistakes or things are really confusing please tell me. I also have some notes on white tie which I could share as well…


quick proportion tips
- eyeballs are an eyeball width apart - ears align with the top of your brows to the bottom of your nose, and are the center-point of a profile view - lip corners line up to the center of each eye - hands are roughly the size of your face - feet are the same size as your forearm - elbows are aligned with your belly-button - your hands reach down mid-length of your thighs - both upper and lower legs (individually) are roughly the same size as your torso (this is all rough estimates for proportion! feel free to add more to help others)
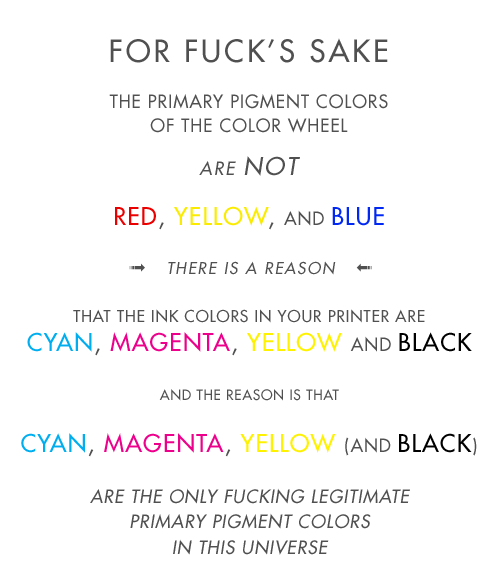


Prepping your print from file to finish: I always hear people complaining about how much better the piece looked digitally, SO, here is a run down on how to get prints that look more like your original piece. First of all, every printer is different. Every paper is different. Make sure you take the time to do test prints and become familiar with how your printer and paper combo work, as you’ll rarely nail a print your first try. This one took about 5 test prints before I was confident to print on the expensive large paper Every time I mess up on a print, I save the remaining paper to use as scraps for test prints. As you can see, the original piece looks very nice! The focus is super strongly on the tiger, and all of the vibrant colors are still super evident in the background. That said, when I print it as is, everything about 85% gray or darker turns BLACK. And this is high quality paper designed to get accurate vibrant colors, too. The best way to fix this is to do layer effects. Brightness/contrast is my favorite, as a typical piece will generally print about 5x better if you up the brightness to around 15-25, and adjust the contrast up or down by 5-10 points. That said, if you have a HIGH contrast piece (Darks against brights) like this one, you typically need to do a few more steps. Often I’ll do a second brightness/contrast adjustment layer and push brightness to an obnoxious level so the darkest darks are closer to a mid-dark range. From there, I’ll create a mask and use a transparent gradient tool to slowly pull back the brightness on all of the lighter areas of the image. Additionally, due to printers using CMYK and your screen being RBG certain colors just physically CANNOT print. Some people will always work in CMYK because of this, but honestly I like my saturated colors and most of my work is intended to be seen digitally so I only ever work in RGB. Photoshop has a nifty toggle (Ctrl + Y) where you can toggle between CMYK and RGB view to see how your piece will appear when it prints. It’s useful to check this because if you worked in a color that cannot replicate in print, you may want to shift it entirely before you even bother printing. Artwork tends to desaturate a bit as it prints, so I’ll often make a Hue/saturation layer to play with, too. In this case the image was already pretty damn saturated, BUT some of the shadows on the tiger were printing more brown than orange, so I adjusted the saturation a bit to keep them vibrant with the rest of the image. **DO NOT use “Lightness” to lighten your image! It basically adds a white overlay to your image. Always use Brightness, instead. After all of that, I have a final print that much more closely captures the essence of the original painting. I could have tinkered even more, but to me the goal is a good print rather than an exact copy. For ULTRA high contrast images, like a dark room looking out into a snowy exterior, expect to do a LOT of adjustment to get it to print correctly. Printers just aren’t too fond of super darks right up against super lights. I could make a proper tutorial on this if people request it. Mostly, just wanted to put my thoughts down in one spot!


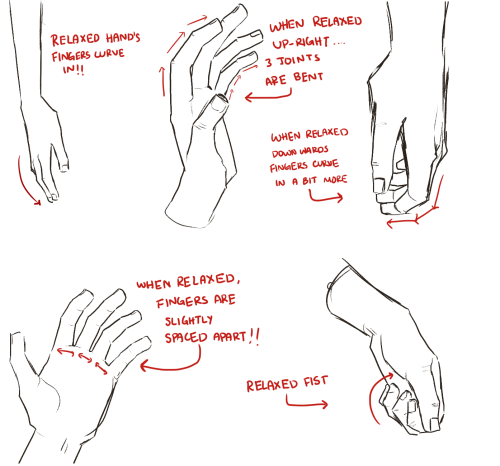

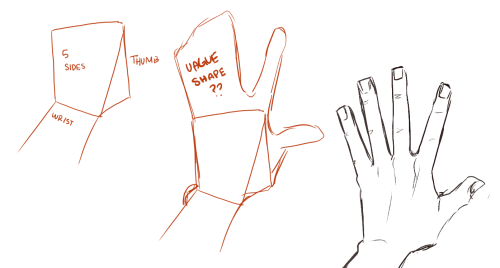
i actually really love drawing hands and only recently have I enjoyed it haha
I’m still not very good at it nor do I understand a single thing about anatomy but here’s some small tips I hope help!!!
tbh ive been waiting for someone to ask for a hand tutorial


A friend shared this on facebook and I'm putting it here for reference.
-
 quietbibliothecary liked this · 1 month ago
 -
 deceasedcorpses liked this · 2 months ago
 -
 nightowl-dreamer liked this · 2 months ago
 -
 mollieblue liked this · 3 months ago
 -
 un-monstre liked this · 3 months ago
 -
 princeoftenderness reblogged this · 3 months ago
 -
princeoftenderness liked this · 3 months ago
-
 oldfartfangirl reblogged this · 3 months ago
 -
 eclectichellmouth reblogged this · 4 months ago
 -
 smellslikeoranges liked this · 4 months ago
 -
 nein-blaec31 reblogged this · 4 months ago
 -
 perfectlyjoyfulnut reblogged this · 4 months ago
 -
 almostloudstarfish liked this · 4 months ago
 -
 shelfreferential reblogged this · 4 months ago
 -
 pocket-dinosaur liked this · 4 months ago
 -
 leeniela reblogged this · 4 months ago
 -
 malapertmarquess reblogged this · 4 months ago
 -
malapertmarquess liked this · 4 months ago
-
 not-mrs-cake reblogged this · 4 months ago
 -
 read-later-1 reblogged this · 4 months ago
 -
 diamondrose015 liked this · 5 months ago
 -
 ontheshelves reblogged this · 6 months ago
 -
 allegrao-swiftie liked this · 6 months ago
 -
 mustbealoosewire liked this · 7 months ago
 -
 crabs-and-bedbugs liked this · 7 months ago
 -
 hawkinthird reblogged this · 7 months ago
 -
 auspiciousaardvark liked this · 7 months ago
 -
auspiciousaardvark reblogged this · 7 months ago
-
 evergreen-lyricist liked this · 7 months ago
 -
 argen-lobo-ridder reblogged this · 7 months ago
 -
argen-lobo-ridder liked this · 7 months ago
-
 the-prairies-calling-out reblogged this · 7 months ago
 -
 chaoticcosmonaut reblogged this · 7 months ago
 -
chaoticcosmonaut liked this · 7 months ago
-
 retirededgelord reblogged this · 7 months ago
 -
 mmmbopthroughlife liked this · 7 months ago
 -
 ontologicalmoki liked this · 7 months ago
 -
 tzarina-alexandra reblogged this · 7 months ago
 -
 katok0r0e liked this · 7 months ago
 -
 delyriosis liked this · 8 months ago
 -
 unknownvoid-official reblogged this · 9 months ago
 -
 cremebrulee-69 reblogged this · 9 months ago
 -
 chaoticconnoisseurgiver reblogged this · 9 months ago
 -
 lurking-in-lace reblogged this · 9 months ago
 -
 ladymavet liked this · 9 months ago
