Sketch-concepts Of Demons, ‘’Demonslayer’’ Comics


Sketch-concepts of demons, ‘’Demonslayer’’ comics
More Posts from Zelo-ref and Others


Turn-arounds for Cephias…or anyone who needs them.


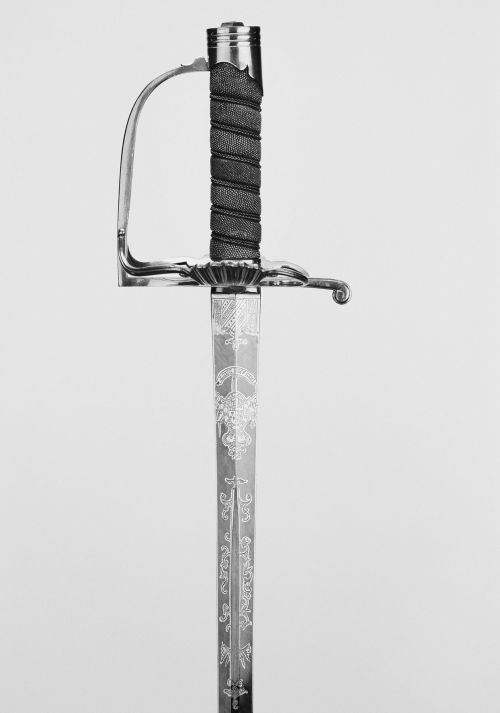

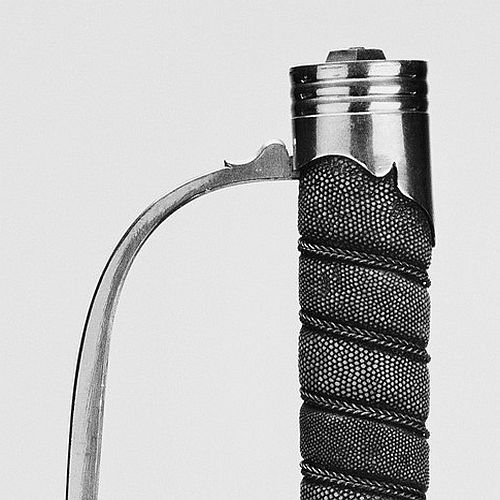
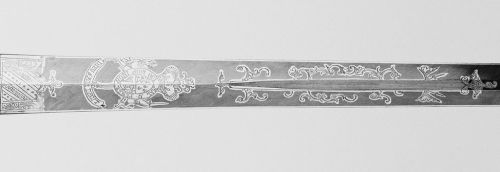
Military Dress Sword
Dated: circa 1787-91
Culture: English
Medium and techniques: gilt brass, wood, fish skin, silver wire, gilt, blued steel/etched
Measurements: overall length 95cm; blade length 62cm
The sword has a gilt/brass hilt with an oval pommel cap. The oval wooden grip is covered in grey fishskin bound with herringbone of silver wire. The straight steel two-edged blade features etched gilt and blued panels decorated with Royal Arms and military trophy.
Source: Copyright © 2016 Royal Collection Trust/Her Majesty Queen Elizabeth II
How To Shade
a quick tutorial on shading (with graphite) by yours truly. this is the process I use for shading, and there are tons more out there if this one doesn’t work for you.
MATERIALS USED

1 HB graphite pencil
1 2B graphite pencil
1 4B graphite pencil
1 blending stub (the bigger the better)
1 plastic eraser (white)
1 kneaded eraser (grey)
now why do I use two erasers? well, they’re very different from one another, and each serves their own purpose.
the plastic eraser is harder, and when it erases, it erases everything. the kneaded eraser is soft, and it doesn’t completely erase everything all at once. you can use it to pick up some of the graphite and leave some behind, lightening (but not totally erasing) your shading. plus, the kneaded eraser is so soft you can mold it, and it doesn’t leave pencil shavings. if one end gets too used, you can just stretch it out, and it’s as good as new.
REFERENCE USED

now lets get this started, shall we?
STEP ONE
scribble lightly over your drawing with either an HB (aka a regular #2 pencil) or 2B pencil. you don’t have to be extremely neat, but do it light and nice enough so it can still be erased/you can still see the original lines underneath.

STEP TWO
take your blending stub (the wider the better, and if you don’t have one, use a tissue) and rub in the opposite direction of the scribbling. don’t press too hard, because it might streak/not work if you do.


STEP THREE
erase the extra shading around the edges (using the plastic eraser.).

STEP FOUR
roughly add your darks

STEP FIVE
roughly add your lights by erasing with the kneaded eraser

STEP SIX
add your finishing touches (secondary shadows, background, etc)

(I reshaped the sides, added more lights, and added the background shadow)
and voila! you just did some shading!


-
 wolfinsheriffsclothing liked this · 2 months ago
 -
 acoffecat liked this · 2 months ago
 -
 theborderlinegood-blog liked this · 4 months ago
 -
 zombiegravitation liked this · 4 months ago
 -
 linestalker liked this · 4 months ago
 -
 syndicatyogurt liked this · 4 months ago
 -
 atiskamatis liked this · 5 months ago
 -
 snarkissist liked this · 5 months ago
 -
 keim-jupiter-blog liked this · 6 months ago
 -
 questcult liked this · 6 months ago
 -
 eclecticcosmonaut reblogged this · 6 months ago
 -
eclecticcosmonaut liked this · 6 months ago
-
 oakbrush reblogged this · 6 months ago
 -
 gargantuanspam liked this · 6 months ago
 -
 firegolds reblogged this · 6 months ago
 -
 khaleesims liked this · 6 months ago
 -
 mrnicklower008 liked this · 6 months ago
 -
 burningbodys liked this · 6 months ago
 -
 drakozyabra liked this · 6 months ago
 -
 alastorylucifer liked this · 6 months ago
 -
 hismercytomyjustice liked this · 6 months ago
 -
 sporadicchaosprincess reblogged this · 6 months ago
 -
sporadicchaosprincess liked this · 6 months ago
-
 zowylander reblogged this · 6 months ago
 -
zowylander liked this · 6 months ago
-
 eveilpuncakegenius liked this · 7 months ago
 -
 bladu-bladu reblogged this · 7 months ago
 -
bladu-bladu liked this · 7 months ago
-
0-just-silent-watcher-0 liked this · 7 months ago
-
 lavendulafaerie liked this · 8 months ago
 -
 twofacedweirdo liked this · 9 months ago
 -
 fruityskirthatesthissite liked this · 9 months ago
 -
 atanesblog liked this · 11 months ago
 -
 twinfl8me liked this · 1 year ago
 -
 allmusesnobruises liked this · 1 year ago
 -
 hiroko15 liked this · 1 year ago
 -
 misakomine liked this · 1 year ago
 -
 m1locer3al liked this · 1 year ago
 -
 lakamu liked this · 1 year ago
 -
 cleopatracaesar liked this · 1 year ago
 -
 lemonsdaily liked this · 1 year ago
 -
 raptorminor10 liked this · 1 year ago
 -
 the-closet-goth liked this · 1 year ago
 -
 ratherinterestingmilkshake reblogged this · 1 year ago