A Compilation Of Snow/winter Gifs. Here Are Similar Compilations Featured On @sixpenceee You May Enjoy:


A compilation of snow/winter gifs. Here are similar compilations featured on @sixpenceee you may enjoy:
Compilation of Calming/Floral Gifs
Compilation of Landscape/Nature Gifs
Compilation of Space/Sky Gifs
Compilation of Pixel Art
Compilation of Cute Transparent Pixels
Compilation of Creepy Pixel Art
More Posts from Zelo-ref and Others


Hunting Sword of Prince Camillo Borghese
Swordsmith: François Pirmet (French, Paris, recorded 1779–1818)
Goldsmith: Antoine-Modeste Fournera (French, Paris, documented 1806–17)
Dated: 1809–13
Culture: French, Paris
Medium: Silver-gilt, steel, leather, mother-of-pearl
Measurements: Weight with scabbard, 1 lb. 10 oz. (737 g) Length with scabbard, 27 in. (68.58 cm) Length of sword, 25 7/16 in. (64.59 cm) Length of blade, 19 ¾ in. (50.17 cm) Length of scabbard, 21 3/8 in. (54.28 cm) Greatest width of hilt, 4 5/8 in. (11.73 cm) Greatest width of blade, 1 3/16 in. (3 cm)
Provenance: Ex. Coll.: Borghese, Rome; Frederick Gallatin; Albert Gallatin; James P. Gallatin
In addition to the traditional hunting motifs, the decoration includes (on the back of the guard) the monogram of Camillo Borghese (1775–1832), Napoléon’s brother-in-law, who served the French cause in Italy. The scabbard is engraved with Pirmet’s name and his title, “gunmaker to His Majesty, the King of Westphalia,” in reference to Napoleon’s brother Jérôme Bonaparte.
Source: © 2000–2013 The Metropolitan Museum of Art


Basically I just shade with a very dark color, and apply a small gradient of some bright saturated color along the borders to emulate diffused light.

Varying light angles and intensity for mood! I love back light HAHAHa–
Can work it in other hues, too! And I guess here’s a quick walk through of smth similar to that pic you were talkin about, with windows of strong light.

Draw the projected light over the subject

Add shadows on the character. Moved the light going past the character hitting the floor.

Overlay the bleeding light!
I use a lot of this kinda thing in finished pics too– here’s a recent example!

(This image was a collaboration– Sketched by labonbull and linearted by 73oss)
Beating Brush Lag in Manga Studio

Booooooooo… what is this, Photoshop?!
Lagging brushes are an occasional problem in any illustration software. Here’s a troubleshooting guide for Manga Studio if your tools are acting like molasses. (Some settings may be different on Windows or if you’re running the Clip Studio Paint branding of the software. For what it’s worth, I’m running Manga Studio 5.0.3 on Mac OS 10.7.5. Yup, I’m behind the times.)
There are a few options to beat the lag:
1. Quit Stuff Bye bye, YouTube. See ya, Skype. Later, Tumblr.
Save your computer’s processor by quitting RAM-hogging apps and tasks while painting. Streaming audio/video will drastically reduce performance, but even leaving browsers open can slow things down, so best to just close it up. Guess that rules out Spotify, but then there’s always ye olde Zune. Gotta love cringing through those high school playlists while working.
2. Change Preferences Easier than changing your mind, and quicker too.
Check under the hood of Manga Studio’s Preferences for a few speed boosts. Do the following in these sub menus:
Preferences/Tablet/Tablet Settings: Change from 1 to 6 (I believe this option is Mac only).

Preferences/Performance/Undo: Lower the Undo count. Try taking it down 10-15 notches from default. You could also turn up that long-titled setting (“Delay before recognizing new object…”) by 100 ms, but I haven’t figured out what that does exactly…
Preferences/Cursor/Display Position of Reversed Cursor: Make sure to check “No Delay”.
After changing preferences, it’s a good idea to close and reopen Manga Studio.
3. Modify Brush Tool Settings Your brushes may take it personally, but remember you’re in charge here.
The Tool Settings window is a wealth of options for customizing brushes. Some are more processor-intensive than others. Here are a few of the best ones to modify: (Note: the look and behavior of brushes may be affected. You may want to duplicate and/or export a brush before changing its settings.)
Tool Settings/Anti-Aliasing: Turn down to “Little” or “None”
Tool Settings/Brush Tip: Reduce the number of materials on your brush.
Tool Settings/Stroke/Space: Increase spacing, but not too much. Brushes are essentially a string of material stamps. A low space setting means a smoother brush, but more work for your computer. Picture it frantically scrubbing a rubber stamp across your canvas. On that note, also make sure Continuous Spraying is not on.

Tool Settings/Watercolor Border: If your brush uses this setting, turn on the “Process After Drag” option. This renders the effect after each brush stroke and saves computing power.
Tool Settings/Correction: Turn off (or decrease) Stabilization, Post Correction, and Brush Stroke.
Tool Settings/Starting and Ending: Turn off all this stuff. Pfffft, who needs it, right?
Here’s a speed test after fiddling with some settings:

Woooooooo! We’re getting faster! Still a bit laggy, which leads to one last tip:
4. Rework The Canvas Might as well rework my life goals too.
Okay, disclosure: The two gifs in this post were recorded on a 4500x3000 canvas at 300dpi with a size 500 brush to emphasize lag. This third one is recorded on a 1080x720 canvas at 72dpi with a size 100 brush:

Yes! We’re cruising now!
Canvas sizing and resolution has a big affect on brush performance. It’s a bit of a conundrum. Getting the best image quality means working at a minimum resolution of 300dpi, which can be taxing for brushes on large canvases. So what to do? Just like traditional paintings start with thumbnail sketches, digital work can start on a low-resolution canvas. Here’s the method:
Set up your canvas normally at the full target resolution. But before drawing anything on the canvas, use the handy tool under Edit/Change Image Resolution. Reduce Resolution to 72dpi. Use this smaller canvas for rough sketching, background filling, blocking in large areas of color, etc. Then increase resolution to 144dpi for building up the body of the painting, still keeping it loose. (I’d recommend switching Interpolate to Hard Outline when increasing resolution.) Finally, blow it up to full resolution and get into the nitty gritty of rendering. This is where you’ll do the crisp line work, highlights, details, etc.

The idea here is to work big to small. This will keep away brush lag by using large brushes on small canvases. As the canvas resolution increases, decrease brush size and work smaller, tightening things up in the process. NOTE: Increasing canvas resolution causes pixilation. Don’t worry about it. This can be cleaned up in the final stages of painting.
Hope this guide is helpful! If lagging persists, remember to check drivers and tablet settings as well. If all else fails, Google’s a good friend ;)
-Armin
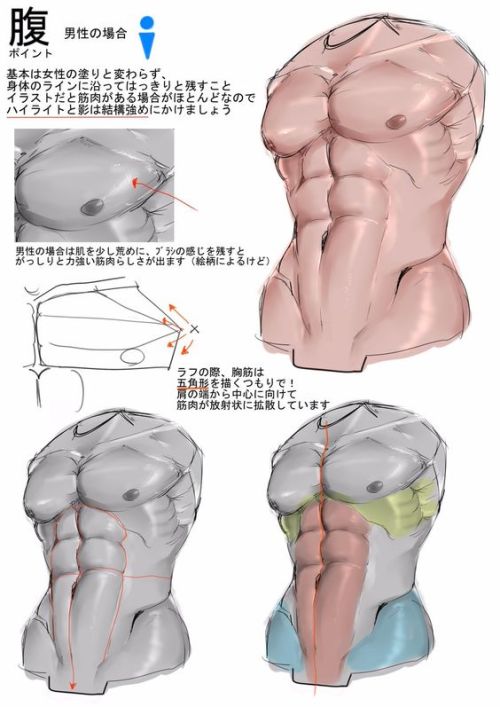
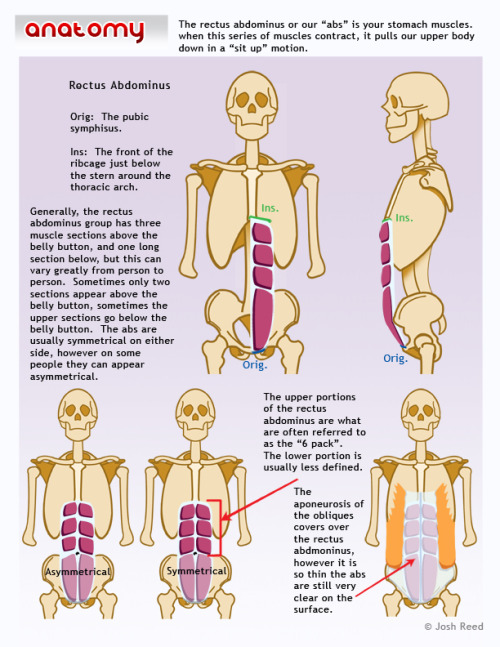
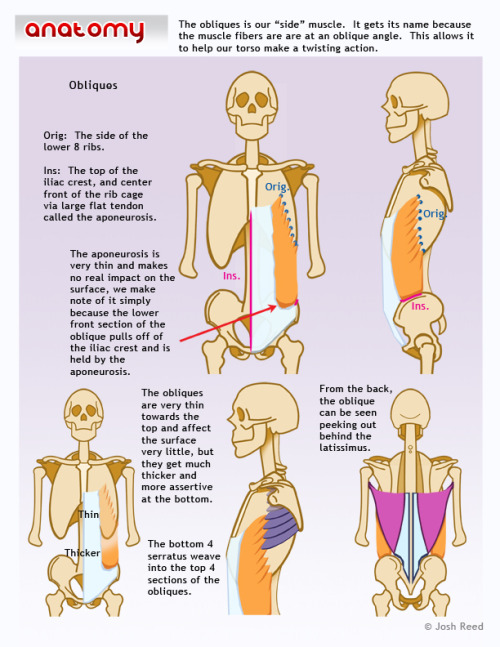
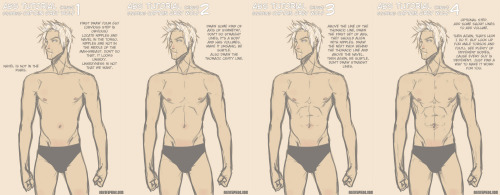
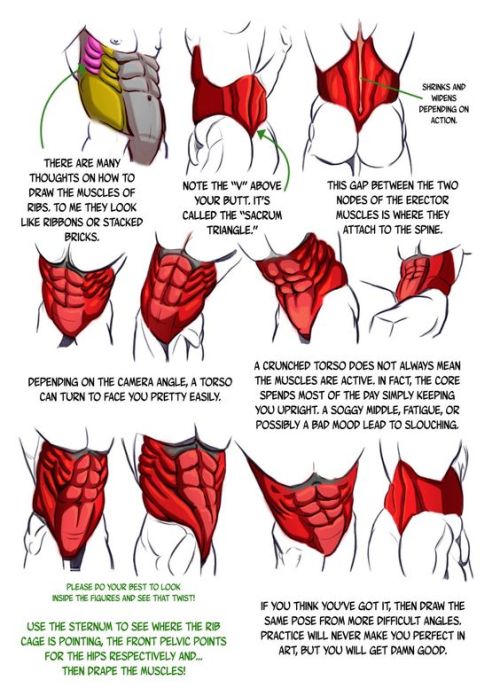
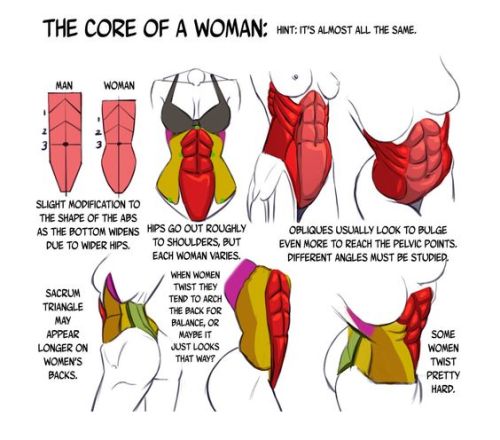
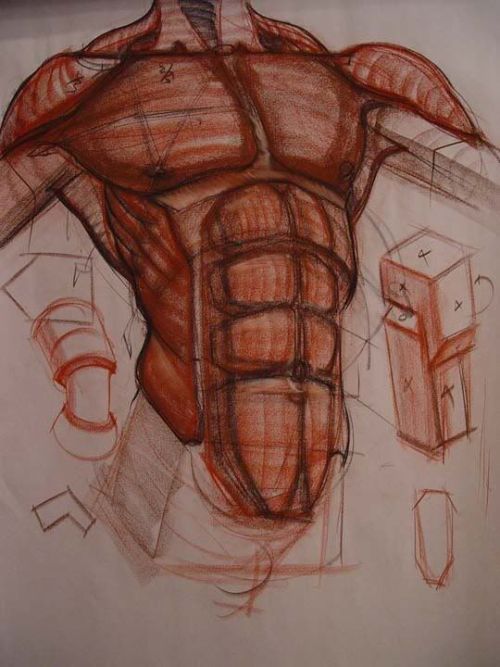

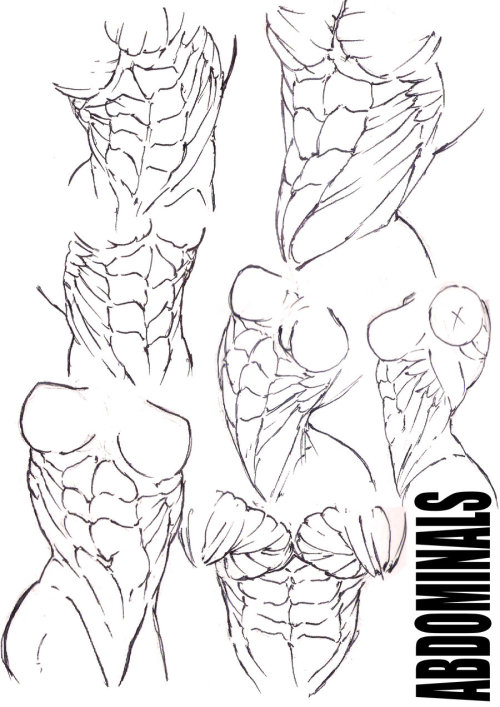

How to Draw Abdominals Top Image Row 2: by Josh Reed Row 3 Row 4: by NemanJa Filipovic Row 5: by Charles Hu Row 6 & 7


At-home gown, 1887-89
From the FIDM Museum


teal armband
spiral armband
dragonfly armband
golden leaf armband
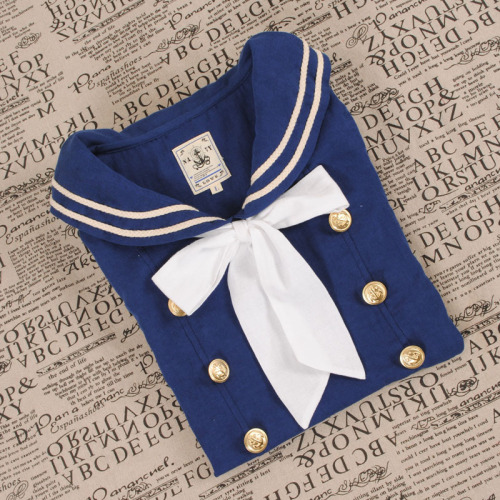
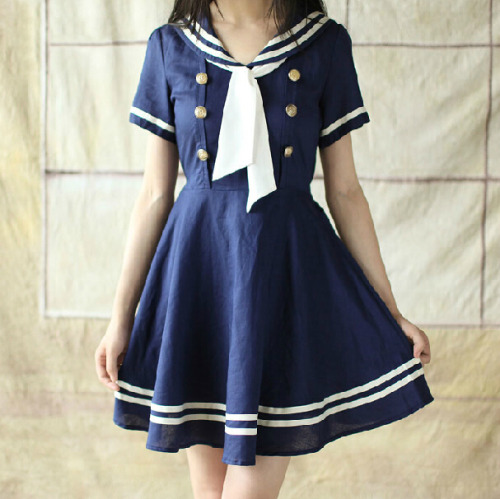
Here is where you can find more amazing products from etsy.


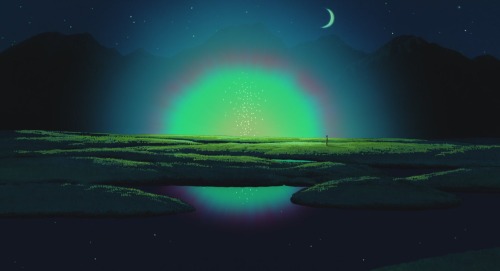
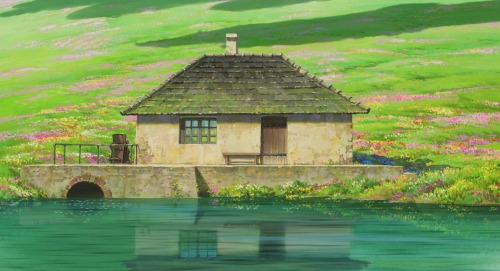
A compilation of nature/landscape gifs. Here are similar compilations featured on @sixpenceee you may enjoy:
Compilation of Space/Sky Gifs
Compilation of Pixel Art
Compilation of Cute Transparent Pixels
Compilation of Creepy Pixel Art


1634 Anthony van Dyck - Gaston de France, duc d'Orléans
-
 ivory-witch liked this · 4 months ago
 -
 carhooterhonks reblogged this · 4 months ago
 -
 cicciadoratz liked this · 4 months ago
 -
 heathengentleman liked this · 5 months ago
 -
 confetti-cat liked this · 6 months ago
 -
 fairytale-lights liked this · 6 months ago
 -
 shaylalaloohoo reblogged this · 6 months ago
 -
 annita89n0mf78lh liked this · 7 months ago
 -
 bonkuss liked this · 7 months ago
 -
 inspirationalclass reblogged this · 7 months ago
 -
 sunkissedfawn liked this · 7 months ago
 -
 flowerboystatue liked this · 7 months ago
 -
 needle-rose liked this · 7 months ago
 -
 ladylemonade4ever reblogged this · 7 months ago
 -
 fat-kawaii-walrus liked this · 7 months ago
 -
 alwaysdearie reblogged this · 7 months ago
 -
 timetravelbypen reblogged this · 7 months ago
 -
 sakon76 liked this · 7 months ago
 -
 sweetteakisses reblogged this · 7 months ago
 -
 martina86 liked this · 1 year ago
 -
 seraphynaa liked this · 1 year ago
 -
 andi-is-salty reblogged this · 1 year ago
 -
 ermachinra liked this · 1 year ago
 -
 countnoquno liked this · 1 year ago
 -
 fallenforfallon liked this · 2 years ago
 -
 iwillhaveamoonbase liked this · 2 years ago
 -
 purple-peaches reblogged this · 2 years ago
 -
purple-peaches liked this · 2 years ago