[1] Color Zones Of The Face [Tried To Find Source, I Think It’s Here ]
![[1] Color Zones Of The Face [Tried To Find Source, I Think It’s Here ]](https://64.media.tumblr.com/82181df6330fcb3655a2e40c6c43287a/tumblr_or5nykhGCu1sm0kjdo1_500.png)
![[1] Color Zones Of The Face [Tried To Find Source, I Think It’s Here ]](https://64.media.tumblr.com/1703500f3e1292e370eda4d4cb761252/tumblr_or5nykhGCu1sm0kjdo2_1280.jpg)
[1] Color Zones of the Face [Tried to find source, I think it’s here ]
[2] Navate’s Skin Chart Supplement – the actual tutorials are: Section I: Skin Basics & Section II: Skin tones
Two brilliant skin tutorials. Do not use flat colors for skin! Underpainting is important for realistic, vivid skin. Remember, underneath your skin is fat, muscles, red blood, blue veins, bones.
Consider reblogging this to support the original artist. I recommend following them as well!
More Helpful links: Ask a Question/Request a Tut | Submit a Tutorial | Promote Your Art Commissions to +18.3 K Dashes | Stay Updated on DeviantArt! | Visit me @astrikos
More Posts from Basket-of-references and Others


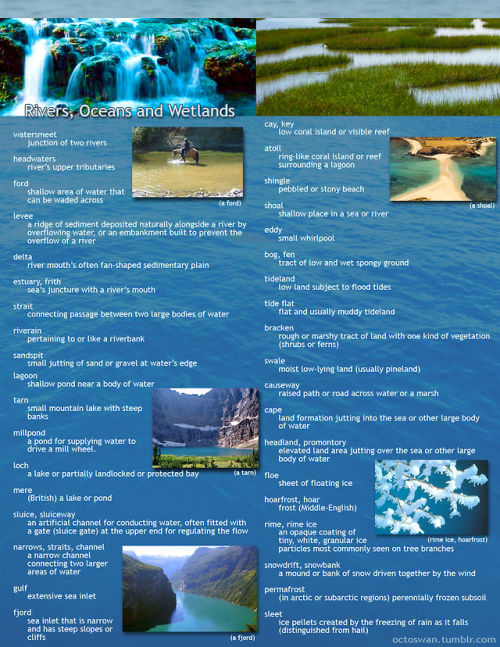
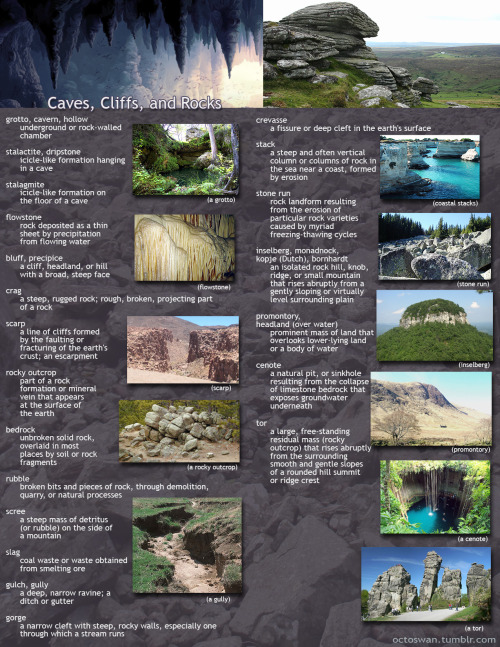
I made these as a way to compile all the geographical vocabulary that I thought was useful and interesting for writers. Some descriptors share categories, and some are simplified, but for the most part everything is in its proper place. Not all the words are as useable as others, and some might take tricky wording to pull off, but I hope these prove useful to all you writers out there!
(save the images to zoom in on the pics)


Someone on discord asked how I was making pins with bottle caps so here goes nothing

you need
bottle caps (the ones made of metal obv)
pliers
safety pins
paper
glue
optional acrylic paint
optional paint varnish (the kind you would spray on top of an acrylic painting)

I'm only saying "optional" because sometimes you just like what's already printed on the bottle cap. I mean look at this puffin, it's so cute. But you should probably spray the print with varnish anyway if you don't want it to disappear too quickly (that cap on the left was in my pocket for like 3 months and the print has already disappeared around the edge)

pinch the edge of the cap with the pliers and turn it slightly toward the top side of the cap. Continue to do so around the entire cap but don't try to flatten it all in one go cause it's kinda hard. It should only take two minutes or so anyway

almost there

there, it's flat now. If you want to paint or write something on it, add a couple of layers of acrylic paint on it before you paint/write what you actually want on the pins

I wanted skeleton parts on mine because I saw someone with pins like that and idk where they bought them

I drew them with a Pitt pen on top of 4 layers of white acrylic

spray a coat of varnish on them but PLEASE do that outside, you do NOT want to breathe that stuff. Then wait a few hours for it to dry

on the back, add 1) glue 2) one safety pin 3) a thin paper across the pin - squish the paper against the wet glue. When it's dry, add another layer of glue on top. Just drown the back of the pin in crystal glue otherwise it's gonna break too easily. Just make sure the safety pin can still open and close easily
let it dry until the next day just to be sure. Tug on the safety pin a bit to make sure it's glued correctly

congrats you've made pins with bottle caps


A master post of Thomas Romain’s art tutorials.
There’s not enough space to post all of them, SO here’s links to everything he has posted (on twitter) so far : 1 2 3 4 5 6 7 8 9 10 11 12.
Now that new semesters have started, I thought people might need these. Enjoy your lessons!
Digital Painting: tips for beginners
Heyo! I got asked if I could make a tutorial on digital painting so I’m gonna throw together some advice meant for people who are starting out and want to figure out exactly how this stuff all works. Because it’s hard! What I hope to accomplish here is to make painting more approachable for you.
Firstly, I have put together something like this before, so for archival purposes here it is: http://holy-quinity.tumblr.com/post/89594801811/i-dont-know-how-much-of-this-kind-of-thing-you
For those of you who don’t wanna bother reading that, here are the main points:
1. Learn your program and its tools, from brush properties to layer styles. And I mean learn them. Make a cheatsheet that shows you exactly what each button and scale does, both in isolation and in conjunction with other buttons and scales. Refer to this as much as possible until it is intuitive. The end goal is to know exactly what to do to your brush’s settings to achieve a given effect.
2. It’s perfectly okay to use your sketches, linearts, and other forms of line in your paintings. They can help guide the form and there’s no need to make something fully “lineless”! I never make things “lineless.”
3. Study other people’s art and try to think how they could have possibly achieved the effects they did. You can learn a lot just by observing and mentally recreating the process stroke by stroke—muscle memory is a powerful tool at your disposal. This becomes easier to do once you’ve started doing item 1 above.
OKAY!
So where the heck do you even begin?
What I’m gonna do is try to make digital painting as approachable as possible for someone who’s never really done it. The main idea here is that digital painting is just like real painting. So if you’ve ever done real painting, you already kinda know what’s coming.
I’m gonna assume you know the basics of digital art: you can sketch, line those sketches using layers and opacity changes, and fill the lines with color, maybe even opting to add some shading…and you’ll get something like this:

You know, cell-shaded, or maybe the shading’s blended, but you’ve still obviously a line drawing with color put down on layers beneath the lines.
The next intuitive step is to try going “lineless”…but when you remove the lines you get this:

idk about you but I’m laughing at how stupid this looks
When I was first teaching myself to paint digitally, I didn’t really know how to deal with this. Without lines, the form of the subject vanished or became a mess like the above. Even if I was meticulous and careful about placing down the color such that without the lines layer turned on, the shapes fit together, it didn’t look quite right. There’d be gaps, I wouldn’t know how to incorporate the subject into a background, the contrast wouldn’t be high enough, or it’d just in general look too much like a screenshot from Super Mario 64.
Painting requires a different process than the above. You’ll have to let go of some of your habits and conventions. Such as staying in the lines. Such as fully relying on the lines. Like, I love my lines, I love my sketches—but in painting, they are guides for form, and are not the form itself. So let me go through how I approach a given painting:

My painting process starts with a sketch (here a boring portrait for demonstrative purposes). I make the opacity of the sketch layer something like 30%, and then throw down my base colors on a new layer underneath. I’m not being meticulous about the sketch itself, because again it’s just meant to guide my placement of color. I’m also not meticulous about my placement of the color.
We’re essentially sketching with color. Because ultimately what we want is for the color to take on the form and shapes conveyed by the sketch.
There’s a lot going into this about how to use value, how to shade, how to use color, etc. that I’m kinda skipping over because it takes a lot of time to explain…but there are hundreds of tutorials out there on those topics so please, google around! I found some helpful tuts that way when I was starting out.
Something I find v useful is to keep selecting colors that already exist in your image for shading and hue adjustment. This is why I start with really blendy, low-opacity brushes when throwing down color on top of the background. I can then select colors within there that are a mix of the two.
For instance, I’ll select the color of the lines here:

…and use that to shade:

And maybe I’ll select one of the darker shades around his eye, but not the darkest, to make the shading a smoother gradient…and so on.
What I do in general at this point is go over the shapes and lines of the sketch. Such that I can turn off the sketch layer and see this:

I’m replacing the lines with shading and value. I’ll continue to do this as I keep adding color.

This is all super loose. I am not dedicated to any particular stroke. I just want the colors and shading and light source to be right. I’ll use overlay layers to boost contrast or add a hue.
Here are other examples where I used this process:


I am constantly changing brushes and brush settings as I paint. It really depends on what effect I want where. I am also constantly selecting new colors and applying or blending those in. I don’t believe in having some uniformly applied base color and then shading with only one or two…that’s what I’d do if I was cell-shading like the first drawing I showed you here, but painting should be about messing with color and opacity and blending to make millions of hues!
Good rule of thumb: Hard, opaque brushes for applying color. Soft, dilute brushes for blending colors. Sometimes hard, dilute brushes can make some cool blending effects! I personally prefer harder edges on my shading so that’s a brush I use often.
This is getting a bit long so I’m gonna split it up into multiple parts, but really what I want you to get from this is:
1. learn the tools at your disposal until they are intuitive
2. sketch and line are guides for form, not the form itself
3. rather, hue and value will produce the form
And of course, practice makes perfect!!! Every drawing you make, every painting you make, will bring you one step closer to the artist you want to be, and thus every drawing and every painting, no matter what, is a success.


Here's my "lazy" foliage tutorial! 🍀 (I say "lazy" in quotes as I consider this method a shortcut, but still requires some effort for the drawing to look nice)
Gif version of the process:

Thanks for reading!
Main art blog/ Consider tipping me on Ko-fi if you've found this useful!

-
 finndiseicla liked this · 2 weeks ago
 -
 heavy-with-hopingg liked this · 1 month ago
 -
 the-awesomeness-of-randomness liked this · 1 month ago
 -
 wipsy0ana liked this · 2 months ago
 -
 roses-and-cough-drops reblogged this · 2 months ago
 -
roses-and-cough-drops liked this · 2 months ago
-
 mickeysartrefs reblogged this · 3 months ago
 -
 sentientstardust1931 liked this · 3 months ago
 -
 etherealabyrinth reblogged this · 3 months ago
 -
 ellsterthinks reblogged this · 3 months ago
 -
 calmmunism reblogged this · 4 months ago
 -
 cosmiccrafts reblogged this · 4 months ago
 -
 thecosmicjackalope liked this · 4 months ago
 -
 blueveildreaming liked this · 4 months ago
 -
 thetwstwildcard liked this · 4 months ago
 -
 heavensgrotesque reblogged this · 4 months ago
 -
heavensgrotesque liked this · 4 months ago
-
 candy-lotus liked this · 4 months ago
 -
 the-trinket-witch reblogged this · 4 months ago
 -
 nervous-bard liked this · 4 months ago
 -
 sarah-fandom-account liked this · 4 months ago
 -
 benevolentcannibal liked this · 4 months ago
 -
 twistedviper reblogged this · 4 months ago
 -
 usaminwife liked this · 4 months ago
 -
 lovin2niteee liked this · 4 months ago
 -
 lynyneju liked this · 4 months ago
 -
 harzilla reblogged this · 4 months ago
 -
harzilla liked this · 4 months ago
-
 akemifoxuk liked this · 4 months ago
 -
 probablydalston liked this · 4 months ago
 -
the-trinket-witch liked this · 4 months ago
-
 hamstergal reblogged this · 4 months ago
 -
 tixdixl reblogged this · 4 months ago
 -
tixdixl liked this · 4 months ago
-
 stonesinthelake liked this · 4 months ago
 -
 synchronize03 reblogged this · 4 months ago
 -
synchronize03 liked this · 4 months ago
-
 fluffy-penguin-paddelina liked this · 4 months ago
 -
 lallopsyou liked this · 4 months ago
 -
 clove-noko reblogged this · 4 months ago
 -
clove-noko liked this · 4 months ago
-
 irishqueen12 liked this · 4 months ago
 -
 cookierye liked this · 4 months ago
 -
 clowngoober liked this · 5 months ago
 -
 kamapon liked this · 5 months ago
 -
 yoho696 liked this · 5 months ago
 -
 painted-daisy-l0l liked this · 5 months ago
 -
 amebanworld liked this · 5 months ago
