Tumblr Has An AI Toggle You Should Turn On To Prevent Your Work Being Shared With Training Models/etc!
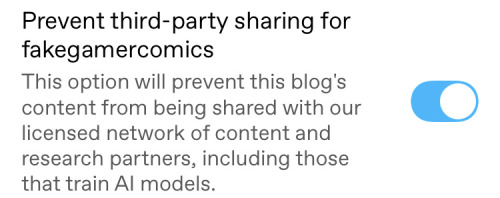
tumblr has an AI toggle you should turn on to prevent your work being shared with training models/etc! it's under settings & visibility.
More Posts from Hwcsnmd and Others
I recently saw a post lamenting how expensive sewing as a hobby is, which has been nagging me all day and of course now I can’t find it anymore.
It is, in fact, quite an extensive hobby and you can get bogged down by the capitalism monster thinking you need to buy a ton of things right away. You don’t! I’ve been sewing most of my life and have been slowly collecting tools and things as I need them but you can start off real small! Here are some random tips from me to you:
Sewing patterns: there are butt loads of free patterns all over the internet. Check out Mood patterns, Peppermint magazine, and your local library for the pattern bind up books if you’re lucky. However, indie patterns are totally worth the price, especially for beginners. They tend to have great instructions and better fit than the paper patterns you can find in stores and they come from people with a real passion for sewing. If you’re going more historical costuming, some of the free patterns can be finagled, but your best bet (besides drafting) is to purchase patterns depending on your era, just avoid Sense and Sensibility patterns. You can also find vintage patterns, but the instructions and fit are a tad different than you may be used to, especially for beginners. Shameless plug anyway for my vintage pattern shop.
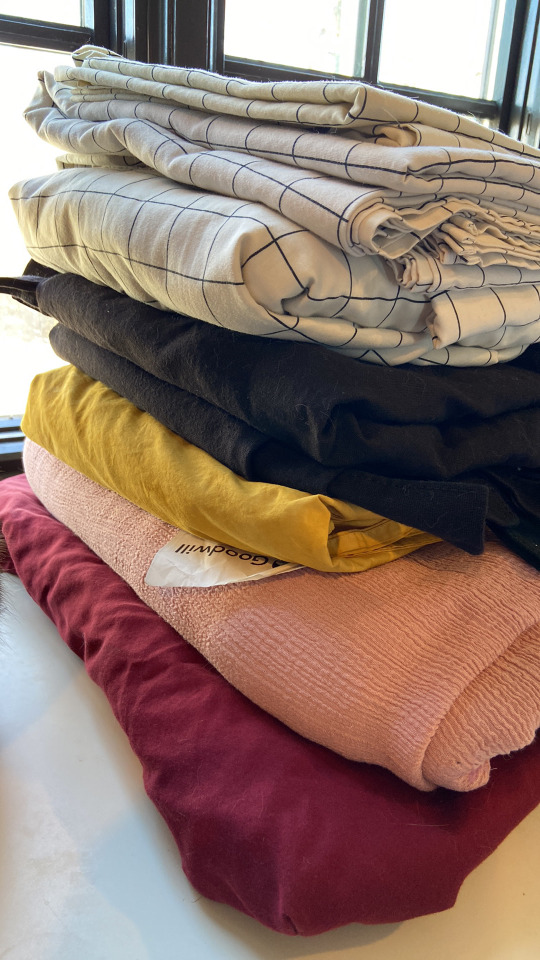
Fabric: don’t be scared of your thrift store! Ive found lengths of fabric a couple times, but I always check for sheets and tablecloths that I like the look and feel of. You can get natural fibers wayyyy cheaper this way and tho it’s an extra step you can dye or overdye to get the color you want. The black fabric in this stack was faded so I dyed it darker black with Rit and the yellow I dyed with marigolds from my garden.

Notions/random bits and bobs: ask your friends and family! Sewing used to be basically ubiquitous and has gone out of style so as a result there are more vintage sewing supplies in the world than you could ever want and usually people hold on to them until they can find a good home. I’ve gotten so much random bullshit from my mom and grandmas and friends just by announcing that I love to sew. Obvi don’t be rude or conspiratorial, but esp older folks love to share their love of the craft.
Machine: cheapest is to inherit one, but you can usually find some older models at thrift stores or on Craigslist/fb marketplace. I found my serger for a decent discount from a company that refurbishes sewing machines.
I hope this helps anyone who is interested in sewing but scared of the starting costs. It’s a bit of a learning and cost curve, but the internet has helped break that down so much.
I made a Moonshine Cybin Flannel to see NADDPOD Live at Carnegie Hall (featuring an embroidered PawPaw)


Read more for details on how I made this
Making the Shirt:
Like a week before I left for New York, I decided that I wanted to make my own NADDPOD clothes to wear since I don’t have a lot of merch. I remembered that JoAnn Fabrics had this mushroom flannel and so I ran out and bought two yards.

I used this button up shirt/lined jacket pattern from MCall’s:
The problem is that I’m right in between the largest boy’s size and the smallest men’s size. So I had to make some adjustments. I cut out the pattern, then shortened it at the waist because there wasn’t room for my hips in the original pattern. Then I cut out all the pieces: shirt front, shirt back, sleeves, pocket, collar, and cuffs.

I knew from using the pattern before that the sleeves were too big for the armhole, and I don’t like the look of gathered sleeves. So I trimmed 5/8” from both arm holes.


Once those adjustments to the pattern were made, I stitched the sides together.


Next up was the collar. I cut two collar pieces, stitched them with the pattern-side of the fabric facing each other, trimmed the excess at the edges and flipped it right side out and ironed it.


I pinned the collar in place around the neck and stitched it in place.

Next up was the sleeves. I stitched each sleeve together, leaving a gap open at the bottom so that the sleeves could be unbuttoned. I hemmed the opening of each sleeve so no raw edges were visible, the gathered the top of the sleeves so they fit into the arm hole.


I pinned the sleeves into the arm hole and stitched them in place.

I cut two cuff pieces, and turned down one edge so that once it was stitched in place, there wouldn't be any raw edges. Then I pinned it in place so the right sides were together and the excess fabric of the cuff was pointed towards the shoulder. I stitched it in place, then folded the cuff in half, right sides together and stitched the ends. That way when the cuff was folded out the right way, all the raw edges would be held inside.


With that, the main construction of the shirt was complete.

Next were my first attempts at embroidery. I found a reference image online that reminded me of PawPaw and printed it out in various sizes. I stitched together a breast pocket, and pinned it to the shirt. Then I was able to use that and my printed images to decide how big I wanted the embroidery.

Once I decided on the size, I unpinned the pocket and transferred the drawing to the fabric using transfer paper. I pinned the drawing and transfer paper in place, and traced over the image. It left a carbon copy on the fabric, and I traced over that with heat erase pen so it wouldn't rub off while I worked.


After that, it was lot of stitching with embroidery thread. Have some in progress pictures.


With the embroidery done, it was time for the finishing touches. Using the guides on my pattern, I marked off the places where buttons and buttonholes were meant to go.


I used the buttonhole foot attachment and setting for my sewing machine to install the button holes, then I sewed the buttons in place by hand.
To secure the embroidery I cut out a patch of white flannel and ironed heat and bond to the back. Then I placed the patch over the thread on the backside of the embroidery, and ironed it in place. The patch prevents the loose threads from getting snagged on anything.


After that, I hemmed the shirt and it was finished!
I literally finished this project the night before I flew to New York. It ended up being a huge hit at the fan meet up in Central Park.
I just finished a quick sketch for a new embroidery project and I hope so, so much I will be able to make it. It’ll be a gift to celebrate a friend’s recovery from a long illness but I don’t dare start on the project until I know for sure she really recovered because I’m afraid to jinx her chances at getting better if I take for granted she is out of danger.
oh i can’t fucking believe this. the gods—they smote me. just smited me out of the blue. i’ve been smit. they gave me absolutely no warning before smating me. smoted my guts all over the place. with thunderbolts and everything. absolutely smurted me


She loves them very much
This takes place in my single fathers AU again hehe
Reblog if you're not homophobic
Every url that reblog’s will be written in a book and shown to my homophobic dad.
-
 fairysaber23 reblogged this · 1 month ago
 -
fairysaber23 liked this · 1 month ago
-
 solidscug liked this · 2 months ago
 -
 smbdymiau reblogged this · 2 months ago
 -
smbdymiau liked this · 2 months ago
-
 welpen reblogged this · 2 months ago
 -
 paeoniaceae7 liked this · 2 months ago
 -
 misty-is-a-dragon liked this · 2 months ago
 -
 moodsbon3s liked this · 2 months ago
 -
 abri-chan liked this · 2 months ago
 -
 kasztanek86 liked this · 2 months ago
 -
 mindfullystatic reblogged this · 2 months ago
 -
mindfullystatic liked this · 2 months ago
-
 darkforze reblogged this · 2 months ago
 -
darkforze liked this · 2 months ago
-
 avisbirb reblogged this · 2 months ago
 -
avisbirb liked this · 2 months ago
-
 blep-23 liked this · 2 months ago
 -
 drowzeeking liked this · 2 months ago
 -
 semiotomatics liked this · 2 months ago
 -
 dont-you-fucking-dare reblogged this · 2 months ago
 -
dont-you-fucking-dare liked this · 2 months ago
-
 querida reblogged this · 2 months ago
 -
 manchestereyes reblogged this · 2 months ago
 -
 bbluejoseph reblogged this · 2 months ago
 -
 faithdragon36reblogs reblogged this · 2 months ago
 -
 pages-and-1nk liked this · 2 months ago
 -
 cap-the-winged reblogged this · 2 months ago
 -
 nekromanta-pepsi liked this · 2 months ago
 -
 justanotherbookwyrm liked this · 2 months ago
 -
 kartonkartonski liked this · 2 months ago
 -
 rotisarychickenbutterfly liked this · 2 months ago
 -
 straytheskies reblogged this · 2 months ago
 -
 allergic-to-semen reblogged this · 2 months ago
 -
allergic-to-semen liked this · 2 months ago
-
 alittleannihilati0n liked this · 2 months ago
 -
 kirbyskingdom liked this · 2 months ago
 -
 dykerardway liked this · 2 months ago
 -
 mushroom-enby reblogged this · 2 months ago
 -
mushroom-enby liked this · 2 months ago
-
 gallifreyanelf reblogged this · 2 months ago
 -
gallifreyanelf liked this · 2 months ago
-
 blue-lollipops-and-ice-clouds reblogged this · 2 months ago
 -
 noizycat liked this · 2 months ago
 -
 fictionalsimp09 reblogged this · 2 months ago
 -
fictionalsimp09 liked this · 2 months ago
-
 moo2310 reblogged this · 2 months ago
 -
moo2310 liked this · 2 months ago
-
 glowmaeda reblogged this · 2 months ago
 -
 buggycat liked this · 2 months ago
