Been Thinking About Fantasy/scifi Rule Systems And Free Will
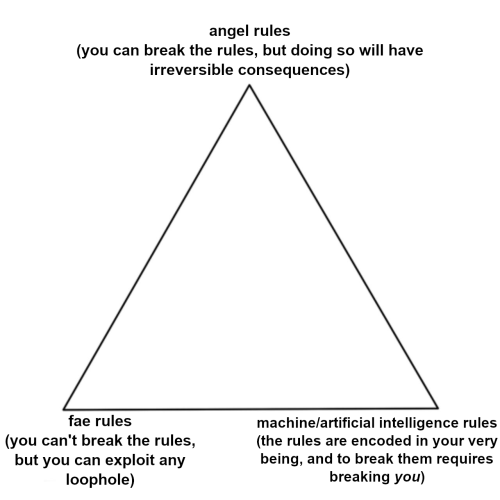
been thinking about fantasy/scifi rule systems and free will
More Posts from Robbedbranch and Others
Coding is weird
This works:
While (var != true)
This does not
While (var = false)
???


"It would be my pleasure to give you a proper tour and introduce you to everyone."
Here is my full illustration for @svsssbigbang for the fanfiction Night at Cang Qiong Museum by @adventure-waffles! An incredible Night at the Museum x Scum Villain AU! Don't hesitate to also check out the other two artists incredible pieces for this fanfiction: dustmeadowx and qiye!
And since I know that tumblr tends to destroy the quality of my illustrations, here are some close-ups under the cut:


Reasons why the 2DS Lite is the best
1. Can hold a charge like, forever. I left mine for months without opening or charging it and the next time I opened it at was at near 100%
If I leave my switch for more than a day without actually powering it off it drops down to 60% Even when you do power it off the switch still drains like 10% a day
2. Very compact, feels easier to bring with me than the switch
3. Other than hinges, nigh indestructable. Don’t have to worry about messing up the controls unlike the switch (joy con durablity sucks)
4. Potects itself pretty well
5. Runs smoothly even after years (Then again this is probably because the games for the 2DS are made to suit its specs)
6. Good games since the games had to focus on gameplay to make up for the graphics
7. Still has pretty good graphics either way (Pokemon White still looks good to this day!)
I cannot wait to watch this story grow

Ill post this au( inspired by tweet above) i started on my twt on Tumblr too
First part


more comic panels below
Second part


Third part


Fourth part


Shenanigans side extra

this is currently an ongoing series, if this does well here, I will continue posting these in bulk (~ ̄▽ ̄)~
feel free to ask me ab this au and give your suggestions!

I absolutely love your art! It makes me so happy that I literally get overexcited sometimes and have to take a break to stim. You convey so much expression and depth with even the most basic/fewest lines (meant in a good way!!), your sketches, finished colour pieces, all the different brushes and textures you use, the various styles, they're all absolutely awe-inspiring. I enjoy checking your page so much, your artistic talent and your creativity in world building so much is incredible.
I was wondering how long it took you to get so good at making art/being so creative and thinking outside of the box? And also if you have any tips to get better at art? Or what helped you advance overtime?
(I'm so sorry this is so much word vomit, sometimes I'm too shy to talk to people and sometimes I cannot stop)
what a lovely ask! thank you anon this made my day :)
to answer ur questions:
getting better is a continuous process, though as with anything sometimes you take steps forward and other times you take steps back (been feeling kind of drained of all creative energy this year due to irl things out of my control so i havent met my own expectations, but that happens!). so yeah im hesitant to put a time limit on 'getting good'
actionable advice on getting better at art:
-draw what you love, you dont have to do things just because you think they'll make you improve.
-look at your own art after its finished and think about what you can improve on next time without being mean to yourself
-draw lots of different things, figure out what you like best
-steal poses, art styles, techniques etc from artists you like. do studies if you want, its good to steal (with credit)
good luck!!!


I've been sitting on this pattern and tutorial for a while now! so time to finally share it with you! I was lamenting that the jellycat pip and sugar mice were long retired and difficult to get your hands on unless you are willing to pay much more than they retailed for each mouse, so i decided to try and eyeball a pattern and make some myself! they're not exact as i only used constructed visual references but they're close! please note that this pattern set is intended for personal use only. Rough tutorial under the cut!
This pattern is for printing onto A4 but you can check your scale with the measurements I've provided or just play around with how big or small you want to try and make them! i didn't really get any wip photos of pip mouse but it's method is largely the same with the nose being the major change, which i will detail in text in the instructions below.
for sugar mouse i would recommend using polar fleece as it will act the right way for the ears to do their squishy marshmallow looking thing. but minky should also work or other similar fabrics! for pip mouse if you can find a similar curly looking fabric with a thin backing that'll be ideal but fleece will also work well, you just wont get the furry texture, you want a fabric with a little bit of stretch to it. i however would not recommend fabrics like felt or non stretch cotton for these guys as it's likely to not take shape the same as there's no give to the fabric.

once you have printed out the pattern and cut the pieces in your fabric, you'll want to sew the ears up and turn them inside out, then put them aside for later. just leave them as is for now but here you can see i was playing around with pinching the turned through ear into shape.

Then moving on, sew the back pieces together along the spine and front of face. you then want pull the bottom open ends apart gently and place the open sides flat up against the base piece so that they're aligned, it can be good to pin this in place so it doesn't shift.

then, get your tail rope, and tie a knot at either end, placing the base of it inbetween the seam at the butt so that it'll sit in the right place, then sew the seam up directly with the tail in place, make sure you sew through the rope to secure it and make sure it doesnt shift. Sew around the bases seam leaving a hole in one side so that you can then turn your mouse through.

once turned through you will want to stuff your mouse with polyfill quite a bit so it takes shape! i like to put weighted beans in mine for extra effect, you can use dried rice or wheat too, just sew a little circle pouch a bit smaller that the mouses base with scrap fabric and fill and seal! then insert into the turning hole while you stuff. once stuffing is done you can sew the hole up with a ladder stitch. the weight from the beads will allow your mouse to sit up quite well.

next you will want to get those ears you put aside, take each corner and bring the ends together in the middle. then sew them gently together at the ends with one or two stitches in about the same spot. you want them to look 3d so dont sew the ends to the back of the ear, just end to end so they meet in the center.

Then pin the ears in place on the head

then you need to ladder stitch the ears in place while they're pinned so they dont shift around, go all the way around the outside edge of each.

now you're almost done! next they just need a face! sugar mouse only needs embroidery by way of a french knot for both the eyes and nose (you can find good video tutorials on how to sew a french knot online), pip mouse will also need a french knot for the eyes but has a separate process for it's nose. (for the pip mouses nose you will need to leave the marked nose hole open and then stitch the nose fabric to the square nose backing in line with the dotted direction on the pattern, (it should look kind of baggy when it's unstuffed) sew it up completley with no hole, then cut a tiny slit in the backing and add polyfill there before closing with a basic stitch, then you ladder stitch the nose directly to the marked nose hole)
in order to hide the embroidery anchor knots i find the best way is to start by going down through the middle of the ears and then coming back up where you want the eye to be, and then going back down and up through the ear for the finishing knot, as it creates a very easy cover for them and looks nice and clean!
then you have yourself a little buddy!

haha they're great to squish! if you use this pattern i'd love to see your results!

-
 sevenofninehouseofmusiker reblogged this · 1 month ago
 -
sevenofninehouseofmusiker liked this · 1 month ago
-
 shpeederman liked this · 1 month ago
 -
 closuresvillageroses liked this · 1 month ago
 -
 dragonroar87 reblogged this · 1 month ago
 -
 link-of-time80 liked this · 1 month ago
 -
 billygoated liked this · 1 month ago
 -
 jenipedia reblogged this · 1 month ago
 -
 leesaves reblogged this · 1 month ago
 -
 mortuarybees liked this · 1 month ago
 -
 princeoftenderness liked this · 1 month ago
 -
 thursday-at-high-noon reblogged this · 1 month ago
 -
thursday-at-high-noon liked this · 1 month ago
-
 gemstonehoopink reblogged this · 1 month ago
 -
 sandwichguyz liked this · 1 month ago
 -
 fruit-teeth reblogged this · 1 month ago
 -
 doctor-wombat liked this · 1 month ago
 -
 deepgoonette liked this · 1 month ago
 -
 demisexualsemigod reblogged this · 1 month ago
 -
demisexualsemigod liked this · 1 month ago
-
 pumpkipodge liked this · 1 month ago
 -
 sleepymangahead liked this · 1 month ago
 -
 gracynvh liked this · 1 month ago
 -
 officialwizardbroccoli reblogged this · 1 month ago
 -
fruit-teeth liked this · 1 month ago
-
 w5aw5 reblogged this · 1 month ago
 -
 redrook liked this · 1 month ago
 -
 potatowonder reblogged this · 1 month ago
 -
 knit-sys reblogged this · 1 month ago
 -
 ghostingurdreams liked this · 1 month ago
 -
 peggiepratt liked this · 1 month ago
 -
 ioniccolumns reblogged this · 1 month ago
 -
 wolfina2 reblogged this · 1 month ago
 -
 that-queer-fool liked this · 1 month ago
 -
 peace-comes-dropping-slow liked this · 1 month ago
 -
 moryera liked this · 1 month ago
 -
 blizzardflame liked this · 1 month ago
 -
 squirrelhours reblogged this · 1 month ago
 -
 finlay-papers liked this · 1 month ago
 -
 pseudonymouscherry liked this · 1 month ago
 -
 paniic-reblogs reblogged this · 1 month ago
 -
 ursoqueer liked this · 1 month ago
 -
 steamturtle liked this · 1 month ago
 -
 ahhhhcrazy liked this · 1 month ago
 -
 kirussy32 reblogged this · 1 month ago
 -
 mardababa reblogged this · 1 month ago
 -
 milestonekestrel reblogged this · 1 month ago
 -
milestonekestrel liked this · 1 month ago
-
 babybirbb liked this · 1 month ago
 -
 fridurwrites reblogged this · 1 month ago
