HOW NOT TO DRAW ARCHERY: AN ART TUTORIAL.
HOW NOT TO DRAW ARCHERY: AN ART TUTORIAL.
DISCLAIMER: I was going to make this “how to draw archery”, but that would probably have taken the rest of my life. This is all stuff I’ve learned from practicing archery in the past, and the tips I’ve given should translate to many, if not all styles of archery. If you take issue with any of the information given here please contact me, as I’m aware I’m not an expert!
Okay, I’ve seen too many bad drawings of archery online. Most of the time I can overlook it, but I’ve made this guide to address drawings where a) the character would hurt/maim themselves if they shot like that, or b) if you tried to shoot like that, the arrow would just make a sad trajectory to the ground, the aerodynamic equivalent of a “WAH-WAH” on a trumpet.
With this in mind:
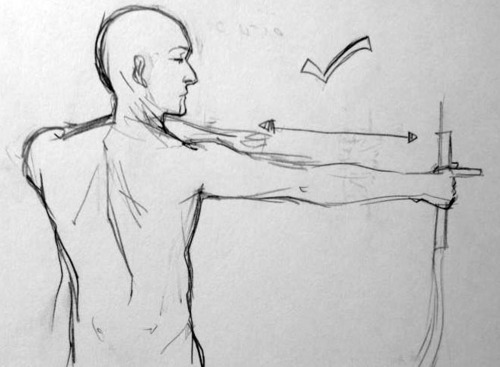
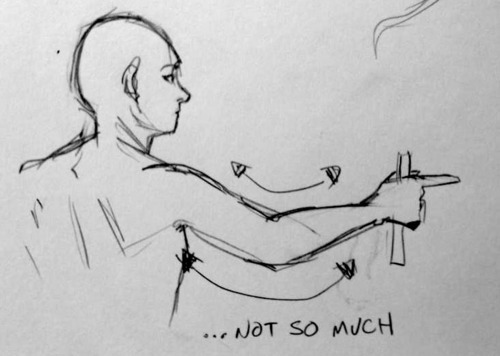
POINT ONE: WHY IS YOUR ARM LIKE THAT
If successful archery is about one thing, it is about consistency - being able to make your body take exactly the same stance over and over and over again. Your body is a key part of the weapon, and just as you wouldn’t want a gun that had components that wobbled and shifted, you don’t want your body to.
With this in mind, characters shooting, particularly at full draw (this is when the arm pulling the string is stretched all the way back), should have the arm that is holding the bow straight. Not locked - I’ll get into that - but straight. A straight arm is easy to replicate - a bent arm could be at a different angle each time. Simple as that.
POINT TWO: DON’T SHOOT YOUR TIT OFF
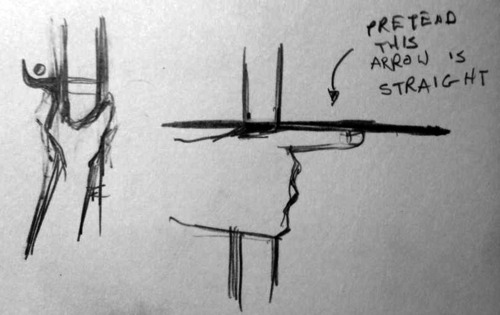
See this diagram
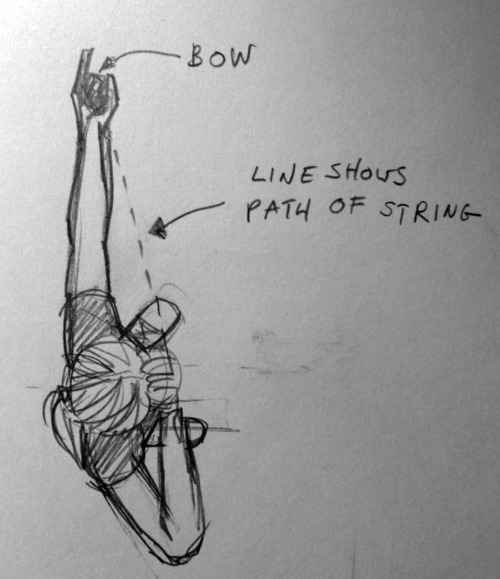
the dotted line is the path the string will take. The string is extremely tight - it has to be for the bow to work. It will therefore move extremely fast. Do you want any part of your body to be in the way of that.
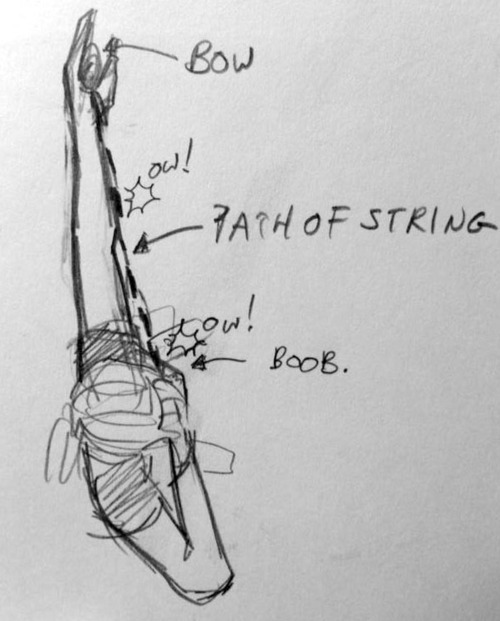
if you have any part of your body (elbows and breasts/pectoral muscles tend to be the worst offenders) in the line of the string, they will get hit. And this will hurt. A LOT. Google “archery bruise” to see how. Yikes. Furthermore, if your arm or chest gets in the way, it’ll knock the arrow off course, and in addition to having sliced your nipple off you’ll have missed your shot too. So KEEP STUFF OUT OF THE PATH OF THE STRING.
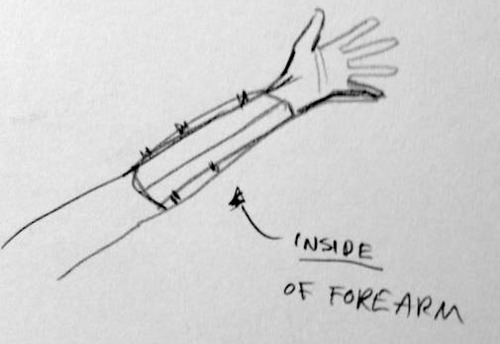
side note: this is where the myth of amazons chopping their boobs off came from. Also, why archers sometimes wear chest-guards - this looks like a one-cupped unisex bra. Stylish. Also why archers often wear protective gear called a bracer. This goes on the tender inside of the arm and wrist that might get clipped by the string, not the outside that is nowhere near it.
POINT THREE: WHAT ARE YOU DOING WITH YOUR FINGERS STOP THAT
Okay I keep seeing this

Having the fingers clasping the arrow like this makes it highly likely that the pressure from them will send the arrow off-course.
Many modern bows have an arrow rest so you needn’t rest the arrow on your hand at all. If that isn’t the case, it works better to rest the arrow on the first knuckle of the index finger (where it meets the hand). If it’s just being used as a platform, the finger shouldn’t be able to exert enough pressure to make the shot go all over the place. Also you won’t end up shredding your fingers with the fletchings.
Talking of that…
POINT FOUR: DON’T SLICE YOUR FINGERS OFF
remember what I said earlier about how incredibly taut bowstrings are
imagine pulling that back with your soft fleshy fingers
it is basically like cheesewire through…soft fleshy fingers.
Use protection. Illustrated below are the tab and archery glove, or just go to google or something, stop the madness.

POINT FIVE: PHYSICS DOESN’T WORK LIKE THAT
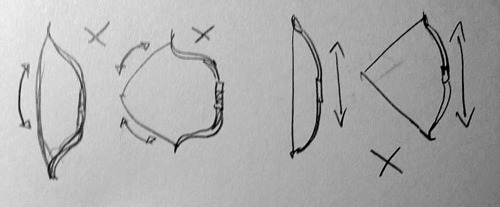
A strung bow is taut. The body of the bow is pulled by the (very tight) string, making a D shape. An unstrung bow will be straighter.
The tension in the string means a string should always be a straight line. If the bow is drawn, it’s two straight lines.

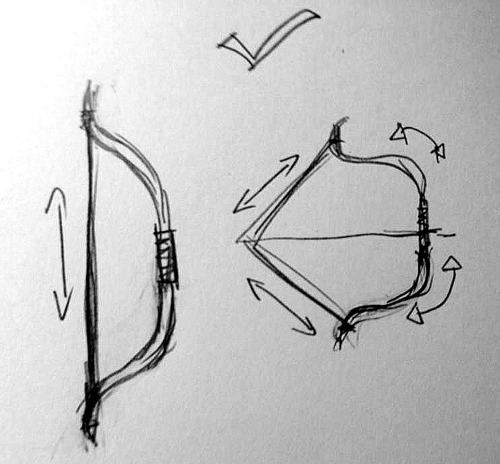
If there is any curve in the string, the arrow will probably fall limply to the floor.
ALSO. When the string is drawn back, it exerts more pressure on the bow, creating that really exaggerated curve. This is where the power comes from. (I think. I am not physics). Basically, if you’re drawing a character at full draw, the string should be straight and the bow should be curved. If the opposite is true something very wrong has happened and you should be sad.
OKAY! I hope this has been helpful, if you have any questions or concerns let me know. And if in doubt, doctor google will help you - look at olympic or professional archers, and see how they’re standing and how their bows behave.
GOOD LUCK DRAWING!
More Posts from Zelo-ref and Others
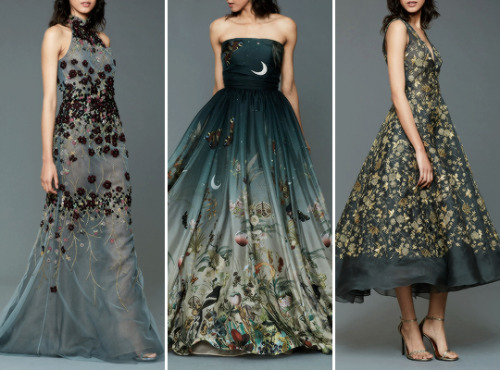
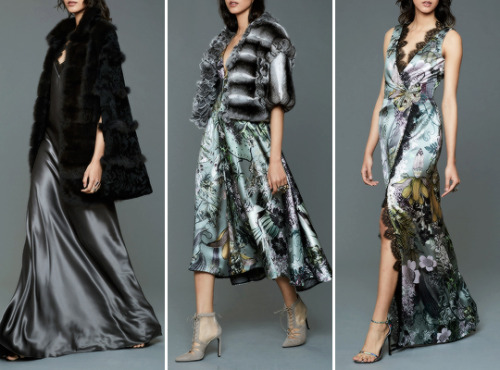
need refs/inspo for period clothing?
here you go:
Medieval (9th-15th century):
10th century and earlier
Romance (1000-1250)
11th century
12th century
13th century
more 13th century
14th century
more 14th
15th century
and more 15th century
Gothic (1150-1550)
Renaissance (1520-1650)
16th & 17th century
16th century
more 16th
Tudors (1500-1550)
more Tudors
Elizabethan Period (1558-1603)
Jacobean Era (1603-1625)
17th century
more 17th century
and again
and even more
this won’t stop
Baroque (1600-1750)
Georgian Period (1714-1830):
18th century
more 18th century
18th century women’s fashion
18th century men’s fashion
Rococo (1720-1770)
Classicism (1770-1790)
children 18th-19th century
Regency Preiod (1811-1820)/ Empire (1800-1820s):
1790-1820s
more stuff on regency and georgian era
even more
that’s not enough regency
and more
how is there so much
early 19th century men’s wear
early 19th century women’s wear
Victorian Period (1837-1901):
Romantic Era (1820-1840s)
Civil War Era/1850-1860s
1870-1890s
more victorian
Edwardian Period (1901-1910):
1900-1910s
Belle Epoque (1880-1910s)
more edwardian/belle époque
Modern:
1910s-1920s [Fashion between the World Wars]
1920s
more roaring 20s
so much 20s
1920s hairstyles
1930s
1930-1940s
1930-1950s
1950s
more 50s
1960s
1960-1970s
1980s
lots of periods in one spot/fashion through centuries:
here, here, and here is almost everything (and properly ordered)
also here with lots of historic fashion magazines
historic fashion
costumes of antiquity
more historical clothing
history of fashion
more history of fashion
“vintage” clothing
historic costumes
children’s historical fashion/toys
details
historic wedding dresses
historic assecoires (hats, shoes…)
hats
masks
parasols
lots of embroidery/jewlery
it indeed is western/european centric, I’m sorry for that, but for other cultures I simply don’t have so many references

This is one of those anime how to draw books, so it may not be the most accurate. It might help some people though.
Afficher davantage
You can actually add your own images into it if you want to compare more dynamic characters or use alternate poses. And I’ll show you how owo
1. You go on the site:

2. Left click the image and scroll down to inspect:


3. You see those two links down there? Those are the image links for the sillouhettes, just add your own image (must be a url, i personally like imgur):


4. And bingo bango! You got your own custom images to compare heights with! I hope this was helpful owo

hi there!! may i ask if you have any tips when it comes to making a color palette/picking colors? the colors of your finished pieces (and even your wips) are always amazing to look at!
ALRIGHT ANON BRACE YOURSELF. I spent a really long time on this sO HERE COMES A REALLY INTENSIVE COLOUR TUTORIAL AKA Houdi learns much in college painting classes.As usual, we need sth to work with so we’re gonna use my OC Anna. Everyone, meets Anna.

Anyway, every drawing starts with a sketch. We have a sketch plus a crash course on warm and cool colour idk why I wrote “hot” and “cold” here but whatever it’s late.

ANYWYAY, what you’ll need to know is red = warm and blue = cool. Anything deprived from these two are gonna be either cool or warm based on the colours surrounding them, so there is no in between. And an important thing related to palette is the line colours. If you’re painting without lines then it doesn’t matter, obv. But choosing the line colours for your drawing is very important. I used to do dark red but HAHA no. Lately I’ve been enjoying a lot of greyish purples and blues, since they’re pretty dark and neutral.
While we’re at it, let’s talk grey. Below is a horrible chart of complementary colours –> greys.

Idealy, they all should be cool machine grey. But alas, I’m not pulling out my oil paint for this and I can’t really blend digitally like I blend tradinationally sO WHATEVER. Anyway, greys are important in your piece. At least for me. It calms the colours down if it’s too vibrant, and lets the eyes travel throughout with ease. I’ll show you the differences later!


Now on to the actual colouring. Usually I start out with the lightest and then shade. Here I’ve blocked out the part where I want the shadow to be. What I do when I choose colours to shade is I use a warm and cool colour, not neccessairly complementary. It depends on which colours you like. I would advise to not use too saturated colours as of yet. I would blend those colours out, and choose the greyish/greenish colour they make. Sometimes you would get purple too, I usally just choose it from the colour wheel if I need it.


Now is the time to choose a darker slightly more saturated colours for the shadows. And just, blend everything until u die. More layers of shadows adds more depth, but it’s also can destroy all your colours altogther, so I suggest 3-4 shades + blush (is applicable) at most. (Althought 5 is when the fun really starts. It’s also kinda advanced and I suck at it lol)

Anyway, colouring lines makes the face lit up.
Hair. Same process.


For the clothes, I chose a really de-saturated blue, and a yellow that’s not too bright. You can see the most saturated thing right now on her is the hair, the eyes, and the buttons on her collar.

Below I have messed around with the saturation. And while to each their own (I kno, that really saturated one might look temtping but stay with me), if you’re just starting out with colours, try to use a more variety of saturation. Too saturated makes it very hard on the eyes, and the printing is gonna be hell on Earth. Too much de-saturation is just meh for me. Ofc, there are artists who utilizes these colours very well, but they know when to and not to abuse them. Just play around and see what you like. BUT TRY AND USE SOME GREYS THEY ARE MAGICAL. And no absolutely no black for shading. Just don’t. please.

Anyway, filters. I like overlaying. Just don’t abuse it cause when you’re doing traditional art after this you’ll cry.

Here’s some colour relationship charts I had to do in college lol it was really hard to mix them with oil paint.

I hope that was useful for you anon! There is another question for how I do BG and PLEASE BE PATIENCE WITH ME IT’S TAKING A VERY LONG TIME TO COMPILE THINGS TOGETHER ;;;;;


DIY 2 Body Chains - one with hex nuts and the other with coins.
Body Armor Jewelry is still trending, but I haven’t seen many DIYs for body chains, harnesses,or headpieces on DIY blogs. The jewelry itself is really cheap to make, especially if you find the right chain and can buy it by the foot.
For pages of DIY Chain Handpieces or Panjas go here.
Bottom Photos: DIY Body Chain Tutorial from Letters and Beads here. She used a belly dancing hip decoration for the chains and decoration.
Top Photo: Find the tutorial for this DIY Hex Nut Body Chain from A Little Fashion here. You can also check out the video below.
Find my 12 Body Armor DIYs Roundup on Tumblr here.


If you're an artist looking to diversify your faces:
click this link
draw whomever you get
don’t worry about making it super-accurate, just focus on the characteristic parts of the face and have fun
the outcome might not look like the ref, but it will be different and more varied than faces you draw out of your head, an dprobably pretty rad on its own right!
feel free to reblog with your drawing, if you want!

-
 white-t-shirt-redconverse liked this · 2 months ago
 -
 embyreal-byrd liked this · 6 months ago
 -
 izumi-yami liked this · 8 months ago
 -
 randommoodswings liked this · 8 months ago
 -
 yami-mashida reblogged this · 9 months ago
 -
 azdock liked this · 9 months ago
 -
 artking-4 reblogged this · 10 months ago
 -
 eggieton reblogged this · 11 months ago
 -
eggieton liked this · 11 months ago
-
 illya-roma reblogged this · 1 year ago
 -
 knife0clock liked this · 1 year ago
 -
 give-me-one-good-reason liked this · 1 year ago
 -
 alittleveggies liked this · 1 year ago
 -
 soren-rave liked this · 1 year ago
 -
justwritingandartreferences reblogged this · 1 year ago
-
 arbrehoux liked this · 1 year ago
 -
 lies418 liked this · 1 year ago
 -
 kinofourpaws reblogged this · 1 year ago
 -
kinofourpaws liked this · 1 year ago
-
 miserylovesbees liked this · 1 year ago
 -
 ashes-of-twilight reblogged this · 1 year ago
 -
 221-fowlimni liked this · 1 year ago
 -
 jademoto liked this · 1 year ago
 -
 silhouettecrow reblogged this · 1 year ago
 -
silhouettecrow liked this · 1 year ago
-
 shitphobe420blazeit reblogged this · 1 year ago
 -
shitphobe420blazeit liked this · 1 year ago
-
 solunova liked this · 1 year ago
 -
 crabbng2 reblogged this · 1 year ago
 -
 raynos liked this · 1 year ago
 -
 avatarquake reblogged this · 2 years ago
 -
 turtles-alltheway-down liked this · 2 years ago
 -
 houseoftheghostyfoxy liked this · 2 years ago
 -
 abstraxx liked this · 2 years ago
 -
 woodsphinx liked this · 2 years ago
 -
 belleeverygreen liked this · 2 years ago
 -
 tuturialreblog reblogged this · 2 years ago
 -
 yenoodlethings liked this · 2 years ago
 -
 hiimsuperawkwarddontmindme reblogged this · 2 years ago
 -
hiimsuperawkwarddontmindme liked this · 2 years ago
-
 felichi-kun liked this · 2 years ago
 -
 artsie-fartsie-smartsie reblogged this · 2 years ago
 -
 sorrythatwasmean reblogged this · 2 years ago
 -
 sonicfan8967 liked this · 2 years ago
 -
 fullnightfestival liked this · 2 years ago
 -
 randomobjectsandstuff reblogged this · 2 years ago
 -
randomobjectsandstuff liked this · 2 years ago
-
 leashamariel liked this · 2 years ago
 -
 f1restart3rr reblogged this · 2 years ago