Curate, connect, and discover
QUE - Blog Posts
Health anxiety sucks because
You know what I changed my mind I’m not elaborating. Health anxiety sucks. That’s it, that’s the tweet.

Lo que más te gusto de mi
Me dices que soy un poco particular y te estorban esas cosas que adoraste mas de mi si soy asi... un poco loco de todas formas y por suerte yo soy otro
Me dices que soy un poco particular cuando esas pequeñas bromas te hacian reir hasta llorar y ahora las odias y aunque no me conoscas de todas formas y por suerte alegria me sobra
Nobody even talk to me right now.
HOW DO WE GO FROM THIS-

TO THIS???????????

WHY?????? WHO??????? HOW??????? His LIPS?? His stupid glasses??? WHY IS HE BROWN!!!
I can't even. The Bumblebee movie NAILED their designs. It was perfect blend of G1 designs and realism. It was so fun to watch. ALL I WANTED WAS TO SEE MORE OF IT. BUT NO. NO!! ALL WE GET ARE 2 FREAKING MINUTES OF ACTION AND THEN THIS MONSTROSITY. WHO EVEN SIGNED OFF ON THIS. IT LOOKS MORE UGLY EVERY TIME I SEE IT. THEY DIDNT EVEN INCLUDE HIS HEADFINS!!!! WHEELJACKS DESIGN IS SO MUCH FUN AND THEY LITERALLY JUST THREW IT OUT THE WINDOW AND FOR WHAY????????? I hate him.
To everyone who likes this design. I am sorry. I respect your decision. I am happy that at least someone can find joy in... this. But dear god. I hate him so much.


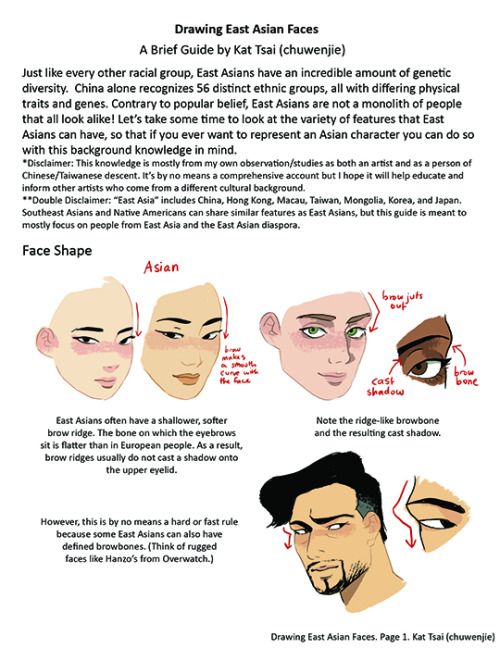
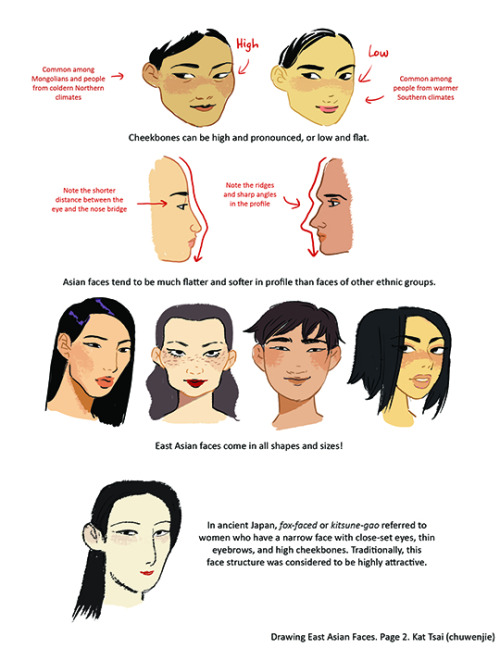

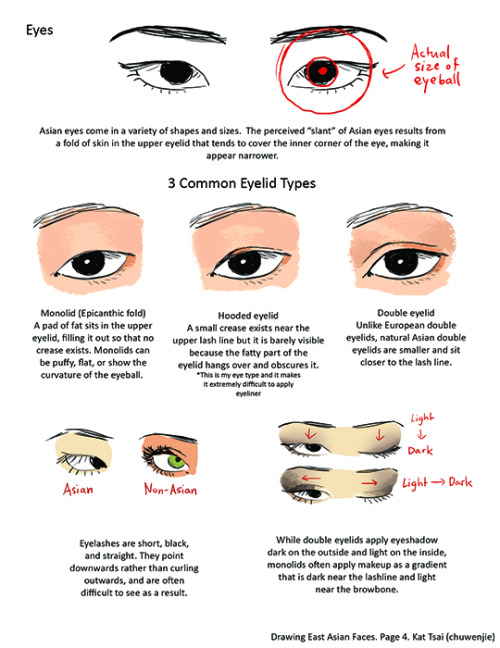

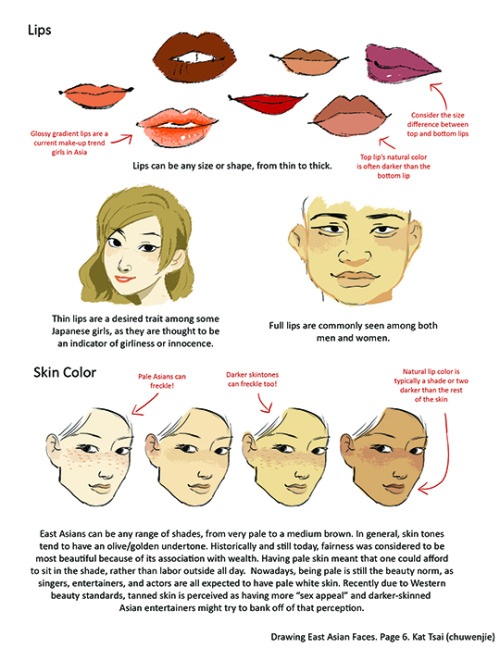
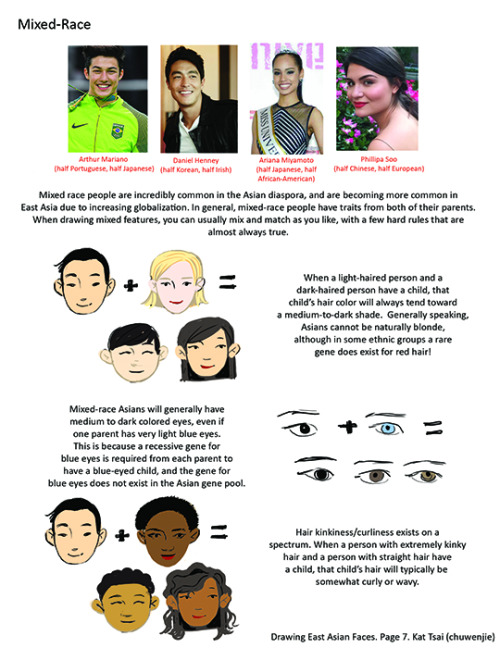
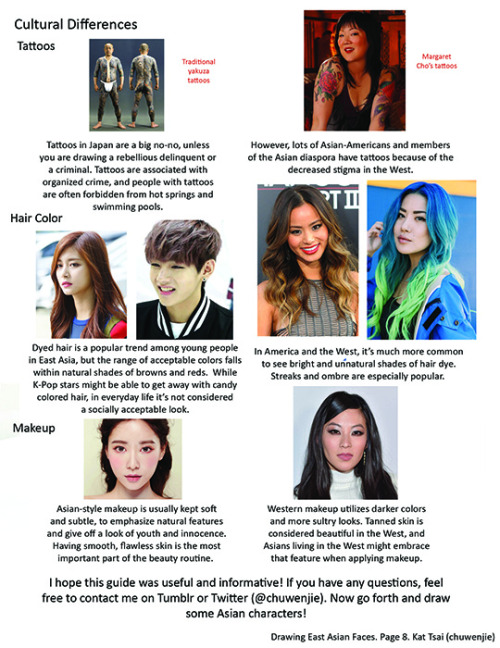
A compilation of stuff I know about drawing Asian faces and Asian culture! I feel like many “How-To-Draw” tutorials often default to European faces and are not really helpful when drawing people of other races. So I thought I’d put this together in case anyone is interested! Feel free to share this guide and shoot me questions if you have any! I’m by no means an expert, I just know a few things from drawing experience and from my own cultural background.


Wandered into an article with 140 iconic cinematic shots, the comments complained there was no explanation to their composition. Decided to give it a run down and keep it to myself.
The compositions are mostly self explanatory but I wanted to see what patterns I could find. That’s just how you learn stuffs.
How to show expression with the mouth!
This was a request and at first I wasn’t sure if I had anything to provide with, but as it turn out it got a little longer than I expected because there were actually things I had to say!! Wow!!
Anyway, this is some guidelines I follow when I try to make the face expressfull, more specifically the mouth! It is often neglected, since it’s actually pretty hard, I’ll admit. But I’m here to help (hopefully…)! A mouth expression tutorial as per request. Enjoy and hopefully it will help some a little. ʕ•ᴥ•ʔ
Draw the teeth at the right angle.
This is super important. The upper jaw follows the angle of the head, and the lower jaw will depend on how open it is. Make sure you have a rough estimate of where the teeth are, and how much of them you’re going to see!
The lips will VERY roughly follow the same angle as the teeth. It really depends on the character, but it gives you a sense at least.

If you DON’T do this, you’re going to lose so much volume and the mouth is going to end up looking unrelatable. I showed this example in this tutorial:

It’s not just the lips!
The cheeks, chin, and tongue play a role too!

Try look at your own mouth or references! I have a very pliable and large mouth, so that’s one reason why my characters have it too lmao.
ASYMMETRYYYYY (ง ͠° ͟ل͜ ͡°)ง
I cannot emphasize how important asymmetry is when drawing expressions. It applies not only to the eyebrows to achieve the Dreamwork Face™, but also the mouth. Seriously if you draw a symmetric mouth I will deliver myself to your mailbox and then shout at you until you fix it.
Look at the difference between these two for example: which one has more “life”?

I think you get the idea.
Push and squish - give it flow
Here’s an old drawing I have but it illustrates how I think when I squish the mouth, and use folding and wrinkles to my advantage.

Look at your own face and see where skin bundles up, where it creases the most and when bumps appear on your chin. Subtle details makes all the difference!
One VERY effective detail is illustrated in the first sketch, where I pull upwards on one side, and downwards on the other. That’s a good detail to use when the character is making a skewed expression, or is extremely frustrated. I encourage you to play around with that concept bc it’s ~super effective~!
EXAMPLES:
Happy: Your entire mouth is pushed upwards, not just the corners of your mouth!

I tend to draw a :3 mouth bc I’ve been drawing Lance too much….. You don’t have to but it’s basically imprinted in my motor memory by now.
Pouting/frowning: corners are pushed down, middle pushed slightly up. Sometimes, there’s a slight dip in the middle too. It can give a sense that the character is biting their lips.

Showing frustration/intimidating/is intimidated: basically showing a lot of teeth. The corners are as open as possible and the middle sorta more squished. An extremely important detail here is showing some of the gums, and open space between the cheeks and teeth. That way it looks like the mouth it open to it’s full potential. Here is also where you basically MUST add folds and bumps, or else it’s not going to look relatable.

(Here I am again with the pulling upwards on one side and downwards on the other, as illustrated on the last sketch)
And then again, here’s just another doodle showing how important it is to show the gums. It’s the same face twice, but the second one looks slightly more frustrated doesn’t it?

(from my other tutorial on how to draw facial expressions)
As you can see, this last one is very versatile and I draw it a lot. Play around with the basic shape and see how much subtle details makes a lot of difference!
That’s it!
I hope that cleared some things up and was somewhat helpful! Enjoy drawing ✨


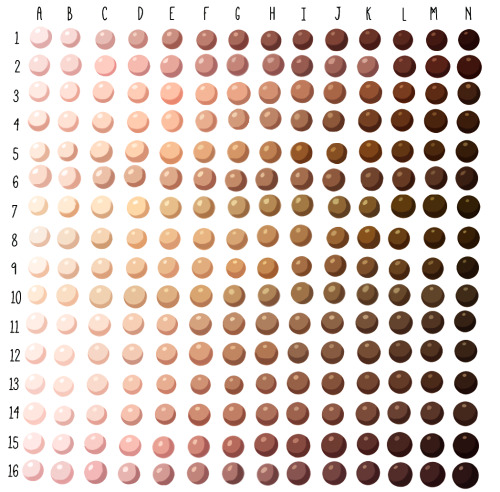
Skin tone swatches, for use as a resource.
Spudfuzz on Deviantart made the original resource, which I modified to be a bit more realistic. She gave me permission to post this.
☛These swatches, like all art resources, should be used as a “jumping off point!” All colours are relative, and change with lighting conditions. As they are now, these swatches work best for adoptables, character lineups, and other art where local colour is important. ☚
[DA]
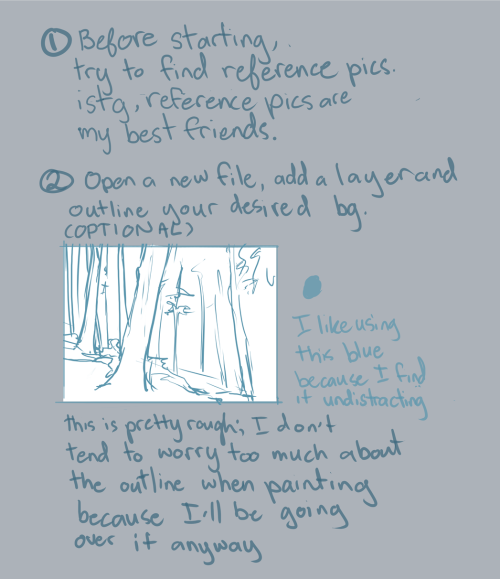


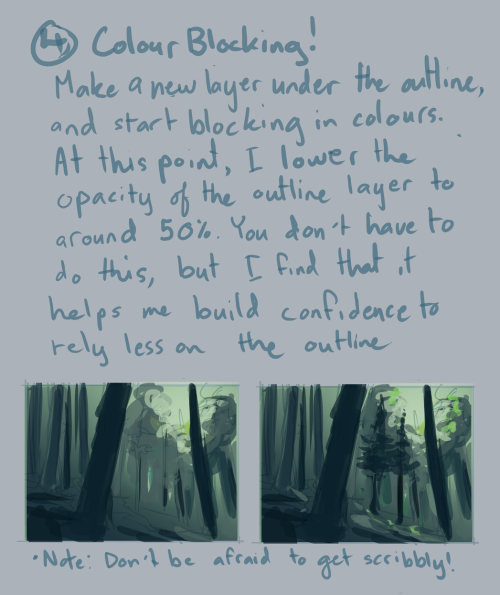


Background Tutorial
requested by ion4ever. sorry it took me so long to do this for you but hopefully I was of some help?
Notes:
I use CS6, and this was mostly done with default hard round brush at around 50% opacity or higher, 100% flow, and size pressure on. I made some random brushes for the greenery by modifying the default ones.
always use a large canvas. I go about 3000px x 3000px.
with enough practice, painting backgrounds like this will be a fairly quick affair. this one, for example, took about 30 minutes? it’s just a matter of time/experience. :)
So yeah, good luck doing backgrounds, and have fun!! :D


Troto a mi propio ritmo, ida y vuelta, una y otra vez hasta cansarme, luego descanso y vuelvo a trotar y asi hasta que siento que ya es suficiente, empece hace poco 😀👕👖🏃 #troto #a #mi #propio #ritmo #descanso #una #y #otra #vez #hasta #cansarme #que #siento #que #ya #es #suficiente #empece #hace #poco (at Guayaquil, Ecuador) https://www.instagram.com/p/CZ3MPC4Lw4j/?utm_medium=tumblr
Wait...


ZACH MORE TALL THAN CHRIS!?


YES HE IS MORE TALL THAN CHRIS

