Curate, connect, and discover
Art Tips - Blog Posts
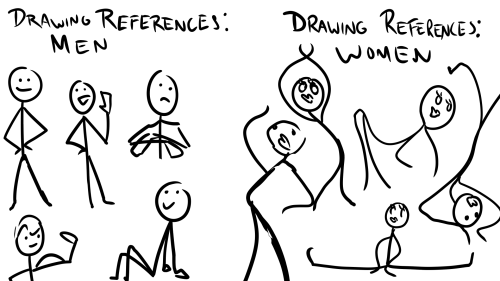
HEY THIS IS IMPORTANT whats your favorite place to find drawing references?
HEY ARTISTS!
Do you design a lot of characters living in not-modern eras and you’re tired of combing through google for the perfect outfit references? Well I got good news for you kiddo, this website has you covered! Originally @modmad made a post about it, but her link stopped working and I managed to fix it, so here’s a new post. Basically, this is a costume rental website for plays and stage shows and what not, they have outfits for several different decades from medieval to the 1980s. LOOK AT THIS SELECTION:

OPEN ANY CATEGORY AND OH LORDY–

There’s a lot of really specific stuff in here, I design a lot of 1930s characters for my ask blog and with more chapters on the way for the game it belongs to I’m gonna be designing more, and this website is going to be an invaluable reference. I hope this can be useful to my other fellow artists as well! :)
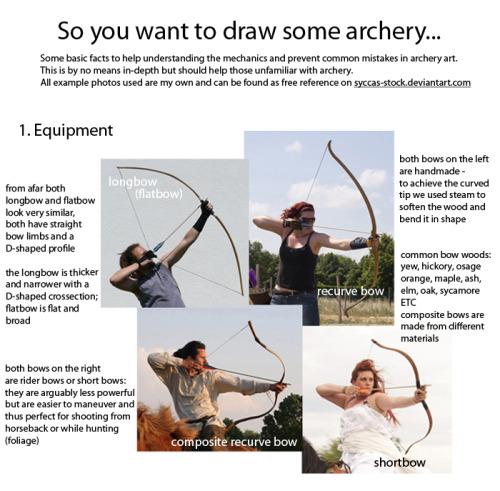
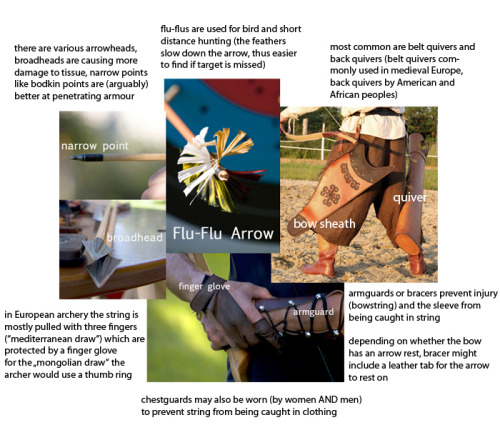
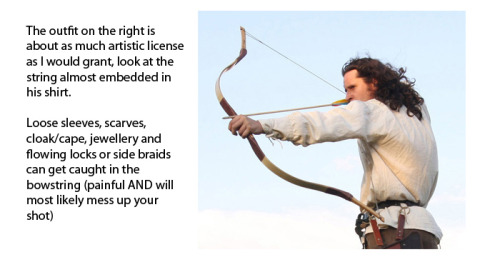
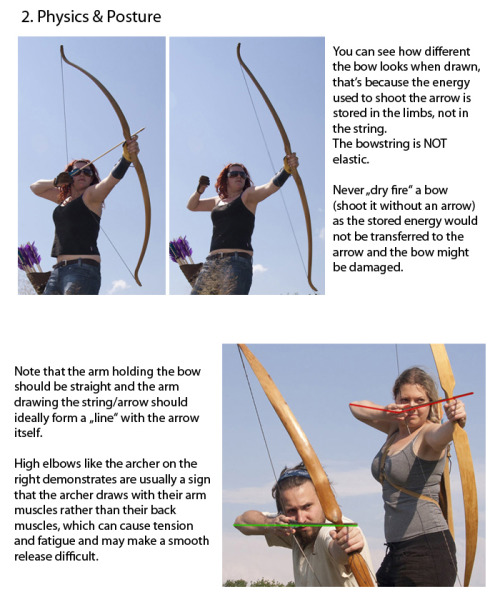

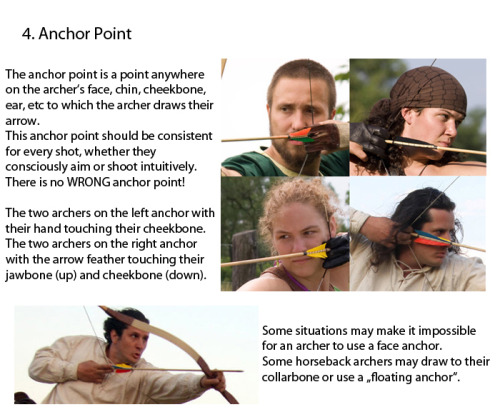
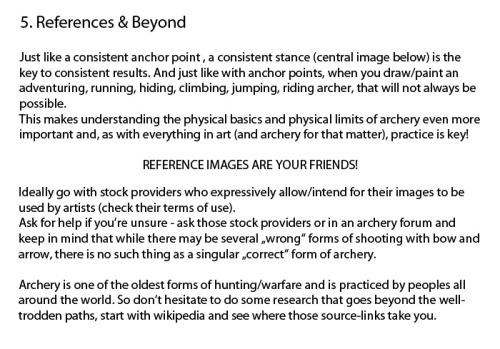
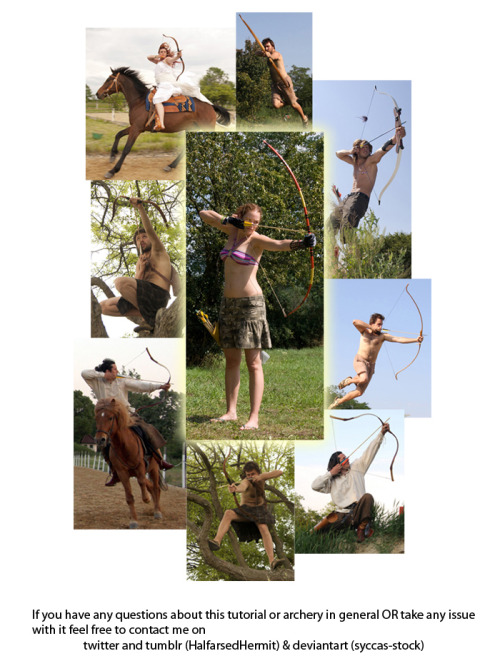
Spent the last two days working on this little archery guide in art and writing. Considering the rise in popularity of archers in pop culture this hopefully comes in handy for a bunch of fandoms.
Can't afford art school?
After seeing post like this 👇

And this gem 👇
As well as countless of others from the AI generator community. Just talking about how "inaccessible art" is, I decided why not show how wrong these guys are while also helping anyone who actually wants to learn.
Here is the first one ART TEACHERS! There are plenty online and in places like youtube.
📺Here is my list:
Proko (Free, mostly teaches anatomy and how to draw people. But does have art talks and teaches the basics.)
Marc Brunet (Free but he does have other classes for a cheap price. Use to work for Blizzard and teaches you everything)
Aaron Rutten (free, tips about art, talks about art programs and the best products for digital art)
BoroCG (free, teaches a verity of art mediums from 3D modeling to digital painting. As well as some tips that can be used across styles)
Jesse J. Jones (free, talks about animating)
Jesus Conde (free, teaches digital painting and has classes in Spanish)
Mohammed Agbadi (free, he gives some advice in some videos and talks about art)
Ross Draws (free, he does have other classes for a good price. Mostly teaching character designs and simple backgrounds.)
SamDoesArts (free, gives good advice and critiques)
Drawfee Show (free, they do give some good advice and great inspiration)
The Art of Aaron Blaise ( useful tips for digital art and animation. Was an animator for Disney. Mostly nature art)
Bobby Chiu ( useful tips and interviews with artist who are in the industry or making a living as artist)
Sinix Design (has some tips on drawing people)
Winged canvas (art school for free on a verity of mediums)
Bob Ross (just a good time, learn how to paint, as well as how too relax when doing art. "there are no mistakes only happy accidents", this channel also provides tips from another artist)
Scott Christian Sava (Inspiration and provides tips and advice)
Pikat (art advice and critiques)
Drawbox (a suggested cheap online art school, made of a community of artist)
Skillshare (A cheap learning site that has art classes ranging from traditional to digital. As well as Animation and tutorials on art programs. All under one price, in the USA it's around $34 a month)
Human anatomy for artist (not a video or teacher but the site is full of awesome refs to practice and get better at anatomy)
Second part BOOKS, I have collected some books that have helped me and might help others.
📚Here is my list:
The "how to draw manga" series produced by Graphic-sha. These are for manga artist but they give great advice and information.
"Creating characters with personality" by Tom Bancroft. A great book that can help not just people who draw cartoons but also realistic ones. As it helps you with facial ques and how to make a character interesting.
"Albinus on anatomy" by Robert Beverly Hale and Terence Coyle. Great book to help someone learn basic anatomy.
"Artistic Anatomy" by Dr. Paul Richer and Robert Beverly Hale. A good book if you want to go further in-depth with anatomy.
"Directing the story" by Francis Glebas. A good book if you want to Story board or make comics.
"Animal Anatomy for Artists" by Eliot Goldfinger. A good book for if you want to draw animals or creatures.
"Constructive Anatomy: with almost 500 illustrations" by George B. Bridgman. A great book to help you block out shadows in your figures and see them in a more 3 diamantine way.
"Dynamic Anatomy: Revised and expand" by Burne Hogarth. A book that shows how to block out shapes and easily understand what you are looking out. When it comes to human subjects.
"An Atlas of animal anatomy for artist" by W. Ellenberger and H. Dittrich and H. Baum. This is another good one for people who want to draw animals or creatures.
Etherington Brothers, they make books and have a free blog with art tips.
📝As for Supplies, I recommend starting out cheap, buying Pencils and art paper at dollar tree or 5 below. If you want to go fancy Michaels is always a good place for traditional supplies. They also get in some good sales and discounts. For digital art, I recommend not starting with a screen art drawing tablet as they are usually more expensive.
For the Best art Tablet I recommend either Xp-pen, Bamboo or Huion. Some can range from about 40$ to the thousands.
💻As for art programs here is a list of Free to pay.
Clip Studio paint ( you can choose to pay once or sub and get updates. Galaxy, Windows, macOS, iPad, iPhone, Android, or Chromebook device. )
Procreate ( pay once for $9.99, IPAD & IPHONE ONLY)
Blender (for 3D modules/sculpting, animation and more. Free)
PaintTool SAI (pay but has a 31 day free trail)
Krita (Free)
mypaint (free)
FireAlpaca (free)
Libresprite (free, for pixel art)
Drawpile (free and for if you want to draw with others)
IbisPaint (free, phone app ONLY)
Medibang (free, IPAD ONLY)
NOTE: Some of these can work on almost any computer like Clip and Sai but others will require a bit stronger computer like Blender. Please check their sites for if your computer is compatible.
So do with this information as you will but as you can tell there are ways to learn how to become an artist, without breaking the bank. The only thing that might be stopping YOU from using any of these things, is YOU.
I have made time to learn to draw and many artist have too. Either in-between working two jobs or taking care of your family and a job or regular school and chores. YOU just have to take the time or use some time management, it really doesn't take long to practice for like an hour or less. YOU also don't have to do it every day, just once or three times a week is fine.
Hope this was helpful and have a great day.
"also apologies for any spelling or grammar errors, I have Dyslexia and it makes my brain go XP when it comes to speech or writing"
Can't afford art school?
After seeing post like this 👇
And this gem 👇
As well as countless of others from the AI generator community. Just talking about how "inaccessible art" is, I decided why not show how wrong these guys are while also helping anyone who actually wants to learn.
Here is the first one ART TEACHERS! There are plenty online and in places like youtube.
📺Here is my list:
Proko (Free, mostly teaches anatomy and how to draw people. But does have art talks and teaches the basics.)
Marc Brunet (Free but he does have other classes for a cheap price. Use to work for Blizzard and teaches you everything)
Aaron Rutten (free, tips about art, talks about art programs and the best products for digital art)
BoroCG (free, teaches a verity of art mediums from 3D modeling to digital painting. As well as some tips that can be used across styles)
Jesse J. Jones (free, talks about animating)
Jesus Conde (free, teaches digital painting and has classes in Spanish)
Mohammed Agbadi (free, he gives some advice in some videos and talks about art)
Ross Draws (free, he does have other classes for a good price. Mostly teaching character designs and simple backgrounds.)
SamDoesArts (free, gives good advice and critiques)
Drawfee Show (free, they do give some good advice and great inspiration)
The Art of Aaron Blaise ( useful tips for digital art and animation. Was an animator for Disney. Mostly nature art)
Bobby Chiu ( useful tips and interviews with artist who are in the industry or making a living as artist)
Sinix Design (has some tips on drawing people)
Winged canvas (art school for free on a verity of mediums)
Bob Ross (just a good time, learn how to paint, as well as how too relax when doing art. "there are no mistakes only happy accidents", this channel also provides tips from another artist)
Scott Christian Sava (Inspiration and provides tips and advice)
Pikat (art advice and critiques)
Drawbox (a suggested cheap online art school, made of a community of artist)
Skillshare (A cheap learning site that has art classes ranging from traditional to digital. As well as Animation and tutorials on art programs. All under one price, in the USA it's around $34 a month)
Human anatomy for artist (not a video or teacher but the site is full of awesome refs to practice and get better at anatomy)
Second part BOOKS, I have collected some books that have helped me and might help others.
📚Here is my list:
The "how to draw manga" series produced by Graphic-sha. These are for manga artist but they give great advice and information.
"Creating characters with personality" by Tom Bancroft. A great book that can help not just people who draw cartoons but also realistic ones. As it helps you with facial ques and how to make a character interesting.
"Albinus on anatomy" by Robert Beverly Hale and Terence Coyle. Great book to help someone learn basic anatomy.
"Artistic Anatomy" by Dr. Paul Richer and Robert Beverly Hale. A good book if you want to go further in-depth with anatomy.
"Directing the story" by Francis Glebas. A good book if you want to Story board or make comics.
"Animal Anatomy for Artists" by Eliot Goldfinger. A good book for if you want to draw animals or creatures.
"Constructive Anatomy: with almost 500 illustrations" by George B. Bridgman. A great book to help you block out shadows in your figures and see them in a more 3 diamantine way.
"Dynamic Anatomy: Revised and expand" by Burne Hogarth. A book that shows how to block out shapes and easily understand what you are looking out. When it comes to human subjects.
"An Atlas of animal anatomy for artist" by W. Ellenberger and H. Dittrich and H. Baum. This is another good one for people who want to draw animals or creatures.
Etherington Brothers, they make books and have a free blog with art tips.
📝As for Supplies, I recommend starting out cheap, buying Pencils and art paper at dollar tree or 5 below. If you want to go fancy Michaels is always a good place for traditional supplies. They also get in some good sales and discounts. For digital art, I recommend not starting with a screen art drawing tablet as they are usually more expensive.
For the Best art Tablet I recommend either Xp-pen, Bamboo or Huion. Some can range from about 40$ to the thousands.
💻As for art programs here is a list of Free to pay.
Clip Studio paint ( you can choose to pay once or sub and get updates. Galaxy, Windows, macOS, iPad, iPhone, Android, or Chromebook device. )
Procreate ( pay once for $9.99, IPAD & IPHONE ONLY)
Blender (for 3D modules/sculpting, animation and more. Free)
PaintTool SAI (pay but has a 31 day free trail)
Krita (Free)
mypaint (free)
FireAlpaca (free)
Libresprite (free, for pixel art)
Drawpile (free and for if you want to draw with others)
IbisPaint (free, phone app ONLY)
Medibang (free, IPAD ONLY)
NOTE: Some of these can work on almost any computer like Clip and Sai but others will require a bit stronger computer like Blender. Please check their sites for if your computer is compatible.
So do with this information as you will but as you can tell there are ways to learn how to become an artist, without breaking the bank. The only thing that might be stopping YOU from using any of these things, is YOU.
I have made time to learn to draw and many artist have too. Either in-between working two jobs or taking care of your family and a job or regular school and chores. YOU just have to take the time or use some time management, it really doesn't take long to practice for like an hour or less. YOU also don't have to do it every day, just once or three times a week is fine.
Hope this was helpful and have a great day.
"also apologies for any spelling or grammar errors, I have Dyslexia and it makes my brain go XP when it comes to speech or writing"
You draw hats so well and im like so amazed by it because every time i try it looks like they're wearing buckets?? how do you draw them?? :o


pringles

![Title card reading: [Storyboarding Basics. Brought to you by NU Animation Club, March 23 2023]. There is a chibi drawing of Feeb drawing on a CINTIQ](https://64.media.tumblr.com/1bb4994121212e48c92ee88de5cbe45d/8f6b9c73271b12ac-28/s500x750/efeaa63ce1f755c3643a35f0973a68f1f1057236.png)


a couple snippets from a presentation i gave at school this past week on storyboarding!!
‼️DISCLAIMER: I am still a student and have only worked on student and indie projects! This is just stuff that I personally find helpful as an amateur, so feel free to take it with a grain of salt!
Happy boarding, friends! ✍️💕
hot artists don't gatekeep
I've been resource gathering for YEARS so now I am going to share my dragons hoard
Floorplanner. Design and furnish a house for you to use for having a consistent background in your comic or anything! Free, you need an account, easy to use, and you can save multiple houses.
Comparing Heights. Input the heights of characters to see what the different is between them. Great for keeping consistency. Free.
Magma. Draw online with friends in real time. Great for practice or hanging out. Free, paid plan available, account preferred.
Smithsonian Open Access. Loads of free images. Free.
SketchDaily. Lots of pose references, massive library, is set on a timer so you can practice quick figure drawing. Free.
SculptGL. A sculpting tool which I am yet to master, but you should be able to make whatever 3d object you like with it. free.
Pexels. Free stock images. And the search engine is actually pretty good at pulling up what you want.
Figurosity. Great pose references, diverse body types, lots of "how to draw" videos directly on the site, the models are 3d and you can rotate the angle, but you can't make custom poses or edit body proportions. Free, account option, paid plans available.
Line of Action. More drawing references, this one also has a focus on expressions, hands/feet, animals, landscapes. Free.
Animal Photo. You pose a 3d skull model and select an animal species, and they give you a bunch of photo references for that animal at that angle. Super handy. Free.
Height Weight Chart. You ever see an OC listed as having a certain weight but then they look Wildly different than the number suggests? Well here's a site to avoid that! It shows real people at different weights and heights to give you a better idea of what these abstract numbers all look like. Free to use.


i know we joke about cis artists having the weirdest sense of anatomy, but also even when the anatomy is fine, no one seems to want to draw women doing normal things


A master post of Thomas Romain’s art tutorials.
There’s not enough space to post all of them, SO here’s links to everything he has posted (on twitter) so far : 1 2 3 4 5 6 7 8 9 10 11 12.
Now that new semesters have started, I thought people might need these. Enjoy your lessons!
Hi! I live your art so much and I was wondering if you have any tips on shading?
Two of the biggest things you want to think about are 1. your light source and 2. form shadows vs cast shadows — which your light-source will dictate.
Form shadows are created by the light source directly hitting the object and are generally softer. Cast shadows are the shadows cast from one object onto another and generally have sharper edges. This contrast between sharp and soft shadows is what’s going to make your drawing really come to life and the shadows read like they’re supposed to
Then, to further define shading, two things to think about are core darks and reflected light. Core darks are the darkest part of the shadow within the form shadow, and reflected light is what it sounds like, light from other objects that has bounced back.

here's a visual representation of that from here
This is all pretty technical and art fundamentals-y but you can easily put it into practice in your own stuff even if what you're making is more cartoony than realistic

see I drew a lovely deku with this technique
Love your art! What's your shading process / any tips? I really like how vibrant it is
Thank you!! also sorry this is a long post
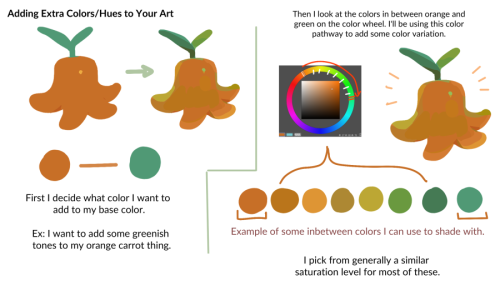
I usually start painting the character after I already have a background, super sketchy or with a placeholder (a photo usually), just so i know what colors to use

I fill the character with a color from the BG or a similar color and use the multiply blending mode

then i paint the lights on another layer with the "add glow" blending mode (i also pick the color depending on the bg).
I add another multiply layer for anything that needs to be darker, like stuff under the characters clothes


I paint a line with a saturated color between the lights and shadows, for example i added a bright red for the cape and light purple for their skin (? this is subsurface scattering, it doesnt happen on every surface but i like how it looks so i use it on everything lol.
Then i paint the lineart a similar color to each part of the character or you can paint it all red and use multiply


that's basically it
some tips (these are just things that work for me)
I think is better to paint the lights, not the shadows. it helps to see the shapes of the thing/character you're drawing better (its what i did with lambert ⬆️)
Draw backgrounds, i think it makes every drawing look more interesting and its easier to decide the lighting for the character, if you dont want to draw anything detailed you can paint something simple and blur it
i really recommend to start with a thumbnail, experiment with colors, perspective, composition, etc. before actually starting the drawing thumbnails of this post

this tip is something that everyone has heard before but use references, real life references like photographs for perspective and lighting, 3d models for anatomy and perspective, paintings to see how other artists stylize objects, bgs or characters. use references for everything
this tip is super important for me: check the values of your drawing, (lower the saturation, with the lineart hidden) if it isnt readable/ doesnt look good in black and white it most likely wont look good with colors (this depends on artstyle and personal preference tho)


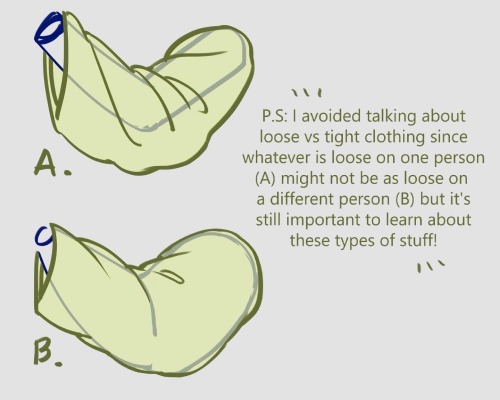
Overview of some topics when it comes to drawing characters who are burn survivors.
DISCLAIMER. Please keep in mind that this is an introductory overview for drawing some burn scars and has a lot of generalizations in it, so not every “X is Z” statement will be true for Actual People. I'm calling this introductory because I hope to get people to actually do their own research before drawing disabled & visibly different characters rather than just making stuff up. Think of it as a starting point and take it with a grain of salt (especially if you have a very different art style from mine).
Talking about research and learning... don't make your burn survivor characters evil. Burn survivors are normal people and don't deserve to be constantly portrayed in such a way.

edit: apparently tum "queerest place on the internet" blr hates disabled people so much that this post got automatically filtered. cool!
second way more important edit: How are people seeing this post where I specifically talk about burn survivors being normal, real people, and still tag this as "TW body horror"? Not a single one of these drawings or pictures is a fresh injury. All of them are healed. How the hell would you feel if someone tagged a photo of you as "trigger warning: gore"?
Disabled people are not your fucking body horror. Grow up.
art tips post
for all the artist following me
Have two sketchbooks: One for finished and high-quality art (stuff made with Prismacolor or Copic if you use that or art for your portfolio) and the other sketchbook for more messy doodles. This way you have a place to try new things and mess up as much as you need. When I only had one sketchbook I was scared to draw in it because I didn't want to mess it up
Do studies. I cant tell you how much I've improved just by doing studies of shoes, hands, noses, and all that. This works for when you have art block too since you’re not really making stuff up and just learning how real things work.
Learn from others. I’ve never taken a real art class because 1. I can’t afford it and 2. there’s no good art classes/programs at my school. I’ve been following several artists and learning from them over the years and they’ve helped me tremendously. Just please do not steal art because that is never okay.
Break down concepts. If you notice there’s something wrong with your piece then figure out why. You can’t get better if you leave mistakes and don't try to understand whats going on. If the color is weird figure out if the values look right or maybe its the saturation of the color.
Watch youtube tutorials. Here are some youtubers I think are pretty good art teaching all things art: Draw with Jazza | DrawingWiffWaffles | Proko | Baylee Jae
Have an inspiration folder/blog. Sometimes you just need a collection of starry nights or a misty forest or even a French bakery. All of those things can help you get inspired to draw. It could even be completely unrelated to what you plan to draw.
There are no dumb ideas in the creative process. If you want to draw a lizard in a dress go for it! If you want to draw various pastries with faces do it! Don’t let the thought of it being too dumb stop you because if I’ve learned anything in my several years of drawing it’s that an idea can lead to another and another and another and you may get a really good idea just from doodling dumb things.
Here’s a few things that can get you started on drawing better:
Dynamic poses | Dynamic clothes | Dynamic figure drawing
COMPOSITION | PERSPECTIVE | CONSTRUCTION
Anatomy:
Legs
Arms
Hands
Heads
Body (Female) (Male
Color Theory
Improving your sketchbook
Most importantly, don’t give up! You may not immediately get notes or followers but it’s more important you get better than to have popularity. How do you think those popular artists got to where they are now? To be good you’ve got to work at it.


HEYY my 2nd color tips pdf is now available ! ^o^ hope you enjoy!
BUY HERE or HERE
Can't afford art school?
After seeing post like this 👇
And this gem 👇
As well as countless of others from the AI generator community. Just talking about how "inaccessible art" is, I decided why not show how wrong these guys are while also helping anyone who actually wants to learn.
Here is the first one ART TEACHERS! There are plenty online and in places like youtube.
📺Here is my list:
Proko (Free, mostly teaches anatomy and how to draw people. But does have art talks and teaches the basics.)
Marc Brunet (Free but he does have other classes for a cheap price. Use to work for Blizzard and teaches you everything)
Aaron Rutten (free, tips about art, talks about art programs and the best products for digital art)
BoroCG (free, teaches a verity of art mediums from 3D modeling to digital painting. As well as some tips that can be used across styles)
Jesse J. Jones (free, talks about animating)
Jesus Conde (free, teaches digital painting and has classes in Spanish)
Mohammed Agbadi (free, he gives some advice in some videos and talks about art)
Ross Draws (free, he does have other classes for a good price. Mostly teaching character designs and simple backgrounds.)
SamDoesArts (free, gives good advice and critiques)
Drawfee Show (free, they do give some good advice and great inspiration)
The Art of Aaron Blaise ( useful tips for digital art and animation. Was an animator for Disney. Mostly nature art)
Bobby Chiu ( useful tips and interviews with artist who are in the industry or making a living as artist)
Sinix Design (has some tips on drawing people)
Winged canvas (art school for free on a verity of mediums)
Bob Ross (just a good time, learn how to paint, as well as how too relax when doing art. "there are no mistakes only happy accidents", this channel also provides tips from another artist)
Scott Christian Sava (Inspiration and provides tips and advice)
Pikat (art advice and critiques)
Drawbox (a suggested cheap online art school, made of a community of artist)
Skillshare (A cheap learning site that has art classes ranging from traditional to digital. As well as Animation and tutorials on art programs. All under one price, in the USA it's around $34 a month)
Human anatomy for artist (not a video or teacher but the site is full of awesome refs to practice and get better at anatomy)
Second part BOOKS, I have collected some books that have helped me and might help others.
📚Here is my list:
The "how to draw manga" series produced by Graphic-sha. These are for manga artist but they give great advice and information.
"Creating characters with personality" by Tom Bancroft. A great book that can help not just people who draw cartoons but also realistic ones. As it helps you with facial ques and how to make a character interesting.
"Albinus on anatomy" by Robert Beverly Hale and Terence Coyle. Great book to help someone learn basic anatomy.
"Artistic Anatomy" by Dr. Paul Richer and Robert Beverly Hale. A good book if you want to go further in-depth with anatomy.
"Directing the story" by Francis Glebas. A good book if you want to Story board or make comics.
"Animal Anatomy for Artists" by Eliot Goldfinger. A good book for if you want to draw animals or creatures.
"Constructive Anatomy: with almost 500 illustrations" by George B. Bridgman. A great book to help you block out shadows in your figures and see them in a more 3 diamantine way.
"Dynamic Anatomy: Revised and expand" by Burne Hogarth. A book that shows how to block out shapes and easily understand what you are looking out. When it comes to human subjects.
"An Atlas of animal anatomy for artist" by W. Ellenberger and H. Dittrich and H. Baum. This is another good one for people who want to draw animals or creatures.
Etherington Brothers, they make books and have a free blog with art tips.
📝As for Supplies, I recommend starting out cheap, buying Pencils and art paper at dollar tree or 5 below. If you want to go fancy Michaels is always a good place for traditional supplies. They also get in some good sales and discounts. For digital art, I recommend not starting with a screen art drawing tablet as they are usually more expensive.
For the Best art Tablet I recommend either Xp-pen, Bamboo or Huion. Some can range from about 40$ to the thousands.
💻As for art programs here is a list of Free to pay.
Clip Studio paint ( you can choose to pay once or sub and get updates. Galaxy, Windows, macOS, iPad, iPhone, Android, or Chromebook device. )
Procreate ( pay once for $9.99 usd, IPAD & IPHONE ONLY)
Blender (for 3D modules/sculpting, animation and more. Free)
PaintTool SAI (pay but has a 31 day free trail)
Krita (Free)
mypaint (free)
FireAlpaca (free)
Aseprite ($19.99 usd but has a free trail, for pixel art Windows & macOS)
Drawpile (free and for if you want to draw with others)
IbisPaint (free, phone app ONLY)
Medibang (free, IPAD, Android and PC)
NOTE: Some of these can work on almost any computer like Clip and Sai but others will require a bit stronger computer like Blender. Please check their sites for if your computer is compatible.
So do with this information as you will but as you can tell there are ways to learn how to become an artist, without breaking the bank. The only thing that might be stopping YOU from using any of these things, is YOU.
I have made time to learn to draw and many artist have too. Either in-between working two jobs or taking care of your family and a job or regular school and chores. YOU just have to take the time or use some time management, it really doesn't take long to practice for like an hour or less. YOU also don't have to do it every day, just once or three times a week is fine.
Hope this was helpful and have a great day.
"also apologies for any spelling or grammar errors, I have Dyslexia and it makes my brain go XP when it comes to speech or writing"


Someone wanted some facial advice, so I just collect some tips. Free to ask for more advice.
Ways to get to know your characters:
These are just some ways I do t, feel free to add your own tips!
Google sheets. Just google sheets. Make a sheet for your story and create categories to fill on your character's traits. Very simple example:

2. Making Pinterest boards. Listen maybe I'm biased because I'm on Pinterest more than I'm on Tumblr and it gives me the most intense nostalgia of any website/app ever, but it may be my most helpful tactic. This works in plenty of ways. Making a board for one story's character designs and making individual categories for each character in that board. Making individual board for each character's design, aesthetic, personality, whatever. No example but I think you get it.
3. I might sound like you lame ass ELA teacher from 9th grade or whatever when I say this, but plot mountains are really helpful. Now I don't mean the plot plot for all you, "I just start writing and am as surprised as my characters when everything goes to shit." writers like me, I'm talking about an internal plot. To explain, there is an external plot (exposition, rising action, climax, etc.) and internal plot (character development,) making external plot mountains isn't helpful for me because I want freedom in my writing. I know where it starts and sometimes where it stops and that's good enough, but writing the development of a character is good to outline just for the foreshadowing and because CHARACTER FLAWS ARE FUCKING IMPORTANT. (Cue the one post about eating mayo packets)
4. Mark their birthdays in your calendar. Like google calendar or whatever the fuck you use. Anyway, dedicate their birthday to just getting to know them. Make a wish list of presents they'd like, or a slideshow about the party activities they'd like, or a pinterest board about what their party theme would be. It's fun, I swear.
5. Make lists of a bunch of stuff. Their flaws, their strengths, their favourite thing, their pet peeves, their favourite people, their pets, their little quirks they have, etc.
6. Physical objects. Make them, buy them, or just stuff you already have. Make a little box of things they'd like or have. Treat them like a friend. A real person. It'll inspire you to write or draw more and you can come up with little backstories on the items.
7. Give them a catchphrase. Even if they never say it, it's cute. I like them. Most people do, I think.
Can't afford art school?
After seeing post like this 👇
And this gem 👇
As well as countless of others from the AI generator community. Just talking about how "inaccessible art" is, I decided why not show how wrong these guys are while also helping anyone who actually wants to learn.
Here is the first one ART TEACHERS! There are plenty online and in places like youtube.
📺Here is my list:
Proko (Free, mostly teaches anatomy and how to draw people. But does have art talks and teaches the basics.)
Marc Brunet (Free but he does have other classes for a cheap price. Use to work for Blizzard and teaches you everything)
Aaron Rutten (free, tips about art, talks about art programs and the best products for digital art)
BoroCG (free, teaches a verity of art mediums from 3D modeling to digital painting. As well as some tips that can be used across styles)
Jesse J. Jones (free, talks about animating)
Jesus Conde (free, teaches digital painting and has classes in Spanish)
Mohammed Agbadi (free, he gives some advice in some videos and talks about art)
Ross Draws (free, he does have other classes for a good price. Mostly teaching character designs and simple backgrounds.)
SamDoesArts (free, gives good advice and critiques)
Drawfee Show (free, they do give some good advice and great inspiration)
The Art of Aaron Blaise ( useful tips for digital art and animation. Was an animator for Disney. Mostly nature art)
Bobby Chiu ( useful tips and interviews with artist who are in the industry or making a living as artist)
Sinix Design (has some tips on drawing people)
Winged canvas (art school for free on a verity of mediums)
Bob Ross (just a good time, learn how to paint, as well as how too relax when doing art. "there are no mistakes only happy accidents", this channel also provides tips from another artist)
Scott Christian Sava (Inspiration and provides tips and advice)
Pikat (art advice and critiques)
Drawbox (a suggested cheap online art school, made of a community of artist)
Skillshare (A cheap learning site that has art classes ranging from traditional to digital. As well as Animation and tutorials on art programs. All under one price, in the USA it's around $34 a month)
Human anatomy for artist (not a video or teacher but the site is full of awesome refs to practice and get better at anatomy)
Second part BOOKS, I have collected some books that have helped me and might help others.
📚Here is my list:
The "how to draw manga" series produced by Graphic-sha. These are for manga artist but they give great advice and information.
"Creating characters with personality" by Tom Bancroft. A great book that can help not just people who draw cartoons but also realistic ones. As it helps you with facial ques and how to make a character interesting.
"Albinus on anatomy" by Robert Beverly Hale and Terence Coyle. Great book to help someone learn basic anatomy.
"Artistic Anatomy" by Dr. Paul Richer and Robert Beverly Hale. A good book if you want to go further in-depth with anatomy.
"Directing the story" by Francis Glebas. A good book if you want to Story board or make comics.
"Animal Anatomy for Artists" by Eliot Goldfinger. A good book for if you want to draw animals or creatures.
"Constructive Anatomy: with almost 500 illustrations" by George B. Bridgman. A great book to help you block out shadows in your figures and see them in a more 3 diamantine way.
"Dynamic Anatomy: Revised and expand" by Burne Hogarth. A book that shows how to block out shapes and easily understand what you are looking out. When it comes to human subjects.
"An Atlas of animal anatomy for artist" by W. Ellenberger and H. Dittrich and H. Baum. This is another good one for people who want to draw animals or creatures.
Etherington Brothers, they make books and have a free blog with art tips.
📝As for Supplies, I recommend starting out cheap, buying Pencils and art paper at dollar tree or 5 below. If you want to go fancy Michaels is always a good place for traditional supplies. They also get in some good sales and discounts. For digital art, I recommend not starting with a screen art drawing tablet as they are usually more expensive.
For the Best art Tablet I recommend either Xp-pen, Bamboo or Huion. Some can range from about 40$ to the thousands.
💻As for art programs here is a list of Free to pay.
Clip Studio paint ( you can choose to pay once or sub and get updates. Galaxy, Windows, macOS, iPad, iPhone, Android, or Chromebook device. )
Procreate ( pay once for $9.99 usd, IPAD & IPHONE ONLY)
Blender (for 3D modules/sculpting, animation and more. Free)
PaintTool SAI (pay but has a 31 day free trail)
Krita (Free)
mypaint (free)
FireAlpaca (free)
Aseprite ($19.99 usd but has a free trail, for pixel art Windows & macOS)
Drawpile (free and for if you want to draw with others)
IbisPaint (free, phone app ONLY)
Medibang (free, IPAD, Android and PC)
NOTE: Some of these can work on almost any computer like Clip and Sai but others will require a bit stronger computer like Blender. Please check their sites for if your computer is compatible.
So do with this information as you will but as you can tell there are ways to learn how to become an artist, without breaking the bank. The only thing that might be stopping YOU from using any of these things, is YOU.
I have made time to learn to draw and many artist have too. Either in-between working two jobs or taking care of your family and a job or regular school and chores. YOU just have to take the time or use some time management, it really doesn't take long to practice for like an hour or less. YOU also don't have to do it every day, just once or three times a week is fine.
Hope this was helpful and have a great day.
"also apologies for any spelling or grammar errors, I have Dyslexia and it makes my brain go XP when it comes to speech or writing"


“Thinking about compression from a side view”
Source: Anime Private School on Twitter
I forgot I have to be active here so here’s my Twitter tutorial on how to draw folds I made a while back to help a friend!


“How to draw folds ✍🏻👕✨”
Source: asayris_art on Twitter and patreon
Cool.

How To Paint Pearls
by koklico


“Notes on skirts and pants”
Source: miyuli on twitter


STORYBOARD/ANIMATIC TIPS
ko-fi✏️
I made these for my friends, but I thought that might be helpful for yall as well! hehe! Now whenever someone asks for storyboard tips I can throw this at them!


Examples of storyboards I made for fun:


A new tool lets artists add invisible changes to the pixels in their art before they upload it online so that if it’s scraped into an AI training set, it can cause the resulting model to break in chaotic and unpredictable ways.
The tool, called Nightshade, is intended as a way to fight back against AI companies that use artists’ work to train their models without the creator’s permission. Using it to “poison” this training data could damage future iterations of image-generating AI models, such as DALL-E, Midjourney, and Stable Diffusion, by rendering some of their outputs useless—dogs become cats, cars become cows, and so forth. MIT Technology Review got an exclusive preview of the research, which has been submitted for peer review at computer security conference Usenix.
AI companies such as OpenAI, Meta, Google, and Stability AI are facing a slew of lawsuits from artists who claim that their copyrighted material and personal information was scraped without consent or compensation. Ben Zhao, a professor at the University of Chicago, who led the team that created Nightshade, says the hope is that it will help tip the power balance back from AI companies towards artists, by creating a powerful deterrent against disrespecting artists’ copyright and intellectual property. Meta, Google, Stability AI, and OpenAI did not respond to MIT Technology Review’s request for comment on how they might respond.
Zhao’s team also developed Glaze, a tool that allows artists to “mask” their own personal style to prevent it from being scraped by AI companies. It works in a similar way to Nightshade: by changing the pixels of images in subtle ways that are invisible to the human eye but manipulate machine-learning models to interpret the image as something different from what it actually shows.
Continue reading article here