Curate, connect, and discover
Drawing Tutorial - Blog Posts

Here is the video. It doesn’t have much detail, but you can draw along with me if you would like.
Something that will help a lot is practicing drawing one part of a horse. Starting with simple head studies is a good example and may help to build confidence. By breaking a horses body down into shapes, it becomes easier to understand and ‘copy’ the shapes and lines.
One thing I get used to get stuck on all the time was added too much detail. Now, I only draw what is most prominent for a horse, ignoring all those tiny, unnecessary details.
Drawing in the manga-like style is about simplicity to a point. It is not called realism for a reason! (˵ ¬ᴗ¬˵) The goal is to be able to draw the same character over and over again efficiently and with less stress to the artist. The same can be said for drawing horses, in a way.
I hope that this helps. If anyone has any questions, I will try my best to answer them!
I have been asked to make a small tutorial on how I draw horses. I taught myself slowly using what I thought was what you were supposed to do, so if it seems ‘unconventional’, that’s probably why.
First step:
I begin by looking at my page or reference (if I am using one). If I am not using a strict reference, I like to imagine what the horse on the paper is going to be doing. Once I have envisioned what I would like to draw, I begin with the three circles concept.

I don’t fully remember where I heard of this, but it has stuck with me for a long time. Basically, I am drawing three circles to represent the body of the horse. The first circle is the shoulder and chest of the horse. The middle one is the belly/back of it connecting the back and front end together. And the last circle is basically the buttocks of the horse, the thighs, if you will.
After drawing said circles, I move on to the legs, neck and head. It’s hard for me to stay on one step, because I tend to jump around.

It is important to note that having a horse anatomy chart on hand is extremely useful! Especially if it is one showing the muscles. Circle 1 in this photo shows the area of the front leg which I believe is called the elbow joint. I draw a sort of upside down v to represent this joint (or whatever it’s called).
Circle 2 shows where I have drawn a line to better define the muscle and the bone that connects the head and shoulders.
Circle 3 shows the line I drew to define the muscle on the butt/thigh.
If you examine a horse, you will notice that they have many “lines” which define the different muscles/bones. Once you single these lines out, it will be easier to draw the horse because you are not focusing on all the tiny lines and details. The way I view a horse I want to draw, is by looking at it simpler. I only put to paper the basic lines and shapes I see, then add any details I think would make it look better.
Horse legs are very tricky. I believe the legs can either make or break the sketch. If they are out of proportion, it doesn’t matter how well the body is drawn, it still looks like trash.
In order to avoid out of proportion legs, I like to gage the distance between the ground and the horses hooves.

I estimate the length I want it to be, rough sketch the hooves, then “cut” the leg in half by inserting the joint. It should be roughly in the middle. When I look at a horses leg, I see an almost funnelled shape. It starts out wide at the top and thins out until it gets to the hoof.
The back legs are kind of tricky to draw. Actually, they’re very tricky.
I am unable to add a video tutorial here, so I will be posting in parts.
Hey friends!
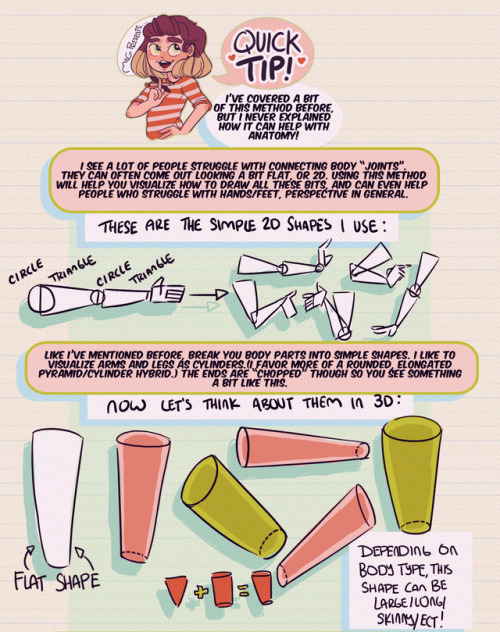
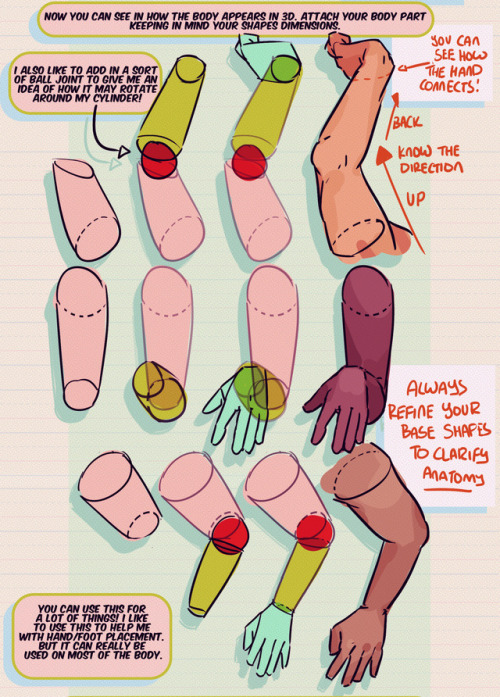
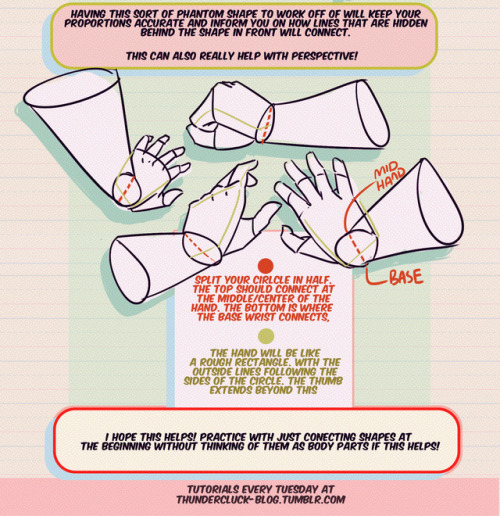
Meg here for this week’s TUTOR TUESDAY! This week I go over just a little trick that I like to use when drawing and connecting arms/hands/legs/feet ect. This helps me with foreshortening as well. I hope it helps you folks as well! I have tutorials that talk more specifically about hand/foot/leg anatomy here. If you have any tutorial recommendations send ‘em in here or my personal. Now go forth and I’ll see you next week!


tutorial for drawing characters with cleft lip! sorry that it's mostly unilateral-centric but it makes up the vast majority of resources and photos. still tried to get tips for drawing bilateral clefts in though.
please keep in mind that this is an introductory drawing tutorial and has some generalizations in it, so not every “X is Z” statement will be true for Actual People : )
if you draw any characters using this feel free to tag me!!


A guide to designing wheelchair using characters!
I hope this helps anyone who's trying to design their oc using a wheelchair, it's not a complete guide but I tried my best! deffo do more research if you're writing them as a character
hii! i hope your okay and doing well! ^.^ if you don’t mind, how do you render hair and skin so smooth????? it looks so yummy
Hello!!! I'm doing good and I hope your day/night is just as good!! 🫶🏼🫶🏼 Sorry it took so long but I made a tutorial for both and I really hope it's helpful 😭


Plus the brushes I used 🩷


How do you draw eyes like that, they're so pretty???? What????? /vpos
Ooo that's an interesting question I'm not sure how to explain it so here's a quick tutorial


I made an art/anatomy tutorial about birds! I hope people will find it helpful!


Any reference for hands is a gift from God.


my recipe for drawing hands!
(small note that this is a shortcut that is more abt style and ease than anatomical accuracy. it helps to take time to really properly study hands, makes it easier to bend the rules a bit like this and have it still look good!!)
(learn rules b4 u break them or whatevah)