Curate, connect, and discover
Tutorial - Blog Posts


My notes on how to draw a portrait

Anatomy. The human body 2.
I share the notes I have collected on how to draw a human figure.

Anatomy. The palm of a man.
I share the notes I have collected on how to draw a human hand.

Anatomy. The human body.
I share the notes I have collected on how to draw a human figure.

Here it is a simple cosplay prop tutorial for a simple classic bomb
.
.
.
This is my first post in english, and my first tutorial; I decided that I will (try to) post everything double and translated for the 2 language that I speak.

Ecco a voi un semplice tutorial sul come fare una classica bomba finta per cosplay.
.
.
.
Questo è il mio primo post in italiano , ho deciso che avrei postato doppio e tradotto nelle due lingue che parlo.
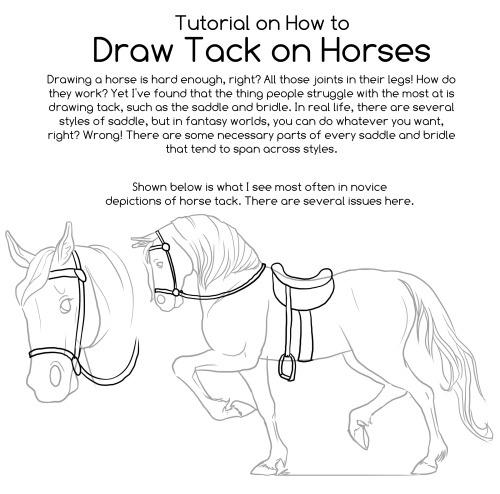
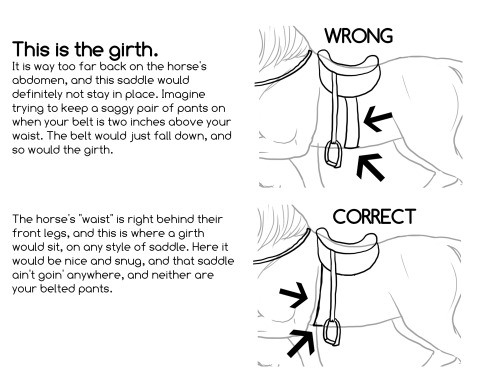
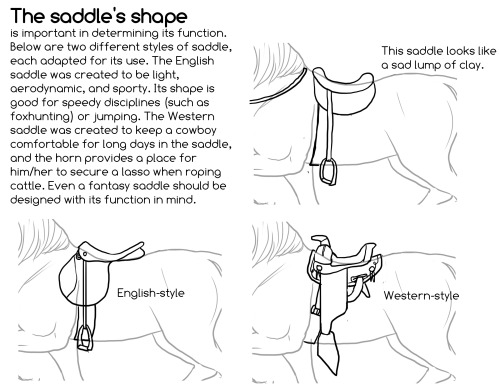
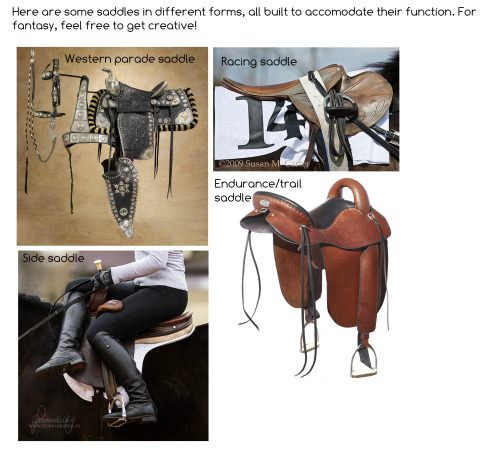
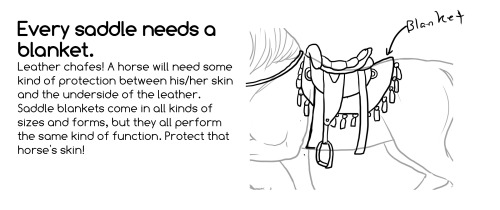
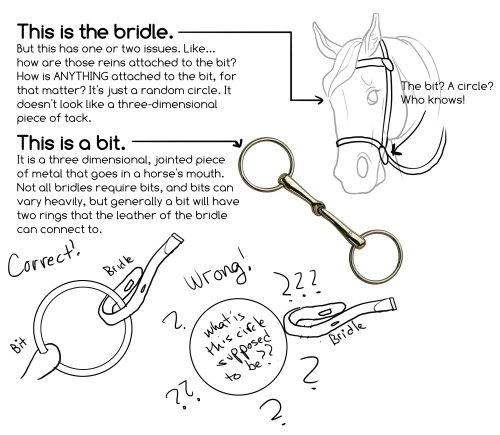
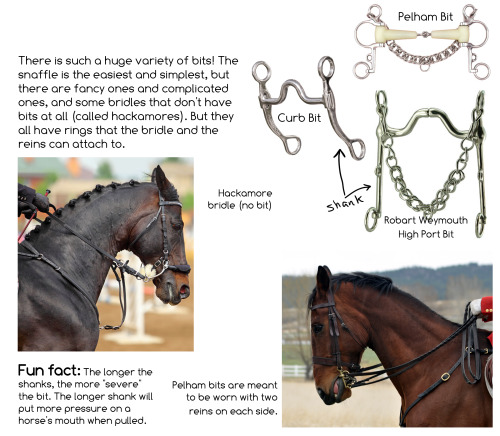
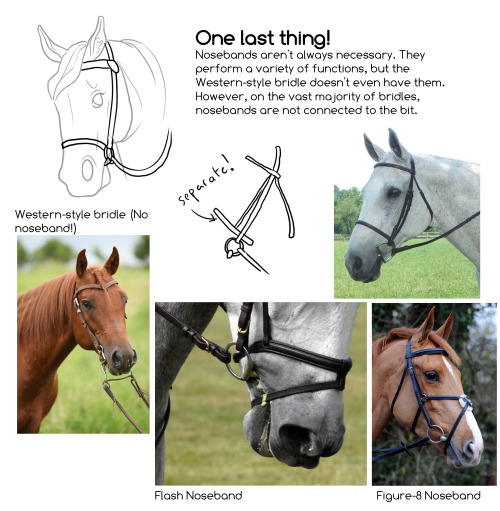
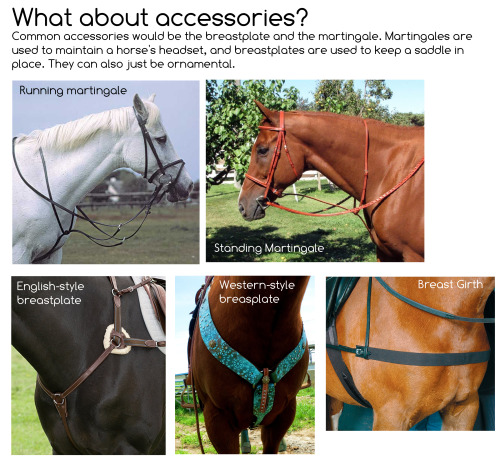
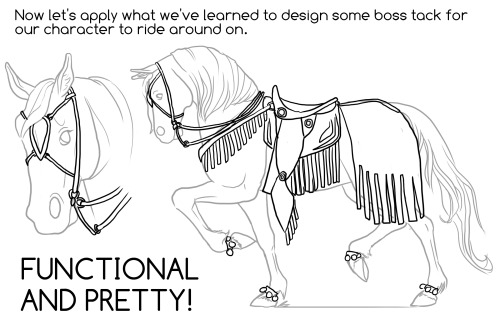
I am such a huge horse nerd and I apologize. :( But I’m really tired of seeing girths that are halfway down a horse’s stomach. This may not be interesting to anyone who is not me, but I like to draw fancy saddles and ridiculously long shanks on bits. Also, horses are the only animal I can draw, so I take advantage of that.
I hope this helps some frustrated non-horsey artists in at least some small way. Remember, when in doubt, add some buckles and some rings. :)

lil tut I did cuz someone asked!
(if you can't read it, open the image in a new tab ^^)
RELATED TUTORIAL (it's about how to know where to add shadow and light :>)
If you have any questions, ask! and if you have any suggestions for tutorials you want me to make in the future, lmk and i might get around to it! X3
✨reblogs greatly apricated✨
And i know! there's gonna be a massive amount of spelling mistakes TwT I'll try and fix them!

A few people on DeviantArt asked for a fur shading tutorial, and even though no one here asked for it, you get it too! >:3c


Overview of some topics when it comes to drawing characters who are burn survivors.
DISCLAIMER. Please keep in mind that this is an introductory overview for drawing some burn scars and has a lot of generalizations in it, so not every “X is Z” statement will be true for Actual People. I'm calling this introductory because I hope to get people to actually do their own research before drawing disabled & visibly different characters rather than just making stuff up. Think of it as a starting point and take it with a grain of salt (especially if you have a very different art style from mine).
Talking about research and learning... don't make your burn survivor characters evil. Burn survivors are normal people and don't deserve to be constantly portrayed in such a way.

edit: apparently tum "queerest place on the internet" blr hates disabled people so much that this post got automatically filtered. cool!
I like this
DUUUDDEEE your art is insane!! I ADORE the scales you draw and render, and how you make so much of your illustrations look like real work staff from WoF would make! Do you have any tips for scales? Rendering? Drawing them :0?
thank you so much!! for scales, i'd recommend avoiding circle shapes and instead go for a more angular hexagonal shape! it reduces weird gaps in between the scales and makes the texture look a lot more tight-knit and interconnected


as for rendering, i think my best tip would be to start with shadows first. make a shadow layer, fill it in entirely with the base color for the shadows, and carve out the light source by erasing parts of the shadow layer. I've been trying out a new method of rendering which takes a lot less time but gives the same if not better results (using a color layer on multiply above a greyscale render layer with a color overlay to add color to the shadows! i'll go more in depth with this once i have a finished example piece to break down)
and i usually render scales by filling in each individual scale above the lineart to create an alpha mask and i use a clipping group using the mask

scale mask (normal layer mode, 100% opacity)

set to "color dodge" at 40% opacity, additional "shadow" layer (black color layer set to "erase" above the layers in the clipping group) used to create depth!
to anyone in the areas impacted by the wildfire smoke, my #1 biggest piece of advice as someone whos been dealing with wildfire smoke in the NW united states for years, is build yourself a Corsi-Rosenthal Cube

they perform as well as expensive HEPA air cleaners, and are comparatively VERY inexpensive. all you need is a box fan, 4 air filters, a piece of cardboard, and some duct tape!!!!
i think it took us maybe a half hour to put ours together, if that, and we replace the filters every 3 months. it's really made a HUGE difference, both when the air quality is bad, but also with our allergies
Hi!! I love your art, and I was wondering if you have any advice for drawing things in perspective/foreshortening? I love how you draw your characters at different angles espec when they're doing an action, it just makes your art look so dynamic 😊


hopefully this helps!! ^^
OK Tumblr Geriatric Ward, let’s talk about your posture-
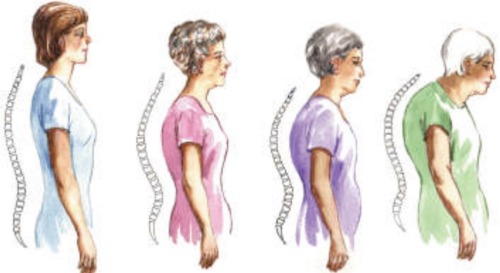
there are things you should be doing now to prevent yourself from starting to look like 🥀
Why does it matter? Future you would like to avoid the pain, limited motion, and fall risk that goes along with worsening posture.
What’s the focus?
1. Keep the flexibility in your spine
2. Stretch the muscles in the front
3. Strengthen the muscle in the back
Here are some simple things you can do daily while sitting and when you get up to go into the bathroom or the kitchen
Keep the flexibility by doing these repeated movements: 10 repetitions several times a day

The goal is to give yourself a double or triple chin. Keep your nose pointing forward, don’t let it tip up or down

Thoracic extension- use a chair with a seat back that comes up to the level of your shoulder blades. Try to bend back over the top of the chair without arching away from the seat back and without extending your neck. If the pressure from the top of the chair is uncomfortable you can place a towel there
Stretch the muscles in the front by using a door frame. This one will feel good afterwards

If this isn’t enough of a stretch you can do one side at a time. If you have the right arm up step forward with the right foot and turn slightly to the left. Then do it on the other side.

Strengthen the muscles in the back by squeezing your shoulder blades together for a count of 10 and then repeating 10 times. You can do this several times a day Hint: Don’t lift your shoulder blades up


There are lots more exercises for strengthening your back muscles but this is a good starting point and easy to do. I like doing it while driving
Tips:
Do the best you can
If it hurts stop
Envision future you saying thank you each time you do one of the exercises
HEADS UP im starting on a how-to googledoc for absolute beginners on music making!
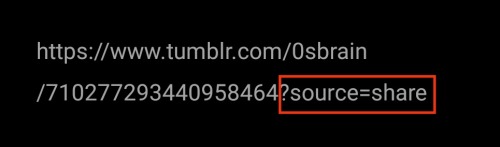
Tumblr added a bunch of tracking shit to share urls, so now ill teach you how to get rid of them
if you copy a url by sharing on the website, the link will look like this

getting rid of tracking in these is easy, just delete everything after the question mark and you are golden
in the case for the app, its slightly more complicated

first you have to delete at. that appears before tumblr(.)com the other tracking shit on this one has a lot more info, so please, clean app urls. after the first set of numbers, there's a / you have to delete everything after it
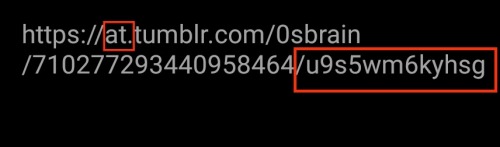
a clean Tumblr url should look like this

blog safely
People will tell you all sorts of nonsense about how to set your TV up to run off a computer instead of the tvs software. Here's what has worked for me over and over.
Disconnect your TV from the internet so it can't update/pull in ads
Get a computer with at least 4 gigabytes of ram and 32 gigabytes of disk space (thin clients are great for this), if you already have one even better!
Connect it via Ethernet if possible
Connect it to your tv, if your computer is older you may need a visual adapter, these are widely available but I recommend buying off ebay because that's the cheapest place ive found and the quality is almost always good
Install VLC
Install Firefox with ublock origin at least for ad blocking
Now you can watch off yt, twitch, whatever other sketchy sites for free content
If you want to torrent public domain media download qbittorrent
If your ISP is weird about it you can set qbittorrent to use a vpns network connection in the advanced configuration section of settings (mullvad is recommended for this but ymmv)
You can watch your public domain media with vlc now
Shopping for laptops fucking sucks ‘cause I don’t know shit about computers. I’ve never had a computer with a functional webcam or microphone or the ability to play computer games made later than 2005 or a speaker that could play anything loud enough to hear from more than a foot away. How the hell should I know what I want?!
Upsizing clothes! There are a million upcycling tutorials for clothes that are too big, but so few on how to make too small clothes you still love bigger!
Thank you for your suggestion! We all go through weight fluctuations in life, so it stands to reason our clothes should be able to fluctuate with us.
Resizing your clothes used to be a very common practice before the advent of fast fashion. Fast fashion sizing is extremely flawed, especially when it comes to plus size fashion, and we're stuck with a lot of vanity sizing, so it's a good skill to have regardless of whether you're looking to mend something old or buy something new.
How to upsize clothes:
Introduction:
There are many different ways to make a garment larger. The following list is not exhaustive, just a few ideas to get you started.
Grading patterns:
If you're making your own clothes, it's always useful to know how to modify a sewing pattern. The easiest way to adjust a pre-existing pattern to your size is slash and spread grading. First, you need to define which spots on the pattern need extra space. You then cut your pattern in that spot, and slide the resulting pattern pieces away from each other until you've got the size you need. Use paper to fill in the gaps. To ensure the resulting pattern makes for well-fitting clothes, make a mock-up and add, move, or remove darts where necessary to adapt it to your body type.
The image below shows potential slashing lines on a set of standard pattern blocks. Each line is a spot that allows you to add extra space. To read more about this process, check out the corresponding article by Threads Magazine.

(Image source) [ID: a diagram of slashing lines on a pattern block for a dress, bodice, skirt, sleeve, and a pair of pants.]
To make your clothes easier to let out in the future, make sure to provide ample seam allowance when cutting out your pattern pieces. This surplus fabric has several different uses, including giving you some wiggle room for when you need to size up your garment.
Now, let's take a look at pre-made garments.
Lengthening clothes:
A garment that's too short on you is easy to modify. Just add more material!
If it's a skirt or a dress, add ruffles to the bottom. Ruffles are easy to make by hand or with a sewing machine. You could also add lace, or wear the item with an underskirt.
For pants, let down your hem or sew on a new cuff. If this isn't enough, maybe consider turning your trousers into capri pants or shorts.
As for shirts, sewing an extra layer to the bottom edge is the easiest way to go, too. You could even combine two shirts into one to get an extra long shirt.
Another option is to cut your item in two and insert extra fabric between your separated garment parts.

(Image source) [ID: a pair of blue pants with cuffs sewn onto the bottom of the legs to lengthen them. The cuffs are made out of a fabric with a blue and brown geometric print.]

(Image source) [ID: a before and after picture of a red t-shirt that was lenghtened by adding in a patch of colourful fabric at the waist.]
Letting out seams/darts:
Remember how we made sure to have ample seam allowance earlier? When a garment has surplus fabric in the seams and you only need a little extra space, you can undo the seams of your garment and sew them back together again, this time with a smaller seam allowance than before. The Spruce Crafts has a pretty good tutorial on how to let out seams. You won't be able to make major size changes using this technique, but if you only need a few centimetres, this is a good way to go.
A lot of garments also have darts. Darts are fabric folds that are sewn down in strategic places to help the fabric follow the body's curves. If a dart doesn't fit you the way you want it to, then unpick the dart and try on the garment. Either leave the dart open, or pin the dart in place however you want it, then take off the garment again and sew the dart back together.
Be careful not to rip the fabric when using a seam ripper. Also note that removing entire darts may change the garment's fit.
You can also add custom darts to achieve a better fit, but that's a topic for another time.

(Image source) [ID: twelve different types of darts on a feminine bodice block.]
Adding extra fabric to your garment:
If we need to add more room than seam allowance or darts can provide us with, we need to add extra material. Remember those slashing lines we looked at earlier? If you're working with a pre-existing garment rather than a pattern, those are the perfect places to chop up your clothes and add in extra fabric.
Check your sewing stash for fabric that's similar in weight and material to your original garment, or go thrift shopping for an item you could use to upsize your garment. Long skirts and maxi dresses are a great source of fabric for alterations like these!
Lace inserts are also a fun choice to add some room, and if you're working with a knit item, you could even knit or crochet your own custom insert.
Define the area where you want to add extra fabric on your item, and measure how much you need. Draw a straight line on your garment with chalk/soap. Make sure the line doesn't cross any important structural or functional parts of your garment like darts or button holes: refer to the slashing diagram we saw earlier if you're not sure what spot to pick. Cut the line open (or unpick the seam if it's situated on a seam), and add in your extra fabric. Finish off your new seams so they don't unravel later on, and you're done!
You can add straight strips of fabric for extra width or length, or you could use flared panels or even godets to make your item flair out.
Want to see this technique in action? Check out this video by Break n Remake:
Some ideas:
This Pinterest user cut a straight line down the front of a t-shirt and inserted a lace panel to add extra width in the front of the garment.

(Image source) [ID: a blue t-shirt with a panel of dark blue lace added in at the centre front.]
Busy Geemaw cut open the side seams of a shirt and used flared panels to add some extra width in the bust and hip area.

(Image source) [ID: a green and white long-sleeved shirt with a striped flared panel in matching colours inserted at the side seam.]
This person added a panel to the sides of a pair of jeans to give them more space in the hip area. You could easily use a long straight panel or a panel that flares at the bottom to resize the entire garment instead of just the hips, or use a wide piece of elastic for extra stretch.

(Image source) [ID: a side view of a pair of light blue jeans with a dark blue wedge-shaped denim insert running down from the waist and ending above the knee.]
This person added a godet in the back of their shirt in order to get more space in the back.

(Image source) [ID: a blue and white plaid shirt with a white lace godet inserted in the back.]
Blue Corduroy enlarged a pair of shorts by opening up the side seams and adding in strips of fabric.

(Image source) [ID: blue denim shorts with a floral fabric insert at the side seams.]
You don't need to resize the entire garment if you don't want to. For example, One Brown Mom turned this ankle-length skirt with a too small waistband into a well-fitting knee-length skirt by taking advantage of the skirt's flared shape.

(Image source) [ID: a woman wearing a black shirt and a brown tartan knee-length skirt.]
Conclusion:
Throughout our lives, our weight will fluctuate and our bodies will change. There's no shame in this: it's just a fact of life. Therefore, knowing how to upsize an item that is too small for you is a useful skill to learn.
If you want more inspiration, check out these projects by Confessions of a Refashionista, One Brown Mom, and Thriftanista in the City.
Things that will make your computer meaningfully faster:
Replacing a HDD with an SSD
Adding RAM
Graphics cards if you're nasty
Uninstalling resource hogs like Norton or McAfee (if you're using Windows then the built-in Windows Security is perfectly fine; if you're using a mac consider bitdefender as a free antivirus or eset as a less resource intensive paid option)
Customizing what runs on startup for your computer
Things that are likely to make internet browsing specifically meaningfully faster:
Installing firefox and setting it up with ublock origin
adding the Auto Tab Discard extension to firefox to sleep unused tabs so that they aren't constantly reloading
Closing some fucking tabs bud I'm sorry I know it hurts I'm guilty of this too
Things that will make your computer faster if you are actually having a problem:
Running malwarebytes and shutting down any malicious programs it finds.
Correcting disk utilization errors
Things that will make your computer superficially faster and may slightly improve your user experience temporarily:
Clearing cache and cookies on your browser
Restarting the computer
Changing your screen resolution
Uninstalling unused browser extensions
Things that do not actually make your computer faster:
Deleting files
Registry cleaners
Defragging your drive
Passively wishing that your computer was faster instead of actually just adding more fucking RAM.
This post is brought to you by the lady with the 7-year-old laptop that she refuses to leave overnight for us to run scans on or take apart so that we can put RAM in it and who insists on coming by for 30-minute visits hoping we can make her computer faster.
Hey, so I’ve talked to you guys about navigating debt collection and I’ve talk to you guys about how to get hospitals to forgive 100% of your medical debt, now I want to talk to you about dental care.
Dental care is something sorely lacking in the US because of the disparity and access. So here’s a few things I think you should know :

Regular cleanings and exams are a lot cheaper than you think. They are one of the most significant things you can do for your oral health to prevent you from developing tens of thousands of dollars worth of work later on. I see a very expensive private dentist that I have seen since I was like 12. His cleanings and exams are $165 without insurance. That for me is doable twice a year. And again he’s expensive. There are many dentist offices, who specifically work with low income patients who will do it for less than 100. 
This is the most significant thing you can do for your teeth twice a year. You have to find the money. Doing this will save you tens of thousands of dollars and potentially heartbreak and heartache regarding your teeth. 
2. Dental schools, dental schools dental schools. If you are in a situation where you do not have insurance and you need thousands of dollars of work done. I want you to find your nearest, and most reputable, school and go get the work you need done.
Dental schools can do pretty much all of the services that regular dentist do and are done under the supervision of dental professionals or done by those professionals themselves to teach their students.
The major con of dental tools is that they take a long time to get back to you. I personally would never have any sort of dental surgery personally unless I absolutely needed it. But they’re great places to get cavities and even root canals if you need them. Especially if you need dental implants. 
Sliding scales. Many dentist offices around the country specifically work with uninsured patients and will offer sliding scales based on your income. Particularly dentist offices that are attached to federal health centers. So look for those. 
The average filling is $150-$250. Not cheap but I promise you you’re gonna want to dig deep and find the money because a $250 filling can save you $2000 of dental work. And, if you go to a dental school, you can probably get them done for $95-$100. 
Download this easy DIY clothing repair guide (only 10 pages) from Uni of Kentucky

link to PDF
https://fcs-hes.ca.uky.edu/sites/fcs-hes.ca.uky.edu/files/ct-mmb-147.pdf
Fumo plush pattern I made for customs making

This is a pattern I made from scratch and that I use for making my customs. It is based on the v1.5 models. Its the definitive version since I made tests before, as I said its from scratch, I could never sacrifice a legit fumo and bootlegs arent reliable for patterns snatching imo since their quality varies.
This is mainly for hand sewing and fairly beginner friendly. I havent tried on a machine because I dont trust these for such small details so I cant garantee you it will looks good if you assemble it with a cheap machine.
Seam allowances and other guides to match the pieces are included there.
I didnt include more hair pieces like the bangs because it would be too specific and this is a general pattern, not one for making [specific character]. I do these parts from scratch as well. If anyone would like help with hair of a specific character I can help (as long as its a character I know, else it would require me to use more time studying the design).
Make the design of the face before cutting the pattern. Methods I recommand using are: machine embroidery (the best), hand embroidery and heat transfert vinyle (require some skills). Ive made a hand embroidery tutorial a while ago. You can also maybe use the face of an existing fumo but its either very costly if you use a legit, or might not get good results if you use a cheap bootleg.
This PNG should be 1:1 scaled but ive added a square on the corner for good mesures. I dont use foot mesures (and i dont know how to use it) so its only cm sorry.
For any additional question, anyone is free to message me.
Customs ive made using this pattern:


Hand embroidery tutorial I mentionned (not at all lazy to link my post):


This ABSOLUTELY works.
I have used this for many years. Definitely b do it.
natural voice change
Lower
Boom Your Voice
How to deepen your voice naturally
How to talk with a deeper voice
How to deepen your voice (pre-t) Voice masculinization
Vocal androgyny in speech and singing
This Phone App Helps Transgender Users Change The Pitch And Tone Of Their Voices (buzzfeed article)
Higher
Voice Feminization
Pitch, range, resonance, depth
How to develop a female voice
Feminine voice techniques
The online Japanese course that no one talks about
Okay so I’m not a langblr and I never plan to be. However. What I do know from following a ton of them is that no one talks about Minato.
Now you may be thinking, ‘What’s Minato?’. It’s a website that was recommended to me by a Japanese Studies university professor for learning Japanse at home.
It’s literally the best resource out there and it’s free (funded by the Japanese government). You can choose between self-study and tutor support-led courses.
There are courses in Hiragana, Katakana, and the general language (from levels A1 to A2), and you can download a certificate and study record after completion of a course.
Here’s the link. Or if you want to type it: https://minato-jf.jp
Go. Learn some actual Japanese.
Hey i’m a fashion design student so i have tons and tons of pdfs and docs with basic sewing techniques, pattern how-tos, and resources for fabric and trims. I’ve compiled it all into a shareable folder for anyone who wants to look into sewing and making their own clothing. I’ll be adding to this folder whenever i come across new resources
https://drive.google.com/drive/folders/16uhmMb8kE4P_vOSycr6XSa9zpmDijZSd?usp=sharing