Curate, connect, and discover
Tutorial - Blog Posts

New character time! And whole new universe/story!
Tutorial
Species: Legend Guardian (VARIANT: THE RABBIT IN THE MOON) Gender: Male (He/Him) Sexuality: Asexual Demiromantic Height: 5'5" Voice Claim: ?
In a universe where becoming a legend is regarded as the best thing a person can become, there has to be a way for them to become a legend. In order to become a legend, people must journey to another plane where many trials await. If they pass the trials, they become legends- though stories that may or may not have actually happened on their journey. Though, they must live in this plane for the rest of time. Lest their stories be forgotten. If they fail their trials.... They die.
Tutorial's duty to this plane is to greet and, well, tutorialize those who come to the plane of the legends. Show them how to fight, how to survive, and how the plane works. However, Tutorial.... doesn't have a great track record.
There have been no new legends in years, because all have perished in the first area that Tutorial presides over. Not because Tutorial wants them to, but because the enemies are so difficult and the "heroes" were never ready for it to be so hard.
Tutorial has become jaded, sarcastic, and not really attentive of those who have come to try because of this. Why try? Why become connected and attached to the hero, when they will inevitably fail? Tutorial won't admit it, but he's become lonely and thinks himself terrible for failing so much....
But a hero will come one day, and seemingly pass the enemies with ease. Tutorial will become increcingly angry and upset at this. If they pass through to the next area.... What does that say about all the fallen friends Tutorial has watched die over the years? And what.... What does it say about Tutorial himself? That he failed them so much?
Hey friends!
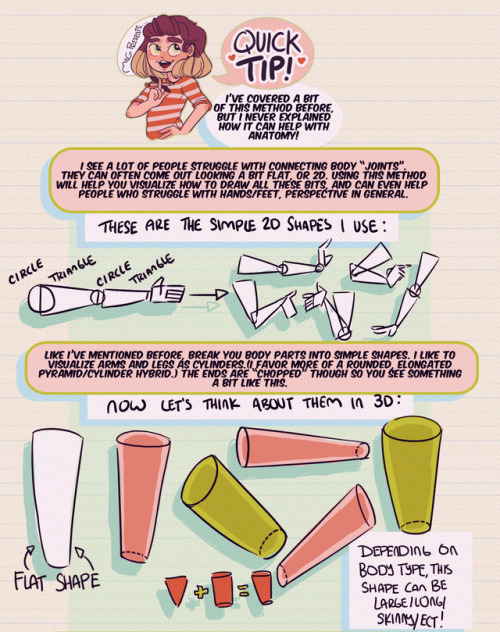
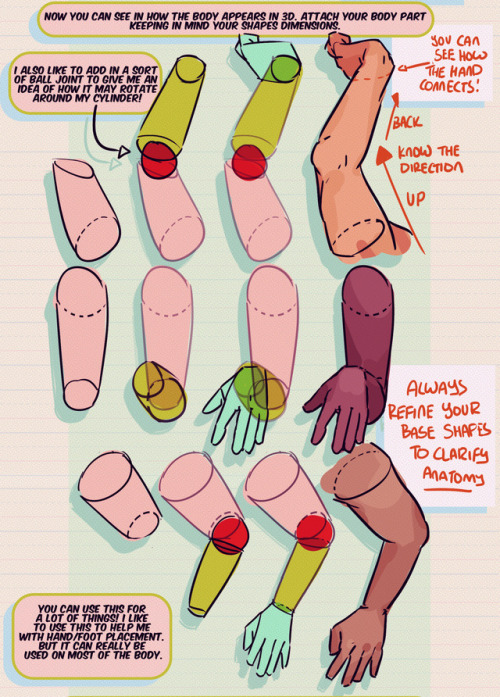
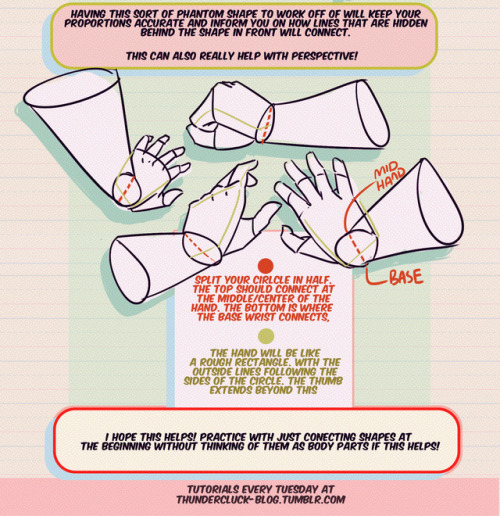
Meg here for this week’s TUTOR TUESDAY! This week I go over just a little trick that I like to use when drawing and connecting arms/hands/legs/feet ect. This helps me with foreshortening as well. I hope it helps you folks as well! I have tutorials that talk more specifically about hand/foot/leg anatomy here. If you have any tutorial recommendations send ‘em in here or my personal. Now go forth and I’ll see you next week!
SONIC POSING NOTES!!!!! !!

Just gonna repost this image because it is relevent. Once you got your stick man pose you can add those shapes on top.

Anyways, more notes, this time on the base shapes.


And that's all that came to mind. I'm working on an expession one too, they've been pretty fun to make.
Could I pretty please get some tips on drawing Blurr? I don’t know what I’m doing unfortunately

Hope this helps!
My advice is to always use tons of references but he’s drawn pretty inconsistently in the show so I just cherry pick my favorite styles and mix them together
This feels ~downy ~, how lovely that would be.


Wing Tutorial is HERE 🦅, now available on my Patreon✨ It includes full speedpaints, a step-by-step of the painting process, drawing tips + more!
How To Place The Song In Posts
Hi! So I got this ask in the comment section of one of my fics:
@isavulpix hi! how did you place the song thingy?
So here I am to show you how to do it!
Step 1:

When you decide to make your fic/post, if you want to add a song (or multiple ones), all you have to do first is click on this little headphones button.
Step 2:

Once you click the headphones button, you can type in the name of the song or the artist of your choice in the search bar ("search audio").
Step 3:

When you search the song you wish to put into your post, you choose which audio you want. When you make a decision like I did in the picture, all you have to do is click on it.
Step 4:

Now, the song that you chose is in your post, just as shown in the picture.
Step 5:

By pressing your finger on the song and holding it, you can actually move the song and place it wherever you want to in your post! If you wish to delete the song for whatever reason, you can just drag it down to the little trash bin at the bottom.

Do you see how I moved it here?
And there it is! I truly hope that my little tutorial helped you. Have a nice day/night!
♡
Wanted to try out a new technique.

So I wanted to understand colours better because essentially I sucked at it. I watched Emilyena's tutorial and she does a good job at explaining the concept!!!
Definitely learned some new thing to incorporate into my drawings now.
for the dragon gifs post you reblogged, could you elaborate on your tags? as someone who loves speculative/fictional biology, id be interested in hearing how actual gliding wings would work for dragons, if youre okay with talking about it of course :]
Gosh, basically.... the whole wing shape is wrong for gliding
Firstly, a majority of the dragons' wings do not have any base to them. base being the membrane that should go down their side


By far the worst offender seems to be arrax here, but like. all of the dragons have NO membrane going from their arms down their sides, the only one who appears to have more normal wings is syrax

It's got more base to the wings so this gif looks slightly more natural to me but not by much
NOW,, my disclaimer. I am not an expert in aerodynamics. So I am just going off what I know personally
First off, the wing shape in most of these dragons is elliptical (like in sparrows) which is good for powered flight (flapping), and when they ARE flapping, it does look very good!! Very powerful strokes etc.
However, because they are missing that base at the wing, a lot of the energy of the downstroke would simply just escape. Wings in general work by "trapping" wind underneath them, by making the air on top roll by at a different speed than the air underneath and generate lift that way, but if there's nothing TO lift... then it won't work
Animals who actually glide all have very specialized wings for it.
Eagles, vultures, condors, etc: all of them have IMMENSE wings, and they almost cannot do powered flight (at least not on the same level that sparrows can), they rely a lot on updrafts


Their wings are all very wide, but very rectangular!! the base of their wings is basically the same width as the rest of the wing, generally
This is true as well for SEABIRDS which are all gliding experts. Seabirds have VERY not wide wings, but they make up for that in length, and this very specialized shape they have allows them to glide for literal WEEKS without needing to land


Basically, I suppose it's something of a tradeoff? Even in these birds the base is incredibly proportionate to the shape of their wings and body, and they depend on wind currents over the ocean specifically. They've evolved for that
alithographica has this VERY GOOD little chart of what different functions wings can perform depending on their shape

I personally think the got dragon's wings are incredibly disproportionate, looking at wings on any other animal it immediately stands out that a whole chunk of wing is simply... gone. For no good reason other than aesthetic I think
And besides the anatomical error, they don't have a clear purpose to their shape, they kinda do everything all the time and its jarring to see on otherwise incredibly designed creatures and its also an immense shame. It would have been so cool to see different dragons have different flying techniques (the only different one we get is caraxes with his wing legs, but from what ive seen)


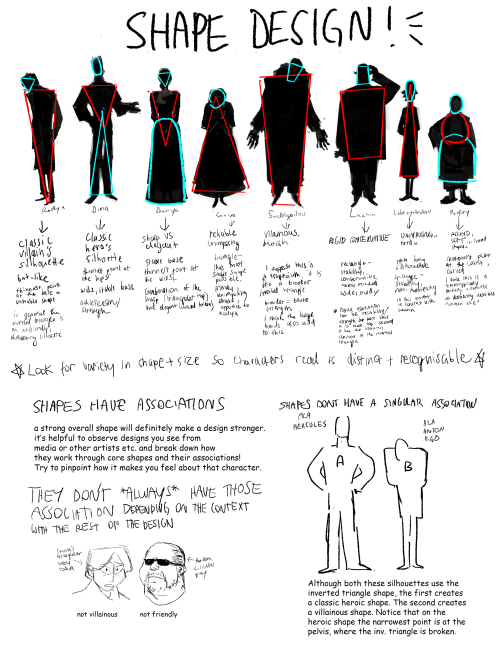
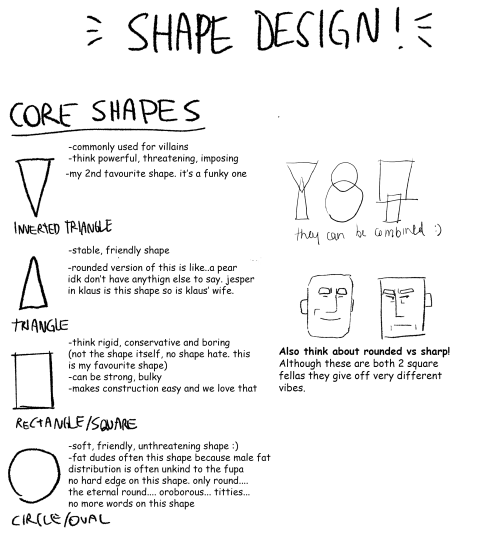
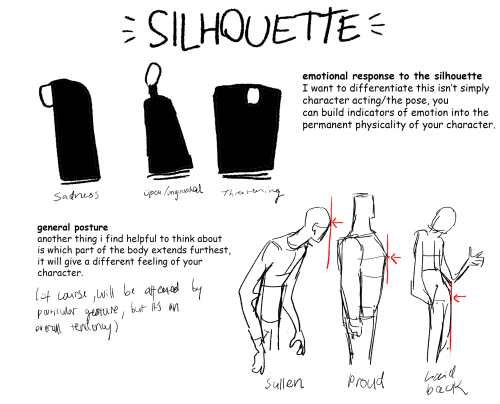
Part 2 of cino art tips is some basic tips on shape and silhouette design which are also principles I think about a lot :)
(also i'm so sorry i chose comic sans to write this in idk what i was thinking but i already flattened the layers)
i don't have any other obvious tips off the top of my head rn but feel free to ask anything you are curious about! i love getting asks uwu


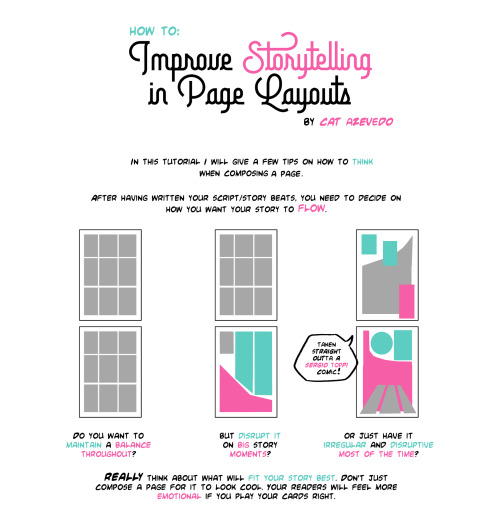
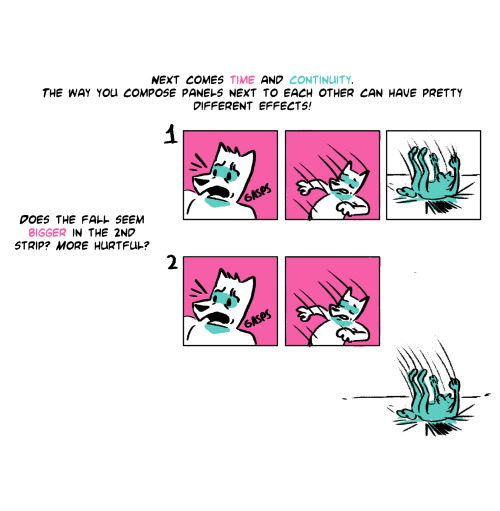
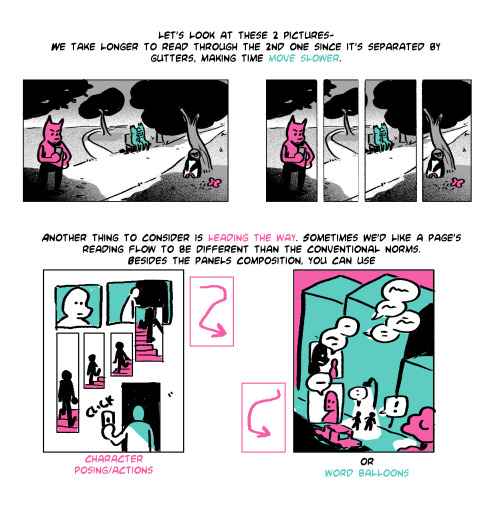

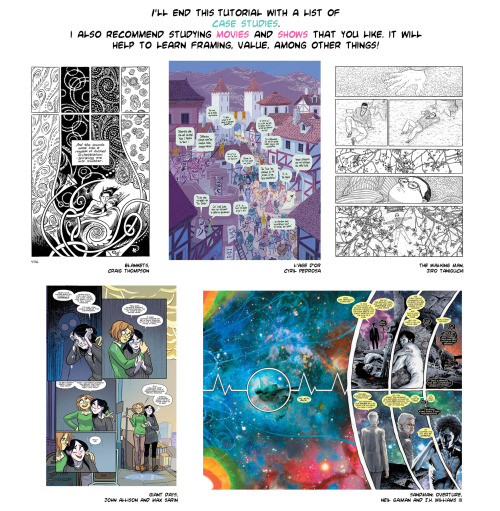
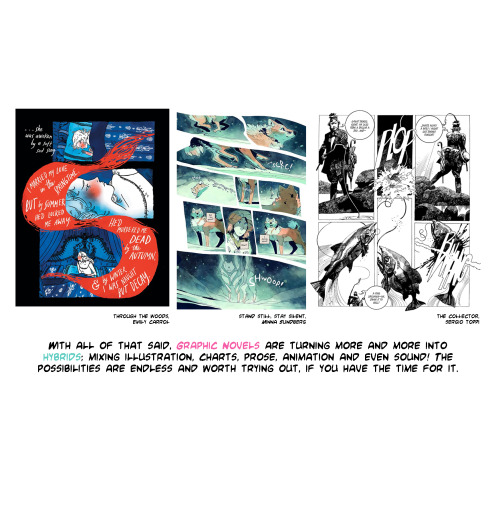
Did a small #tutorial for class on “How to Improve Storytelling in Panel Layouts”! Thought it might help some peepz around here!
My how 2 make comics is out now, for anyone that wants to start a comic but has no idea how or where 🤓
Get it here! ☀️


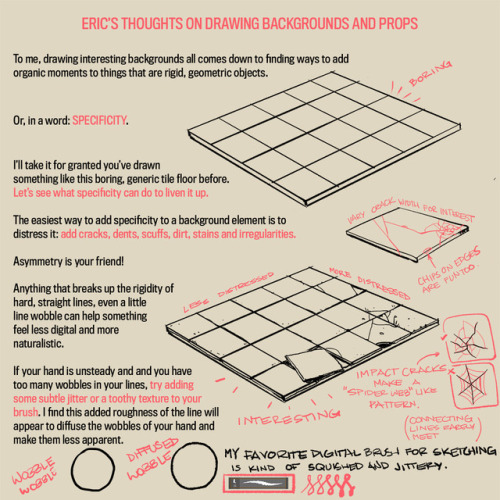
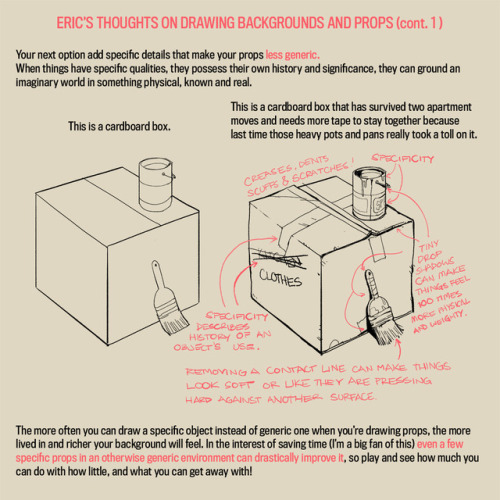
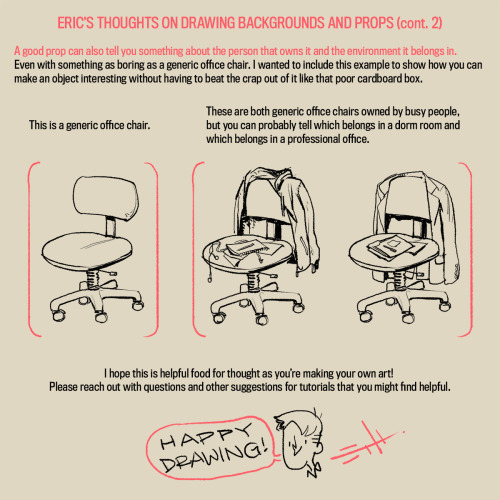
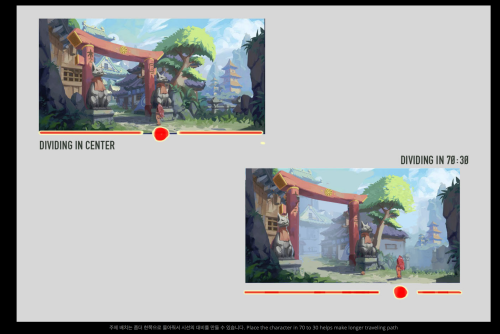
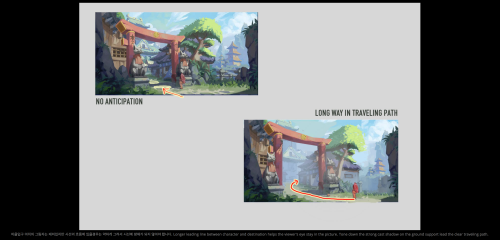
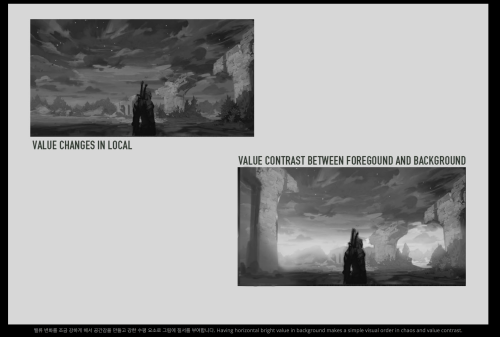
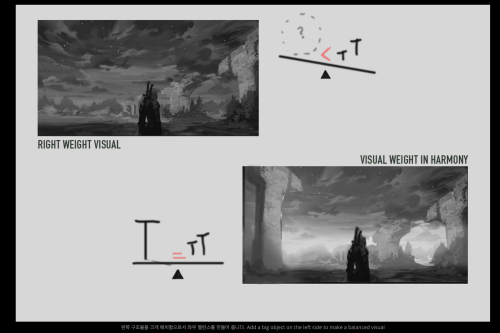
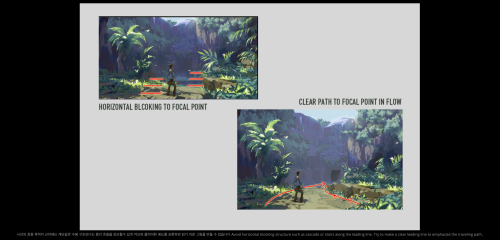
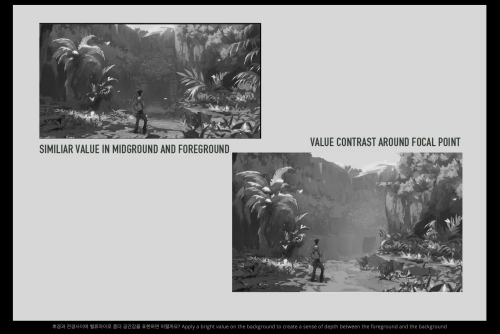
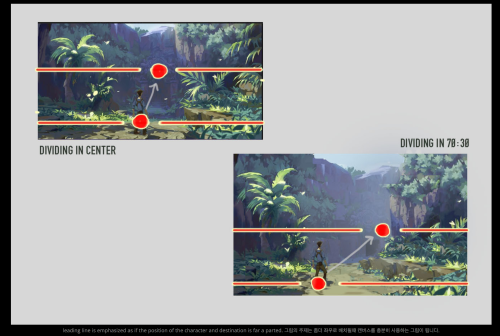
A long time ago an anon asked my thoughts about drawing backgrounds, so I finally got around to putting this together. It’s more prop-centric, but it still represents my philosophy to backgrounds.
I’ll try to do something more about drawing actual background spaces in the future! Please let me know what you think, if anything is unclear, or if you have suggestions for other tutorials you might find helpful!
a thing i only recently realized i knew abt character design that isnt just common sense apparently:
do not start ur character design by doing a full, refined turnaround/model sheet.
like. everyone in my childrens book il class is fuckin doing this even though most of them are illustration majors and its a huge mistake (our prof literally warned them against this, and YET)
any time you design a character, start by not caring. by just doing what feels right. dont settle on the first thing; play around. and then draw your character a shitload of times before u start a ref sheet
dont finish anything, just. do super fast sketches of them over and over and over. fill up a page or two. as you draw them theyll evolve. that will happen whether your sketch it out at the beginning or jump right into a final draft, and lemme tell u, u do NOT want ur character evolving and changing AFTER ur final draft. u want to get that out of the way early so u can get a decently consistent finished product
then when you go to do your model sheet you will already be able to keep your character on model without it bc youve drawn them a shitload of times. then it wont be “struggling to draw the character the same every time” itll just be “this is what the character looks like and i could draw them with my eyes closed bc of muscle memory”
dont just jump in and be like “shit i gotta have this full complex polished thing right out of the gate!” like. in the beginning, Do Not Work Hard. play. play a lot. and THEN do a refined drawing. your refined drawing will look way better, too, bc by then youll be completely comfortable with your design
its just a super bad idea to present a character as “heres a ref sheet” as soon as you have a concept. your concept will evolve and u have to let it, or else ur designs will look rushed/bad and your drawing will looks stiff and uncomfortable bc u can only draw ur character at a ¾ths view in a particular pose bc youve drawn them twice in ur entire life
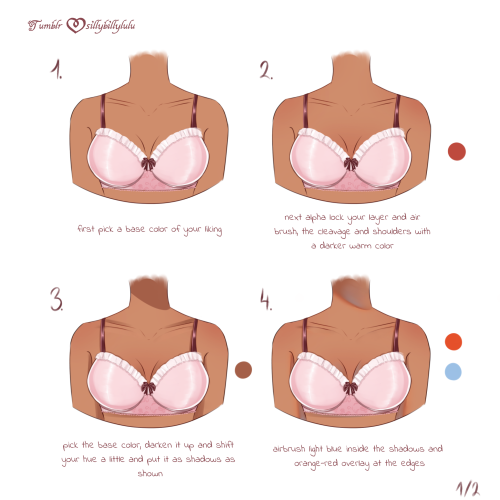
^Really helpful skin painting tutorial^
Awesome resource submitted by the lovely @girlymisticbaest! Be sure to go follow them!
Thanks for reading! ❤️
More useful articles and resources / support Art-Res | my art tumblr
Utilidade pública meu povo, para quem edita por celular e quer aprender a finalizar capas, um tutorial lindo e cheiroso feito pelo momô <3
— Como eu finalizo as minhas capas (IbisPaint X)

Atualmente algumas pessoas começaram a me perguntar como eu faço para finalizar as minhas capas, então, depois de juntar um pouco de coragem — e paciência — resolvi fazer um “mini” tutorial. Não prometo que a minha explicação será perfeita, no entanto, espero poder ajudar um pouquinho todos os capistas de celular sz Acredito que não será difícil de entender, ainda assim, aqueles que estiverem com dúvidas podem só me chamar no privado e/ou mandarem asks que irei tentar sanar todas as dúvidas!
⟨ Como mencionado no título; este tutorial é por meio do IbisPaint X — e apenas nele, não precisa de mais nada <3 ⟩
Bem, sem mais enrolação, a capa sem finalização está assim:

Claramente, já de cara, é notável a diferença de qualidade, mas não se preocupem, não é difícil chegar ao resultado mostrado acima!
O primeiro passo é simples (como todo o processo), você só precisa duplicar a camada com a sua capa pronta.

obs: para os que não sabem, é só apertar onde está circulado de vermelho para duplicar.
Então, vocês vão vir onde está circulado em amarelo (o lugar que fica a borracha e o lápis) e vão em filtros, que está circulado em vermelho.

Nisso, já no filtro, vocês vão ter que ir até a parte de Artístico — e clicaram em: Aberração Cromática (Movimento).

E vão colocar nessa configuração:
Distância: 1px
Direção: 192°
Ordem das cores: B-R-G
A capa vai ficar assim:

Porém, como podem notar, existem pequenas “manchas” de glich aos lado e iremos removê-las com a borracha (mas só os lados e muito pouco para não estragar o efeito!)
obs: por isso que temos uma camada duplicada, pois ela fará com que o que você removeu não diminua o tamanho a capa (600x400).
Ficará assim:

Lembrem-se: apenas removam com a borracha os lados onde o glich fica sobrando.
obs: não esquecer de juntar as camadas quando finalizar esses passos apertando o botão circulado em vermelho.

Agora, com apenas uma camada, nós voltaremos novamente para os filtros, dessa vez, contudo, iremos até Borrão — e apertaremos em: Máscara de nitidez.

Nessas configurações:
Raio: 3px
Força: 255%
E, em tese, a sua capa ficará com essa mesma finalização:
Espero ter conseguido ajudar um pouco, assim sanando a dúvida dos curiosos sz Qualquer coisa, como mencionado no começo, só me perguntarem! szszsz
the single greatest cloud brush I've worked with so far oh my god

just adjust opacity and size depending on how crisp lines you want

this shit took like 10 minutes


A guide to designing wheelchair using characters!
I hope this helps anyone who's trying to design their oc using a wheelchair, it's not a complete guide but I tried my best! deffo do more research if you're writing them as a character
hii! i hope your okay and doing well! ^.^ if you don’t mind, how do you render hair and skin so smooth????? it looks so yummy
Hello!!! I'm doing good and I hope your day/night is just as good!! 🫶🏼🫶🏼 Sorry it took so long but I made a tutorial for both and I really hope it's helpful 😭


Plus the brushes I used 🩷


My therapist cancelled on me and I'm sad and Booba helps so today I'm gonna teach you how to color booba for when you feel sad


Will I get flagged for this? 😿


to celebrate 3 years on testosterone, here’s a tutorial on how I do my quick and dirty screentones
I’m working on drawings for several zines that I hope to get riosgraph printed. I thought a neat way to get some interest for these future projects would be to show my work.
Watch me draw and listen to me ramble!
The face I’m drawing comes from a photo in “Artist’s Models 8: Practical Poses for the Working Artist.”
...aaaand here’s what I’m aiming for the final pieces to look like.

Also, I should have more copies of my “R. J. Hill: Therapist” comic for sale later in the week.
My Etsy: LINK / My Ko-Fi: LINK
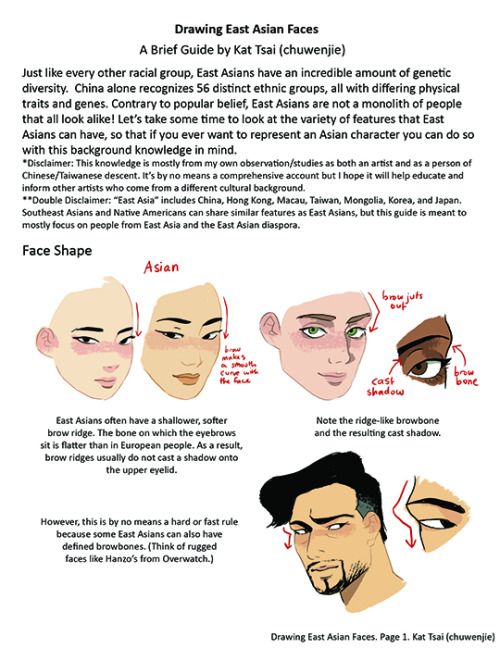
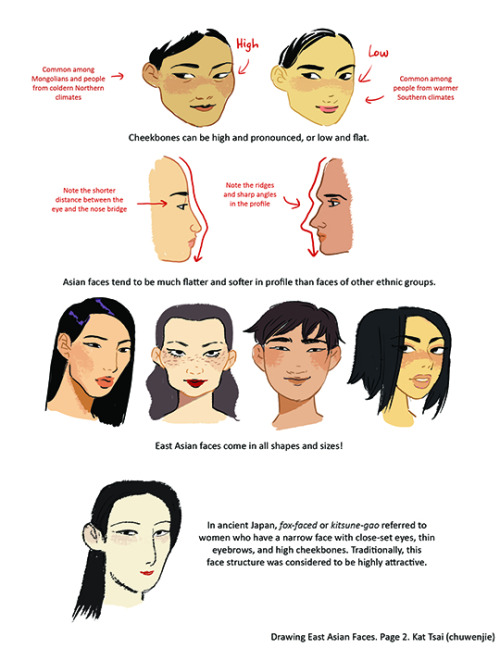

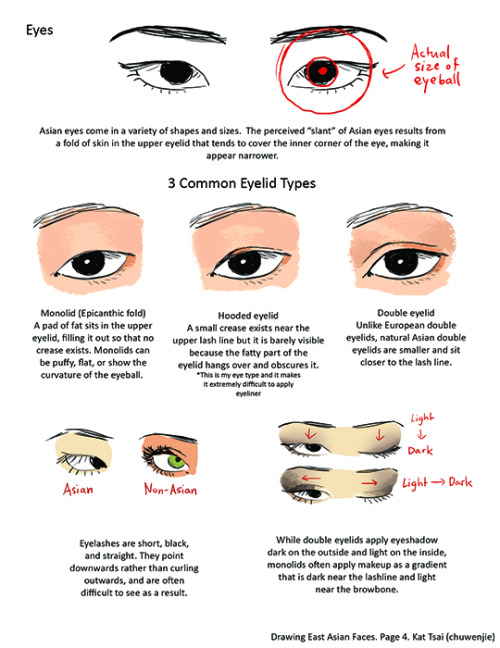

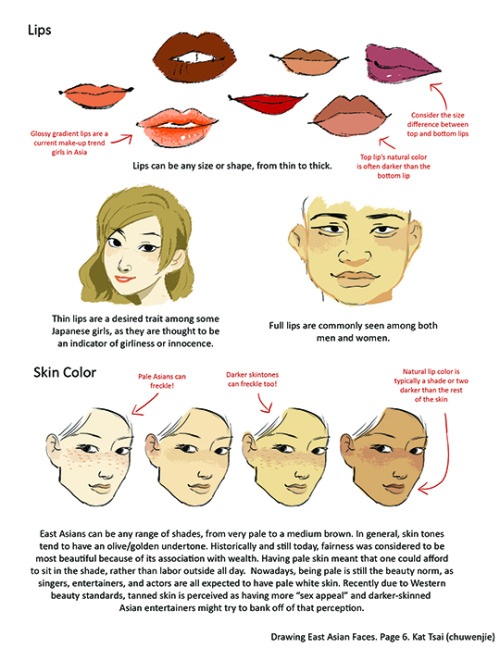
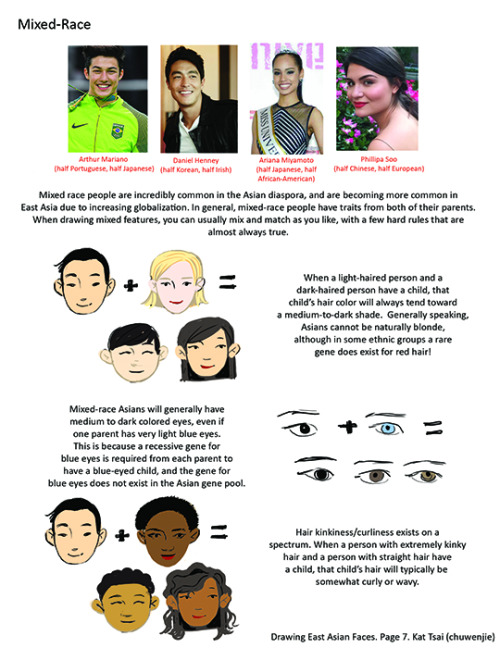
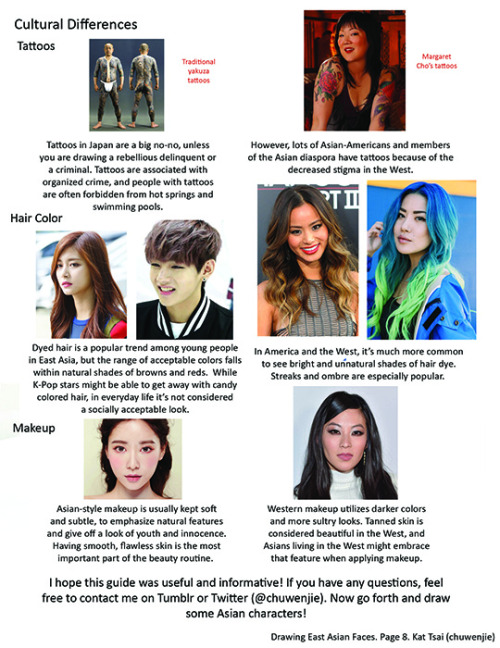
A compilation of stuff I know about drawing Asian faces and Asian culture! I feel like many “How-To-Draw” tutorials often default to European faces and are not really helpful when drawing people of other races. So I thought I’d put this together in case anyone is interested! Feel free to share this guide and shoot me questions if you have any! I’m by no means an expert, I just know a few things from drawing experience and from my own cultural background.


Source: FOERVRAENGD
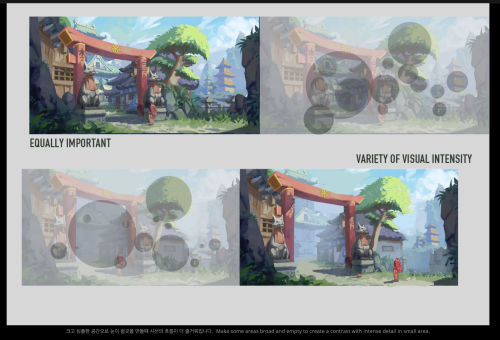
List of tutorials that helped me with environmental painting: “How to make your own Perspective Grid in PS” <—- this one is the best thing I’ve ever discovered. Srsly CHECK IT OOOOUUUUT! Snuffen’s Background Tutorial P1More or less ALL tutorials by Griffsnuff is awesome, so make sure to check out the rest of them! More or less ALL tutorials made by AquaSixio! List of youtube channels that also helped and inspired me: FZDSCHOOL - More or less one of the most known concept art-related resources I know on youtube. It’s great to sit and draw and just listen to the talking. SinixDesign- This guy is also great! He has some design workshops ever now and then where the viewers can send in their stuff for critique! very encouraging and inspiring! moatddtutorials- This guy is more into drawing than painting, and has a more cartoony style. He has interesting methods when it comes to perspective. And he also challenge himself in some of his videos (the engine block video is a great example of this) foxOrian- Also known here on dA for his awesome perspective and composition tutorials. He has a youtube channel where he posts some videos that might be interesting as well.
Notes on Character Design
Character design and drawing are tome-sized topics and even if I had all the answers (I don’t - I have a lot to learn), I’m not sure I could communicate them effectively. I’ve gathered some thoughts and ideas here, though, in case they’re helpful.
First, some general things: - Relax and let some of that anxiety go. This isn’t a hard science. There’s no wrong way, no rigid process you must adhere to, no shoulds or shouldn’ts except those you designate for yourself. This is one of the fun parts of being an artist, really - have a heady good time with it.
- Be patient. A design is something gradually arrived at. It takes time and iteration and revision. You’ll throw a lot of stuff away, and you’ll inevitably get frustrated, but bear in mind the process is both inductive and deductive. Drawing the wrong things is part of the path toward drawing the right thing.

- Learn to draw. It might seem perfunctory to say, but I’m not sure everyone’s on the same page about what this means. Learning to draw isn’t a sort of rote memorization process in which, one by one, you learn a recipe for humans, horses, pokemon, cars, etc. It’s much more about learning to think like an artist, to develop the sort of spacial intelligence that lets you observe and effectively translate to paper, whatever the subject matter. When you’re really learning to draw, you’re learning to draw anything and everything. Observing and sketching trains you to understand dimension, form, gesture, mood, how anatomy works, economy of line; all of the foundational stuff you will also rely on to draw characters from your imagination. Spend some time honing your drawing ability. Hone it with observational sketching. Hone it good.
I don’t think I’ve ever seen anyone do this sort of thing better than Claire Wendling. In fact, character designs emerge almost seamlessly from her gestural sketches. It’d be worth looking her up.
- Gather Inspiration like a crazed magpie. What will ultimately be your trademark style and technique is a sort of snowball accumulation of the various things you expose yourself to, learn and draw influence from. To that effect, Google images, tumblr, pinterest and stock photo sites are your friends. When something tingles your artsy senses - a style, a shape, a texture, an appealing palette, a composition, a pose, a cool looking animal, a unique piece of apparel, whatever - grab it. Looking at a lot of material through a creative lens will make you a better artist the same way reading a lot of material makes a better writer. It’ll also devour your hard drive and you will try and fail many times to organize it, but more importantly, it’ll give you a lovely library of ideas and motivational shinies to peruse as you’re conjuring characters.
- Imitation is a powerful learning tool. Probably for many of us, drawing popular cartoon characters was the gateway habit that lured us into the depraved world of character design to begin with. I wouldn’t suggest limiting yourself to one style or neglecting your own inventions to do this, but it’s an effective way to limber up, to get comfortable drawing characters in general, and to glean something from the thought processes of other artists.

- Use references. Don’t leave it all up to guessing. Whether you’re trying to design something with realistic anatomy or something rather profoundly abstracted from reality, it’s helpful in a multitude of ways to look at pictures. When designing characters, you can infer a lot personality from photos, too.


And despite what you might have heard, having eyeballs and using them to look at things doesn’t constitute cheating. There’s no shame in reference material. There’s at least a little shame in unintentional abstractions, though.
Concepts and Approach:
- Break it down. Sometimes you have the look of a character fleshed out in your mind before putting it to paper, but usually not. That doesn’t mean you have to blow your cortical fuses trying conceive multiple diverse designs all at the same time, though. You don’t even have to design the body shape, poses, face, and expressions of a single character all at once. Tackle it a little at a time.

The cartoony, googly eyed style was pre-established for this simple mobile game character, but I still broke it into phases. Start with concepts, filter out what you like until you arrive at a look, experiment with colors, gestures and expressions.
- Start with the general and work toward the specific. Scribbling out scads of little thumbnails and silhouettes to capture an overall character shape is an effective way begin - it’s like jotting down visual notes. When you’re working at a small scale without agonizing over precision and details, there’s no risk of having to toss out a bunch of hard work, so go nuts with it. Give yourself a lot of options.

Here’s are some sample silhouettes from an old cancelled project in which I was tasked with designing some kind of cyber monkey death bot. I scratched out some solid black shapes then refined some of them a step or two further.
Here’s an instructional video by Feng Zhu about doing much the same thing (only way better).
- Shapes are language. They come preloaded with all sorts of biological, cultural and personal connotations. They evoke certain things from us too. If you’re ever stuck about where to go with your design, employ a sort of anthroposcopy along these lines - make a visual free association game out of it. It’ll not only tend to result in a distinguished design, but a design that communicates something about the nature of the character.

Think about what you infer from different shapes. What do they remind you of? What personalities or attitudes come to mind? How does the mood of a soft curve differ from that of a sharp angle? With those attributes attached, how could they be used or incorporated into a body or facial feature shape? What happens when you combine shapes in complementary or contrasting ways? How does changing the weight distribution among a set of shapes affect look and feel? Experiment until a concept starts to resonate with the character you have in mind or until you stumble on something you like.
If you don’t have intent, take the opposite approach - draw some shapes and see where they go. (It’s stupid fun.)

You might also find it helpful to watch Bobby Chiu’s process videos in which he feels out his character designs as he paints.
- Cohesion and Style. As you move from thumbnails to more refined drawings, you can start extrapolating details from the general form. Look for defining shapes, emergent themes or patterns and tease them out further, repeat them, mirror them, alternate them. Make the character entirely out of boxy shapes, incorporate multiple elements of an architectural style, use rhythmically varying line weights - there are a million ways to do this

Here’s some of the simple shape repetition I’ve used for Lackadaisy characters.
- Expressions - let them emerge from your design. If your various characters have distinguishing features, the expressions they make with those features will distinguish them further. Allow personality to influence expressions too, or vice versa. Often, a bit of both happens as you continue drawing - physiognomy and personality converge somewhere in the middle.

For instance, Viktor’s head is proportioned a little like a big cat. Befitting his personality, his design lets him make rather bestial expressions. Rocky, with his flair for drama, has a bit more cartoon about him. His expressions are more elastic, his cheeks squish and deform and his big eyebrows push the boundaries of his forehead. Mitzi is gentler all around with altogether fewer lines on her face. The combination of her large sleepy eyes and pencil line brow looked a little sad and a little condescending to me when I began working out her design - ultimately those aspects became incorporated into her personality.

I discuss expression drawing in more detail here (click the image for the link):
- Pose rendering is another one of those things for which observational/gesture drawing comes in handy. Even if you’re essentially scribbling stick figures, you can get a handle on natural looking, communicative poses this way. Stick figure poses make excellent guidelines for plotting out full fledged character drawings too.

Look for the line of action. It’ll be easiest to identify in poses with motions, gestures and moods that are immediately decipherable. When you’ve learned to spot it, you can start reverse engineering your own poses around it.
- Additional resources - here are some related things about drawing poses and constructing characters (click the images for the links).


Lastly…
- Tortured rumination about lack of ability/style/progress is a near universal state of creative affairs. Every artist I have known and worked with falls somewhere on a spectrum between frustration in perpetuity and a shade of fierce contrition Arthur Dimmesdale would be proud of. So, next time you find yourself constructing a scourge out of all those crusty acrylic brushes you failed to clean properly, you loathsome, deluded hack, you, at least remember you’re not alone in feeling that way. When it’s not crushing the will to live out of you, the device does have its uses - it keeps you self-critical and locked in working to improve mode. If we were all quite satisfied with our output, I suppose we’d be out of reasons to try harder next time.
When you need some reassurance, compare old work to new. Evolution is gradual and difficult to perceive if you’re narrowed in on the nearest data point, but if you’ve been steadily working on characters for a few months or a year, you’ll likely see a favorable difference between points A and B.
Most of all, don’t dwell on achieving some sort of endgame in which you’re finally there as a character artist. There’s no such place - wherever you are, there is somewhere else. It’s a moving goal post. Your energy will be better spent just enjoying the process…and that much will show in the results.
(If you haven't answered this before) how do you do shading?
i havent !! and. i cant say this is gonna be any help but heres some of the things i try to keep in mind when im shading stuff

so youve got your flats on your initial drawing, the thing thats getting the business

then youve got find out where the light is coming from ! your light source is gonna determine where all the highlights and shadows are cast, and while it doesnt have to be EXACT, its generally a good rule to keep it pretty consistent through the drawing - sometimes youll probably have to deal with multiple sources, and each ones gonna be casting its own light and shadow ( and color by extension )

the intensity and sharpness of your shadows generally also reflects the brightness or closeness of the light ! basically if you wanna make something look BRIGHT, you gotta make sure the shadows are dark enough to get the idea across

so the actual shading part - the way i shade is by getting a brush on a very low opacity, picking the color i want for shadows and then layering the strokes over and over until i get about the darkness i want ( because im LAZY and i dont actually work with complex backgrounds a bunch, i can usually get away with drawing the shadows directly on the locked flat colors layer so theres nothing to clean up after )

afterwards i clean it up a little if i need to, add highlights while keeping in mind where the light is coming from, and start on the Detail Work ( it also might be helpful to keep in mind that highlights dont always go on the EDGE of things, but rather where the curve of something is - where the light would catch. this can help add a little depth and make flat things look rounded out ! )

and THEN its basically me zooming into the drawing at least 200%, putting another layer over the top of everything, and going over the outlines with a tiny brush so the harsh black is mostly gone ! there shouldnt be anything along the edge thats darker than the darkest part of the shadow ( with exceptions like the eyes and nostrils )
and thats mostly it ! i picked red for the shadow color, but picking your shading ( and flats ! ) based on the colors in your background can go a LONG way into making it seem like your character is actually in the environment

reflective light is also an important thing to keep in mind when choosing shadows and highlights - light and color doesnt always just hit an object and stay there, and even in the shade there could be light bouncing back from stuff like water or grass creating smaller, subtle highlights along the edges of things close by
not everything reflects the same way either ! something like a piece of wood is going to react differently than say, a metal ball

so you get your light source, basic highlights and shadows, not bad ! but then theres ALSO the light reflecting from the rest of the environment along the edge of the ball, and then finally the color from both the dragon and the ball reflecting a bit on each other
honestly though these arent RULES of drawing and more just guidelines i work with sometimes, and maybe your style of shading and highlighting looks completely different than this and thats ok !! - im still figuring a bunch of stuff out about light and reflections myself, and the great thing about art is that you can do whatever the hell you want with it
