359 posts
Latest Posts by jenna12381 - Page 4
Sly4 AU where Penelope is really missing, and there's a jealous doppelganger.
Sly4 AU where Penelope really was hypnotized and Bentley doesn't lose her.
Fixing Thieves in Time Penelope
Thieves in Time was a pretty good game overall, but I am STILL pissed about what they did to Penelope. ‘She thinks Sly is a bad influence’ like excuse me? Even if that made any kind of sense (it doesn’t), am I the only one who remembers that she had a bit of a crush on Sly when she first joined the Cooper Gang? And suddenly her inventions are awful, even though they recruited her because she was as good if not better than Bentley? I call bullshit, fuck you very much.
I’ve come up with three alternate ways they could have done Penelope’s story that actually make sense and don’t feel out of character:
Option 1 Mind Control: Le Paradox has Miss Decibel hypnotize Penelope to make her give him the designs for the time machine. He decides to keep Penelope on-hand to maintain his blimp, and to serve as a hostage should the Cooper Gang uncover his plans and try to stop him. Upon their arrival in England, Sly and the Gang immediately learn that Penelope is working for Le Paradox and are devastated. During a recon mission, Sly and Bentley discover devices similar to Miss Decibel’s record players, which keep Penelope hypnotized. Bentley immediately begins drawing up plans to destroy the devices and free Penelope. The boss fight against her still happens, but with the plan being to destroy the hypnotic devices keeping Penelope under Decibel’s control. The Cooper Gang succeeds and Penelope is freed, reuniting with Bentley and rejoining the Gang for the rest of the game.
Option 2 Double Agent: Penelope catches wind of someone trying to get their hands on the designs for the time machine, and does a little investigating on her own. This leads her to Le Paradox, who offers her a position working for him. Recognizing the threat Le Paradox’s plan poses to her friends and boyfriend, Penelope agrees, and she sabotages his plans and tech every chance she gets. Throughout the game, she leaves clues for the Cooper Gang to find (such as the sheriff’s badge), trusting them to thwart Le Paradox’s operations. She’s ordered to go to England to work alongside the Black Knight, who is revealed to be Raleigh from the first game (Le Paradox arranged his escape from prison in exchange for a chance at revenge on Cooper and the Gang). In the final fight, Penelope reaffirms her allegiance to Bentley and the Cooper Gang, and she and Bentley work together to dismantle the giant robot, allowing Sly to land the final blow to take down Raleigh. As in Option 1, Penelope and Bentley reunite, and Penelope rejoins the Gang for the rest of the game.
Option 3 Dangerous Threats: Le Paradox threatens to erase Bentley from history unless Penelope gives up the designs for the time machine to save him. Terrified of losing her true love, Penelope reluctantly agrees, and Le Paradox keeps her close by as a hostage and to prevent her from tipping off Bentley and the Gang. She is sent to Medieval England and is kept prisoner in the castle by the Black Knight (who could be Raleigh as in Option 2, or a new character) and is forced to design and build the mechanical guards for him. Once in England, Sly discovers Penelope’s location and sneaks into the castle to confront her. When she reveals Le Paradox’s threats, Sly reassures her that together they can keep Bentley safe, and convinces her to escape with him and return to the Gang. Penelope and Bentley reunite at the hideout, and she gives the Gang useful information about the Black Knight’s plans and weaknesses. During the boss fight, Penelope again comes through for her friends by being the one to finish off the Black Knight and reveal the next time period they need to travel to.
In all three versions, Penelope and Bentley both serve as tech experts during the final confrontation with Le Paradox, making use of their combined talents to help achieve victory (while also being totally adorable together: finishing each other’s sentences, hugging and holding hands, kissing, all of it).
Got a request from @mx-kit for this pinup of penelope from Bentley's Hackpack. As always, I take any requests for future acquisitions

Inner Conflict Prompts
Have a character wrestle with guilt over a past mistake.
Introduce a scenario where a character must choose between two equally important things.
Show a character struggling with their own identity or sense of self.
Have a character battle their own fears or phobias.
Introduce a moral dilemma that challenges the character’s values.
Show a character torn between loyalty to their friends and their personal ambitions.
Reveal a character’s internal struggle with jealousy or envy.
Have a character grapple with feelings of inadequacy or imposter syndrome.
Show a character dealing with the aftermath of a traumatic event.
Have a character question their own sanity or reality.
Character Strengths
adaptable / adventurous / ambitious / amiable / articulate / attentive / bold / brave / calm / candid / capable / compassionate / confident / considerate / courageous / creative / curious / decisive / dedicated / determined / diligent / diplomatic / empathetic / energetic / enthusiastic / fair / faithful / forgiving / friendly / generous / gentle / genuine / hardworking / honest / humble / imaginative / independent / insightful / intelligent / intuitive / inventive / joyful / kind / loyal / mature / modest / motivated / observant / optimistic / organized / patient / perceptive / persistent / practical / proactive / reliable / resilient / resourceful / respectful / responsible / self-aware / self-disciplined / sincere / supportive / tenacious / thoughtful / trustworthy / understanding / wise / witty
How does the gang (and Carmelita) play Among Us?
Sly as Crewmate: Possibly the worst Crewmate, as he gets distracted and, weirdly enough, doesn’t understand the maps. Will lie about his location or describe it badly on purpose just so he gets yeeted out the air vent and can fly around as a ghost the rest of the time. Only once Sly is a ghost will he ACTUALLY do his tasks with any seriousness.
Sly as Imposter: Knows every vent location on every map and the best way to get from place to place through the vent systems. Sabotages a lot and waits at electrical for people to come fix it, then vents out and waits for body report. The fact that he plays dumb on Crewmate usually gets him off the hook for Imposter. Unless someone is really suss on him, you want Sly as your fellow Imposter.
Bentley as Crewmate: Best Crewmate. Seriously. Has lightning fast reflexes for every task, and will actually take the time to teach you if you’re new. He is, however, extremely bossy during emergency meetings, and is immediately suss on everyone who isn’t new. If you don’t have a good alibi, you’re getting yeeted. He also usually calls Emergency Meetings with the button to tell everyone who the Imposters are. If he thinks he got one Imposter and the other is going to kill him, he tells everyone who he thinks is the most suss, and he’s usually right.
Bentley as Imposter: Has a different strategy for every map and knows how to hide bodies. He knows what to look out for and rarely vents. If his fellow Imposter is REALLY good, he’ll sit back and watch the fireworks. His favorite thing to do is not kill anyone and let people throw suspicions around. However, he’s not a good ally, and will IMMEDIATELY sacrifice fellow Imposters if others are suss on them.
Murray as Crewmate: Murray is a bit clumsy at the game in general, but he tries his best to complete tasks. He’ll often vote with the group and is usually sussed on because he’s usually staring at his map. Literally the worst at spotting bodies.
Murray as Imposter: His favorite thing to do is hide in vents and then pop out to kill someone before diving back into the vent. Doesn’t self-report because he knows it looks bad, since he never finds bodies. He excels at double kills with other Imposters because he’s good at reading the in-game “body language.”
Carmelita as Crewmate: Like the detective she is, she is always suss on everyone, and is a new player’s worst nightmare. She has the visual distance of Crewmates and Imposters memorized, and prefers to play with a faster discussion and voting time. She’s usually pretty good at figuring out the Imposters, and typically leads the vote.
Carmelita as Imposter: She knows the game well and uses this to her advantage. She knows how to fake tasks, and will usually follow her fellow Imposter around, either to make a double kill, or to wait until they kill, then report. She also usually self-reports, though if she plans to do this, she makes sure she has a half-decent alibi and is seen as “safe” by other players. However, she dislikes being the only Imposter, as this is when she makes the most mistakes.
Conflict Prompts
Have two main characters get into a heated argument that escalates.
Introduce a rival who challenges your protagonist’s goals.
Have a character betray the group, creating distrust and tension.
Make a natural disaster strike, forcing characters to work together despite differences.
Have your protagonist face a moral dilemma that splits their friends’ opinions.
Introduce a character with opposing beliefs or values.
Make resources scarce, leading to fights over necessities.
Have a long-buried secret come to light, causing conflict among characters.
Create a situation where characters must choose between loyalty and personal gain.
Have an authority figure issue an unjust order, causing characters to rebel.
Thieves In Time Redux Meme #15

Seriously, fans? Why does Sly get to have all the fun?
I know having Penelope go that hard is a bold move, but come on. If she started this whole mess, and feels a need to correct her mistakes, shouldn't she end it herself?
We can even have her feel like she has to do it alone, or else her attempt to atone for what she did won't count.
But because I'm not a monster, let's also have the rest of the playable cast join her so they can kick some skunk tail!
And for good measure, Penelope also gets to finish Le Paradox off. Complete with a speech on what she learned about friendship.
Of course, she will have to be told her attempt did count. And that she nailed it. And no, Sly will not be lost in time.
Showing 'Determination' in Writing
Jaw set firmly, lips pressed into a thin line.
Eyes focused intensely, not wavering.
Shoulders squared, standing tall and firm.
Fists clenched tightly.
Taking deep, steady breaths to maintain calm.
Saying, “I will do this” with conviction.
Pushing back sleeves as if preparing for action.
Marching forward with purposeful steps.
Ignoring distractions or interruptions.
Voice steady and unwavering.
Nodding to oneself as if reaffirming resolve.
Gritting teeth in concentration.
Placing hands on hips confidently.
Writing or speaking with clarity and precision.
Pounding a fist into an open palm.
Looking straight ahead, not letting gaze drift.
Tightening grip on tools or objects they’re working with.
Breaking tasks into manageable steps and tackling them one by one.
Keeping eyes on the goal, not looking back.
Saying, “Nothing will stop me” with steely determination.
Thieves In Time Redux Meme #14
I couldn't resist.

Penelope is going to go through a lot in this story. While simultaneously keeping a dark secret of betrayal, she learns to like Sly, Bentley, and Murray all over again.
She ends up having a change of heart, and finally starts to see the boys as her family... only for Le Paradox's reveal at the end of Episode 5 to nearly rip that away from her, and right when their trust in her is at an all time high.
Showing 'Anger' in Writing
Clenched fists and knuckles turning white.
Eyes narrowing to slits, brows furrowed.
Jaw muscles tensing visibly.
Speaking through gritted teeth.
Taking deep, sharp breaths.
Pacing back and forth, unable to stay still.
Pointing a finger accusingly.
Voice raising to a shout or a growl.
Kicking or punching nearby objects.
Lips pressed together in a thin line.
Rapid, agitated movements.
Slamming doors or throwing objects.
Standing with arms crossed tightly.
Glaring intensely without blinking.
Face turning red or flushed.
Breathing heavily and erratically.
Snapping at others for minor things.
Shaking with barely contained rage.
Muttering or growling under their breath.
Eyes blazing with fury.
Regretful Gestures
"I wish I could take back what I said."
"If only I had listened to you sooner."
"I can’t believe I hurt you like that."
"I should have been there for you."
"I regret every moment I made you feel unloved."
"I should have appreciated you more."
"I didn’t realize what I had until it was gone."
"I’m sorry for not being the person you needed."
"I wish I could undo all the pain I caused."
"I’ve made so many mistakes that I can’t fix."
Ways to Make a Character Apologise
"I'm sorry."
"I just...want to say I'm sorry."
*brings gift* "This is to make up for what I did."
"You're right, it was my fault."
"I have some reparations to make."
"I would like to make it up to you, if you give me a chance."
"I just need one chance. To prove that I truly regret doing what I did."
"Saying sorry does not make me any less smaller. It's just the right thing to do."
"Do you think you could forgive me?"
"You deserve this apology, so take it grandly."
"I will do anything to prove how sorry I am."
*goes to lengths to apologise* "I'm still not done apologising."
"Come with me, please."
"Let me do the right thing."
"You can choose not to accept it. But that doesn't mean I won't do it."
- ashlee
Thieves In Time Redux Behind The Scenes Blog
Hey kids! Welcome to my behind the scenes blog!
Do you hate Thieves In Time with a burning passion?
Do you love redemption stories?
Are you a Bentley/Penelope fan like me?
Are you wondering what might have happened if Penelope had joined the boys for the events of Thieves In Time?
If you answered "yes" to all of these questions, then congratulations! This Thieves In Time rewrite is for you!
Since I can't pin more than one thing to the top of my blog, here's a link to the abridged version of my story!
Here's a link to the mission recaps, and a link to everything Penelope does in the story.
Feel free to ask me anything about Thieves In Time Redux!
My askbox is currently open. I have so far answered 6 questions.
Emotions in writing
Affection
Definition: Affection is a feeling of fondness or love towards someone or something. It typically involves a warm attachment, a caring attitude, and a desire to show kindness and tenderness.
When you want to write the emotion affection, it's important to "show" the emotion your character is experiencing through their physical reactions and dialogue, rather than "tell" it.
Physical signs:
Hugs: Characters wrapping their arms around each other.
Kisses: Gentle or passionate lip contact between characters.
Hand-holding: Characters clasping each other's hands.
Cuddling: Characters snuggling closely together.
Caresses: Gentle touches or strokes on the face, arms, or back.
Smiling: Warm, genuine smiles directed at each other.
Eye contact: Prolonged gazes or meaningful looks.
Leaning in: Characters moving closer to each other.
Playfulness: Light teasing or playful physical interactions.
Body language: Open and relaxed posture, facing each other.
Resting heads: Characters resting their heads on each other's shoulders or laps.
Arm around shoulder: One character placing their arm around the shoulders of another.
Squeezing hands: Characters giving a reassuring squeeze to each other's hands.
Nuzzling: Characters pressing their nose or forehead against each other affectionately.
Sharing personal space: Characters standing or sitting closely together.
Whispering: Characters leaning in to share intimate or secretive words.
Back rubs: Characters giving gentle massages to each other's backs.
Gentle touches: Characters brushing away hair from each other's face.
Playful nudges: Light nudges or bumps with elbows or shoulders.
Shared laughter: Characters laughing together, often with touching or holding each other.
Internal sensations:
A sense of inner warmth or comfort when thinking about or being near the person they care for.
A fluttery feeling in the stomach or chest when they see or think about their loved one.
A general feeling of happiness or contentment when in the presence of their loved one.
A heightened sense of excitement or anticipation before seeing their loved one.
A calm and peaceful feeling when thinking about their relationship or when spending time together.
A subtle ache or longing when apart from their loved one.
A sense of security or safety when they are with their loved one.
A feeling of being valued and appreciated by their loved one.
A deep affection and fondness when remembering shared moments or qualities of their loved one.
A sense of gratitude for having their loved one in their life.
Mental Responses:
Longing for their presence
Comfort in their words
Excitement at hearing from them
Gratitude for their kindness
Eagerness to reciprocate
Nostalgia for past moments together
Anticipation of future connections
Affectionate memories surfacing
Sense of belonging
Telling Affection Examples to Avoid:
Try avoiding things like this:
John felt an overwhelming affection for his wife.
Sarah was filled with affection for her newborn baby.
The old man's eyes were filled with affection as he watched his grandchildren play.
Despite their rocky past, Mary still felt a deep affection for her ex-husband.
The dog's tail wagged with affection as his owner petted him.
Practical Examples of Showing Affection:
Some examples of showing affection in a sentence:
She hugged her friend tightly, feeling her warmth and comfort after a long day.
He smiled at his daughter and tousled her hair, glad to see her growing up so fast.
She rested her head on her partner's shoulder, sighing contentedly and feeling at ease in their embrace.
He placed a gentle kiss on his wife's forehead, silently communicating his love and support for her.
Thieves In Time Redux Meme #13
Here's how I fixed Thieves In Time...

Anyway, these changes are only the tip of the iceberg...
I know making Penelope the main protagonist is a bold move, but I can't see this story going any other way. Yes, this also means making her fully playable as well.


Penelope and Henriette Cooper Gijinka
First pic: Henriette "One Eye" Cooper
Second pic: Penelope
Thieves In Time Redux Mission Recaps #2
Here is everything Penelope does in each mission... This includes who is assigned to each mission. You'll notice some of them were reassigned from canon.
Check out what happens in each mission here.
Bold: New mission
Italics: Reassigned
Paris Tutorial:
Sly's Segment (Sly): Nothing.
Bentley's Segment (Bentley): Follows Bentley through the sewers.
Penelope's Segment (Penelope): Tries to find Bentley after getting separated from him. Saves him from a guard's wrath.
Murray's Segment (Murray): Nothing.
Turning Japanese:
Photo Op (Sly): Nothing.
Breakout (Sly): Nothing.
Sushi House Startup (Sly): Nothing.
Something's Fishy (Bentley): Helps Bentley and Murray advance further in the fish caves. Also snoops around for information, but only hears ill words about El Jefe.
Pretty In Pinker (Murray): Nothing.
Tiger Tail (Penelope): Convinces Bentley to follow El Jefe instead of her. Goes snooping around the geisha house for information, but only hears general grievances against El Jefe's boss.
Spiked Sushi (Rioichi): Nothing.
Altitude Sickness (Sly): Joins the group for the mission. Tries to go rogue in pursuit of the blimp. Runs into Sly and El Jefe's duel, then decides to help Sly via aerial support. Also gets scolded for running off, mostly by Bentley.
Go West, Young Raccoon:
Under Arrest (Sly): Nothing, though she does convince Sly to take out some of Toothpick's men.
Jailhouse Blues (Bentley): Nothing, though she does have a lengthy chat with Bentley about her running off last episode.
Cooper For Hire (Bentley): Helps Murray protect Bentley from a bed of scorpions.
Saloon Bug (Sly): Snoops around Toothpick's office, then opts to move further ahead for more information. She finds very little apart from Toothpick's men complaining about their boss.
Blind Date (Tennessee): Nothing, though she does gain permission to stay behind while the boys try to fetch Carmelita.
Jail Break (Penelope): Joins Tennessee and Carmelita to free the boys from jail. Focuses on freeing Bentley.
Grand Key Larceny (Murray): Wins at a mechanical bull riding competition in disguise.
OP: Gold Digger (Sly): Placed on van retrieval duty with Murray. Also provides aerial support during Toothpick's boss fight.
Clan Of The Cave Raccoon:
Stone Age Reconnaissance (Sly): Nothing.
Unexpected Ties (Sly): Nothing.
Getting Stronger (Bob): Demonstrates events for Bob. Falls ill after the mission is cleared. Placed on bed rest for several missions.
Going Up (Murray): Nothing. Bed rest.
Starving Starving Hippo (Murray): Nothing. Bed rest.
Ice Ice Bentley (Bentley): Nothing, though she does gather enough strength to check up on Bentley. (No, she does not go in person.) Bed rest.
Duty Calls (Sly): Nothing. Released from bed rest after this mission. Has seen the error of her ways by the beginning of the next mission.
OP: Jurassic Thievery (Penelope): Placed with Murray and Carmelita. Provides aerial support for Bob. Gets roped into The Grizz's boss fight with Murray. Helps Murray with the boss fight, even dealing the final blow.
Of Frogs And Mechs:
Shopping Spree (Sly): Nothing.
Juggling Act (Sly): Nothing.
Cane Swipe (Penelope): Helps Sly distract the Black Knight's guards so he can steal back Sir Galleth's cane via aerial support.
Eye In The Sky (Sir Galleth): Nothing.
Mechanical Menace (Sir Galleth): Nothing, though she does offer Sly advice on salvaging his broken relationship with Carmelita.
Short Supply (Murray): Helps Murray out in the tavern.
Untitled SSH (needs new name) (Penelope): Follows the Black Knight around instead of Sly. Bentley joins her in the blacksmith's. Sir Raleigh is exposed as the villain of this episode, alongside his creation Robo-Penelope.
Hard Target (Sly): Gets kidnapped after mission is completed.
Princess Out Of Distress (Bentley): Escapes from said kidnapping situation. Runs into impostor and fights her. Bentley helps her defeat said impostor. Also includes a double love confession.
OP: Frog Trap (Sly): Impersonates impostor in order to severely weaken Raleigh and free Sly from the villain's clutches. Declares loyalty to Team Sly. Helps everyone finish the villain off.
40 Thieves:
Lost And Found (Sly): Nothing, though she is stated to have helped Bentley perfect some new technology for Sly.
Open Sesame (Sly): Nothing.
Rug Rats (Salim): Sends her car into the tower to help Salim free one of his allies.
Up In Smoke (Bentley): Helps Bentley during his portion of the mission.
Copy Cats (Murray): Joins Sly and Murray in person, then gets trapped in with Murray. Manages to get Murray out of the caves safely, but not before helping Sly find another of Salim's allies.
Heavy Metal Meltdown (Rename?) (Salim): Submits an EDM track for use in the mission, which turns out more effective than in canon.
Untitled New Mission (Penelope): ?????????
All Rolled Up (Sly): Finds an alternative to Carmelita having to belly dance, though the cop does still have to stay behind. Joins the boys for the hangar raid, pulling more than her fair share of weight. Gets outed as Le Paradox's ally, then refuses to rejoin him. Helps defeat Miss Decibel.
Paris Epilogue:
Deja Vu All Over Again (Penelope): Leads the blimp raid. Starts the final boss fight. Refuses to rejoin Le Paradox again. Also ends said boss fight and wins, even saving Sly one final time in the process.


Thieves In Time Redux Meme #12
Sly, Bentley, and Murray after the events of the story...

Too bad the second half didn't happen in canon...
Thieves In Time Redux Characters
Other than Penelope, our other heroes go through their own personal character arcs as well.
Sly learns that maybe ditching his friends on Kaine Island wasn't the best idea.
Bentley becomes less overprotective and more supportive towards Penelope. He'd be humbled after she saves him multiple times over the course of the story.
Murray doesn't go through much of an arc. He spends much of the story being a good older brother towards our heroine, and making her look good. If anything, he shows he can step back and let others take his spotlight.
As for Penelope, our main protagonist... She realizes what's truly important to her: Her friends.
I'm not touching whatever Sly and Carmelita are doing. Not here. Their fighting actually gets worse until Episode 5, when they realize they've been acting like children.
Isn't this so much better than whatever happened in vanilla?

Hello, again! Welcome back to Petite Princesses! With Princess Maker 2 Regeneration out (except for the PlayStation), I decided it’d be polite of me to create a basic guide to some of the simple parts! This one will be about everything from the starting menu!
Bear in mind that due to the change in localization (bless the Translators), I’ll refer to each stat by all 3 English names on first mention, but I’ll default to the latest translation from then on. As well, I’ll be using Centimeters and Kilometers for ease of reference. Furthermore, I’ll be using Refine for screenshots.

Here’s our basic screen, of which you can see many different things. I’ve labeled them accordingly, and I’ll speak of each tab in detail!
I☆I
CURRENT DATE: A Box where you can tell the day— the year is on top (1210), with the month (April 4) and the day of the week (Sunday) on the left, with the day of the month (the Fourth) on the right. The game starts on your daughters 10th birthday, and ends on her 18th (in our case, April 4th 1218)
I☆I
STAR: I didn’t label this myself, but the “Star” section on the right side info box is pretty important. Here, our daughter’s sign is Aries (Mars), and her blood type is B. Your star sign determines starting statistics and a +100 bonus from slaying a certain foe that I’ll mention later, while type influences passive stat increases. I’ll explain the exacts in another post someday, but for the impatient, googling Patrons on the Princess Maker Fandom Wiki should do the trick!
I☆I
ARM/WPN: This is her equipment! You can set it in the menu marked ITEM (the box with the sword, shield, and scroll). All equipment can be equipped at any point, and your armor is even visible during (non errantry) battles!
I☆I
STATUS: Here she will have her statuses— there are 3 in the game. Sick (Stress > Constitution/Stamina, represented by a Skull) lowers her HP in combat and can lead to her demise, Degrade (Stress > Morality or Faith, whatever is higher, represented by blue lightning) makes her less likely to work properly and risks being arrested (lowering your reputations) / wasting your money (happens mostly during free time but can occur during working hours), and Love (Triggered by an event when she’s 14 that requires her Charisma/Glamour stat to be the highest, represented by a Pink Heart) that lasts 3 months, makes her less likely to work, and lowers 3 of her hidden stats (Relationship with Father, Cube, and Prince— the last of which could be troublesome for getting the ending).
I☆I
HER MEASUREMENTS: This ones pretty simple— it’s her Height, Weight, and Three Sizes (Bust/Waist/Hips). In modern releases, it uses Centimeter/Kilograms, but in the original DOS en leak, its Inches and Pound. If she’s overweight, then she cannot wear certain clothes (all that aren’t the Siren Robes, Cotton Dress, or seasonal outfits). You can tell her weight by her sprite. As well, you can calculate her threshold by .95[height]-[Age + 87]. To get a rough idea, let’s punch in our daughter from earlier, Alice. At 146 centimeters, .95 x 146 is 138.7. Now, she’s 10, so 10 + 87 is 97. 138.7 - 97 is 41.7. Behold, she’ll turn overweight the second the “weight” bar is “41.70”, but if she’s at “41.69”, it’s fine. Though I am to assume rounding is in play!
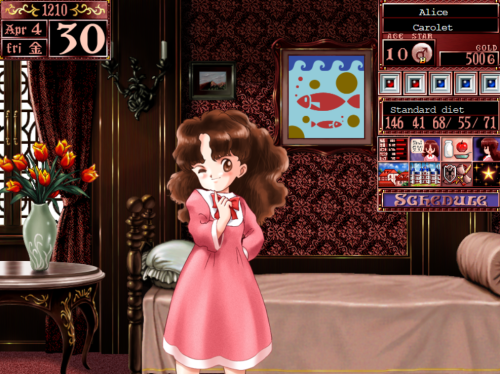
(Do mind the different stats of her three sizes— I don’t have the original file, so I had to make a replacement with the necessary stats!)
I☆I
STATS: Brings up a Menu. For Clarity, below is the side bar from Regeneration. I will list the stats in order, with every name applicable in the order of DOS/Refine/Regen.
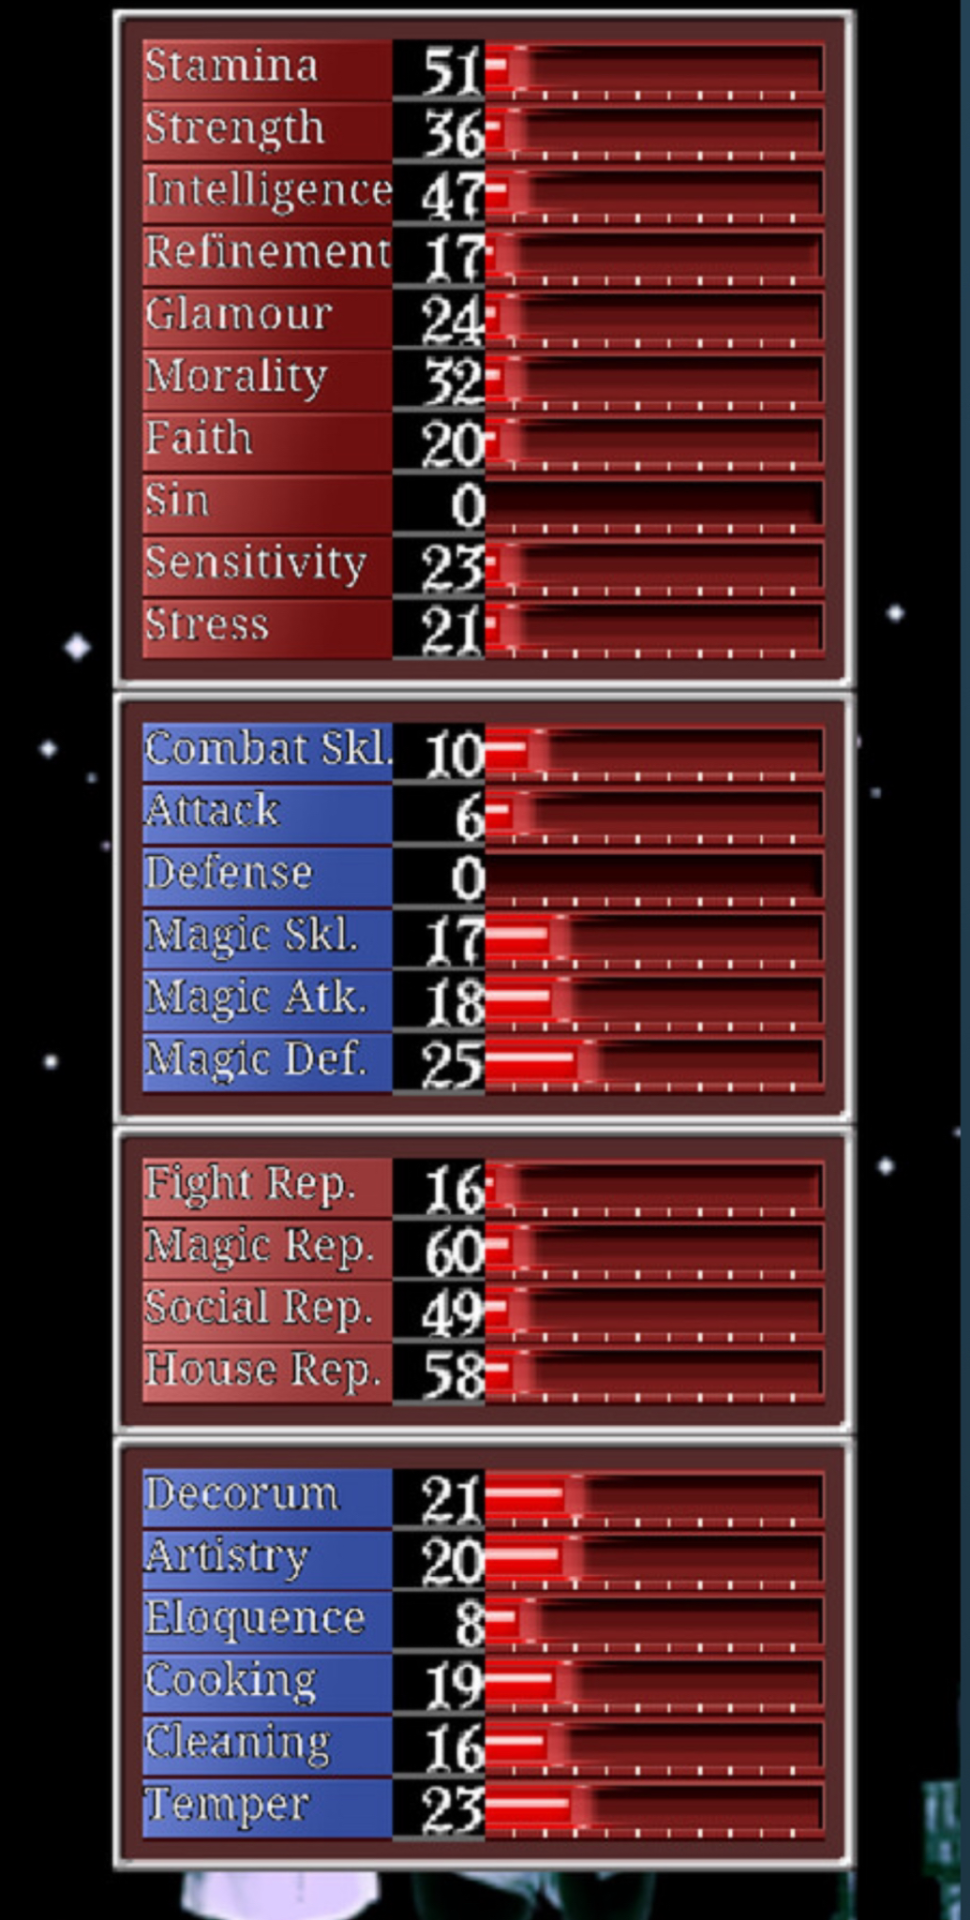
Constitution/Stamina: Determines your daughter’s HP. Needs at least 50 to be good at most jobs. Also determines your daughter’s health. Most easily raised by Farming. Likely to be Lowered by Dieting
Strength: A bonus to Attack: 8 points of Strength is equivalent to 1 attack point. Most easily raised by Farming. Likely to be Lowered by Salon.
Intelligence: Essentially, her MP. Needs at least 10 to cast a magic attack. Most easily raised by Science. Likely to be Lowered by Bar work
Refinement/Elegance: Not particularly important unless you’re doing a Ruling Queen run— in which case it needs to be 800. You may need this to get random proposals (which means money!) Most easily raised by Decorum, or if you’re cheap, Lucifon in the Desert. Likely to be Lowered by Farming, so it’ll be zero for a while
Charisma/Glamour: Usually important for special marriage endings. Can cause a few problems such as Attempted Sexual Assault, becoming someone’s Mistress (if it’s her highest stat, indicated by her different facial expression), and generally being asked out. Easily raised by Dance, if you’re cheap (again) Lucifon in the Desert, or the Sleazy/Illegal Bar if you’re willing to tank the stress.
Morality: Need at least 30 for a basic marriage ending. Can also play a part in rejecting the more gross offers she may encounter, as well as being able to stave off delinquency if it’s higher than Faith. If it’s your highest stat, you may encounter a deal that will sell all of it for Equivocal Gold. Easily raised by Church Work, or simply being born with Type A blood. Likely to be Lowered by the aforementioned demonic deals.
Faith: Staves off Delinquency if higher than Morality. It’s definitely a stat that exists. Easily raised by Church, which can also prevent the demon from showing up to eat her morals. Likely to be Lowered by Science.
Sin/Karma: If it’s over 100/250, she will get a Sin ending. If it’s 500 (along with some decent fighter/magic reputation), she will instantly become the Queen of Darkness by the end. You’ll likely get this by killing anything in Errantry, but other “Sinful” acts like the illegal bar and hunting animals will raise it too. Can be sold off for 100g per 10 points, or simply going to Church for work normally.
Sensitivity: It’ll let her see what’s usually “mythical”, such as Fairies and the such if she goes where they hang out. If it’s the highest, she’ll run away, lowering her reputations. Easily raised by Salon work, but can be raised in a multitude of fun ways.
Stress: This is mostly a problem early game. So long as it doesn’t exceed her Morality/Faith or stamina stats, she’s in the clear. It can go to Zero in certain events, such as witnessing Fairies, so if you plan right, Free Time doesn’t have to happen.
Combat Skill: Essentially, your Hit/Dodge rate. Essential for any adventurer, otherwise you’re unable to do ANYTHING! Easily raised by Fighting/Kung-fu classes, but the tempting Restaurant and Inn can lower it.
Attack: Exactly what it says. It determines your daughter’s attack stat. Separate from your strength, but both will result in your “total” attack. Easily raised by Fencing and most Swords. Difficult to lose.
Defense: A difficult stat to raise terribly high. Also exactly what it says on the tin. Can be gained consistently by second level Kung-Fu classes, but not terribly fast. Also, most armor increases it.
All of these skills will be boosted by the spirit Valkyria, first Skill, then Attack, then Defense. When you get to 400 Fighters Reputation, as well as 40 instances of Fencing, Kung-Fu, or Errantry, you’ll receive the Valkyria Sword— which is the second best sword in the game, with 25 attack, 10 defense, and 18 skill.
Magic Skill: Like Combat Skill, but for Magic. Easily raised by Magic Classes. Impossible to lose.
Magic Attack: Much like Attack, but for Magic. Unlike Attack, there isn’t another stat that also functions as an attack bonus, but Magic tends to be what most of the tougher bosses are weak to. Easily raised by Magic Classes.
Magic Defense: It’s like Defense, but easier to raise! In fact, there’s a few ways to raise it! Unfortunately, most things that can do Magic can’t hit you once you’re skilled enough, so this is mainly for Wendy. Can be raised by Theology or working at the Graveyard. Likely to be lowered at Science (but slowly)
All of these skills will be boosted by the sorceress Fay, first Magic Skill, then Magic Attack, then Magic Defense. When you get to 400 Magic Reputation, you’ll receive the Power Ring/Unrivaled Ring, letting you cast Magic without needing 11+ Intelligence. Unfortunately, you’ll have to waste a ton of money as this also requires 32 magic classes- which become Useless very fast. More importantly than that, if you do only Magic classes for a mont, she’ll come raise one of the Magic stats by 5. The stat she raises is of your choosing, so my recommendation Magic Attack.
Decorum: You need decorum to be able to speak to people at the palace. Easily(and for the most part, Only) raised by doing Decorum classes. Impossible to lose.
Art/Art Skill/Artistry: Impacts her Dance Contest score and determines what painting she’ll create in Art Class. For the record, if it’s the highest of the Housework/Social stats, the daughter will be locked into an Art based ending. Easily raised by… Painting Classes. Cannot be Lowered below 100 once you reach 100.
Conversation/Speech/Eloquence: Really only used for two characters at the castle. Only raised by Bar work. Impossible to lose.
All of these skills will be boosted by the demon Paimon, first Decorum, then Artistry, then Eloquence. When you get to 400 Social Reputation, as well as 64 instances of Painting, Dance, or Protocol, you’ll receive Perfume— which… attracts suitors. Which at the point you get it, you’ll already attract anyways.
Cooking: Very important for the Cooking contest. You will need at least 90+ to win, alongside high sensitivity.
Cleaning: An entirely useless stat. It only impacts your Housekeeping reputation.
Temperament/Personal/Temper: Solely important for the Queen. Likely to be lowered by Sinful Work.
All of these skills will be boosted by the spirit Domovoi, first Cooking, then Cleaning, then Temper. When you get to 400 House Reputation, as well as 120 instances of Housework, Bar work, or Restaurant work, you’ll receive the Perfect Flour— it guarantees a Cooking victory, but by the time you get it, you’ll be guaranteed to win anyways.
Fight Repuation: Derives from your “Combat” oriented stats. Can be raised further by winning fights with the sword, or a Dragon Fang. Serves as Morale if higher than Magic. Can be uniquely lowered by selling the “Royal Sword” I allude to.
Magic Repuation: Derives from your “Magic” oriented stats. Can be raised further by winning fights with Magic. Serves as Morale if higher than Fight.
Social Reputation: Derives from your “Social” oriented stats. Can be raised further by winning the Dance/Art contests. Can be uniquely lowered by talking to the Clown.
House Reputation: Derives from your “Housework” oriented stats. Can be raised further by winning the Cooking contest.
All reputations will be lowered by being arrested or running away from home.
But wait! There’s more!! Let’s bring up the Four Hidden stats!
Relationship with Father (called Father_love by Mad Eddy) is rather relevant- you can use it to scold her and dissuade her from things like delinquency and being a mistress. Easily raised by Vacations and just. Talking to her. Most likely to be lowered by Free Time (regardless of pocket money) and resting for the Harvest Festival. Needs to be 100 (along with some stats) to Marry Her.
Relationship with Cube (called Cube_love by Mad Eddy) is rather less relevant. Pretty much is only for the ending, where it needs to be 100. Can be conveniently raised by changing equipment on errantry- you can essentially spam it if you’re really into that.
Relationship with Prince (called Prince_love by Mad Eddy) is mostly just for the Ending, but this time it needs to be 96. Raised by 12 each time you meet him, so every January 31st must be spent with him.
All of them are subject to lower by 6 if she falls In Love.
Maternal Instinct is exactly what it says, Important for some endings (like Princess of Darkness for some reason). Raised by Babysitting and Tutoring. Lowered by Hunting (for. Some reason?)
I☆I
TALK: Lets you talk to your daughter. The Three option are Father-Daughter Chat/Father-Daughter talk, Pocket Money, and Scold/Lecture.
When you click Father-Daughter talk, you get 3 more options. How she is doing/Recent matters will prompt her to speak about, well, whatever she wants. Usually, it is about herself, such as her (in)ability to do art, or how she worries about her childrearing skills. After that is Her studies/About study, which is related to what you’ve been making her study— be it how she appreciates how Art brings people together, or how she’s the best magician ever. As for Other topics/Another topic, it’s known to have some weird conversations, usually relating to her body, sometimes relating to other things. As well, picking any option here will raise your internal “Relationship with Father” stat by 1– this is important for two things down the line.
Pocket Money is a lot less complicated, as it’s pretty straightforward. Essentially, you give your daughter 20 + 10x gold, with “X” being the second digit of her age. So, if your daughter is 10, that’s 20 + (10 x 0), which would just be 20. If she’s 18, that’s 20 + (10 x 8), which would be 100. However, while the price increases, the benefits do not— she will lose 20 stress when used, regardless of age. This option does not raise the internal stat mentioned above. As well, if sick, she will not accept your money, and if “Degrade”, she will take it, and it will not impact her stress.
Scold/Lecture is pretty useless… it doesn’t do anything but make your daughter look a little confused. If she’s sick, she’ll wonder if she’s doing something wrong— which will lower her stress by 5, for whatever reason, at least in the refine version. But what you’d actually want to use this feature for is when she’s being rowdy, indicated by the “DEGRADE” marker— it’ll lower her stress by her relationship with her father, (up to a 100 point stress loss!!), and then raise it by 5. If you’ve been playing up a daddy’s girl, this could be of great use.
I☆I
DIET: Now, this one’s a little interesting. You have the choice of 4 options, which tie to her weight and stamina! By selecting the Normal/Standard diet, you’ll have a daughter that gains roughly .20 kilograms per month. This is the default, and is also standard, costing 30g. By picking the Robust/Hearty diet, you’ll gain a little over .30 kilograms, but you’ll also gain 10 stamina at the end of every month. It costs 80g, but can be good if you’ve been neglecting your stamina intakes— or if you really want to bulk up early game with the right set up. Then there is the Slim down/Refined diet— In addition to lowering your weight gain to around .15 kilograms, it also lowers your Stamina by 5. It costs 10g, so it’s not really recommended, unless you’re about to cross the threshold. Finally is the Slim Down/Intensive diet. Here, you’ll lose a hefty 20 stamina, but in return you’ll lose around .50 kilograms, and it costs 5g. This is only worth it if you have stamina (and kilos!) to burn. It’s worth noting that if your daughter is getting a little too weak (low stamina), then Cube will swap to the Hearty diet, but you can simply change back to whatever diet you’d like.
I☆I
INFO: You’ll find personal information here, such as your daughters birth and her star sign. You’ll also find connections (Raised by talking to Palace Staff) and Sick/Delinquency percentages. One percent is equal to one point of stress over the stat mentioned in “Status”— you’ll need 90% Sickness (Critical) to become Bedridden (Which will kill you if it lasts at least 2 months, ending the game), and 90% Delinquency (A hooligan) to become a Gang Member (Which will get you arrested— a harsh penalty to your reputation stats).
I☆I
SHOP: Another doozy, but we’ll simplify, simplify, simplify!
The Armorer/Armoury is ran by Armorer Zeno/Zen, with Anita as a Part Time worker. Here you can buy equipment, which goes in the Armor/Weapon slots. You’re free to buy anything here, but I highly recommend buying a Dagger and Leather armor, especially if you’re not confident in “Rushing” strategies. Don’t worry! I’ll cover adventuring as a whole in a future post, maybe multiple
The Tailor is run by Maura, who sells clothes. The variety isn’t particularly extravagant, but this is where you’ll find the seasonal clothes. As well, the Cotton Dress is only 500g: you’ll always be able to afford it for the harvest festival if you’re not in debt. Otherwise, there’s not many tips I can give here, other than pick the clothes you find cute— though you can wear most of these only when you’re at least 13, sometimes older.
The Restaurant is ran by one Chef Balbon, and sometimes his part timer Marcia/Marthia. Here, you’ll find food that’ll lower your stress (or raise Stamina!) and raise your weight. Here’s a fun fact! The food is free if you don’t have the money— you’ll just have to spend your first month block working at the kitchen for free. Regardless of if you pay or not, you can only eat here once per month.
The Item/Pawn Shop is run by Shalom alongside his part time assistant Wendy. Here you can buy a few so-so items (which also serve as birthday gifts for when the day comes: you’ll have to buy from the first four items on the list), as well as a Healing Pill and Grenade for errantry. Unique to this shop, you’re able to sell items, though I’d be wary on selling anything that’s “Royal”.
The Church may ring some bells to history buffs— Sister Lee will ask you to donate 100g. Accept, and you’ll lose 10 sin! That’s its entire purpose. This can be used should you rack up far too many on a murder spree and not want to dedicate the time to church work, though it does feel rather humorous in its execution.
Lastly, is the Hospital/Clinic, with Doctor Lombardini asking if you’re sick, and if you are, charging a fee for an examination. When you pay the fee, you’ll lose stress up to one less than your stamina— which means if you don’t gain any more stress (ie- resting), you’ll recover by next month. Really unnecessary unless you’re high up on stress.
I☆I
CASTLE: Basically, a way to gain reputation, a lot of it if you know how to work it. First of all, the key stat here is Decorum, raised by Protocol Classes. Let’s get started, rapid fire motion!!
The Palace Guard/Gatekeeper will be your first stop, needing 10 decorum to speak properly (almost every birthday will start you with 10 decorum). His preferred stat is Refinement. Every 5 points in refinement is worth one point for Personal Connections (hereinafter referred to as just “Connections”). You can gain up to 15 points per visit this way, and 40 total.
Next is the Royal Knight/Imperial Guard Knight, who needs 30 decorum. His preferred stat is Refinement. Every 8 points of Refinement is worth one point for your connections. You can get up to 25 points per visit this way, and 50 total. Did you notice the text was identical? This guy isn’t very special. But since you’re raising elegance anyways, it’s worth a visit.
After that comes the General, who needs 50 decorum. His preferred stat is Glamour. And every 5 points of Glamour will be worth a point for your connection stat. You can max out your visit at 50 points for connection, and 120 total for the guy overall. If you’re raising Glamour, which you likely are if you’re raising your decorum, it’s worth checking him out, at least until you max at 50.
Making it to 70 Decorum lets you speak with the Minister of State. His preferred stat is Intelligence. Aside from the usual, that being that every 10 points is worth a connection point, up to 60 a visit for a maximum of 100, your connection to him specifically can net you bonuses at the Dance Party— specifically, a score boost. This is fun if you are a dirty cheater!
If you’re still raising your decorum, at 80 you’ll have the manners to speak to the Archbishop. His preferred stat is Faith. Like the Minister of State, 10 points is one connection point, and a visit will max at 60, but his overall max is 120. You’ll want to raise Faith anyways, so it won’t hurt to visit the old man.
Getting tired? Great! So is our next stop— at 85 decorum, you’ll speak to the King’s favorite #2, the Royal Concubine/Favorite Mistress. Her preferred stat is Conversation/Speech/Eloquence. Yes, that’s right! A stat with three names!! Eloquence is the Regeneration name. Anyways, every 10 points of Eloquence will equate to 1 point for connections, up to a maximum of… 10 per visit. Her total maximum is 120, but considering you only get this stat at the Bar, I wouldn’t bother.
Now to the King’s favorite #1, the Queen! She’d love to invite you for tea if you have 90 decorum. Her preferred stat is Temperament/Personal./Temper. Much like #2, the same rules apply, 10 points = 1 point, 10 maximum per visit. She’ll raise your connections by 160 points total. This one is even more worthless, as it’s gained by doing housework (arguably easier), but there’s no other reason to raise Temper. What a fraud.
At 95 decorum, we’ll have the Bowing Skills to bow our way to the King. You may think otherwise, but his preferred stat is, strangely enough, Fight Rep. Every 10 points will go to your connection stat, but here’s where it gets interesting— the King has no limit per visit! For the crazies who raise it up to a maximum, the King will gladly give 99 points to your connections. His true maximum is 300, but Fighters Reputation is fairly easy to raise, and you’ll definitely be able to make use of his benefits.
So, what do connections do? Why, palace discounts of course! If you raise them high enough, you’ll get marked down prices! These apply even if she’s buying rogue, so it’s nice to have. Personal connections don’t go away, either! Well, unless you happen to sell that “Royal” thing.
Now, the Jester/Clown is unique— he doesn’t really care for decorum, and speaking to him will lower your social reputation by 15. What he does want is someone to talk to, and that Eloquence stat will come in handy. He’ll also raise your sensitivity by 15. If you keep talking to him, you may even be on the path for that 4th Art-based Ending. If you, of course, are feeling whimsical.
And to defy all odds, the Young Military Officer does… well, nothing. He doesn’t have any preference, he doesn’t require decorum, and he doesn’t impact your stats in any way. Well, not any way that you can see. He’s only available on January 31st, and if you keep your promises, he’s the ticket to becoming a Princess.
I☆I
ITEM: A screen where you can see your inventory. Many items in this game are passive, they’ll have their effect when just held in your inventory. Exceptions include clothes (which are to be clicked on to be worn- then granting their bonuses), Equipment (can be clicked to add to weapon/armor slot, then their effects are in, uh, effect), and consumables (like the Ancient Milk and the Breast Pill). Some items are to be traded away, however. Usually, they are to be traded in errantry.
I☆I
SYS: The save menu. You save your game. You load your game. You leave your game. That is. Uhm. All.
I☆I
SCHEDULE: Leads to the scheduling screen, of which, we’ll talk about… next time!! I’d like you tune in for that, ok?
Ask me anything relating to my Thieves In Time rewrite, and I'll be happy to answer.
Reblog if you'll PUBLICLY answer anything in your ask right now.
Im game

Canon compliant
Canon compatible
Canon complacent
Canon comparable
Canon compulsive
Canon competitive
Canon competent
Canon compassionate
Canon complementary
Canon comprehensible
Canon companionable
Canon compressible
Canon complexifying
Canon compensatory
Canon complicit
Was Penelope serious about having ten years of martial training? Like, how old was she when she started?
…For that matter, how old was she when she started the whole Black Baron thing? I mean, we know it was because of the age requirement so she probably wasn’t 18 yet. And it sounds like ACES has been going for probably over five years (at the bare minimum), and if Penelope and the main trio are currently about 21-ish…
Yeesh, she must’ve gotten into it really young, huh?