NSFW because there will probably be nude refs | this is a side blog to sort all of the art stuff I need | none of it is mine
151 posts
Latest Posts by artrefforsteph - Page 3
i rr like ur art and i was wonderin how you pick out your color schemes when you draw? like do u just kind of yolo it or do u have like a thing u do lol
thank u !!! actually i already tried to explain one way i pick colors here , tho thats pretty old and only refers to analogous color schemes so… im gonna try to update it a lil bit! (btw everything ill say from this point on is just based on my own experience, im no art student and im sry if anything i explain makes no sense….!! ANYWAY moving on)
1) probably the thing i use the most are analogous color schemes bc theyre easy to do and look very calm and harmonous:

the two colors i show on the color pick thing are the ones farthest to the left and right, every other color is somewhere between them! bc of this the drawing looks calm and natural. most of the different colors u can see are created by playing around with the saturation!
2a) something i only recently started using frequently is the analogous color scheme with a highlight:

the most part of the drawing is done in analogous colors, but i added a highlight to kinda of… “break open” the closed off feeling that analogous schemes usually have! for that highlight i tend to use a higher saturated color on the other side of the color wheel, or at least one that doesnt “match” the other colors.
2b) most of the time i do the highlight not like this tho, but in the lineart:

thats a lot more subtle !
3) and sometimes i just do…..whatever lmao

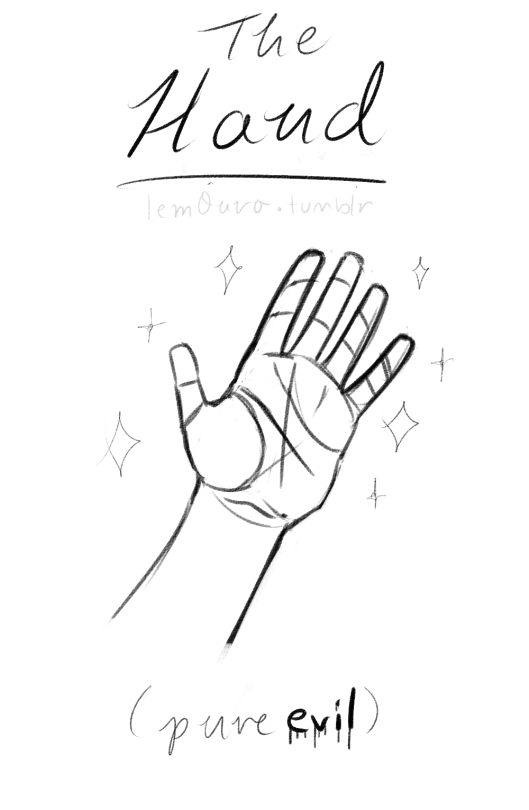
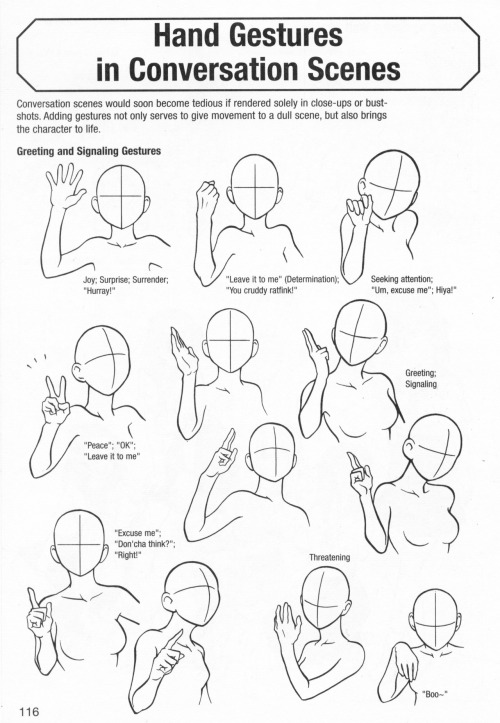
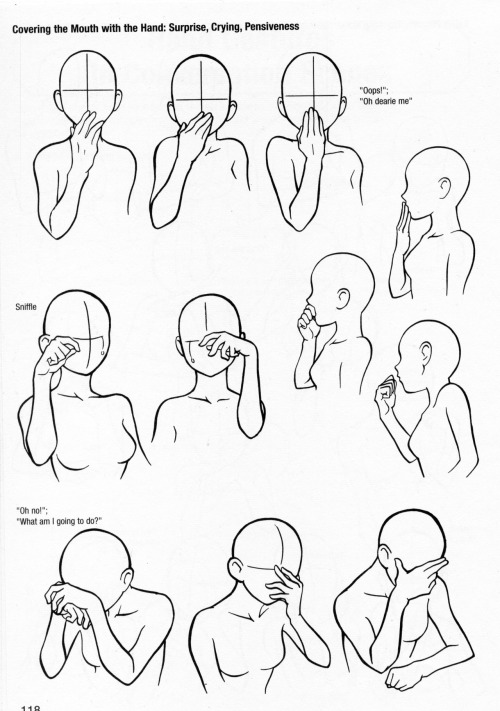
I'm kinda ashamed to ask this, but could you make a tutorial on how to draw hands? ;A;
omg dont be ashamed at all!! Hands are generally tough to get used to, lots of artists struggle with it! so dont be ashamed i feel you.
and I actually have made a hand anatomy guide before in fact! If you want to get better at drawing hands I def recommend you learn the basic anatomy first. Please check out the ones I made, I try to make it simple and easy to understand:
Artistic Anatomy: Hands Part 1
Artistic Anatomy: Hands Part 2
There’s my guide to the anatomy, but here’s some more tips that I’ve noted to myself that I’d like to include
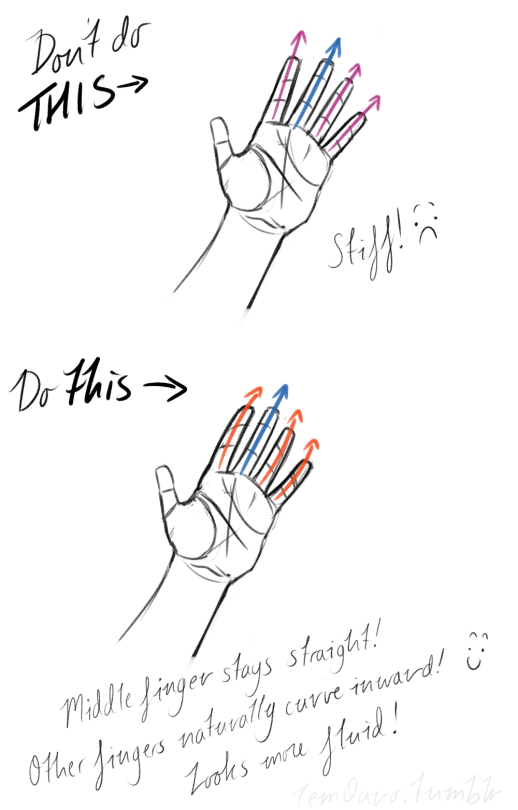
First off, I’d like to just note on the fingers: if you pay close attention to your own hand, you may notice the fingers are ever ever so slightly curved inward. It’s a very subtle detail, but I noticed that, despite how slight it is, it can make a hand look more lively, and less stiff.
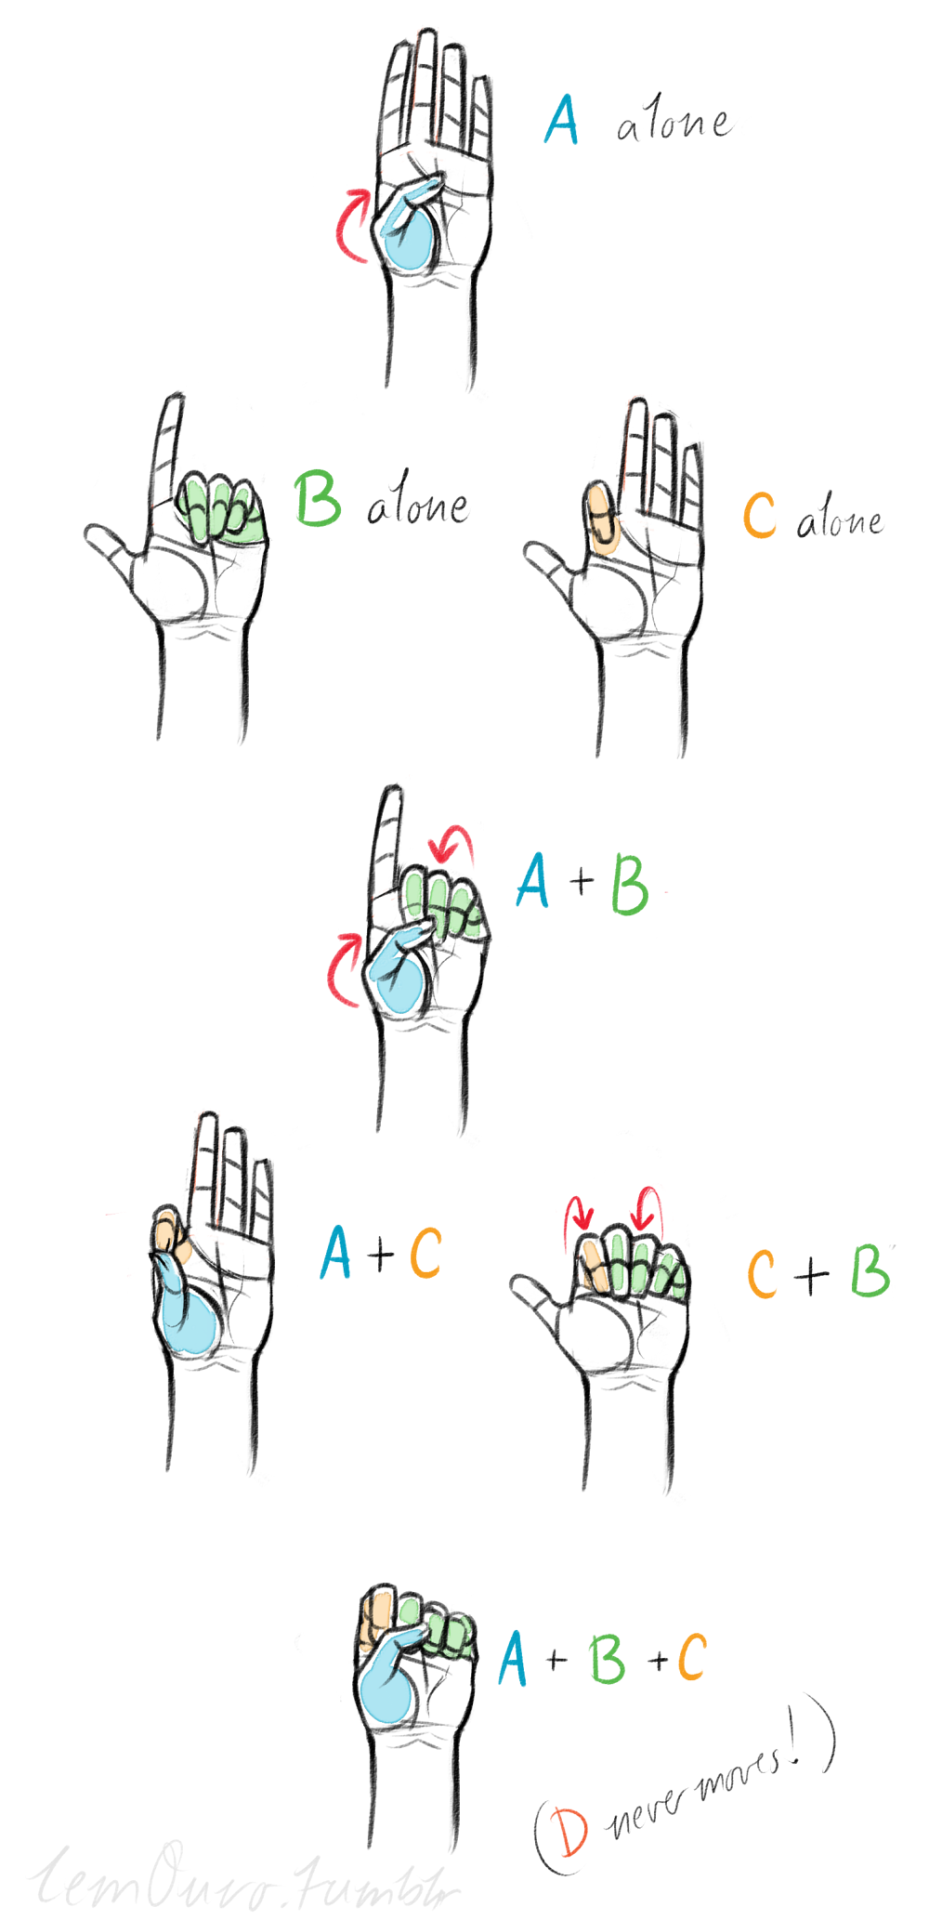
Second, the “M” on the palm! Your hand moves in many ways, and because it does it creates creases in your hand. The most prominent creases appear to make an M shape; this is handy to remember for what I’m going to talk about next. (It also could be a “W” I guess, or to be more specific a “ )X( “; just think of it in whatever way helps you remember!)

SO now that you see the M, draw your hand as a basic blocked shape and add your details. As you do, you can see that the M divides the palm into four basic parts!


When the hand moves, parts A, B, or C of the palm, alone or in different combos, will create the general poses that the hands do normally. These parts are the parts that move, with D being stationary, no matter what!
Here’s a chart of all the possible combos. Once you have down what part of the hand moves for a certain pose, you can change up the fingers and tweak it a bit to do what you need to make it more specific!
This is simply my method of drawing hands. God knows there are hundreds of tutorials out there by other artists, but personally, this way helps me the best (after learning the anatomy first).
This way I can divide the hand and combine the parts in any such way I need!
Hands take a lot of effort to grapple, and you need to practice them a lot, especially foreshortening of the hand; that’s really something you need to learn through your own studies. Look at your own hands, draw hands from life, from magazines, shows, comics; just draw hands! You’ll eventually figure out a method that works best for you. So to get better at drawing hands; draw hands!! And don’t stress over it, have fun with it!


I got multiple people asking for help with eyes, so I threw something together quick
EDIT: ah yeah, my bad! thank you @yipyo20


Tumblr Dashboard Image Display Sizes (Updated March 20, 2016):
Photo Post: 540 by 810 pixels for dashboard view. Use 1280 by 1920 pixels for high-res version (except for superwide panoramas).
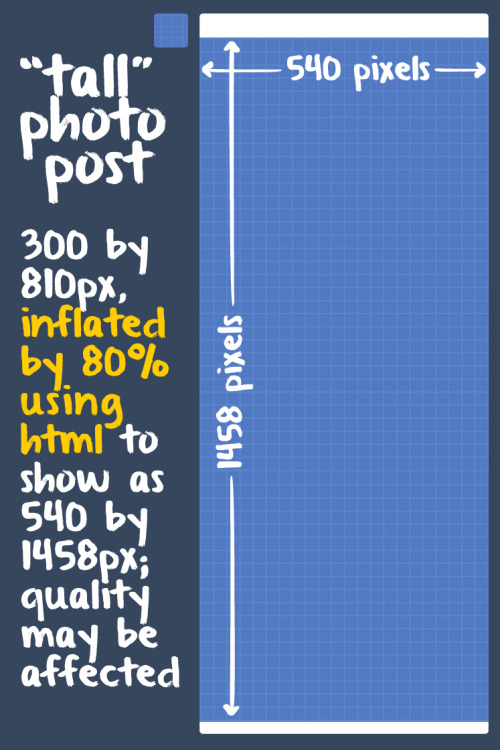
“Tall” Photo Post: Tumblr takes a 300-by-810-pixel version of your image then stretches it by 80% using HTML height and width attributes to make it 540 by 1458 pixels. Image quality may be diminished. Aim for uploading at least 710-by-1920-pixel images in case Tumblr switches to a better image size on the Dashboard. (It’s happened before.)
Photoset: 540-pixel width for one image in a photoset row. 268-pixel width for two images in a photoset row. For three images in a photoset row, Tumblr displays 177 pixels on the left and right images and 178 pixels for the middle. Gutters are 4 pixels.
Audio Post: 169 by 169 pixels for album art.
Link Post: 540 pixels wide for the image grabbed by Tumblr from the web link (if available).
Text Post: As of March 30, 2015, inline images can appear full-width (540 pixels wide). Any inline images that are 300 pixels wide or larger will display as full-width.
Avatar: 64-by-64-pixel icon next to posts.

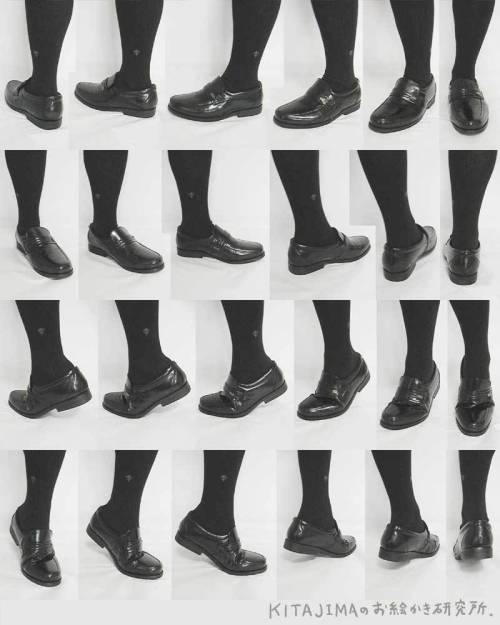
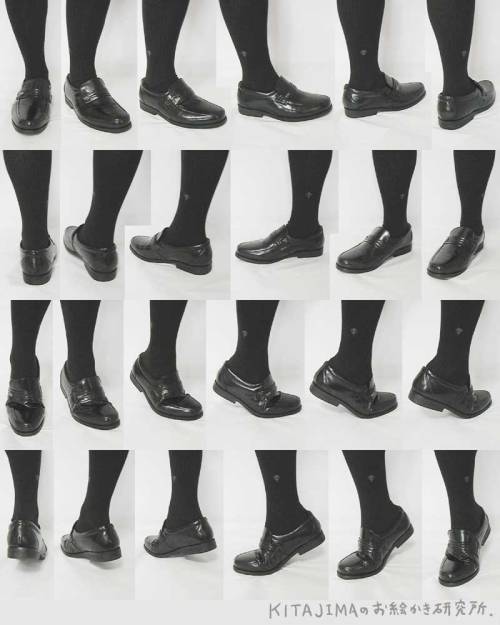
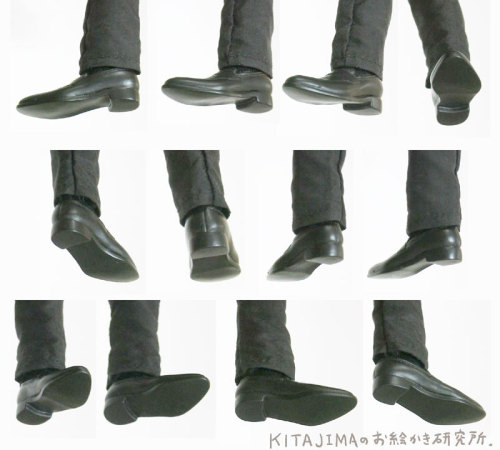
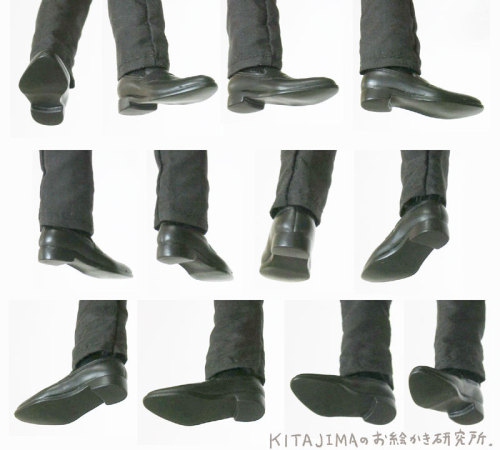
Great Reference , a good hand how to draw is always needed ^_^ But, the thing is I MUST draw it for real :/
weibo.com

Please, like or reblog if you download it
Cecilia Script - Hello stockholm - Livewell - Pirmokas - Chunkfive ex - Solmet brush


Foodie’s Feed / Death to the Stock / Jay Mantri / Little Visuals Picjumbo / New Old Stock / Refe / Unsplash / Gratisography
I get quite a few questions about where I find my stock images that are used in live previews so here’s a list of my favourite (all can be found on the resources page). Most of these are free to use on personal and commercial projects but double check the licenses before use.


Why Krita is Awesome: A Collection of Reasons Why This Program is Worth Taking a Look At
Krita is a painting program that has been around for a while, and in the last few years, underwent major changes and improvements. Because of these improvements, many artists are using it not just because it is free, but because it offers amazing features. These are by no means all of the great things Krita has to offer, but simply some of my favorite features of the program.

1. The Brush Engines.
Yes, engines. As in plural. There are many. And they all do different things. There is no way you could possibly capture all of its possibilities with one screen shot, but here are just some of the possibilities. Along side standard round, square, and shape, and textured brushes, there are brushes that smear, blend, and create interesting abstract strokes. There are brushes for filters, and one of my favorites, the Experiment Brush, which is basically a pre-filled lasso tool.
Brushes also support weighted smoothing, or brush stabilizers.

This is incredibly useful for line art. And while I do not usually use this feature, it is something that I feel many programs are lacking, such as Photoshop.
But its brushes aren’t the only thing about Krita with variety.

2. Color Selector Customization.
Whether you prefer something basic, or something more complicated, Krita will likely have what youre looking for. You are not likely to find yourself missing your other program’s color wheels. There are even more options than this, and other color selectors.

Gotta love that customization.
Krita also has some great naviation tools.

3. On the fly rotation, zoom, and brush sizing.
With krita, zooming, rotating, and brush size scaling are all smooth, and dynamic with the use of hot keys. These are features I miss when in other programs. To zoom, Ctrl+Middle mouse button, hover over the screen to zoom in and out. The same with shift rotates (press the ‘5’ key to reset rotation). Holding down shift and draging your brush on the canvas dynamically changes its size, allowing you to see the change, and get the exact size you want without brackets. Brackets also work, if that’s what you are used to. Krita also has highly customizable hot keys.

4. The Pop Up Pallet
The pop up pallet is a set of your 10 favorite brushes (which you can edit), and a built in color wheel that appears when you right click on the canvas. It is incredibly useful for switching between those few brushes that you use in almost every picture.

5. Real time, seamless tiles creation.
Pressing the W key in Krita will infinitely tile your canvas, and allow you to work real time on simple to complex tiled images. You can zoom in and out to see how your tiles work form a distance, and paint freely to create seamless artwork easily, without having to check using filters and manually tiling. Very usefull for patterns, backgrounds, and games.

6. The Symmetry Tool
This one goes without saying, Krita supports both horizontal and vertical symmetry, along with a brush that is capable of radial symmtry with as many directions as you like.

Go nuts, kid.
There are many more reasons why this program is awesome. And it is only going to get more awesome. And the coolest thing about it, is that it is 100% free. So go check it out! There’s nothing to lose. Krita isn’t for everyone, it can be hard to get the hang of, and it is not meant for photo editing, it is a program completely focused on digital painting from start to finish.
Give it a go and see if Krita is the program for you.


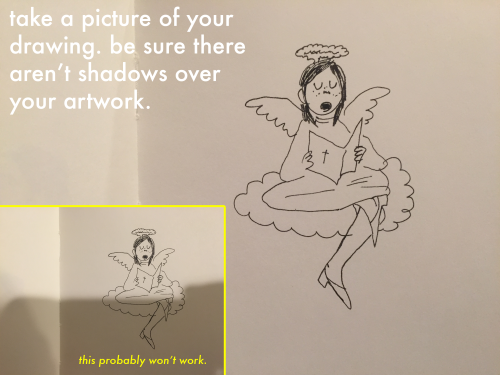
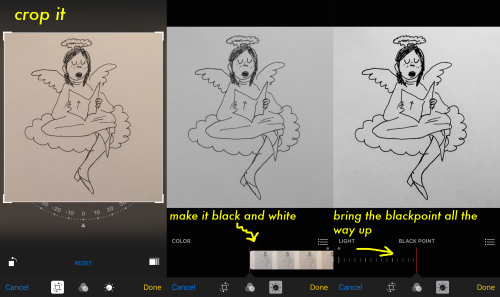
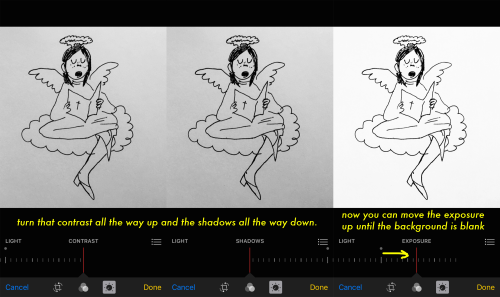
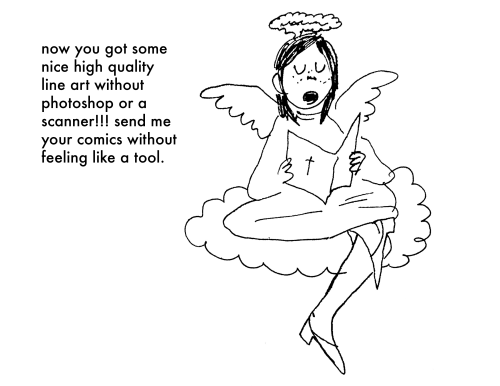
get some nice black and white line art without a scanner or computer just on your (i)phone! this is how i upload all my comix hope this is helpful
WACOM TABLET DRIVER NOT FOUND - What Do
So, you put your Windows computer to sleep for the night. You come back the next day all eager to wake it up and put it right to work on that thing you’ve been working on and ….
Oh no - you’ve seemed to have lost all pressure sensitivity and high resolution pen tracking! Well, you figure, why not go check the driver settings. Maybe it’s just groggy and needs a little morning reminder? You go to your Control Panel, click on Wacom Properties Configu—
Ah.
Now, you figure, all is lost and there’s only one thing left to do: save your work, close all your programs, and do a full system restart. What a fun time this is.
But HOLD ON! There’s another way! Try this out first before pulling the plug:
Open your Start menu (or press the Windows Key) and simply type “Services”. There will be an icon at the top of your list which appears to be two small gears with the name “Services.” Click that and look what happens next:
Scroll down the list and select “Wacom Professional Tablet Service” from the list of services and click the little “Restart” link in the column to the left. Now simply wait for the service to stop and start itself back up again!
If for some reason, clicking this little “Restart” button makes matters WORSE, the failsafe approach is the manual restart. Double click the “Wacom Professional Tablet” service and a window will pop up.
Manually stop the Wacom driver by clicking the Stop button. Wait for it to shut down, then start it back up again with the Start button once it becomes visible. Once restarted, click OK!
Test your Tablet now in Photoshop. You may have your pressure sensitivity fully restored!
IF NOT, simply close and reopen Photoshop, which will be nice and quick since it (and your work) are still loaded into recent memory. Yes, this isn’t IDEAL, but it surely beats having to close EVERYTHING and restart the whole computer. Especially if you were listening to a good tune at the time.
Now, providing you’ve done it correctly, (really now, how could you not,) you should find your Wacom’s pressure and tracking sensitivity fully restored! AND you’ll have access to the Tablet Properties config app once again!
Celebrations! For discovering such a wonderful little time saver.
:: ADDENDUM ::
As pointed out by Addleton there is a permanent fix for this issue by disabling the service called “TabletServicePen” if you’re using an Intuos/Bamboo or “Tablet PC Input Service” if you’re using a Cintiq.
Disabling this will stop this issue for good – but it will disable all Windows-related tablet functions such as flicks and handwriting, and may make some software such as SAI misbehave on certain hardware. If all you use your tablet for is Photoshop and drawing, it’s probably best you disable those services.
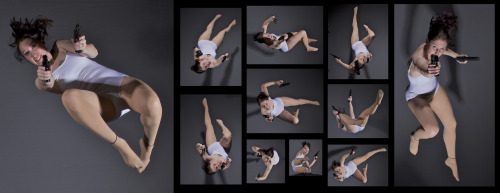
SenshiStock
RomanceBacBat

SenshiStock is a collection of non-nude, figure model drawing references.
There are over 2000 FREE pose references on on DeviantArt.
SenshiStock.com has some merch & themed download packs for purchase.
There is a free web sketch app that also works on mobile. There are over 1500 images in rotations with optional tags and timer.
There is a SenshiStock Patreon for supporting the creator in exchange for more pose reference goodies.
—DeviantArt Gallery Shortcuts— General Drawing Poses Foreshortening or Perspective Poses Dynamic Flying Falling Action Poses Male Poses Gun Poses Staff Weapon Poses Ax, Hammer, Bat Poses Sword Poses Small Blade Poses Archery Poses Sailor Guardian and Magical Girl Poses Romance or Couples Poses Sitting and Kneeling Poses Dramatic and Reaching Poses Magic & Hogwarts Poses Defeated or Lying Poses Dance and Performance Poses Back Poses Pin Up Inspired Poses Life In General Poses Fights and Fighting Poses Leaning Poses Pairs Poses Wings Poses Hanging Poses Groups of Three or More Poses Instrument Poses Mirror Poses Pregnancy Poses
Space Brush
Just a quick brush / texture I put together to learn how to make Sai brushes.

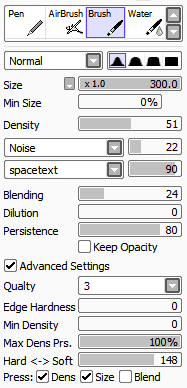
You can get the space texture here. SET THE BRUSH LAYER ON LUMINOSITY.
photoshop: beginners masterpost
quick links:
the correct updated photo sizes (note: old tutorials will have the old sizes!)
how to make gifs
how to edit photos
guides:
getting started by sorrydearie
beginner masterpost by allieofrph
how to color by lunavlovegood
tutorials by thosetutorials
tutorials by gangofyouth
other resources:
how to add a psd
learn about psds/coloring tools
how to add text to a gif
text + fonts masterpost
how to center text
how to use the selective color tool
basic font principles
gifs: where to find videos
youtube
vimeo
+ how to download them
graphics: where to find pictures remember to ask for permission when needed and to credit artists!
flickr
500px
photobucket
fotki
sites masterpost
resources: psds, textures, tutorials & more
PhlearnLLC
resources blogs
thosetutorials
yeahps
foreverps
fyeahtutorial
completeresources + their ask blog
shading colour tips
hey yall its me the Art Mom™ to help you shade pretty
rule 1: DO NOT SHADE WITH BLACK. EVER. IT NEVER LOOKS GOOD.
red- shade with a slightly darker shade of purple
orange- slightly darker and more saturated shade of red
yellow- i think like..a peach could work but make it a really light peach
green- shade with darker and less saturated shade of blue or teal
blue- shade with purple
purple- a shade thats darker than the purple you’re using and maybe a little pink (MAYBE blue)
pink- darker shade of red
white- a really light lavender or blue..or i guess any really light colour??
black- okay listen dont use pure black to colour anything unless you want to leave it with flat colours because you cant really shade black lol
grey- a slightly darker shade of purple or blue (less saturated)
brown- slightly darker and less saturated shade of purple or red
aaaaand thats all i got lol. let me know if there is anything i should add to this list!!

apparently ppl don’t know about waifu2x??? despite its… concerning name it’s literally the most convenient website i’ve ever come across as an artist
it allows you to resize artwork without it becoming pixellated. this is a MASSIVE help if you, for example, make lineart too small or something. it works best with things that 1. have no textures 2. have smooth lines 3. have cel shading, but it still works really damn well for things that don’t fit that profile
here’s an example:

normal size

2x in paint

2x in waifu2x
so like, there’s that. go wild
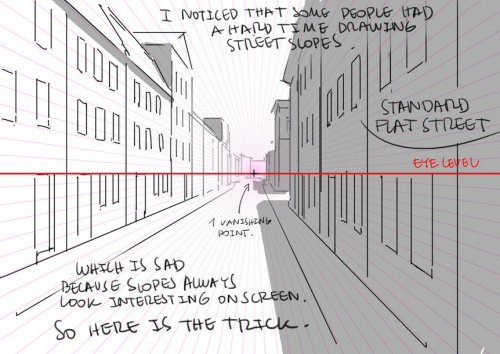
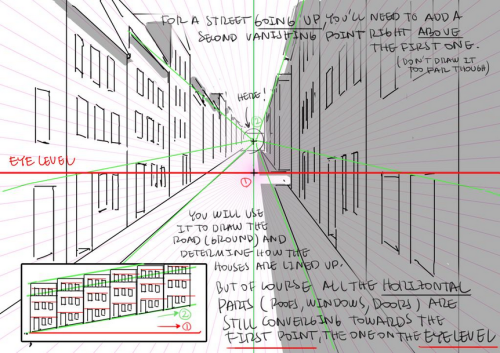
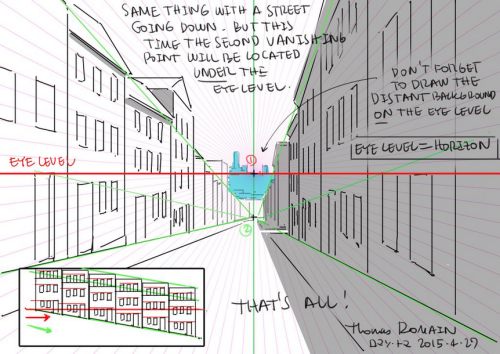
How to draw street going up & down without losing your mind.
by Thomas Romain (Space Dandy, Code Lyoko, Basquash!, E.P. Kiss Dum, Cannon Busters). Another one…
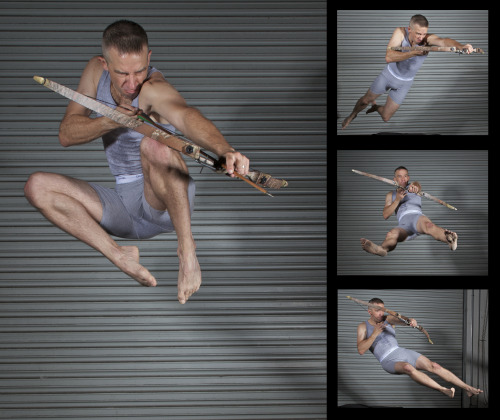
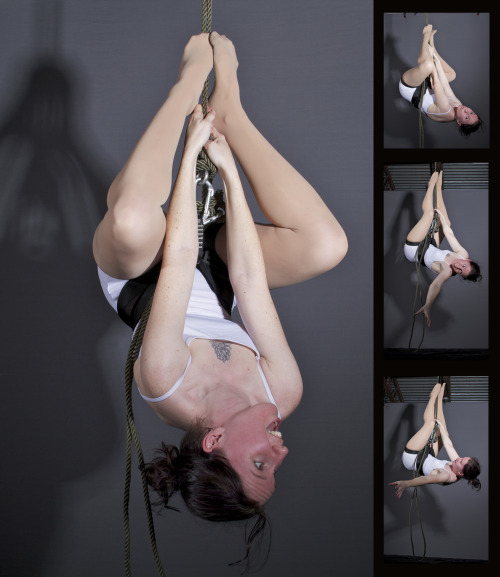
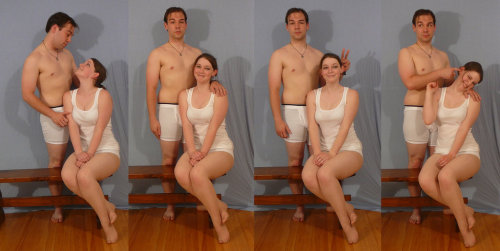
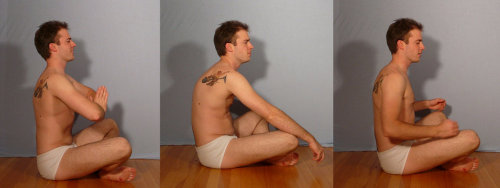
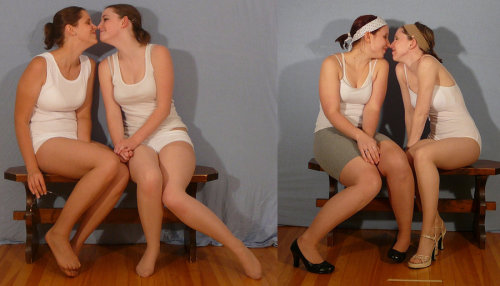
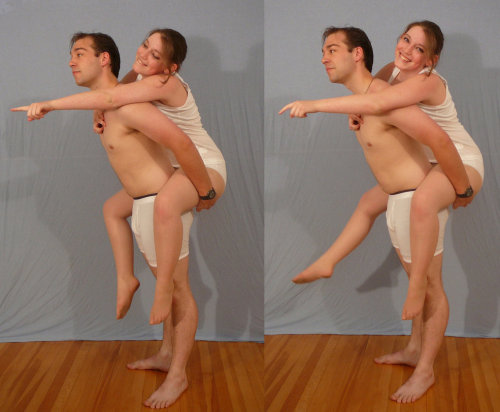
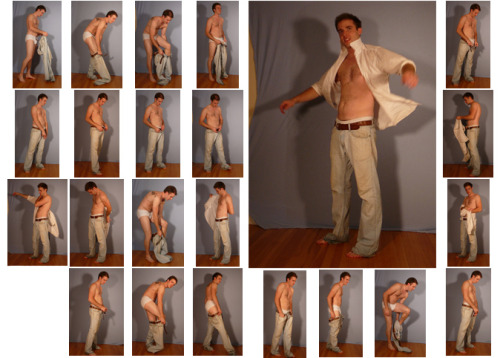
SenshiStock’s gallery consists of millions of pictures that are free to use as reference.
General Drawing Poses Sit and Kneel Dramatic and Reaching Drawing Poses Magic and Hogwarts Drawing Poses Staff Weapon Pose Reference Hammer, Axe and Bat Pose Reference Sword Weapon Drawing Reference Small Bladed Weapon Pose Reference Gun Weapon Pose Reference Bow and Arrow Archery Stock Foreshortening and Perspective Poses Dynamic Flying Falling Action Poses Deafeated or Laying Drawing Poses Magic Crystal Magical Girl Wand Weapon Transformations and Dance Cards Back Pose Reference Pin Up Inspired Poses for Drawing Performances Poses Life in General Poses Fights and Fighting Pose Reference Leaning Poses Classic Sailor Senshi Poses Wings Sailor Moon Villains Pairs Romance or Couples Pose Reference All the Male Stock Hanging Stock Drawing Reference Three or More Groups Instruments Mirrors Whip Technobabble
REFERENCE MASTERPOST WOAH
text tricks; click the <html> button in the corner

<small> makes things smaller. the more <small> you use, the smaller it gets.
<big> same applies with big
<sup> makes things go up up up up
<sub> makes things go down down down down
<u> makes underlines (only seen on blog pages)
go here for spacy wacey words
z̗̟̻̫̼͓͂ã̤̬͓̼͓̔̐̇͑ͩ̀l̯̜̰͐̒ͪg̺͎͈̍o͍̫̬̤ͭ ͍ͩͤ̈́a͇̘͙̼̠̪̣ͨ̾̍̿k̼ͣa̯̮͇̟ͫ̑ͤͭ̔̊ͣͅ ͌͆s̮̫̼͖̫̖̐̆ͦc̎ͪÃ͔̬̘̫̣̮̮̂̉͗R̈́Ẏ̖͕͚̱̩̠ ̫̝͎̞͖̄T͔̎͊̍ͪ̔E̲̞̽ͨ̿̑X͓̜̩̖̜ͦ͊T̹̥̰̊̎͂ found here
here and here for ƒαηcу/սռﻨƈօժε †εχ† (☞ here for unicode symbols ☜)
upside down text? oɯəlqoɹd ou
of course, those are the basics. <code> makes things monospaced and <pre> puts your text in a grey box.
other;
need themes? NEED THEMES? HERE’S A THEME REC W/ 4000+ THEMES AHHHHHH
japanese emoticons? (◕△◕✿)
things that look like japanese emoticons but are cute lil gifs?
anything else you need help with? a blog full of tutorials just for all the sweeties out there!!!!!
Hi! I love your art of various fanlands and i was wondering, would you ever do a tutorial on how you draw them or the process of how you draw them? Or perhaps have any tip or tricks?
sure.
there are certain things/tricks I do almost every time, so here we go.
pick colors for the sky and the ground.

Keep reading

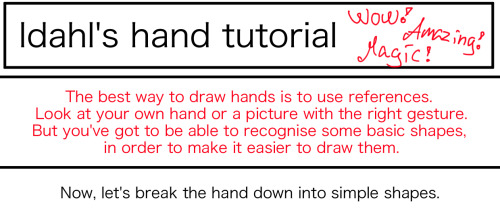
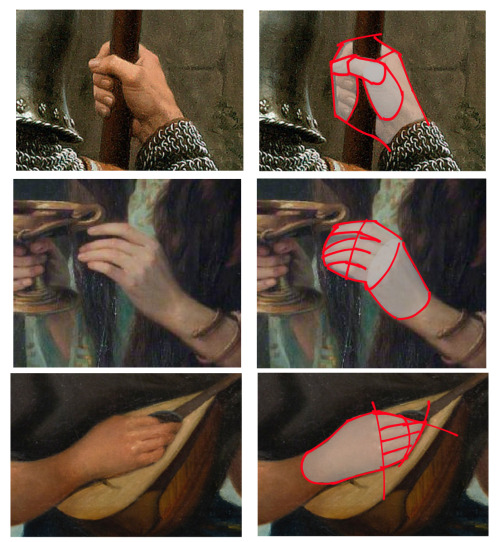
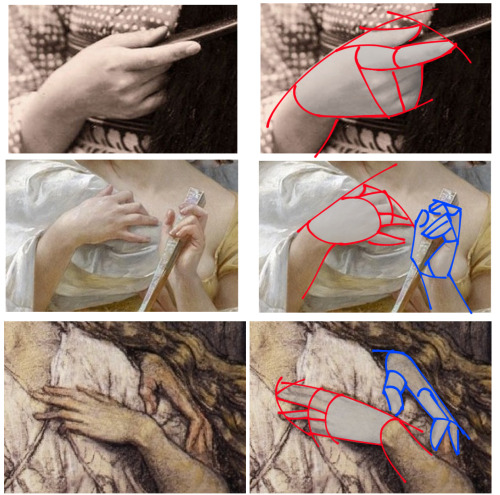
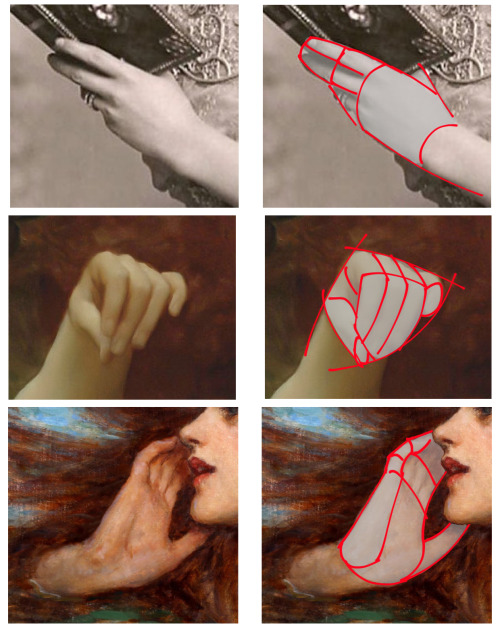
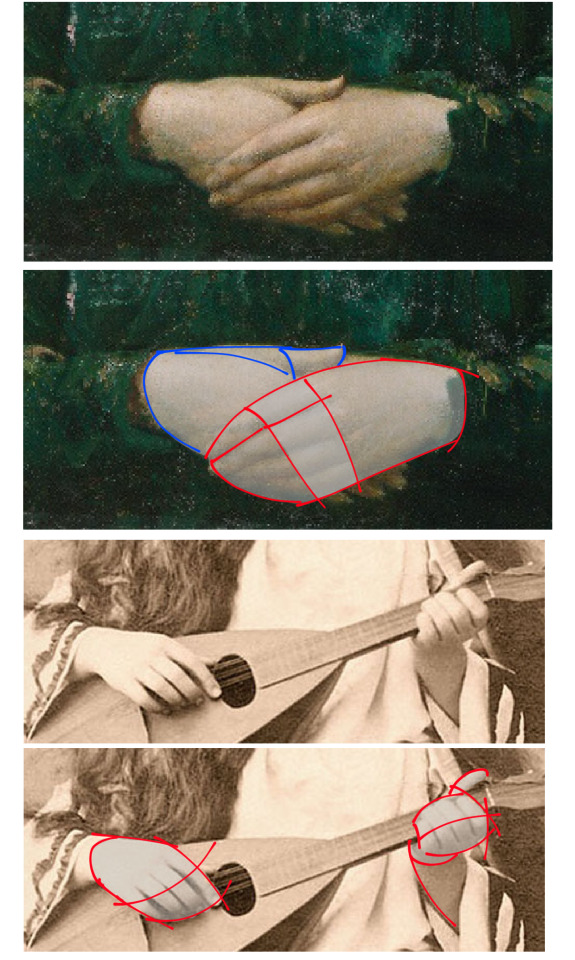

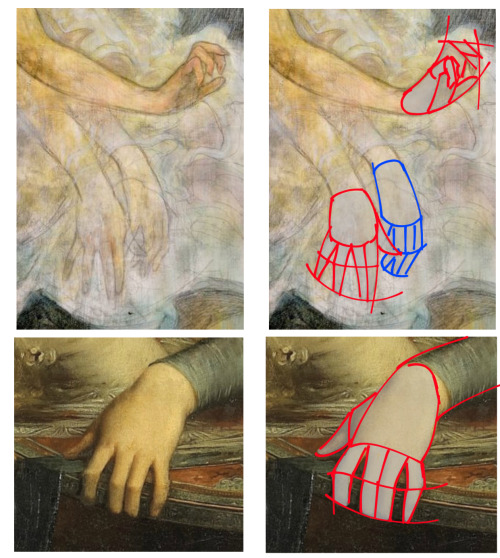
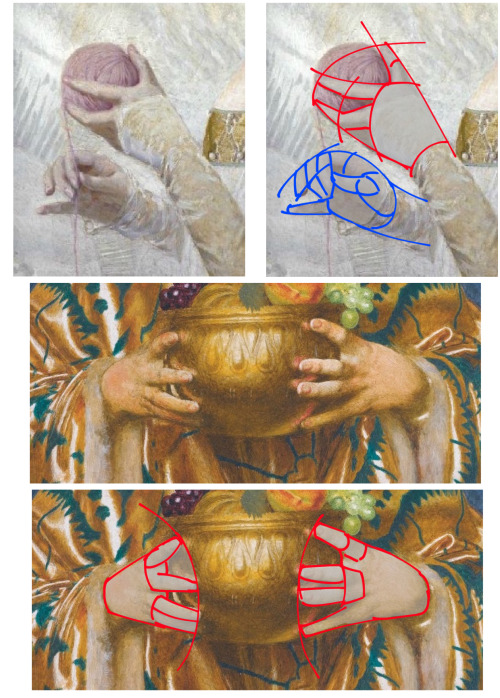
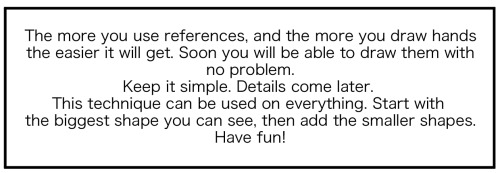
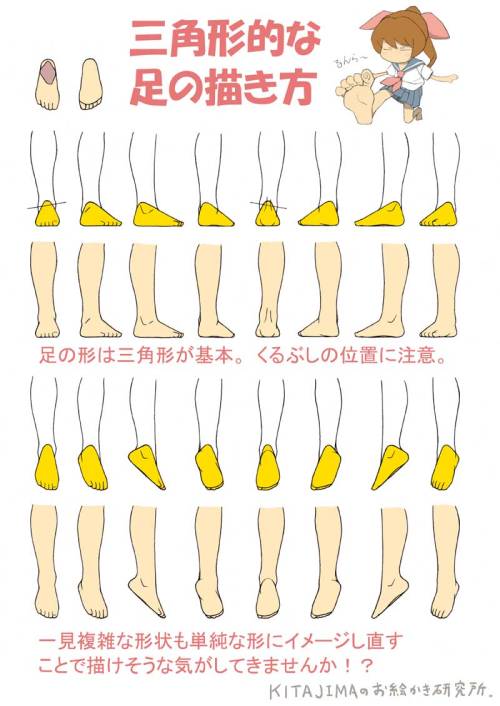
This is how I draw hands. I simplify the shape and then later I will add the necessary details. It makes it easier to get them right. But the only way to learn how to draw hands is to just keep drawing them.

i just found this website that can randomly generate a continent for you!! this is great for fantasy writers

plus, you can look at it in 3d!

theres a lot of viewing options and other things! theres an option on-site to take a screenshot, so you don’t have to have a program for that!
you can view it here!