NSFW because there will probably be nude refs | this is a side blog to sort all of the art stuff I need | none of it is mine
151 posts
Latest Posts by artrefforsteph - Page 4
Copic Marker Walkthrough
Lately many people have been asking me how to create a space nebula effect with markers. The process is relatively simple, but it’s not easy to explain simply with words alone. So in this walkthrough I’m going to show step by step how it’s done.

First things first. This is the list of supplies I used. -Strathmore Mixed Media 5.5 x 8.5 sketchbook-Pink and White Colored Pencil-White Gel Pen-13 Copic Marlers (12 colors and a colorless blender, which I’ll explain how to use later.) I should point out now that you aren’t required to use the exact brands I used to create the drawing. I use these materials because they’re what I’m most accustomed to.The techniques I demonstrate can be done with whatever markers and paper you’re comfortable using. What matters is that you understand the technique because when you do you can apply it to anything.

I begin by making some abstract cloud-like shapes with E50 (Eggshell), which is a very faint yellow. There’s no pencil sketch here because space nebula (as well as atmospheres and natural landscapes) can be easily created by layering abstract shapes on top of each other.

Using Y21 (Buttercup Yellow) and G20 (Wax White) I basically repeat the first step. Still working very light. I realized after the fact that Buttercup Yellow was a bit too intense for this drawing so I stopped using it there. This is why it’s important to have a sheet of scratch paper nearby to test out colors before you apply them. Because once they’re down, they’re DOWN.

Next I use R20 (Blush) to start defining the shapes of the gases in the nebula. Then I go back to Eggshell. It’s probably hard to see what I did here, but I used the brush tip end (on its side) to swipe inward, from all sides, towards the center of the nebula. The reason being is that the brush tip is more saturated than the chisel tip. This helps intensify the lighter shade of yellow that’s already on the paper. If also makes crossfading colors easier because the sideways swipe motion creates a soft gradient that tapers towards the edge. I’ll use this technique multiple times throughout the drawing..

Now with B000 (Pale Porcelain Blue) I layer over the gases in the center while working my way outwards. Again I’m pulling my strokes inward because I know the surrounding space will be deep blue and I want the transition to be a smooth one.

With E04 (Lipstick Natural) I’m finally beginning to put in some of the darker colors. At this point the drawing sill looks like a random mess. Sometimes you’ll get the urge to rush and make the drawing look like something, but you have to be patient and take your time.

Using B32 (Pale Blue) and R20 again, I’m going around the nebula detailing and adding layers of color. I’m also leaving some white spaces which will later become stars. My Pale Blue is actually beginning to dry out, but here in able to make that work to my advantage because it streaks from the chisel end create a dry brush effect which helps add to the glow. The nebula portion of the drawing is beginning to take shape.

Working my way around the perimeter with Pale Blue. From here you can see the importance of working light to dark. Build your colors gradually and avoid the urge to go too dark too early. You want to have room for error and you don’t want create more work for yourself.

With B04 (Tahitian Blue) I fill the surrounding space completely. I’m not too concerned with trying to get an even layer because I know that I’m going to add darker shades of blue next.

Here I used B00 (Frost Blue) to start cleaning up some of the edges around the nebula. I also used BG15 (Aqua) to add some pockets of color in the surrounding space.

Adding darker layers to surrounding space with B14 (Light Blue), which surprisingly a pretty dark shade of blue. Then I used B97 (Night Blue) to add the last layer, which is the darkest layer in this drawing.

Now it’s time for the final details. 0 is the Colorless Blender. But it’s not necessarily used to blend. Instead it almost acts like an eraser because the ink pushes colors away when you put it down. Because of this I generally don’t use it. But it works great for things like water, landscapes and atmospheres. Or in this case, space in which I used it to pull out highlights in and around the nebula. The colorless blender is odd, but it occasionally has its uses.

This is the final step and my personal favorite. Highlights and small details. I used the pink and white pencils to color around the edges of the brightest stars to make them look as if they’re glowing. Then I used the a white gel pen to color inside those stars to make them shine and pop off the page.

And here’s the finished drawing. This was hastily put together, but hope y'all found this to be informative and easy to follow. I’ll try to do more marker walkthroughs on different subjects in the future. Until then thanks for all your support and encouragement!


I’ve been seeing a lot of Big Hero 6 concept art and I wanted to set a brush to kind of mimic the graphite style of some of the sketches. I don’t have a “fully functional” version of SAI, so I tried to make this as simple as possible.

This is very old but I found it again and I still like it. Amazing.
All my vampires have their own set of pointy teeth óuò. My babies.


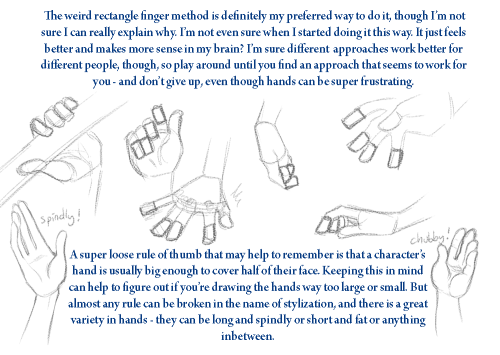
Thanks for the ask! The truth is, I’m still really shaky on how to draw hands. But here’s a really short and simple tutorial on my approach.
Need some better/more in-depth hand tutorials? Check these ones out, they are all amazing: (link) (link) (link) (link)


This is mostly geared towards painting braids, since most tutorials are a complicated formula for sketching a bunch of overlapping lines that miraculously make a braid. I’m a simple person. Blobs are good.


My first shot at creating a sort of tutorial/guide, telling how I do things. On this initial chapter we’re going over the handy matter of Hands. Not meaning to be an encyclopedic explanation, only showing my own methods and self-taught clues. Hoping somebody finds it useful! :3 I’ll do more if this one is received well. So let me know~
My thanks also to the supporters in my Patreon campaign, who helped me decide which themes to focus on for a start. And are actually allowing this to happen. :D Cheers!


i dont really need a whole tutorial but i was wondering if you had any coloring tips?
uhm uhm i guess the main thing for me personally is for shading, don’t use a colour that’s just darker than your base colours e.g if you have yellow, don’t use a darker version of that same yellow. use an orange or pink

using a darker version of base colours is boring imo. play around with colours until you find something you like. mix colours together. its fun
i hhope that helped
Hi! I really love your art and I'm wondering if you should show me how you color and shade. thanks! :)

tadaaaaa!
Problem with drawing your OC?
There is a 3D program where you can set everything.. i mean EVERYTHING on your character! And it’s free!
It’s called FUSE
http://store.steampowered.com/app/257400


you can pick between realistic and anime style… But most important: you can ANIMATE THEM!


A master post of Thomas Romain’s art tutorials.
There’s not enough space to post all of them, SO here’s links to everything he has posted (on twitter) so far : 1 2 3 4 5 6 7 8 9 10 11 12.
Now that new semesters have started, I thought people might need these. Enjoy your lessons!
Genice, can you give me some advice with hands? The hands i draw sometimes end stiff and ugly. Also hands in perspective, because sometimes they end too big or small. Thanks!
i mostly got better at drawing hands by just practicing how to draw them a lot!what i would do is draw a pose or two over and over again (maybe at slightly different angles and stuff) first with reference, and then draw them again without looking at anything to see how much i can draw from my mind, and then go back and forth between the two until i get enough of a “feel” to draw a certain pose decently without relying on reference. i think after a while you kind of develop patterns in the way you draw hands and from there it becomes easier to draw different hand poses and stuff from scratch
to make the hands you draw look less awkward/stiff, i think it helps to focus more on the overall flow of the composition and silhouette of the hand rather than getting all the details in and anatomy right and stuff in the initial stages


when drawing hands in perspective i think it helps to visualize them as 3d shapes

to get the foreshortening right (aside from using perspective guides and whatnot) i like to just draw the hand first, and then eyeball the perspective and adjust its size and position until it looks right

(select with lasso tool > ctrl+t to transform +right click for more transform options)

another thing i do is take reference pictures with my ipod (any camera works tbh. i just find using a mobile device to be more convenient)by holding the camera close to my hand i can get a really exaggerated perspective like this:

it’s nice because i can get the ref for the exact pose and angle i’m looking for without having to do a lot of internet fishing


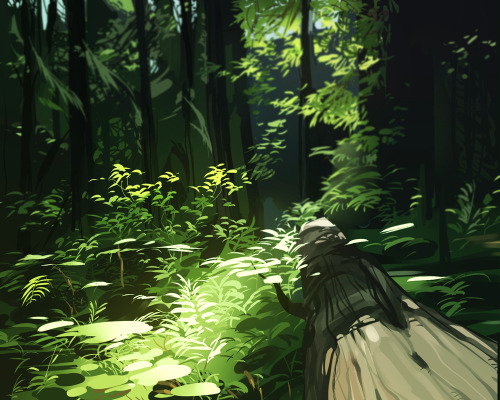
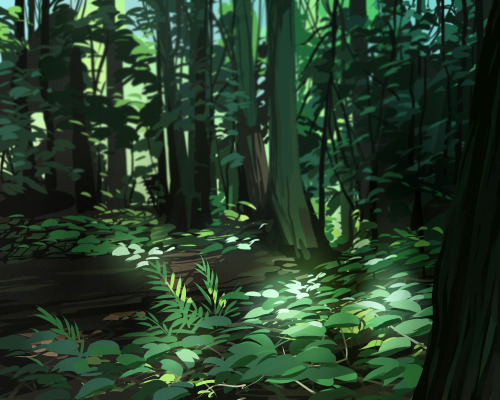
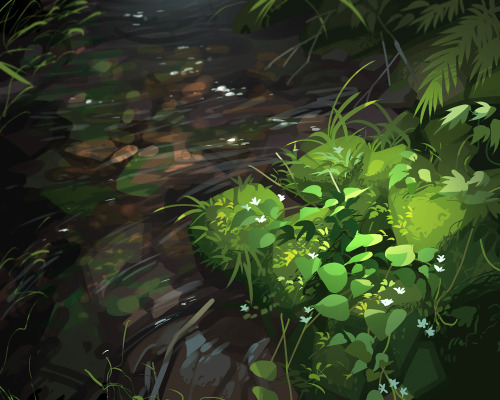
Path into the light.
Ailigas Karigasniemeä kohti tammikuu 2014 .
Utsjoki, Finland 2014.
by Tiina Törmänen


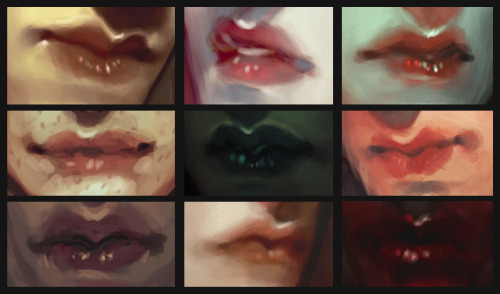
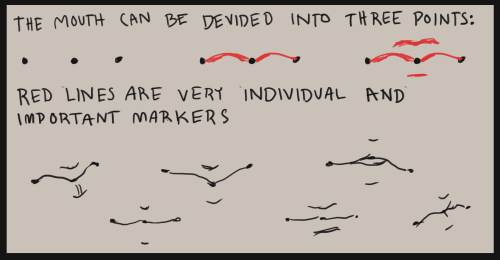
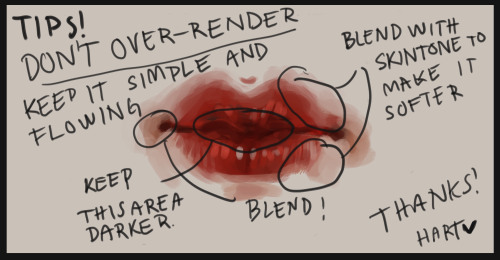
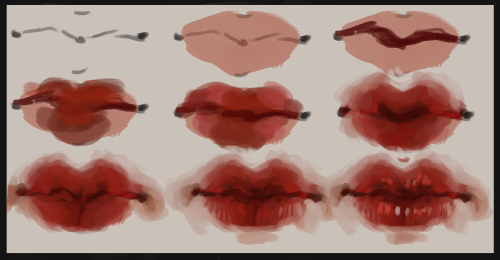
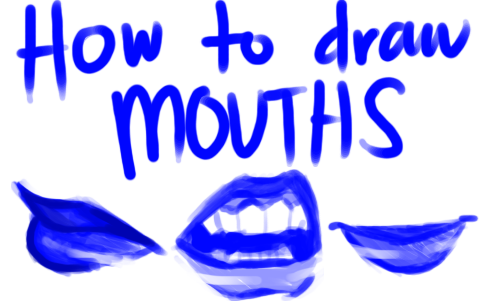
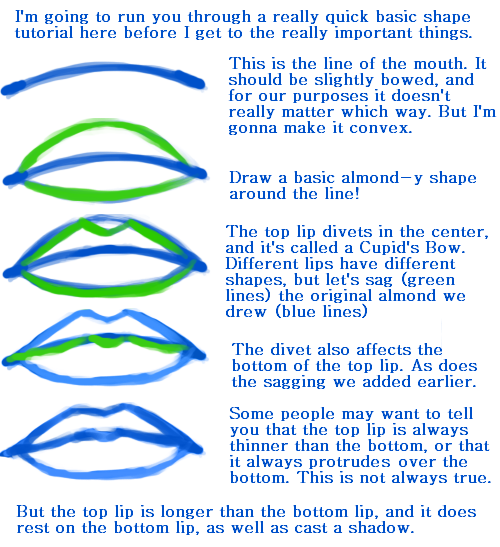
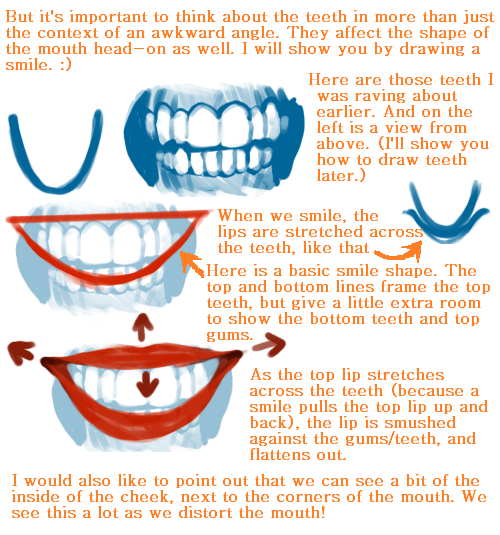
i’ve had more than one anon asking about lips and i’ve tried to do a little tutorial before without posting it simply because i feel like my mouths aren’t really that special. they are always really quick and not super detailed, but i tried to put something together anyway! as always this is not a depiction of how you best draw mouths or how you should paint them, this style is just how i draw them.
and of course, i added some examples. i use this method almost everytime painting lips these days.
If you're an artist looking to diversify your faces:
click this link
draw whomever you get
don’t worry about making it super-accurate, just focus on the characteristic parts of the face and have fun
the outcome might not look like the ref, but it will be different and more varied than faces you draw out of your head, an dprobably pretty rad on its own right!
feel free to reblog with your drawing, if you want!
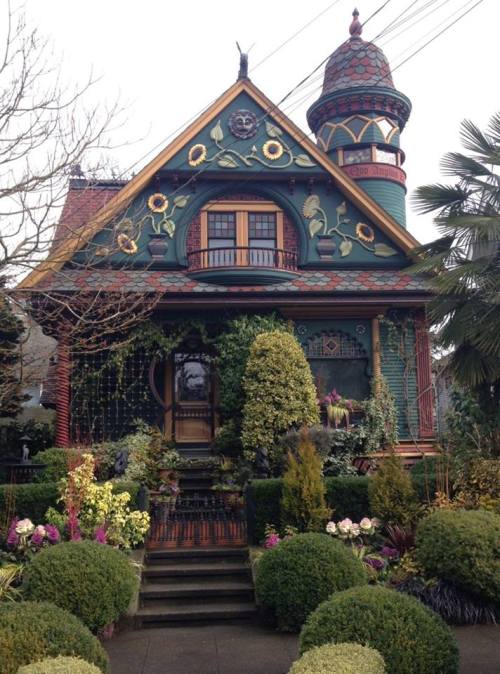
create your own home!
i found this great site that lets you create 3d models and floor plans of custom homes! you can even put in furniture and customize wallpapers/floors!! it has everything you could ask for!! you can use it make ref pictures of your oc homes or just make your dream house!
this is what i manged to make


so I downloaded a new art program recently

It’s called Krita. Maybe you’ve heard of it, but in case you haven’t, seriously, check it out! It’s really nice!
The best way I can describe this program is that it’s a combination of Easy Paint Tool SAI and Photoshop. And the best part is the program is completely free to download from their website. I think what I like most about it is that not only does it have a Stablizer like SAI does, but it has practically all the tools I ever use from Photoshop. Not saying it’s going to replace SAI or PS for me (at least not yet; I’m still learning my way around Krita lol), but it’s probably the only thing I’ve ever found that is coming close to doing it.
I put some screenshots under the cut!
Keep reading
Mischief - The Sketching/Art software that acts like a regular raster-based painting software, but with infinite vector scaling! [x]
FACES
Drawing a face (the circle thing)
How to draw faces
Heads in profile
Drawing heads
A face tutorial
Avoid same facing
Diversify your faces
Face shapes
To make your drawing look like the person you’re drawing
Make your faces look like the person
Expressions
More about expressions
Drawing lips
Lip tutorial
Drawing ears
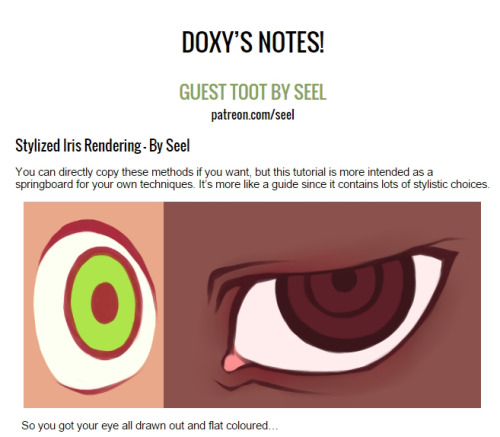
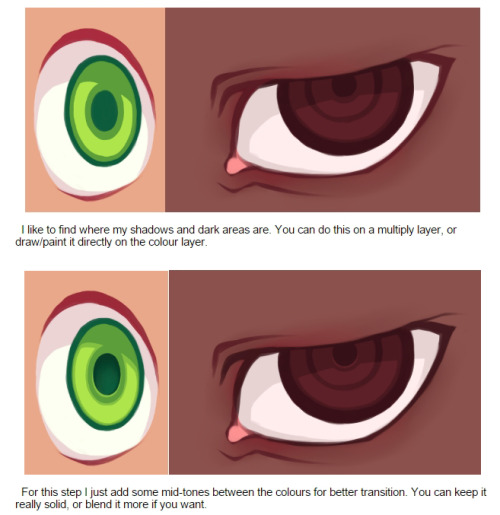
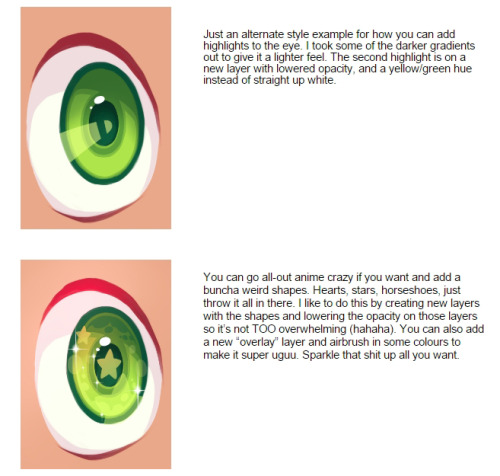
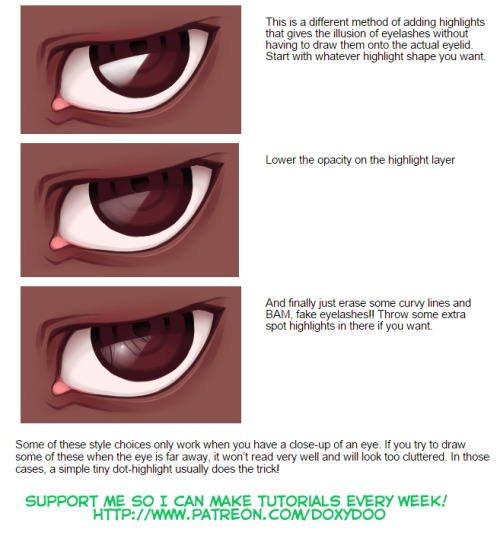
Drawing eyes
Realistic eyes
Drawing a nose
Drawing kisses
Drawing glasses
Drawing hoods
BODIES
Guide to human types part 1
Guide to human types part 2
Guide to human types part 3
Different kinds of athletic body types
Ladies tutorial (nudity)
Fellas tutorial
Curves on girls tutorial
How to draw necks
Drawing shoulders
Drawing arms
Drawing hands
Hand tips
More hands
Hands tips and techniques
Hands, arms, legs and feet
Legs, torso and expressions
Drawing boobs
How to boob
Boobs and hips
Drawing abs
Beer belly tutorial
Drawing backs
How to draw back views
Legs reference
Drawing knees
How to draw butts
Penis tutorial (nsfw)
Drawing feet and shoes
Sitting reference
Realistic woman body shape chart
Hair
Drawing hair
Hair tutorial
Drawing curls
Drawing braids
ANIMALS & CREATURES
Canines vs felines
Drawing cats
Drawing cats tips
How to draw big cats
Drawing rats
Basic deer tutorial
Deer sketching
Dog anatomy
Dog anatomy tutorial
Dog nose tutorial
Dog paw tutorial
Basic wolf tutorial
Horse tutorial
Sheep vs goats
Drawing giraffes
Basic owl tutorial
Bird wing tutorial
Drawing bird beaks and faces
Butterfly tutorial
Drawing animal legs on humans
Winged people anatomy
Dragon tutorial
Drawing dragons
Dragon wing tutorial
Fur tutorial
Drawing sharp teeth
OTHERS
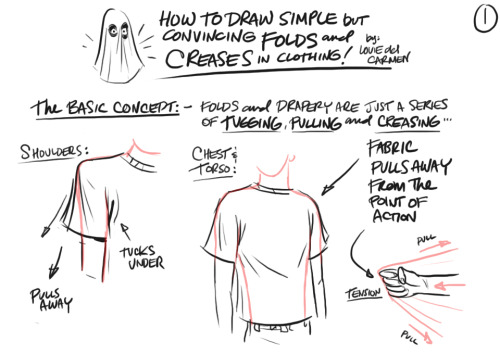
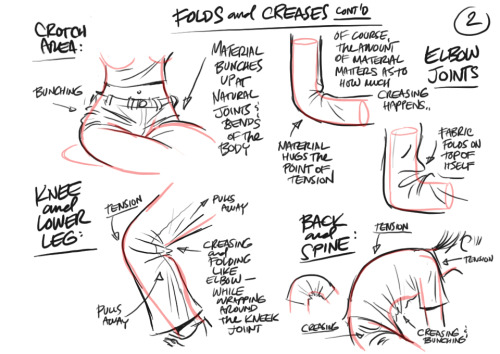
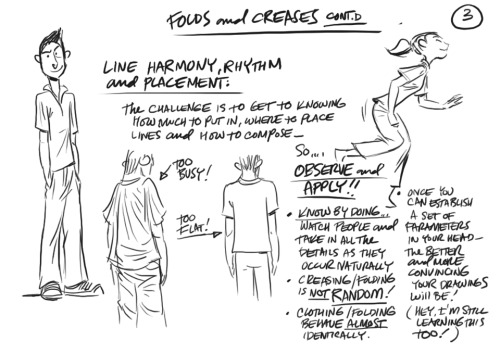
Drawing clothes
Clothing folds tutorial
Collars, vests and pants reference
Hats reference
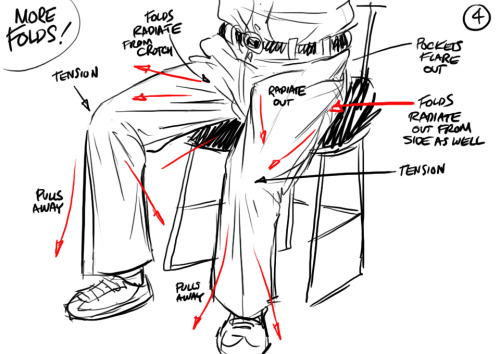
Drawing jeans
Drawing bows
Drawing trees
Tree tutorial
Drawing water
Water tutorial
Drawing crystals
Ice
Clouds
Creating form
Perspective tricks
Character design reference
How to draw better (video)
Learn how to draw better
Art reference & tutorials blog
Tutorial masterpost
How to draw anything


Watercolor Tutorial
As promised a step by step guide, which hopefully will help you understand how I work with watercolors. If you have more questions I’m glad answer them.

Materials: Pencil (2H), Daler Rowney Fine Grain - Heavy weight paper (A5, 200g/m2), Windsor & Newton watercolors, Ink and drawing pen, colored pencils, white paper, tissue

Keep reading
HOLY FREE ART PROGRAMS BATMAN
I’ve had this list sitting around for a while (in case I ever want to try something new) and I thought I’d share it, because why the hell not, everybody loves free stuff. I’ve only used a couple, so for all I know these could be complete shit. BUT YOU NEVER KNOW, RIGHT?
*= available for both windows and mac os
GIMP * - Does a lot of the same stuff as Photoshop.
FireAlpaca * - Similar to Paint Tool Sai, so it’s a good alternative for Mac users.
Autodesk Sketchbook Copic Edition * - Simulates the look of copic markers.
MyPaint * - Basic stuff, nothing fancy.
Pinta * - Drawing program modeled after paint.NET.
Inkscape * - Vector/drawing program meant to be similar to Illustrator.
ArtRage * - Digital painting program; you can get the trimmed down version for free or buy the full version with more features.
Sumo Paint * - In-browser drawing app.
DAZ Studio * - Some sort of 3D model poser thing.
Pencil * - Software for animating.
SketchUp * - Tool for making 3D models. Looks handy for stuff like architectural drawings.
Blender * - Pretty popular 3D software.
escape motions * - Some browser apps, fun to fiddle with when you’re bored (the fluid fire simulation is pretty cool imo).
Twistedbrush (Pixarra) - Seems to be meant for replicating the look of traditional media.
Pixia/Phierha - A popular program in Japan, according to the website.
Krita - This was originally made for Linux and it looks like the developers haven’t ironed out all of the kinks in the Windows installer.
Artweaver - Another trimmed down free thing if you don’t want to buy the full program.
paint.NET - Pretty basic kit, probably good for simple stuff.
Project Dogwaffle - I’m not sure what this one is all about because I couldn’t stop laughing at the terrible website.
Speedy Painter - Lightweight digital painting program.
mtPaint - Originally made for pixel art; simple enough to run on older computers.
Chasys Draw IES - Supposed to be some sort of drawing+image editor thing.
PaintRibbon - Seems to be another plain old basic image editor.
DrawPlus - Looks like it’s made for graphic design and vector stuff.
SmoothDraw - I’m guessing this is a basic thing for people who don’t want to bother with complicated stuff.
hi! umm pls pls PLS if you have the time, do a thingy on arms when you get the chance, they are so hard i could almost cry aslkdjaskjsas, i keep forgetting how many curves an arm should have/how long it should be (in diff positions/when it's not resting at the hips) etc etc etc ahhh omg please!! thank you sosososo much, i l♡ve all of your art and i hope you have a nice day!! ✧ ㅠㅠ ✧


I don’t want to go into detail in terms of muscles, but I’m sure you can find them if you google arm muscles! Hope this helps u out a little!