Curate, connect, and discover
Tutorial - Blog Posts
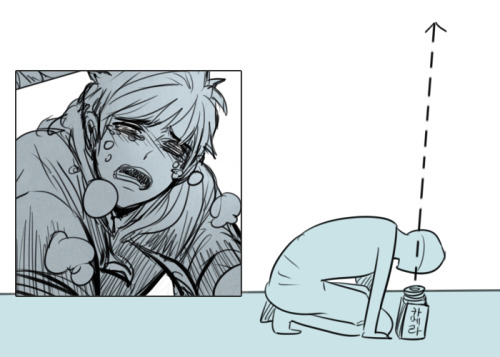
SONIC EXPRESSION NOTES!!


Expressions.... hard to explain... but I hope this is helpful :D
Hi! I live your art so much and I was wondering if you have any tips on shading?
Two of the biggest things you want to think about are 1. your light source and 2. form shadows vs cast shadows — which your light-source will dictate.
Form shadows are created by the light source directly hitting the object and are generally softer. Cast shadows are the shadows cast from one object onto another and generally have sharper edges. This contrast between sharp and soft shadows is what’s going to make your drawing really come to life and the shadows read like they’re supposed to
Then, to further define shading, two things to think about are core darks and reflected light. Core darks are the darkest part of the shadow within the form shadow, and reflected light is what it sounds like, light from other objects that has bounced back.

here's a visual representation of that from here
This is all pretty technical and art fundamentals-y but you can easily put it into practice in your own stuff even if what you're making is more cartoony than realistic

see I drew a lovely deku with this technique
Seus designs são lindos, poderia dar uma dicas? 🥰
Olá meu bem!! <3 obrigado pelo elogio (morri de amores pois sou boiola mas abafa kkkk) bem, como você não especificou que dicas gostaria de receber (e nem o estilo de capa que tem mais dificuldade) resolvi trazer o que mais ajudou para que minhas capas tivessem uma evolução (!)
Primeiramente, eu edito tudo pelo celular. Tudo. Desde a base até a finalização, tudo. Não se limite, existem vários apps de edição e todos eles são muito úteis para editar uma capinha cheirosa e babadeira 🩷✨ o que eu uso é o Ibis Paint X mas tem gente editando por várias outras plataformas. Não se limite!
Finalização:
é uma das minhas partes favoritas! Mas a ordem é bem complicada e demora nas primeiras vezes que faz. Mudei minha finalização esses dias e foi a que mais ajudou as minhas capas a ficar com qualidade. Primeiro, eu faço a capa nas medidas de 600 x 400... Sim, MAS EU POSSO EXPLICAR! Já disse uma vez e digo de novo, não são as medidas que vão deixar a capa com qualidade, é a finalização. Edito tudo nas medidas corretas do app/site pois sou doido :3
Vamos falar da finalização do igor! Primeiro eu salvo a capa (aperte na opção Adicionar Camada a Partir da Tela) e eu coloco a nitidez no raio de 2 e força no 240 e pq sim, depois eu vou mexer nas configurações do app (e como já disse, eu uso o Ibis paint). Logo após eu vou mexer no tom/saturação/luminosidade, nessa configuração, tente mexer até realçar mais as cores, dar mais contraste (pois é ela que vai dar o tchan na hora da segunda finalização). Após isso, eu mexo no balanço de cores, apenas por fazer (essa parte é opcional). Agora vamos pro pulo do gato. Aperte na opção Adicionar Camada a Partir da Tela (que vai duplicar a sua capa e a alteração que fez e aperte a opção de efeitos Borrão Gaussian no raio 5, e dai vem um truque! Coloque no modo de mistura escurecer e se for necessário, diminua a opacidade. Tentem e me digam se funciona com vocês! Mais um truque da minha finalização. Dupliquem novamente a camada com toda a sua alteração E usem o mapa de gradação ou seja, usem degradê. Nisso, eu não posso ajudar muito pois vai de cada capa. A única dica que posso dar é sejam felizes e testem a vontade as cores, brinquem a vontade! E depois de verem um degradê que casou com a sua capa, brinquem com o modo de mistura e testem qual mais se adequa para a capa. Depois disso eu só adiciono o efeito 3d aberração cromática (movimento) e apago as extremidades. Depois disso eu adiciono os psds (vai de cada capa) e faço minha terceira finalização. Que é onde adiciono o TÍTULO, CRÉDITOS E DETALHES EXTRAS , sim eu não havia adicionado o título!
Um exemplo:


primeira capa depois da primeira finalização; a segunda sendo depois da segunda finalização e a terceira capa totalmente finalizada.
(Desisto de tentar explicar gente, é isso por hoje, eu até tentei gravar minha finalização mas não deu certo :'))) qualquer dúvida, me mandem nas asks <3
How to do a pixel animation!
This tutorial will show you how to do a small pixel animation in Photoshop! Of course, this means you will need Photoshop to do this and I also recommend that you have a Wacom tablet. I would also recommend this tutorial for beginner animators, young and old alike!
I chose to do this tutorial as I recently learned how to do it and am pretty proud of myself for it and was hoping you guys might want to know too! For this tutorial I’m just going to do a simple gif of a blinking eye, nothing too complex!
I am kind of bad at tutorials so sorry if this one isn't the best...
STEP 1:

Open a canvas with these settings! 100 X 100 in pixels is best to get the pixel effect!
STEP 2:

Select the brush tool! You do this by hold clicking the pencil and choosing the icon with the paintbrush on it!
STEP 3:

Open a new layer! You do this by clicking the button I circled!
STEP 4:

Click this button! It will turn the timeline into an interface that’s easier to manage!
(There was an error that happened here that I can’t seem to fix... sorry!)

STEP 5:

Now for the fun part! Draw your design and when your done, click the circled button to create a new frame! You can make the eye in any style you wish, or follow my style!
STEP 6:

Draw the previous design onto the new canvas, but make it move a slight bit. This will make it move when you play the finished result! The smaller the adjustment is, the smoother the animation will turn out but this will mean more work. When you are finished drawing this frame, make another!
STEP 7:
Simply repeat 6 as many times as you need to!
STEP 8:
Now to save your animation!

Click file, and then “save as”.
STEP 9:

Name your animation and save it in the Photoshop (PSD) format, then hit the save button! Depending on how long your animation is will determine the time it takes for your file to save, so you will need to sit tight if you’ve made an animation with a ton of frames!
STEP 10:
If you want to make your animation a gif, click file and then export.
From there, click “save for web (legacy)”. After clicking the button, this window should appear.

If you export it as 100 X 100, it WILL come out really small, like this.

but if you want to make it bigger and still keep the pixel format, I recommend changing it up to 300 X 300. You might lose some of the pixel format by making it bigger however...

Congratulations! You have successfully made a small gif of a blinking eye and on the path to create many more wonderful creations! Have fun!


Hey everyone! I had a few people in the past ask how I draw gemstones, so I made a quick tutorial. I hope it helps!
How I use fanfiction.net:

Step one: search fanfiction.net

Step two: type the name of the character you want to read about

Step three: hit search; you will get a differentiating amount of results; use the box labeled narrow results to make your search more specific. It does not filter out ships, characters, and other stuff. However, it can give you fics based on what you choose, such as language, genre, etc..
This can help you @castielssuperhell
I rate it 10/good
What to do when you don’t like a fic: a step by step guide
Step 1:
Sunrader's tutorial is exactly what I was looking for:

Terraform Right Side Up | Flipping SC4 Terrains for Sims 2, by Sunrader Sims.
Game Fuckery Help and Linux List [Update].
![Game Fuckery Help And Linux List [Update].](https://64.media.tumblr.com/e98e20c2f262c4285a5c3241c3af9311/57c6cc862497c94f-97/s500x750/f5af6399f8a612fd3598df9aee346093201ba01a.png)
I'm avoiding re-installing this shit again, so in the meantime I'm sorting some stuff into lists. For Linux research purposes.
Edit: Standby Memory Allocation on Windows 10: New info coming in: That's not the issue. However, what i wrote below about TM is my own experience and has worked for me (without doing what Jessa was saying in the SB memory part, I remembered, hope I didn't waste anybody's time). Does it make sense? idk, but it's harmless, and if it's actually a thing and not just a freak coincidence, and can help anybody else then why not. I do remember trying it with and without cleaning cache :/ [for fuck sake the nerve on EA to put out for sale a new edition without improving it to 64bit]. As discussed by Jessa below, it's an OS problem. What worked for me, for some bizarre reason was to keep Task Manager on before and while playing the game. without it my game was crashing often, on my main non gaming computer. What solved it was fixing windows... for anyone's interested, the gory details are at the bottom of the post under the cut.
+ That combined with clearing cache often.
Jessa's video (Memory Allocation and 4GB Patch Repair). Edit: Turns out this video was pulled back, so basically just make sure the patch is applied?
1. Secound opinion on the whole matter by BrandiNotBroke [the whole #pink flash diaries tag is interesting]:

2. Leefish forum - Sims2 Graphic Cards:
3. @celebkiriedhel's Post (Texture Memory):
Linux:
@teaaddictyt & @niamh-sims About Linux.

2. @nonsensical-pixels about Linux.

3. @brandinotbroke, first Linux supporter I've encountered here. A comprehensive post:

Texture Memory Fuckery (Pink Soup, among other things):
Kiri's post linked at the beginning, first an foremost.
Original Post by @fireflowersims, plus; re-blog by @ovytia. Both of their tags, and comment:

2. A recap on Pink Soup/Texture Sizes by @rockethorse in the comments:

That's it for now. Any more information or good links will be welcome.
Task Manager thing briefly, for the curious (as if it interests anyone else but me, but in the interest of keeping track).
So the game was crashing often. That thing was easy to spot because the laptop would make loud airplane noises when I'd load the game. It got stuck or something, so I went to end it by force with task manager and noticed that all the resources where used to the max - right up until I'd open TM, and then everything would cool down. Like it was playing hide and seek with me. So I figured I'd get smart with it right back, and just leave TM open the whole time. Low and behold, the game stopped crashing. That combined with clearing cache often. Does it make sense? idk, but the computer works in mysterious ways.
Interesting. Very good to know, thanks.
This is a big one.
Recent finds I really like: Different Colour Standards into hexes, here's RAL:

Royal Skies' fast tutorials for Blender. He has playlists full of knowledge, here's one.

Ambient CG, a website for free & ready to use materials. Has really good stuff.

Nvidia’s vMaterial Library, it's fantastic. It’s free but requires registration, 2gb~ of textures.

Free section at Poliigon has some good stuff as well.

22.04.25: Free 3D models at CG Trader's free section. Really interesting stuff.
Resources for Creating: My Go-To things.
Update: I’ll be updating the list on this page from now on, since Tumblr can’t handle so many hyper-links in one post, on Dreamwidth - right here, so I won't have to update it multiple times. Please note: I keep updating this list, and updates aren't showing up on reblogs. Please check the original post for the most up to date list.
Sooo this is going to be a long comprehensive list. I got back to this game after a long time and with a different computer, with a dedicated graphics card, hurray! It made me want to return to making things, so while gathering back all the necessary stuff, I've complied this list. It might be is updated as I go along, but these are the main things I use. Maby one day i'll even finish something. So here are my go-to resources & tutorials; I'm posting it here for safekeeping, and hopefully others will find it helpful. Everything that's listed is here free. So many wonderful things for free under the cut.
Programs – General:
Creating: Blender. Blender Addons: 3D Print Toolbox – comes with blender, enable it from within the program. Originally for 3d printing. Good for fixing flipped normals, and some quick general repairs. Source Tools And source tools wiki – for exporting as SMD!!!! (SimPe: to enable bump maps for the mesh on import). GMDC Addon for Blender 4.0+ by Nopke.
GIMP. GIMP Addons: G'MIC-Qt. Resynthesizer. Nvidia dds?. Doesn’t it come with Gimp?
Other: Nvidia Texture Tools Exporter (iirc it works with all graphic cards that are compatible, doesn’t require Nvidia). For making Normal / Bump / Cube Maps. For high quality compression.
NormalMaps - Online, For making all types of maps, has good setting menus. A very cool tool.
Converting: Umodel, for Unreal Engine (Static meshes: export as gtlf.2. Animated meshes: export as psk. Requires Add-on). AssetStudio, for Unity. AC Viewer, self implied (+ USD Addon for blender). QuickBMS* and support forum, for basically everything else. (don't forget the required scrips, down the same page). *I haven’t tested it fully yet, but it was recommended here. A tutorial for it is listed further down. Works like a charm.
UV Mapping: UV Mapper, Classic (free) and the most recent Demo (for visualization).
Programs – Sims:
Never Mind the Bollox, Here's Osab and MAGIkarp to the rescue!
Latest version of SimPe, works with a non-default installation path. Chris Hatch's updates.
Home Crafter installation, Post by Huge Lunatic at Sims2Artists.
Repository Wizard, by Pick'N'Mix Mods. A game changer.
DBPF Compare, by Pick'N'Mix Mods.
Object Relocator, also by Pick'N'Mix Mods.
SMD Tools, by Lazy Duchess.
The Compressorizer, by JFade – Lazy Duchess's edit.
Bulk Rename Utility, to change file names in well, bulk. As explained by io here.
Lot Adjustor, by Mootilda at MTS.
Tutorials:
Override the game's graphic settings via Nvidia, as explained by iCad. The settings to Nvidia Profile Inspector she linked to at MTS have been deleted for some reason, here they are via WebArchive.
Meshing in Blender:
Mesh Optimization Info (and links), by Crisps&Kerosene.
Additional - Reducing Polycount:
Tutorial, by Flaming-Chickens (another username on other sites perhaps?)
Edge – Un-subdivide, a quick one by CG Link.
Transfer high poly details to low poly object in Blender, by 3Dnot2D.
Shrinkwrap Modifier - Blender Tutorial for Beginners - Basics, by in2vert.
Placeholder for this Addon that I want to try but haven't found, something for AR that was on facebook's defunct AR.
Scaling tips, by Blender Secrets.
How to fix inverted/ flipped normals, by ipaintsmallthings.
Converting: How to Extract 3D Models, Textures, Music from Unreal Engine Games, by iwanMods.
Extract 2D/3D/SFX Unity Assets fast & easy from your Unity Game, by iwanMods as well.
How to use QuickBMS, by darkhorse.
Guide to Converting 3t2 and 4t2 Part 01 and Part 02, by Chiaroscuro/tenlittlepandas.
Converting TS4 Windows and Doors, by Crisps&Kerosene.
Using Different Material Maps as Shading/Details for Base Texture, in Gimp or Blender, by Pineapple Forest & Crisps&Kerosene: https://www.tumblr.com/crispsandkerosene/764893644571525120/great-info-thats-the-reason-some-conversions?source=share
Texture Editing in GIMP:
Using Gimp Add-ons: G'MicQT. Resynthesizer. Both by Davies Media Design. This guy's channel for Gimp in general – here's a good one to begin with. And another one about layer masks.
Making a texture Tile Seamless: 1. My favorite - How to Make Seamless Textures for Cinema 4D - 3 Levels of Photoshop Wizardry using iPhone Photos, by School of Motion.
2. Simple Trick for More Realistic Texture Patterns in GIMP, by Davies Media Design – Quick and simple, using the Resynthesizer plugin. Good for patterns.
Making walls in SimPe out of a square texture, with minimal quality loss. To be written.
SimPe: Cloneable Objects: A List of Good Objects for Cloning, by IgnorantBliss at MTS.
Huge Lunatic's Tutorials, Her website.
Object Creation for Absolute Beginners, by Moune.
Sims 2 start to finish Object Creation Tutorial, by JWoods, Numenor, Lethe_s & IgnorantBliss.
The Material Definition (TXMT) Guide, by PixelHate – very comprehensive. Part 5 is about Bump/ Normal maps.
Null (Texture-less) Groups, by Skell. For bodyshop, for Objects see an elaboration by Midge the Tree below.
Crisps&Kerosene discovered how to add specular maps to objects! It's incredible there are still new things to discover in this ancient game.
More on Specular Maps, by Pineapple Forest.
Making new flooring & walls with SimPE, by Charisa. Includes adding Bump/Normal maps. She added a file to clone from in the comments below. It works for normal maps as well. Here's cool discovery in the game files.
Expanding footprint: a mini tutorial, by Deedee.
How to add correct drop shadows to objects, by Yuxi, via Wayback Machine.
Making Objects Viewable in Neighborhood View, by iCad.
Making Objects Visible In Build/Buy Mode, Invisible In Live Mode, by Midge the Tree.
Making Seasons-Friendly Trees, by Echo.
Io/ Serabiet's resources list, mainly for Bodyshop but not just.
Pineapple Forest's Tutorials, useful tips for efficiency and optimization.
MTS modding forum in General.
The Sims 2 Tutorials, on Tumblr. A database, is more updated.
Sims2Artists tutorials section.
LeeFish modding forum.
Garden of Shadows, Tree of Knowledge section.
Troubleshooting: What to do if you get a System.OutOfMemoryException Error, SimPe Forum, via WayBack Machine. Thank you @fanseelamb for the find.
How to read object error logs: I just want to know what causes it!!, by Episims.
Common TS2 errors, by Midge the Tree.
General game fuckery: How to Stop Sims 2 Crashing (Memory Allocation Fix and 4GB Patch Repair), by Jessa.
Graphics card problems, LeeFish forum.
Graphics help - DIY, by Kiri. How to fix faulty Texture Memory allocation, and the problems that stem from it. Tumblr can't handle anymore hyper links so here it is: https://celebkiriedhel.tumblr.com/post/189431721483/graphics-help-diy
General: Switching between save folders without renaming them, by Nopke.
Resources:
3D Models Online*: Various furniture designers' websites: Porada, Zanotta, Muuto, Hay, Poltrona Frau, many luxury furniture designer basically.
3D Warehouse, belongs to Sketchfab (get the Collada files).
Scan the World.
Wikimedia Commons. And more.
*(NOT OPTIMIZED).
Textures: Architextures.
Fabrics & Wallpapers: Natural Stones: Wall Plasters:
iCad's Woods. Shastakiss's Cluedo Metals, Yeti Metals, Pirate Woods. Goat's Woods.
Textures from other games: Dishonored, Thieve and much more, by Saricoya at GoS. Dreamfell by io.
Resource sharing threads at Garden of Shadows.
SimPe - General: CEP Extras list, HugeLunatic at Sims2Artists.
TXMT settings for different materials, by Hafiseazale.
Extended SimStandardMaterial Shader for the Sims 2 + Optionally Brighter Sims, by Crisps&Kerosene.
Custom CubeMaps, by Crisps&Kerosene.
Shiny TXMT Settings & Cube Maps Packs, by Pineapple Forest.
Build/ Buy: Templates for Recoloring Maxis items; MTS Templates sction, Hafiseazale (+cc), ZeroDark.
Template for Seasonal Trees, Gwenke at Sims2Artists.
Making Roof Recolors, Tutorial & template by Numenor, great template by iCad.
Pack for making food clutter usable, by DeeDee.
CAS: Default Makeup Packages - BYO Packages, by Huge Lunatic.
Body shape, Io/Serabiet on Tumblr.
Skin template, Io/Serabiet on Tumblr.
Hair texture, iCad.
Color Actions, Pooklet on Tumblr.
That's it for now.
Edit: forgot about CEP extras. Added more links. Edit 02: Added Troubleshooting section under tutorials.
This Blender manual has a good demonstration of projections & their effect on textures, here are a couple:


Understanding UV Mapping - How Map Projections Work.
Back to Geography with this one; I've seen in some places people say they don't like/understand UV Mapping or unwrapping. Well, I love mapping and had this video saved, It's short and light and explains very clearly how projections work. It helped me catch up on the issue. Unwrapping from what I understand, is basically the first part in the video where the guy is fighting the globe.
How To Dreamwidth: A Primer
the more friends ask me about dreamwidth, the more i realize i know a lot about this site that isn’t super obvious at first glance. so here is a primer for those of you thinking about making a dreamwidth account. this post ranges from your really basic starter tips to the completely esoteric things that come from using it for a decade.
2023 note: This post was written in 2018. While most of this post is still true, various features may have been changed or updated in the years since.
a what now? dreamwho?
Dreamwidth is a code fork of LiveJournal. A code fork means that they took LJ’s code (which used to be open source) and went their own direction with it. They still use the basic ideas behind LJ’s codebase, but have changed and improved upon it in various ways.
The core difference between DW and other websites is privacy isn’t an afterthought, but the central feature. You can lock posts, filter them to a select group, or make them visible to only you. I recommend reading through this section of DW’s FAQ for more on this.
When you make an account, you can subscribe (ie follow) and grant access to other users. Both of these are one-way – if A subscribes to B, that doesn’t automatically grant B access to all of A’s locked posts. Here’s more on this.
DW in general can be kind of confusing for people who have only used tumblr, but their FAQs are pretty good on the whole, and they’re searchable. If a website feature is confusing, start there.
okay, i have a journal. now what?
Customize it! DW doesn’t have all the latest and greatest features, but you can still make it your own. Here are some useful tips.
You can change your layout from Organize > Select Style. Mobile support is hit or miss, unfortunately, but there are some nice default layouts that work with it. You can also use this style for Practicality which makes DW fully mobile-friendly. If you’d rather design it yourself, Tabula Rasa is completely stripped down.
You can get premade DW layouts at the dreamwidthlayouts community. If you have trouble with your code, ask over at style_system.
Edit your profile! This is where you put your usernames for other social media sites, tell people a bit about yourself, and mention your interests. Your interests will be part of the interest search; it’s one way to find people.
Upload icons! Free accounts get 15 icons; paid accounts get 100 icons, premium accounts get 250 icons. You can use one icon in each entry and commment you make. It’s good form to put the maker of the icon in the comment section if you didn’t make it. If you got it from someone on tumblr, you can even link their blog using the code <user name=username site=tumblr>. (This works all across DW!)
While you can’t make pages, you can set a post to stick at the top of your journal, much like Twitter’s pinned tweets. Here’s how to do it.
You can also change how Dreamwidth itself looks, if you don’t like the red. Go to Account Settings > Display. Most other site display preferences are on that page.
While you’re here, look through the Account Settings > Privacy page. By default, your public entries will be included in site searches. You can turn it off at the bottom of the page if you want. You can also set it so your entries are automatically access-locked or private as well.
This got very long so the rest is behind the cut. (Now you really know I’m legit.)
Keep reading
Great info! That's the reason some conversions from newer games have flat and unsaturated textures.
It's a great method for shading even if you don't have a normal map. Make one out of the texture with an image editing software, or with Nvidia Texture Tools Exporter. If the texture is too flat, it can be made out of the mesh itself in blender, like so.

Shout-out to people converting objects to TS2 from other games. Don't ignore normal maps!
You can retain many details by desaturating (the right way) normal map and using it as overlay.


Pond Bottom Defaults
The void of doom has bothered me for a long time. I finally found the textures in the program files months ago, and it took me months to get around to making an upload. I also found out how to get paint under the water, but I imagine there’s at least one person who would want the simpler way of using a default.
Here’s the preview/swatch of all 3 options:

As shown in the first picture, the terrain.ini can be edited to get rid of the sand edge (which shares it’s texture with the beach texture). Editing this file is optional, but I personally recommend it. I included a terrain.ini in the download, which is from the MG program files.
I haven’t seen any differences between various EP/SP combos, but you may want to edit your own if you’re way pre-MG or have your own configurations already in your own terrain.ini. Open the terain.ini file in the program files of MG or your newest EP of you don’t have MG. The file path will be something like InstallLocation/Sims 2/Most Recent EP\TSData\Sys. For example mine is C:\Program Files (x86)\Origin Games\The Sims 2 Ultimate Collection\Fun with Pets\SP9\TSData\Sys
These are the values I used:
ShallowPaintDepthMin=-0.35 DeepPaintDepthMin=0 ShallowPaintDepthMax=5 DeepPaintDepthMax=2BeachPaintPeakDepth=0 BeachPaintEndDepth=0 BeachPaintMaxAlpha=0
Any terrain.ini edits won’t apply to existing ponds, although this is pretty easy to fix. Just redig around the pond edges (some objects may need to be moved) then undo it. The pond paint will be updated. Then fix any terrain painting/objects/deco that got messed up.
All files are compressed with included swatch and preview. I also included the terrain.ini instructions.
Download | Alt
Credit to Nilxis for the textures.

By popular demand (I saw two people asking) I thought I would throw together a quick guide to using the road editor tool in the newest version of SimPE! You'll see that this is a very easy tool to use, and best of all, goof-proof. If you do mess up (you probably will) it's very, very easy to correct.
Very, very, very important to make a backup of your hood before you ever do any tinkering in SimPE! I also recommend practicing on a test hood you don't actively play in to get a feel for it before you do anything to your main hoods.

We're starting with a vanilla Strangetown. I would recommend going in your game and taking a nice overhead screenshot of the hood like this first to look at for reference of where everything is situated the way that you're used to looking at it.

2. Open SimPE, go to Tools> Neighbourhood> Neighbourhood Browser and open the hood you're wanting to work on. If you're not so familiar with SimPE, opening your hood can take some time. Touch nothing until it's loaded!

3. Once it's all loaded, from the Resource Tree list pick Neighbourhood Terrain Geometry (NHTG). Then you'll see one file populate the Resource List - click that. Make sure on the bottom that you have Plugin View tab selected.

4. Now you should see this map of your hood pop up! There are different things you can toggle, I like to check the Show Lots box when I'm editing the roads. Then click the Road Editor button on the right.

5. To be able to see better, I've pulled this Plugin View window up a bit - it may rearrange the Resource List and Resource Tree windows a bit to accommodate. You can also press the Zoom 2x button to see closer, and then you'll have to use the scroll bars to move around the map and the road editor tool.

6. The road editing tools here will be placed down in the same orientation as the map. So the two parallel roads running through Strangetown from this perspective are the vertical straight road pieces (top row, second from left).
When you select a road tool, above it will indicate which tool you have selected.
Also - I recommend having Handle Stop Signs ticked.

7. Once you have the correct type of road selected for the spot you're working on, simply click on the map - it lays it down one tile at a time. If you miss a spot like shown here, just fill it in.

8. If you want to create an intersection, first delete the section of road where the intersection will go.

9. Then choose the type of junction for the intersection you're making, and add that piece in. You'll see a red circle appear (unsure if this is because it's an intersection or because you have handle stop signs selected, but I recommend you do have that selected either way).

10. Once you're done making all your changes, click Close Editor.

11. This is the part where you save your changes! First click Commit in the top right of the editor. Then, File> Save!

12. Load your game to check! Looks pretty good with all those new roads!

13. However, we have indeed made some mistakes! Which were absolutely for illustrative purposes and not truly an accident.

14. Never fear! Simply reload the hood in SimPE - I've deleted the spot where the T-junction should go and added one in, and deleted where the road just ended abruptly and added a proper end piece.
I have not experimented with what happens if you try to build a road through hood deco - if you have, please let us know in the comments how that went!
I also have barely touched the terrain editing tools, so that's outside the scope of this tutorial.
I hope this helped!
Mini tutorial on how to improve catalogue thumbnails for custom TS2 decor items using SimPe

Tiny object mesh combined with large shadow mesh often results in crappy thumbnail (even if you can’t see the ground shadow that doesn’t mean there isn’t one).
The most popular TS2 deco cloning material ever: Fruit bowl & Chinese vase both come with custom (non-standard) thumbnail camera settings. Vase settings may work well for some cc meshes but usually don’t. Fruit bowl camera settings are sh*t.

Note: obviously you can also replace the shadow with a smaller one.
Note2: By “the entire mesh” I meant: everything above the ground level ;)
And if you’d rather fix a shadow instead of removing it, I did a tut on that.
Sometimes it’s enough to clear out custom thumbnail camera settings in thumbnailExtension. Sometimes removing or resizing the shadow will do the trick - often it’s both.

hey there! I've been working in blender for a while now but I'm really enthralled by how clean and kinda cel shaded your textures look would it be alright to ask what your general shader setup looks like or how you achieve that? thanks!
Thank you for asking! My shader setup is pretty simple, I just use an emission shader or just plug the image straight into the output haha if there're any shadows on my models it's usually painted in by hand I think the biggest thing that helps my shader look so nice is that I change my color management settings from filmic to standard


Other than that I have used the default principled BSDF shader a few times with one of the default "studio lights" or HDRIs as the world lighting


Here's a tutorial on how to set up the HDRIs to be rendered if you're interested

IT'S DONE.
i wrote up a massive comparison post for a bunch of the current and upcoming social medias out there for artists! hopefully this can shed some light on the options out there and what looks promising!
click the link below the image to check it out >:3
edit: apparently that link is bugging out for some people so here's another click-through link!

recently a few people have asked how i sharpen my gifs and so i thought i’d put together a little SHARPENING TUTORIAL for anyone who’s interested…
the first thing i’d say is to make sure you’re using the most hq images/screencaps/clips you can find. i know this advice gets thrown around a lot but for good reason! here’s a really good post with more info on where to find the best stuff to use. now on to the tutorial:
we’re using smart filters in this tutorial which means smart objects babyyy
group your layers if you haven’t already and convert the group into a smart object (filter > convert for smart filters)
now duplicate your smart object so you have two identical layers
apply a smart sharpen filter to the bottom layer (filter > sharpen > smart sharpen)
my standard settings:
amount: 500%
radius: 0.2 - 0.5 px (see what looks best!)
remove: lens blur
“more accurate” selected
good work! now if that’s looking a little extreme don’t worry, we’re not done!
apply a gaussian blur filter to your top layer (filter > blur > gaussian blur)
set the slider to 1.0 pixels
finally set the opacity of your blur layer to 25%
and that is it! your layers should now look a little like this:

the lovely thing about this is that you can basically keep your filter settings the same for whatever you’re working on and simply play with the opacity of that blur layer should you want to increase/decrease the sharpness!
fingers crossed this all makes sense. if anything wasn’t clear or you have further questions don’t be afraid to ask. happy giffing!!
my favorite clip studio assets!
since i’ve been using csp a lot more now i thought i’d make a post of the assets i use the most for ppl looking for good stuff!
general brushes: Pen + Caspar Pen (かしペン+カスレかしペン) (my fav pen for sure) Erase Along Edge (YOU NEEED THIS ERASER YOU NEED IT!!!) Freehand Style Brush Set (フリーハンド風ブラシセット) (cant recommend this one highly enough, i use it for all my backgrounds) Bong pen OBONGBONG’S PEN Halftones (スルスル塗れる5線刻みトーンブラシ) A non-shin pen (しんでないペン) SU-Cream Pencil Noisy Ink Brush v2 Simple Retro Halftone Brushes Smeared Paintbrush (べっとり絵筆) A breather pen (一息ペン) Aj’s Pencil Set Watercolor set (수채화 세트) T-marker Wind Brush Set (Tマーカー風ブラシセット) Watercolor marker ▲ ■ and texture set (水彩マーカー●▲■とテクスチャーセット)
special effect and decorative brushes: Tights Pen (タイツペン) Glitch Brushes 2 (彩塵ブラシ(Prism Dust) Hand-painted effect set No. 2 (手描き効果セットNo.2) Oriental Emblem 11-20 (동양 문양 11-20) (this creator has so many amazing assets ive downloaded them all) Ribon brushes (りぼんブラシ) Lace Set レース セット Ornate lace Bramble (rose-玫瑰叢) Loose hand-painted sprinkle brush (ゆるゆる手描きのふりかけブラシ) Bush pen (수풀 펜) Fantasy Papers Pearl Brush (真珠ブラシ)
gradient maps: Gradient map set for hologram (홀로그램용 그라데이션 맵 세트) Yunywave★ Gradient Set cb gradients 3 ONG SET
3D: The Only Perspective Grid You Need! 3d sketch head Movable horse 1.8 A (可動のお馬 1.8a) Sitting poses collection (便利かもしれない座りポーズ集)
misc: Raiku RGB Shift Hand-drawn Rags tool Set (手描きのボロ線ツールセット) VHS action set
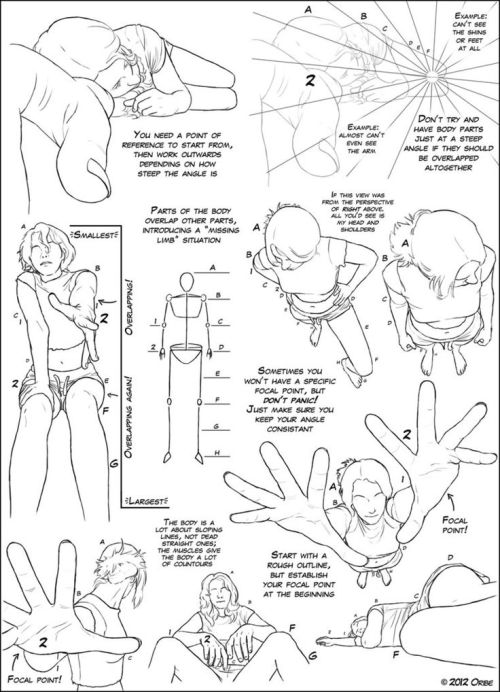
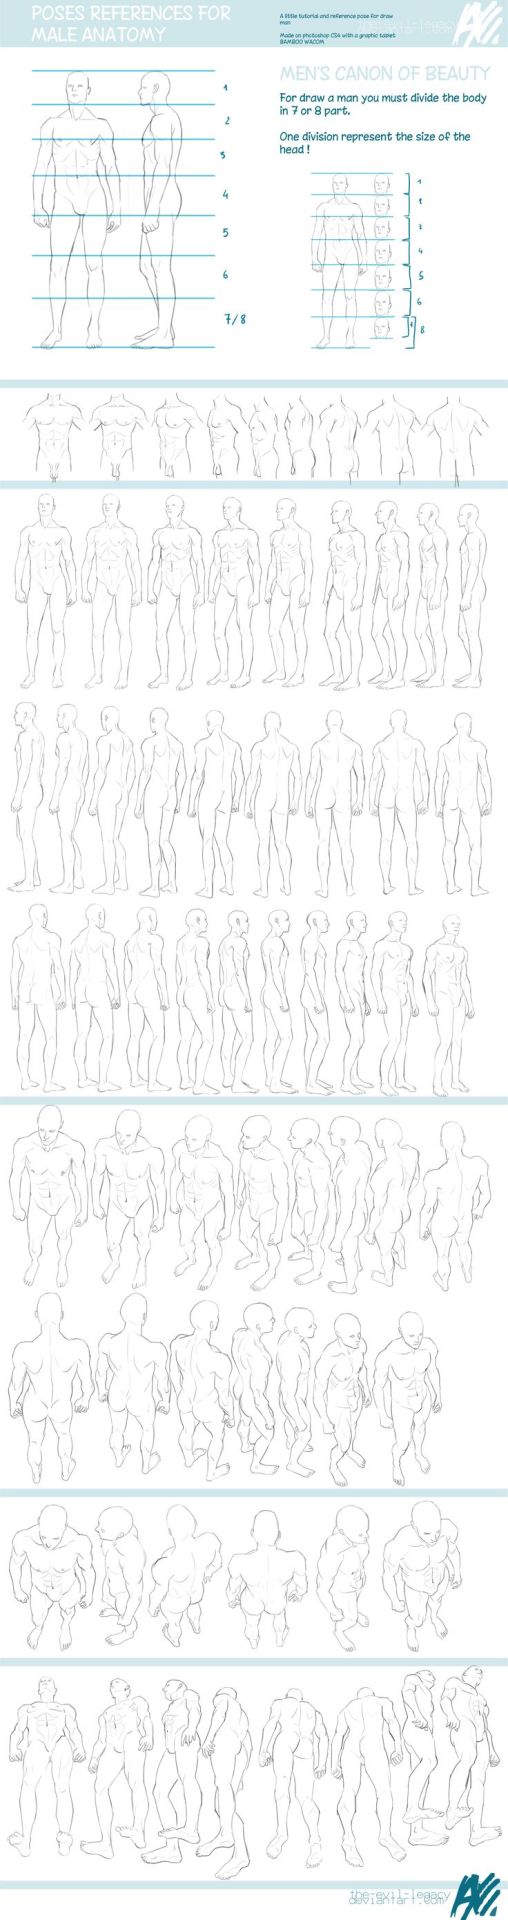
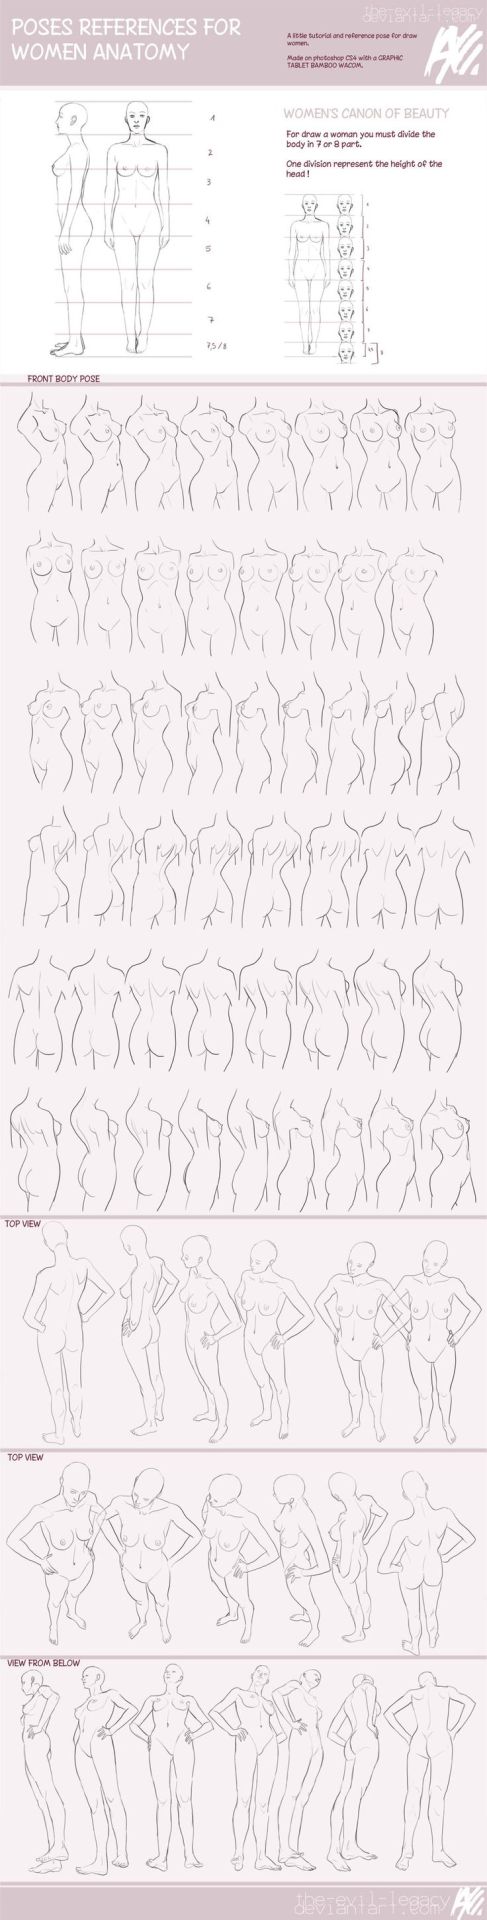

btw. i made this quick guide of some of the natural size and proportion reference points in the human body. of course this all varies even irl, and you can stylize however you want, so ymmv but thought it might be helpful for some folks.


Fairy Tail Opening 16: Stike Back by Back-On! [8-bit]


I’m not the best drawer but here are some tips I’ve been living by.
Head:
The most basic, draw a circle to get the feel and then draw lines so the face is symmetrical.
As we all know, the typical anime face is like a pentagon. When drawing the eyes, make sure to leave room for the cheek on the face
Draw small lines under the mouth to define the lower lip
When drawing hair, draw the basic form of the hair, and then draw the smaller strands
Body
This torso only apply to anime girls, I forgot to add this but don’t forget the shoulders.
I draw hands with a square and than add four fingers on top and the thumb on the side (ALWAYS MAKE SURE THAT THE THUMB IS ON THE RIGHT SIDE, omg)
I did a lot of small tips, so if you need any specific help ask me.
Always draw a basic figure before drawing in the details. Here’s a tutorial about getting clean lines in traditonal
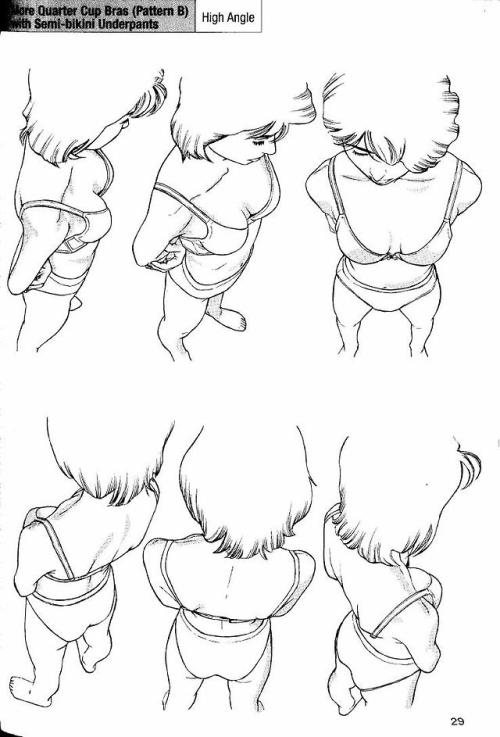
This a tutorial about expression
Bunch of generic tutorials that is kind of complicated
To get better, always look for inspiration and draw all the time. I’m not even joking, all the time. I got points docked off one time at school.
Here’s a download for Painttool Sai
This a really nice program but you’re probably going to need a tablet
the single greatest cloud brush I've worked with so far oh my god

just adjust opacity and size depending on how crisp lines you want

this shit took like 10 minutes


I wanna do more of these… >:U